- Semiconductor BusinessHOME
- Products and Services of Macnica,Inc.
-
technical information

-
Events and Seminars
- Handling Manufacturer
- Support
- Inquiry
- Click here to purchase products
- Semiconductor business e-mail magazine registration
![]()
![]() Narrow down by specifying conditions
Narrow down by specifying conditions
現在2189件がヒットしています。check


Paid Quartus® Prime or paid IP (Intellectual Property) licenses are registered and issued in conjunction with the PC's NIC ID.
If a user wishes to change (rehost) the NIC ID associated with a license, the license administrator must sign in to the "Self Service Licensing Center (SSLC)" and perform the rehosting procedure.
This section explains how to change the NIC ID of a computer linked to a paid license.
Please note that this procedure must be performed by the license holder (administrator).
Precautions when changing the NIC ID
• You can change your NIC ID a maximum of three times during your maintenance contract period. You can check the remaining number of changes allowed for each license in the Self Service Licensing Center.
- If the remaining number of times you can change the NIC ID (remaining rehost count) is 0, you cannot change the NIC ID.
• Renewing your license maintenance contract will reset the remaining rehost count, allowing for a maximum of 3 renewals.
• Packaged licensed products (SW-ONE-QUARTUS, IPS-xxx, IPSR-xxx, etc.) can be rehosted on a product-by-product basis. Only some of the included licenses can be rehosted.
Restoration is not possible.
For example, you cannot rehost only the Questa*-Altera® FPGA Edition of SW-ONE-QUARTUS and operate it with a different NIC ID than Quartus® Prime.
Task list
The steps to rehost the NIC ID assigned to the license are as follows:
|
3. Register a new computer (optional) |
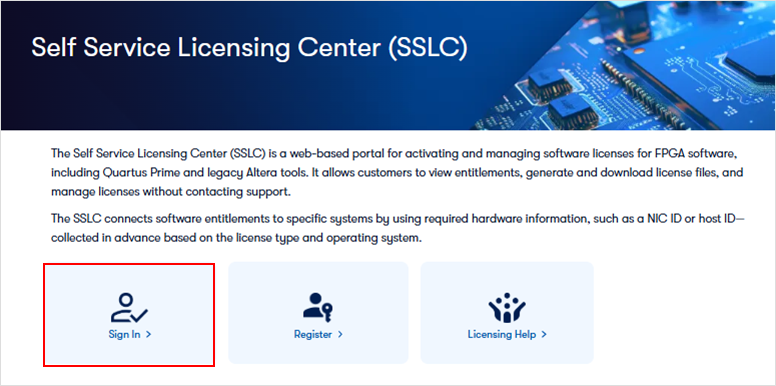
1. Sign in to the Self Service Licensing Center (SSLC).
Click the link below to go to the License Center sign-in page.
A sign-in page for the License Center appears.
Click [Sign In] located on the left side of the screen to sign in.
[Notes]
To use the License Center, you need an <Altera account> and <Registration with the Self Service Licensing Center > is required.
If you don't have an account yet, please see how to sign up for an Altera account.
• Customers signing in to the License Center for the first time should register for an Altera account and then register to use the Self Service Licensing Center.
After entering your username, a verification code will be sent to your registered email address. Please enter the code in the form and click the [Verify] button.
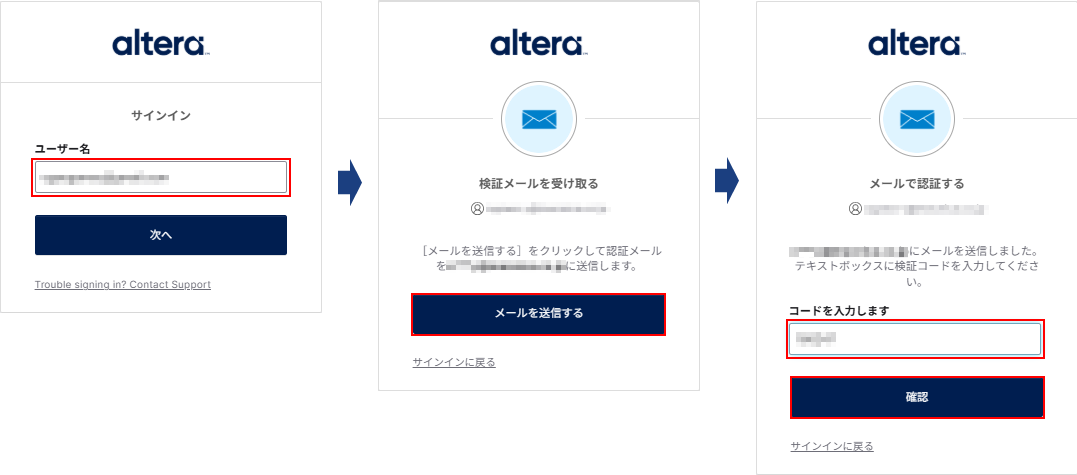
Access is completed when the top page of the license center is displayed.
2. Check the number of times rehosting is possible.
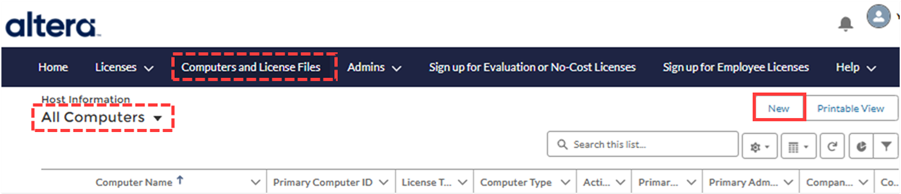
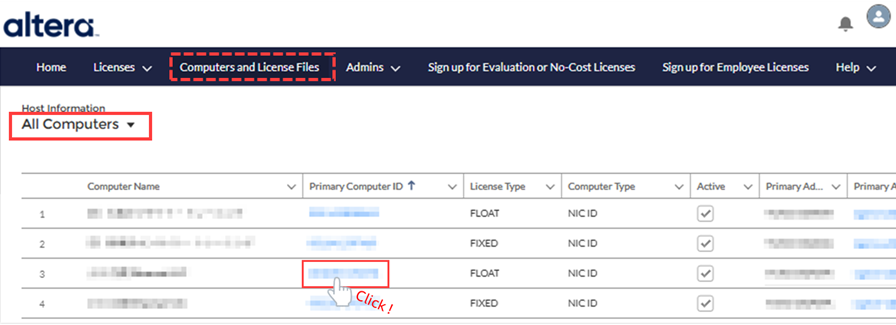
1. Clicking the [Computers and License Files] menu will display the [All Computers] view.

2. Find the computer information that has the NIC ID associated with the license you want to rehost in the list, and click the NIC ID in the "Primary Computer ID" column.

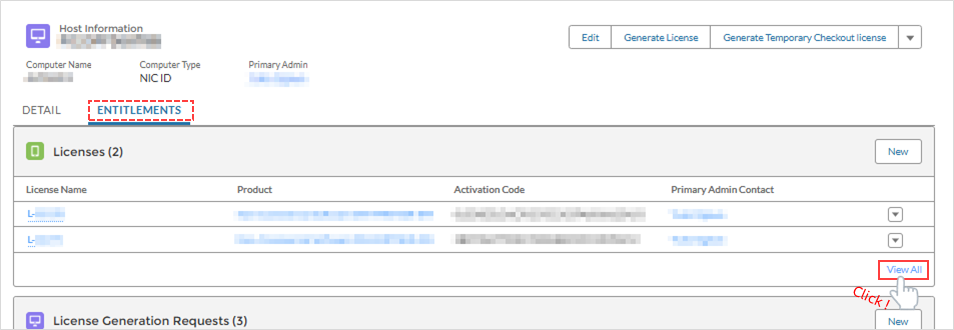
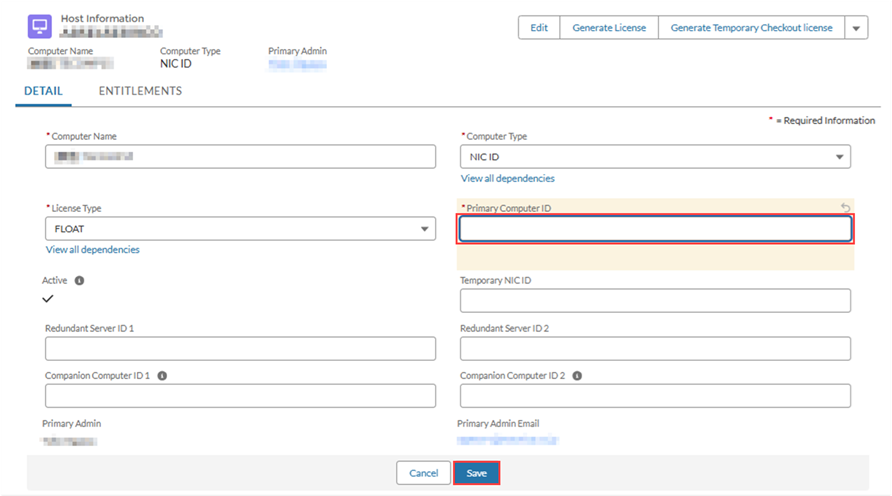
3. Details of the specified computer will be displayed. Clicking [ENTITLEMENTS] will show the licenses owned by this computer under "Licenses".
Click [View All] in the lower right corner of the "Licenses" section.
4. Details of your licenses will be displayed. The number shown in the "Available Rehosts" column NIC IDstrange Number of times that can be changed This represents...
Licenses with a display of 0 here cannot have their NIC ID changed.

Additionally, if multiple licenses are associated with a NIC ID, and even one of those licenses has a rehost count of 0, then rehosting is not possible using the method of changing the NIC ID on a per-PC basis [B].
If applicable, [A] Rehost only the necessary licenses by changing the NIC ID on a per-license basis, or
Alternatively, exclude only the licenses with zero rehosts from the licenses associated with the target NIC ID, and then perform the rehost all at once by changing the NIC ID on a per-PC basis.
3. Register a new computer (optional)
We will now register the information for the computer to which the new license will be linked.
If you have already registered your NIC ID information, you can skip this step.4. Change the NIC ID associated with the license.Please proceed.
1. Clicking the [Computers and License Files] menu displays the [All Computers] view. (This displays information about your registered computers.)
2. Click [New] in the top right corner of the screen.
*Note! There is no "Delete Computer" function, so you cannot delete information about a computer once it has been registered.
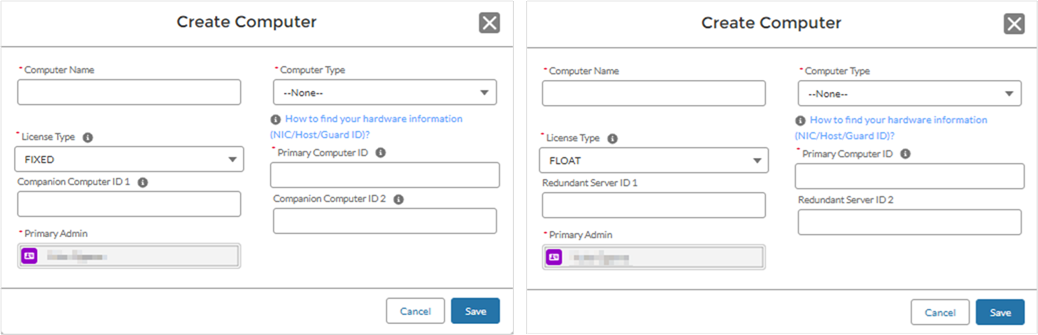
3. Enter the information of the computer to be registered.
|
item
|
explanation
|
|
Computer Name
|
Enter the name that identifies the computer you want to register on the license center. (It does not have to be the computer's host name.)
The Computer Name can be changed after registration. |
|
Computer Type
|
Select the NIC ID.
|
|
License Type
|
Specifies the type of license to use. Choose from FIXED or FLOAT.
[Notes] ・The Questa* - Altera® FPGA Edition FIXED license does not support remote operation such as remote desktop. |
|
Primary Computer ID
|
For fixed-state use, use Quartus® Prime, IP, or Questa*-Altera® FPGA Edition. Enter your computer's NIC ID. If you are using FLOAT, enter the NIC ID of the computer you are using as the license server. |
|
Companion Computer ID 1 / 2 or Redundant Server ID 1 / 2 |
Input is optional. For companion licenses, see How to Get a Companion License. A redundant license is registered when operating three FLOAT license servers. [Notes] - You can change the NIC ID after registration, but you cannot leave it blank. If you register or change these NIC IDs after assigning a license, the number of IDs that can be changed during the maintenance contract period (maximum of 3 times) will be reduced. |
4. Click the [Save] button. A message will appear indicating that registration is complete.
5. Once you confirm that the registered computer information is displayed in the [Computers and License Files] menu, registration is complete.
4. Change the NIC ID associated with the license.
There are two ways to change the NIC ID associated with your license:
Select the appropriate method based on your hosting needs and proceed with the rehosting.
|
Of the multiple licenses associated with a single NIC ID Only certain licenses This is a convenient method when you want to rehost. |
All multiple licenses associated with one NIC ID This is a convenient method when you want to rehost all at once. |
[A] Change NIC ID per license
This rehosts only some of the licenses associated with a single NIC ID.
1. Click the [Licenses] menu > [License Reports] and switch to the [All Licenses] view from the menu.

2. From the list, click the "License Name" of the license you want to rehost.
3. In the Licensing Information section, click the pencil icon on the far right of the Primary Computer field (the field where the NIC ID is displayed) to enter edit mode.

4. In the Primary Computer field, click the [X] mark to the right of the existing NIC ID to delete it.
5. Clicking "Search Host Information..." will display the options in a dropdown list.
Select the computer information for the newly registered NIC ID you wish to link from the list, or enter the first few characters of the NIC ID and select from the information found.
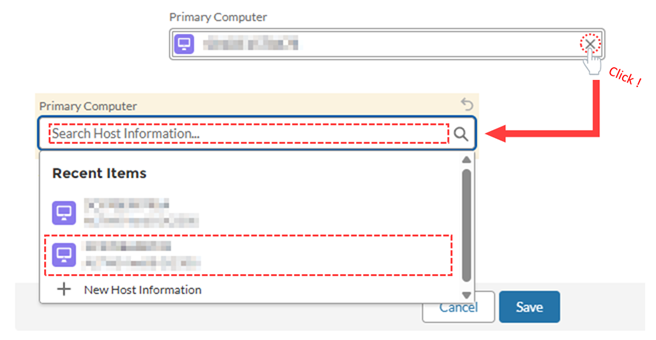
6. Click the [Save] button to save your changes.
This completes the process of changing (rehosting) the NIC ID associated with the license.
If you have other licenses to rehost, please perform operations 1 through 6 in this section.
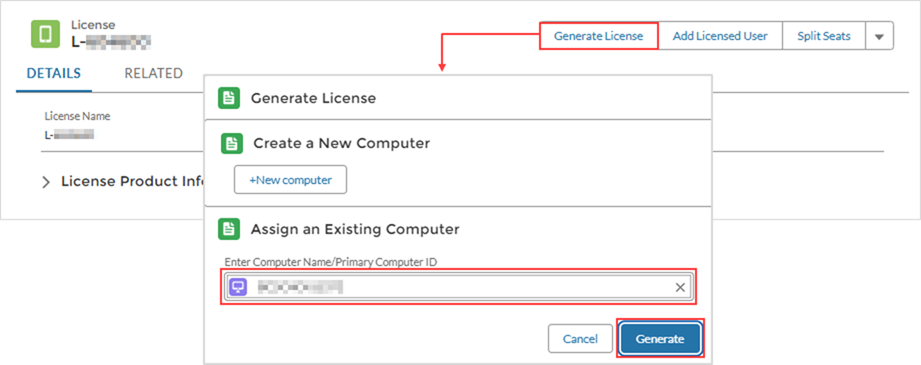
7. To issue a license file for the NIC ID after rehosting, click the [Generate License] button in the upper right corner of the page.
In the Generate License window that appears, confirm that the NIC ID you just registered is displayed under "Assign an Existing Computer".
Click the [Generate] button to issue your license.
8. The license file will be sent to the email address you registered.
The license file has now been issued.
Please save the license file attached to the email to the computer on which you will be using the license. The file extension is.dat. It is recommended to save it in this format.
Please do not use full-width characters or spaces in the file name or save folder path.
Afterward, configure the license file according to your license type and then use the service.
This completes the process of changing the NIC ID on a per-license basis.
[B] Change the NIC ID for each PC
1. Clicking the [Computers and License Files] menu displays the [All Computers] view. (This displays information about your registered computers.)
2. From the list of host information, find the computer information that owns the license you want to rehost, and click the NIC ID in the "Primary Computer ID" column.
3. On the host (computer) information page, click the pencil icon at the far right of the "Primary Computer ID" field to enter edit mode, and then enter the new NIC ID you want to associate.
4. Click the [Save] button to update the information.
This completes the process of changing the NIC ID in the computer information (rehosting).
5. To issue a license file for the NIC ID after rehosting, click the [Generate License] button in the upper right corner of the page.

6. The license file will be sent to the email address you registered.
The license file has now been issued.
Please save the license file attached to the email to the computer on which you will be using the license. The file extension is.dat. It is recommended to save it in this format.
Please do not use full-width characters or spaces in the file name or save folder path.
Afterward, configure the license file according to your license type and then use the service.
This completes the process of changing the NIC ID on a per-computer basis.
Click here for recommended articles/materials
How to create a new Altera account
How to register for the Self Service Licensing Center (SSLC)
How to issue new licenses for Quartus® Prime, IP, and Questa* - Altera® FPGA Edition
How to obtain a companion license for Quartus® Prime
How to obtain a checkout license for Quartus® Prime
How to Obtain a License for an Altera® FPGA Development Kit
How to manage Quartus Prime and third-party software FLOAT licenses on the same server PC.