- 半導体事業HOME
- マクニカの製品・サービス
-
技術情報

-
イベント・セミナー
- 取扱メーカー
- サポート
- お問い合わせ
- 製品購入はこちら
- 半導体事業のメルマガ登録
![]()
![]() 条件を指定して絞り込む
条件を指定して絞り込む
現在2169件がヒットしています。check


こんにちは。
マクニカで インテル® FPGA 製品の技術サポートをしている インテル・F・ハナコ です。
ここでは、Quartus® Prime Standard Edition において、
によって配置制約した下位エンティティを別のプロジェクトで適用させる方法をご紹介します。
Notes:
作業環境
今回はわかりやすく説明するため、2つのプロジェクトを用意し、それぞれを [プロジェクト A]、[プロジェクト B] とします。
[プロジェクト A] で使用していた下位エンティティを、[プロジェクト B] にインプリメントさせるフローです。
その際、デバイス型番 および Quartus Prime Standard Edition の環境は、以下の必要があります。
|
プロジェクト A |
プロジェクト B |
|
| FPGA |
同じ型番 |
|
|
Quartus Prime Standard Edition |
同じバージョン(ビルド番号を含む) |
|
作業フロー
下図は、Standard Edition における作業をフローチャート化したものです。
下位エンティティのパーティションに対してネットリスト・ファイル qxp をエクスポートし、別のプロジェクトで再利用します。
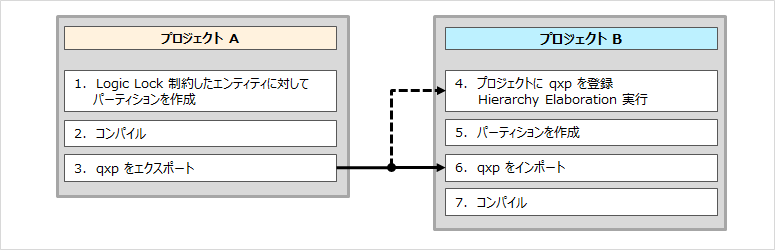
では、このフローを Quartus Prime Standard Edition のメニューで具体的にご案内します。
1. [プロジェクト A] Logic Lock 制約した下位エンティティにパーティションを作成する
Logic Lock が設定されている下位エンティティにパーティションを作成します。
(Logic Lock リージョンの作成方法は、こちらの記事の "Logic Lock リージョンを作成する" をご覧ください。)
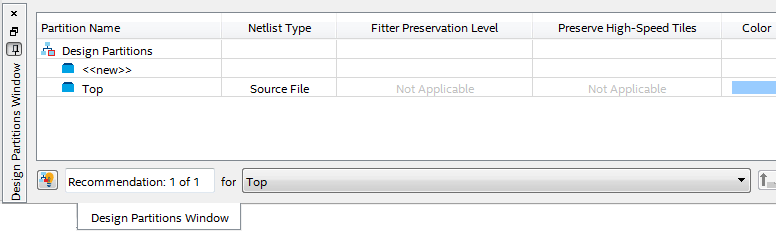
1. パーティションを作成するための Design Partitions Window(Assignments メニュー)を表示します。
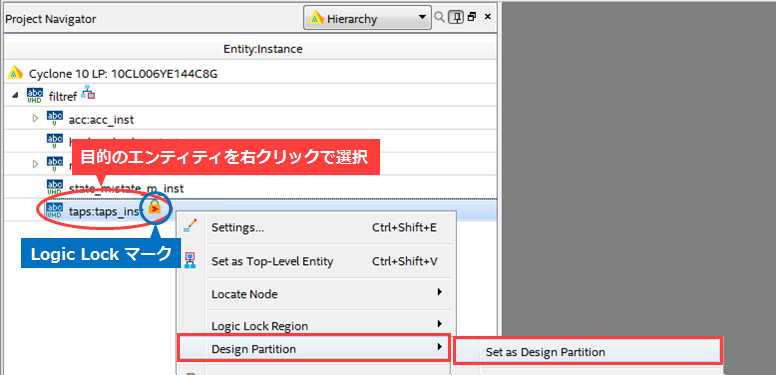
2. Project Navigator ウィンドウから、パーティションを作成したいエンティティを右クリックで選択し、
Design Partition > Set as Design Partition を選択します。
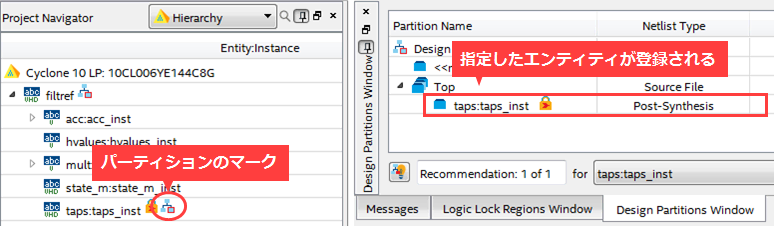
Design Partitions Window に指定したエンティティが登録され、Project Navigator ウィンドウ上にマークが付いたことを確認します。
パーティション名は、指定した ”エンティティ名:インスタンス名“ がデフォルトで使用されます。
Rename(右クリックのメニュー)で変更も可能です。
2. [プロジェクト A] コンパイル実行/コンパイル結果を確認する
ピン・アサインやタイミング制約、必要に応じてオプションなどの制約を行い
コンパイル(Processing メニュー > Start Compilation)を実行して、Logic Lock のレイアウト制約を反映させます。
コンパイル・レポートや Chip Planner、Timing Analyzer によりコンパイル結果の検証を行い、プロジェクト A の仕様に満足したかを確認します。
もし要求を満足していない場合には、オプションやタイミングなどの制約を付加させ再コンパイルしてください。
その際、Rapid Recompile やインクリメンタル・コンパイル(Pro Edition はインクリメンタル Optimization)を採用することで
再コンパイルに要する時間を軽減することが可能です。
作成したパーティションに対して、配置情報を引き継いだネットリストを生成させるため
Netilist Type を Post-Fit、Fitter Preservation Level を希望のレベルにセットし、再びコンパイルを実行します。
関連情報:
3. [プロジェクト A] 下位エンティティの qxp ファイルを生成する
該当エンティティのパーティション・ファイル qxp を生成させます。
1. Design Partitions Window 内の該当するエンティティを右クリックで選択 > Export Design Partition を選択します。
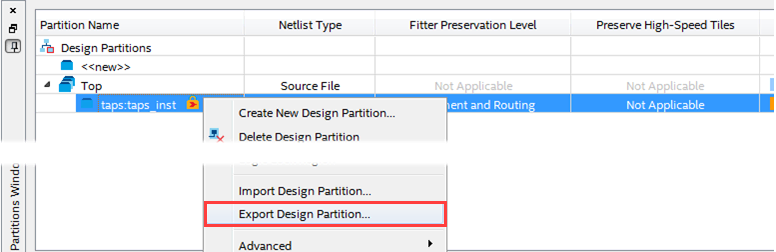
2. Export Design Partition ダイアログボックスが表示されます。
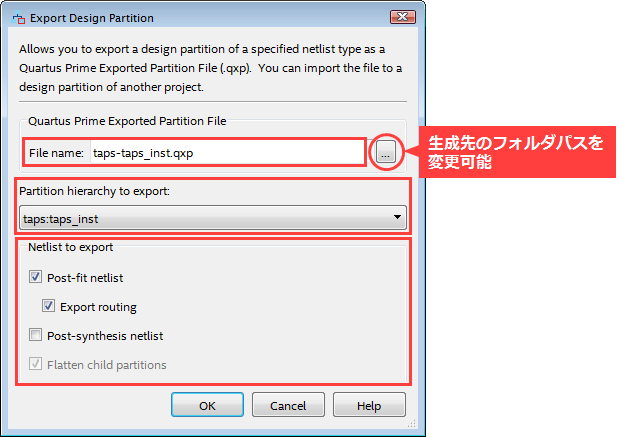
qxp ファイルに対する設定をします。
| File name | 生成する qxp のファイル名を指定します。 (デフォルトは、”partition_name”.qxp) |
| Partition hierarchy to export | 指定したパーティション名が選択されていることを確認します。 |
| Netlist to export | qxp ファイルに記録する情報を選択します。 [Post-fit netlist] 配置後のネットリストを生成します。配線情報も付加する場合は、[Export routing]オプションを適用します。 [Post-synthesis netlist] 論理合成後のネットリストを生成します。 Post-fit netlist と Post-synthesis netlist の両方をチェック (On) した場合は、適用先のプロジェクトにおいて、そのパーティションの Netlist Type が選択可能になります。 |
今回の場合は、下位エンティティの配置情報を別プロジェクトにそのまま移管することが目的のため
Netlist to export は、Post-fit netlist を選択します。
Export routing は必要に応じて適用してください。
[OK] ボタンをクリックし、qxp を生成します。
以上でプロジェクト A における作業は完了です。続いて、プロジェクト B へ該当エンティティの qxp を適用させましょう。
4. [プロジェクト B] プロジェクトに qxp を登録し、Hierarchy Elaboration を実行
1. 再利用先のプロジェクト B において、下位モジュールのコンパイルする対象はプロジェクト A でエクスポートした qxp ファイルになります。
そのため、ユーザーが作成したデザイン・ファイルと同様にプロジェクトへ登録します。
■ プロジェクトを新規に作成する場合
⇒ New Project Wizard の Add Files において、下位エンティティの HDL ソースの代わりに
プロジェクト A で生成した qxp ファイルを選択してください。
■ プロジェクトが既存する場合
⇒ Add/Remove Files in Project(Project メニュー)において、下位エンティティの HDL ソースを削除し
プロジェクト A で生成した qxp ファイルを追加してください。
2. 各エンティティの階層関係のデータベースを作成するため、Hierarchy Elaboration を実行します。
- Processing メニュー > Start > Start Hierarchy Elaboration
5. [プロジェクト B] 下位エンティティにパーティションを作成する
1. Design Partitions Window(Assignments メニュー)を表示します。
2. Project Navigator ウィンドウから、パーティション・ファイルを適用するエンティティを
右クリック > Design Partition > Set as Design Partition を選択します。
Design Partitions Window に指定したエンティティが登録され、Project Navigator ウィンドウ上にパーティション・マークが追加された
ことを確認します。
6. [プロジェクト B] パーティションに qxp ファイルをインポートする
下位エンティティのパーティションに qxp ファイルをインポートします。
1. Design Partitions Window 内の該当するエンティティを右クリックで選択 > Import Design Partition を選択します。
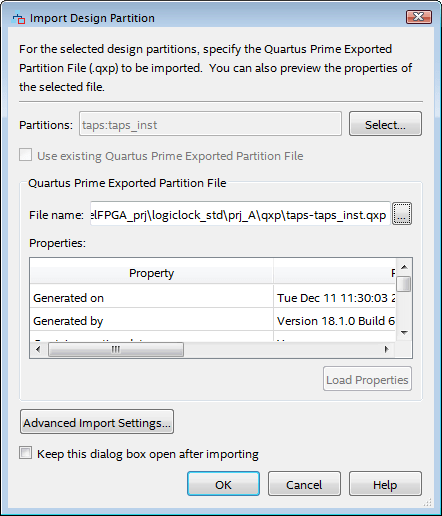
2. Import Design Partition ダイアログボックスが表示されます。
- File name に、プロジェクト A で生成したパーティション・ファイルを指定し、[OK] ボタンをクリックします。
インポートが成功したメッセージが表示され、Design Partitions Window に以下の内容が確認できます。
- Imported 項 = Yes
- Last Imported From項 = 登録したパーティション・ファイルのパス
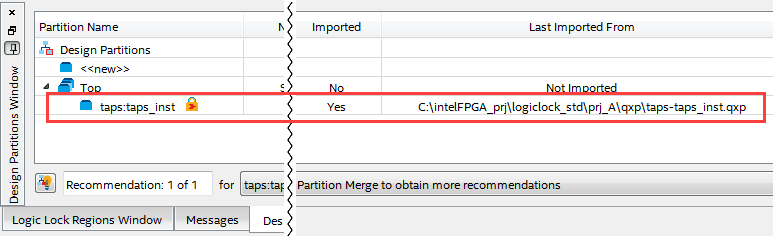
また、Design Partitions Window と Logic Lock Regions Window にそれぞれプロジェクト A で設定した内容が登録されたことが確認できます。
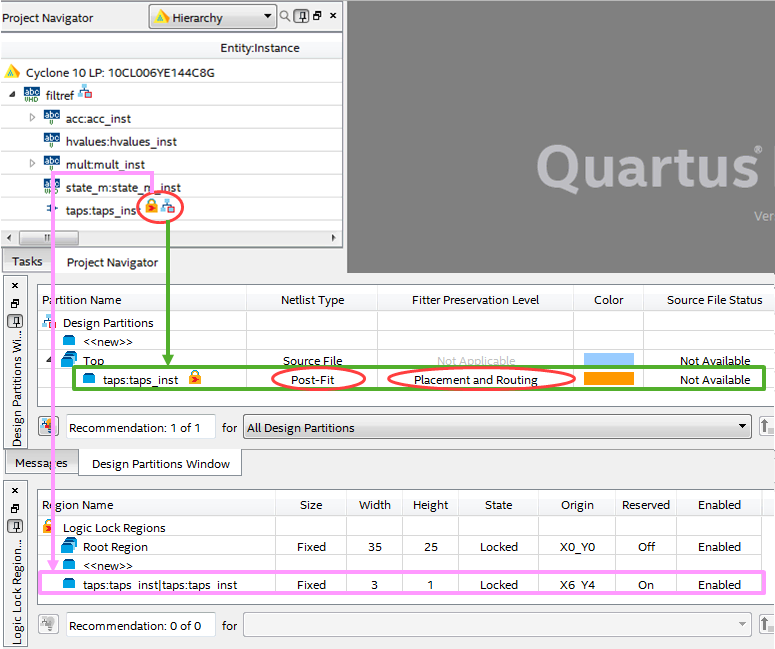
インポートした該当エンティティは、エクスポート時に指定したネットリスト情報で自動設定されていることが確認できます。
今回の例では、Post-Fit/Placement and Routing で登録されています。
プロジェクト B に引き継ぐ際、必要に応じて Fitter Preservation Level を変更することも可能です。
また、プロジェクト A でエクスポート時に Post-synthesis netlist を選択していた場合は、Netlist Type も適用することができます。
7. [プロジェクト B] コンパイル実行/コンパイル結果を確認する
ピン・アサインやタイミング制約、必要に応じてオプションなどの制約を行い
コンパイル(Processing メニュー > Start Compilation)を実行します。
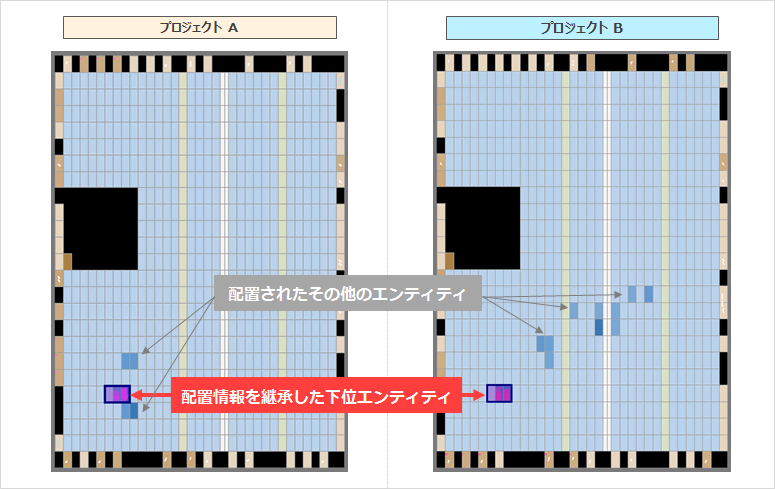
コンパイル・レポートや Chip Planner、Timing Analyzer によりコンパイル結果の検証を行い
下位エンティティの配置情報が適用されたことを確認します。
もしプロジェクト全体として要求を満足していない場合には、オプションやタイミングなどの制約を付加させ再コンパイルしてください。
その際、Rapid Recompile やインクリメンタル・コンパイルを採用することで、再コンパイルに要する時間を軽減することが可能です。
おすすめ記事/資料はこちら
Quartus® Prime にはコンパイル時間を短縮させる こんな方法があった
おすすめ FAQ はこちら
MAX 10 デバイスはインクリメンタル・コンパイルをサポートしていますか?
Quarus II Web Edition で.qxp(Quartus II Exported Partition) ファイルを生成することはできますか?