
![]()
![]() Narrow down by specifying conditions
Narrow down by specifying conditions
現在1889件がヒットしています。check


The Agilex™ 5 FPGA & SoC FPGA E Series (hereinafter referred to as Agilex™ 5 E) is developed using the Quartus® Prime Pro Edition.
Normally, Quartus® Prime Pro Edition is a paid development software, so you need to purchase a SW-ONE-QUARTUS license to use it.
If you develop using Agilex™ 5 E, you can also use it free of charge.
(※ Users who are using SW-ONE-QUARTUS licensedo not need to obtain a free Quartus® Prime Pro Edition license for Agilex™ 5 E.)
This article describes your free Quartus® Prime Pro Edition license file for Agilex™ 5 E developmenthow to obtain .
License overview
Below is a summary of the free Quartus® Prime Pro Edition license file for Agilex™ 5 E development:
| Applying for and obtaining a license | free |
| maintenance period |
1 year * It can be used within the range of the version released within the maintenance period of the license. |
| License expiration date |
1 year |
There are two ways to obtain this license file:
|
[B] How to obtain through the Self-Service License Center (SSLC) |
|
|
When you start Quartus Prime, the license file is automatically acquired and set. - The NIC ID used for acquisition is the automatically detected MAC address. - Only FIXED license type is available. |
- The user must obtain a license file from SSLC in advance. - You can obtain a license with any NIC ID. ・ You can specify FIXED or FLOAT for one NIC ID. |
* Either method requires an internet connection when obtaining a license.
[A] Automatically obtain with Quartus® Prime
A1. Launch Quartus® Prime Pro Edition
For Windows OS, click Start ➤ Intel FPGA <version_build> Pro Edition ➤ Quartus (Quartus Prime <version>), or double-click the Quartus® Prime shortcut icon you created on your desktop.
For Linux OS, run the quartus command in the terminal to launch the GUI.
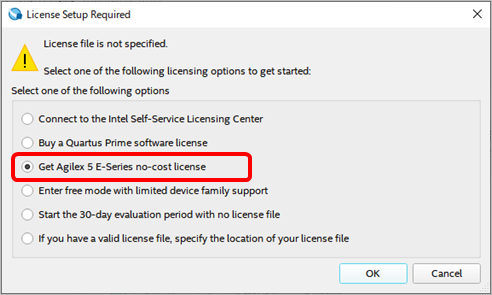
A2. Select the option from License Setup Required
Since the paid license SW-ONE-QUARTUS has not been set, the License Setup Required window will be displayed.
Select "Get-Agilex 5-E Series no-cost license" from the options and click the OK button to automatically start the process of obtaining the license file.
Just wait for a while.
When the message window on the lower left appears, license file acquisition and setup is complete.
Clicking the OK button will launch the Quartus® Prime Pro Edition, so you can continue using it.
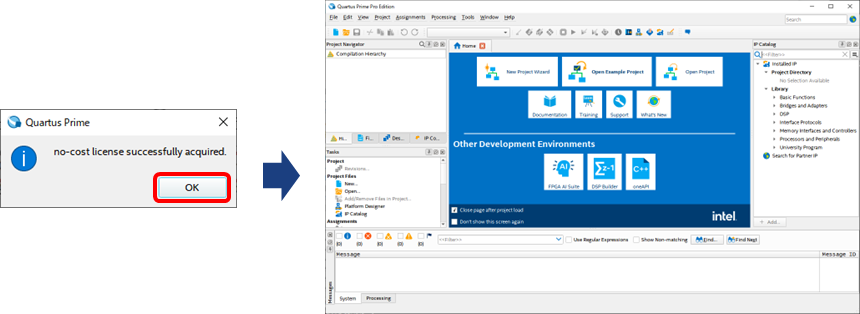
This completes the process of obtaining and setting up your free Quartus® Prime Pro Edition license file for Agilex™ 5 E development.
[B] How to obtain through the Self-Service License Center (SSLC)
There are four work flows to obtain this license file:
|
B1 |
B2 |
B3 |
B4 (issue license file) |
Below are the details of each flow.
B1. Sign in to your Intel account
"Intel FPGAs & Programmable Devices" home page Go to and click on the top right of the screen. Click the person icon.
A sign-in screen will appear, so enterthe email addressyou registered when you created your account and click [Next].
[Notes]
Don't have an account? Learn how to sign up for an Intel Account.
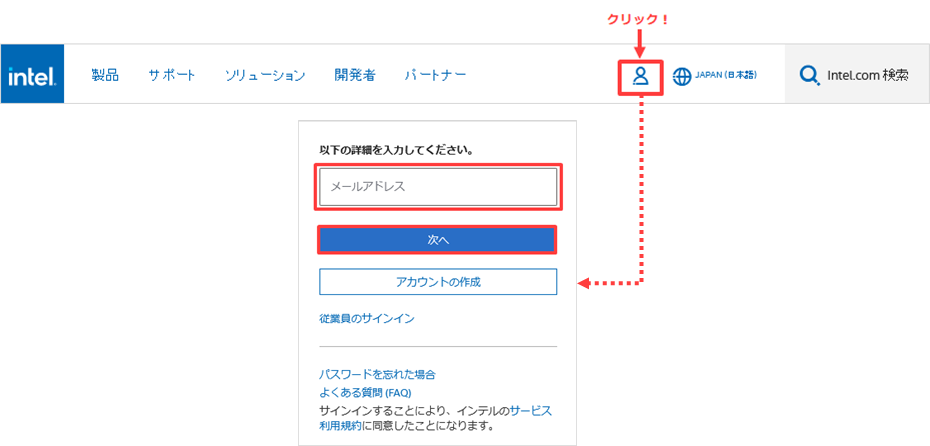
Sign-in is completed through the authentication system of Microsoft Azure AD.
If you have trouble signing in, visit Customer Support Please contact us.
[Notes]
If the email address of your existing sign-in account is a shared address (group address), you cannot currently use it.
It is necessary to change the administrator's e-mail address to an e-mail address that can be used to sign in, so please contact the person in charge at our company.
B2. Sign in to the Licensing Center
Select "United States (English)" from the language selection menu, then click the human icon in the upper right corner of the screen again to display the menu.
(* The menu may not be displayed in Japanese.)
From here,selectIntel® FPGA Self Service Licensing Center.
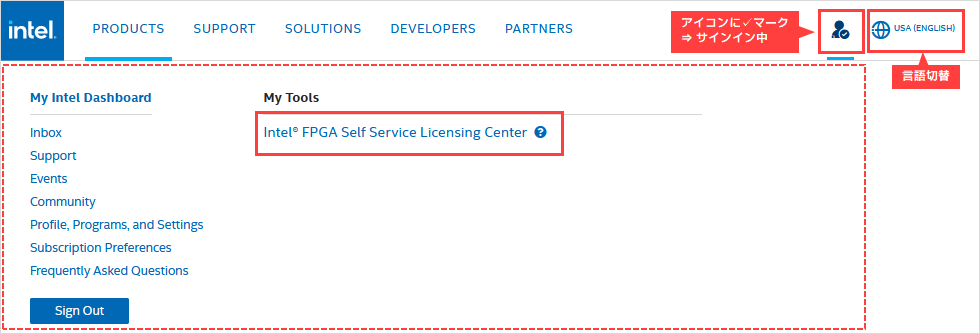
If you switch to "United States (English)" and still cannot see [Intel® FPGA Self Service Licensing Center] in the menu,
Click the link below to go to the License Center sign-in page.
Intel® FPGA Self-Service Licensing Center
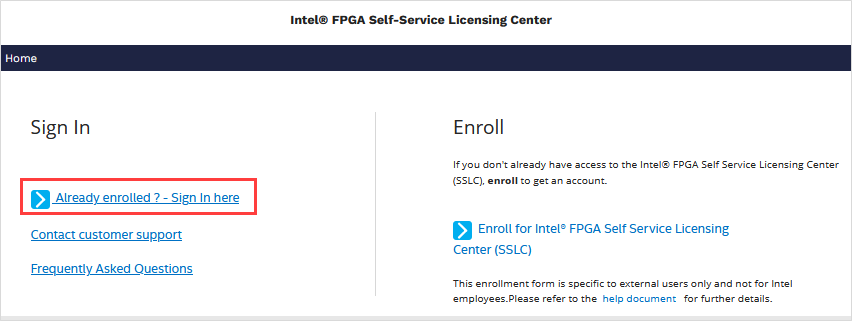
A sign-in page for the License Center appears.
Click [Already enrolled ? -Sign In here] on the left side of the screen to sign in.
[Notes]
If you are signing in to the License Center for the first time, please see how to sign up for the Intel FPGA Self-Service License Center.
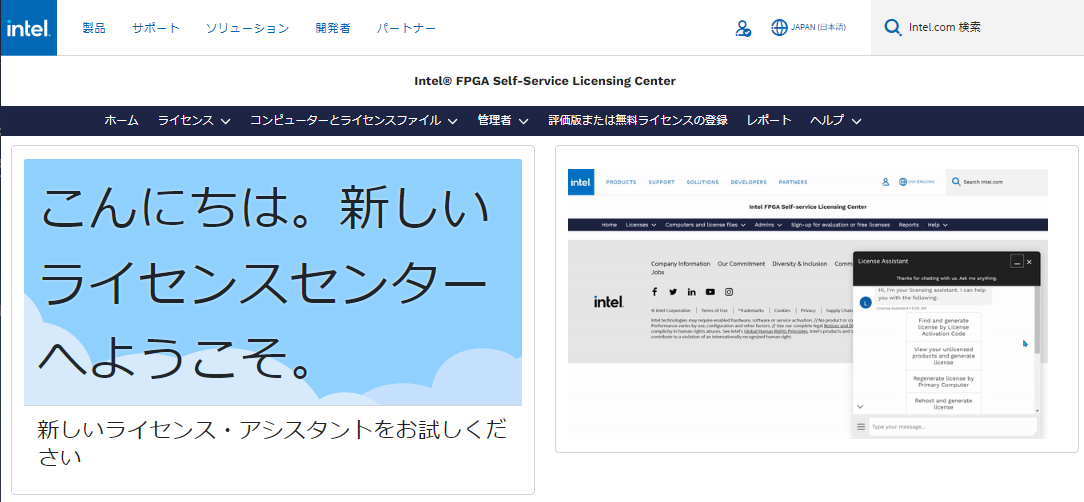
Access is completed when the top page of the license center is displayed.
B3. Registering a new computer
Newly register the information of the computer for which the license is to be issued.
When linking a license to a computer that has already been registered in the License Center,
Skip this step and proceed to B4. Assigning the license to your computer.
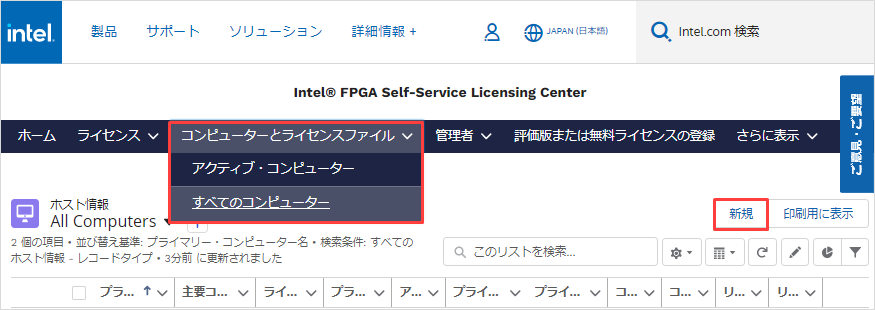
1. Click the Computers and License File menu and select All Computers.
(The registered computer information is displayed.)
2. Click New in the upper right corner of the screen.
※ Note! Since there is no "delete computer" function, once registered computer information cannot be deleted.
3. Enter the information of the computer to be registered.
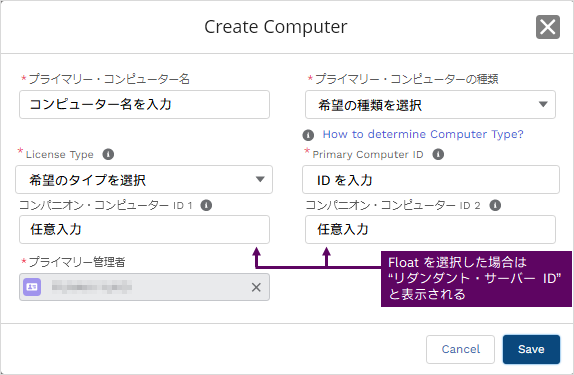
| item | explanation |
| Primary computer name | Enter the name that identifies the computer you want to register on the License Center. The primary computer name can be changed after registration. |
| Primary computer type |
NIC ID.Select a
|
| License Type |
Specifies the type of license to use. FIXED or FLOAT.Choose from |
| Primary Computer ID |
If you are using FIXED, enter the NIC ID of the computer on whichyou will use (compile) Quartus® Prime Pro Edition. When using FLOAT, enter the NIC ID or HOST ID of the computer used for the license server. |
| Companion ID 1/2 |
Input is optional. [Notes] For information about companion licenses, see How to get a companion license. ・This item is displayed only when FIXED is selected for License Type. - You can change the NIC ID after registration, but you cannot leave it blank. ・If you register or change these NIC IDs after linking the license, the number of IDs that can be changed (up to 3 times) during the maintenance period will be reduced. |
| Redundant server ID 1/2 |
Enter only if the license server is operated in a redundant format. [Notes] ・This item is displayed only when FLOAT is selected for License Type. - You can change the NIC ID after registration, but you cannot leave it blank. ・If you register or change these NIC IDs after linking the license, the number of IDs that can be changed (up to 3 times) during the maintenance period will be reduced. |
4. Click the [Save] button. A message is displayed indicating that registration is complete.
5. If you can confirm that the registered computer information is displayed in the [Computers and license files] menu, registration is complete.
B4. Assigning a license to a computer
Link the license to the registered computer.
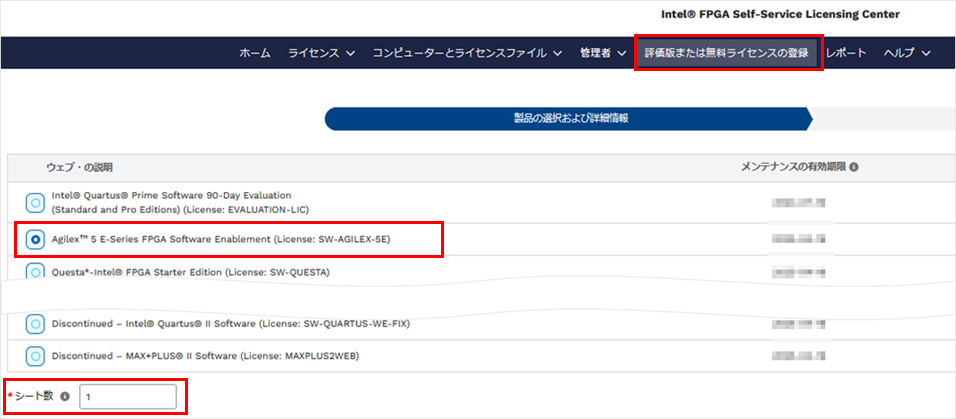
1. Click the [Evaluation or free license registration] menu.
2. Select the following license items from the product list, referring to the following:
・Agilex 5 E-Series FPGA Software Enablement (License: SW-AGILEX-5E)
[Notes]
The order in which products are listed may differ depending on when you use the License Center.
3. Enter the number of licenses for the NIC ID you are applying for in the number of seats field located at the bottom left.
Enter 1 for FIXED and the number to be operated for FLOAT.
4. Click the Next button located at the bottom right.
5. Select the registered computer information to which you want to assign this license from the "Select an existing computer" list.
6. Check the content regarding usage consent and feedback listed at the bottom, and mark ✔ if you agree.
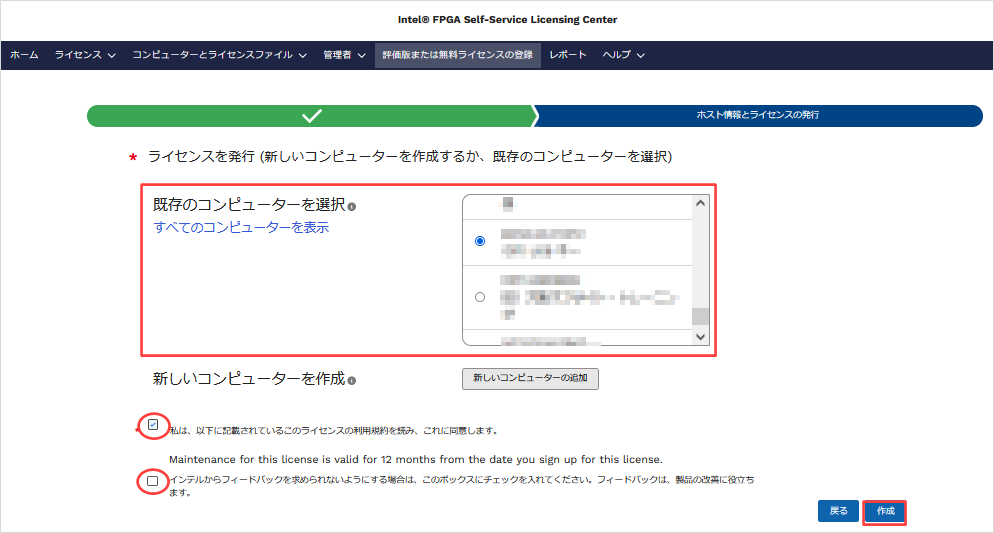
7. Click the Create button.
A license file will be sent to your registered e-mail address.
Save the attached license file to the computer where you will use the license. It is recommended to save the file with the extension.dat.
Do not use double-byte characters or spaces when renaming the file and when saving in the folder path.
For the obtained license file, set the license according to the license type (FIXED / FLOAT).
License files that have already been issued can be reissued at the License Center. Please see here for how to obtain it.
Return to the workflow for Method [B]
This completes the process of obtaining and setting up your free Quartus® Prime Pro Edition license file for Agilex™ 5 E development.
Related article
How to sign up for an Intel Account
How to Register for the Intel® FPGA Self-Service License Center
Intel® Quartus® Prime Licensing Structure
FIXED Licensing Instructions for Intel® Quartus® Prime, IP and Questa* - Intel® FPGA Edition
Intel® Quartus® Prime, IP and Questa* - Intel® FPGA Edition FLOAT License Setup Instructions