- Semiconductor BusinessHOME
- Products and Services of Macnica,Inc.
-
technical information

-
Events and Seminars
- Handling Manufacturer
- Support
- Inquiry
- Click here to purchase products
- Semiconductor business e-mail magazine registration
![]()
![]() Narrow down by specifying conditions
Narrow down by specifying conditions
現在2189件がヒットしています。check

*This article is based on information as of August 2025.
Introduction
We incorporated Hailo-10H, which makes generative AI possible on edge devices, and created an embedded device that can chat using Qwen.
Used equipment
Hailo AI Accelerator Hailo-10H
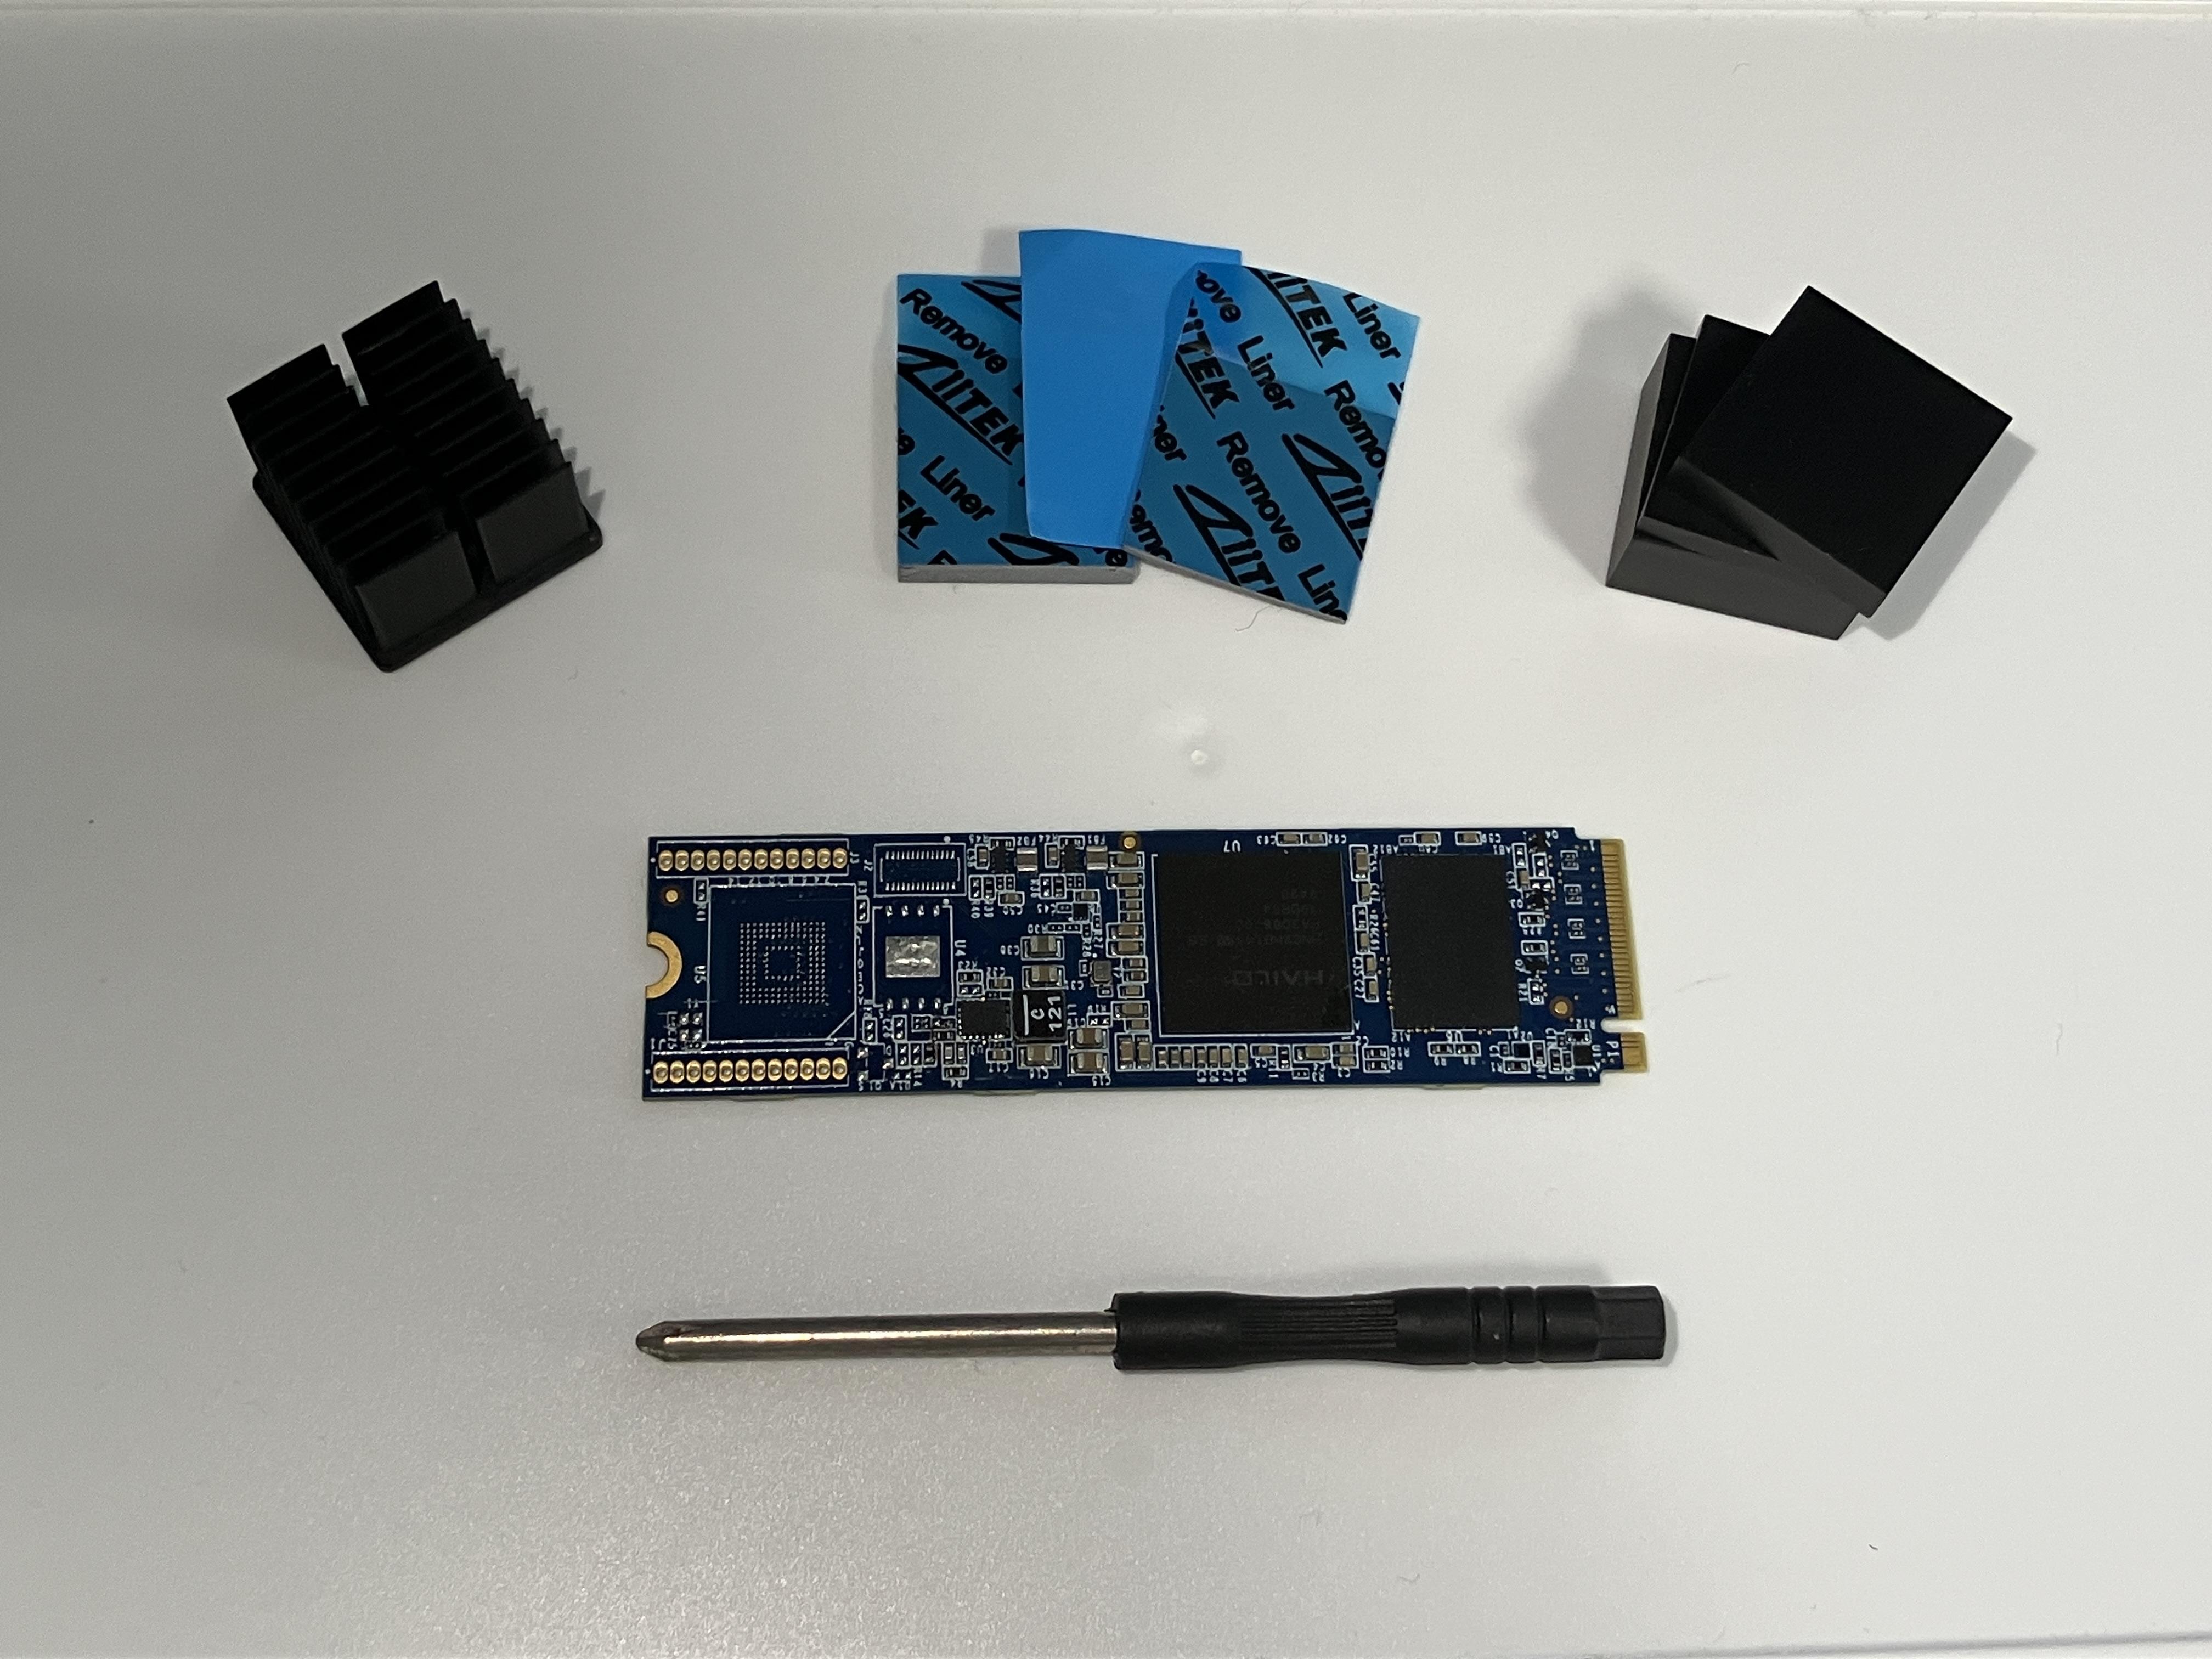
Hailo has released the Hailo-10H, a new AI accelerator. It differs from the Hailo-8, which was primarily designed for CNN models, in that it now supports larger models thanks to its DRAM capacity and adds functionality required for Transformer models, making it compatible with generative AI models. However, it is expected to only support a maximum of around 10B of parameters.
This time we are using the 8GB memory version of Hailo-10H.
At this time, users cannot freely add models, and only models prepared by Hailo can be run (fine tuning using LoRA is possible). Supported models are listed below.
https://hailo.ai/products/hailo-software/model-explorer/generative-ai/
The photo on the right shows the contents of the Hailo-10H Starter Kit.
ADLINK Industrial Fanless Embedded PC MXE-310
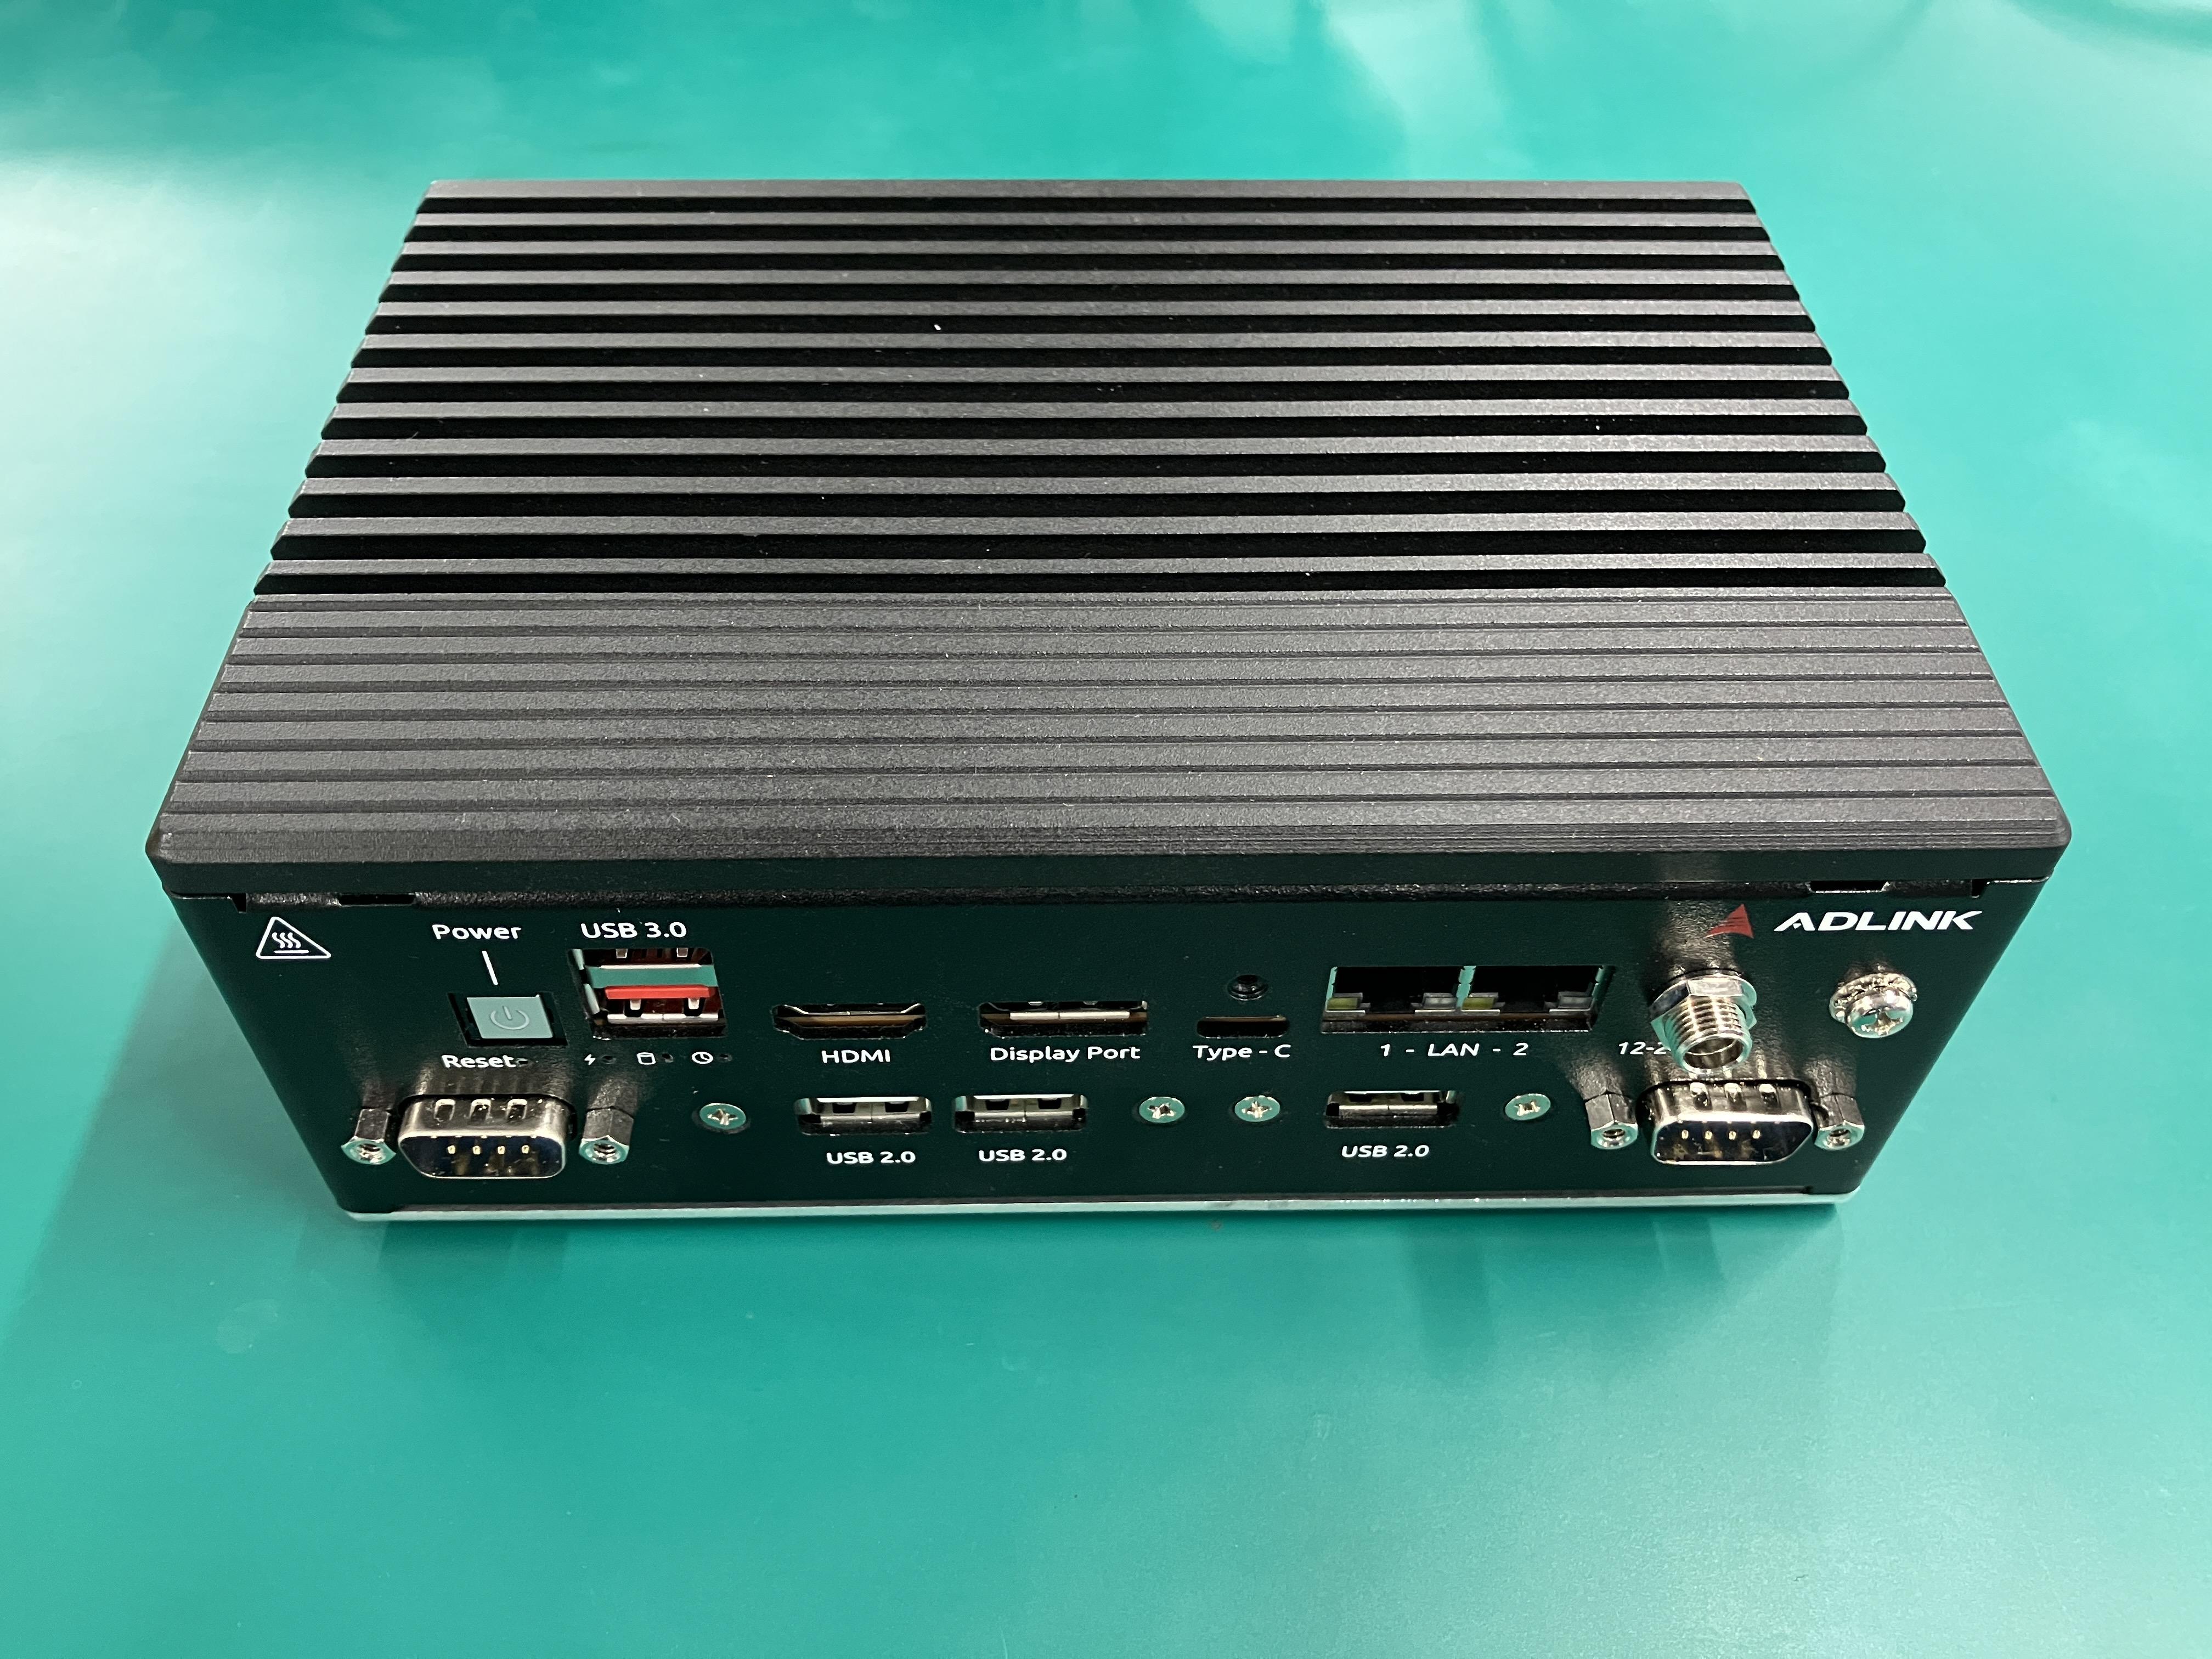
This time, we used the ADLINK MXE-310 box-type PC as the host PC to implement the Hailo-10H. It is a fanless IPC equipped with an Intel® Core™ series processor, and is compact (180x130x70mm). You can choose the CPU and memory, but this time we chose the following specifications.
CPU: I3-1315UE
Memory: 32GB
The photo on the right is an external view of the MXE-310 that was actually used.
Hailo-10H implementation
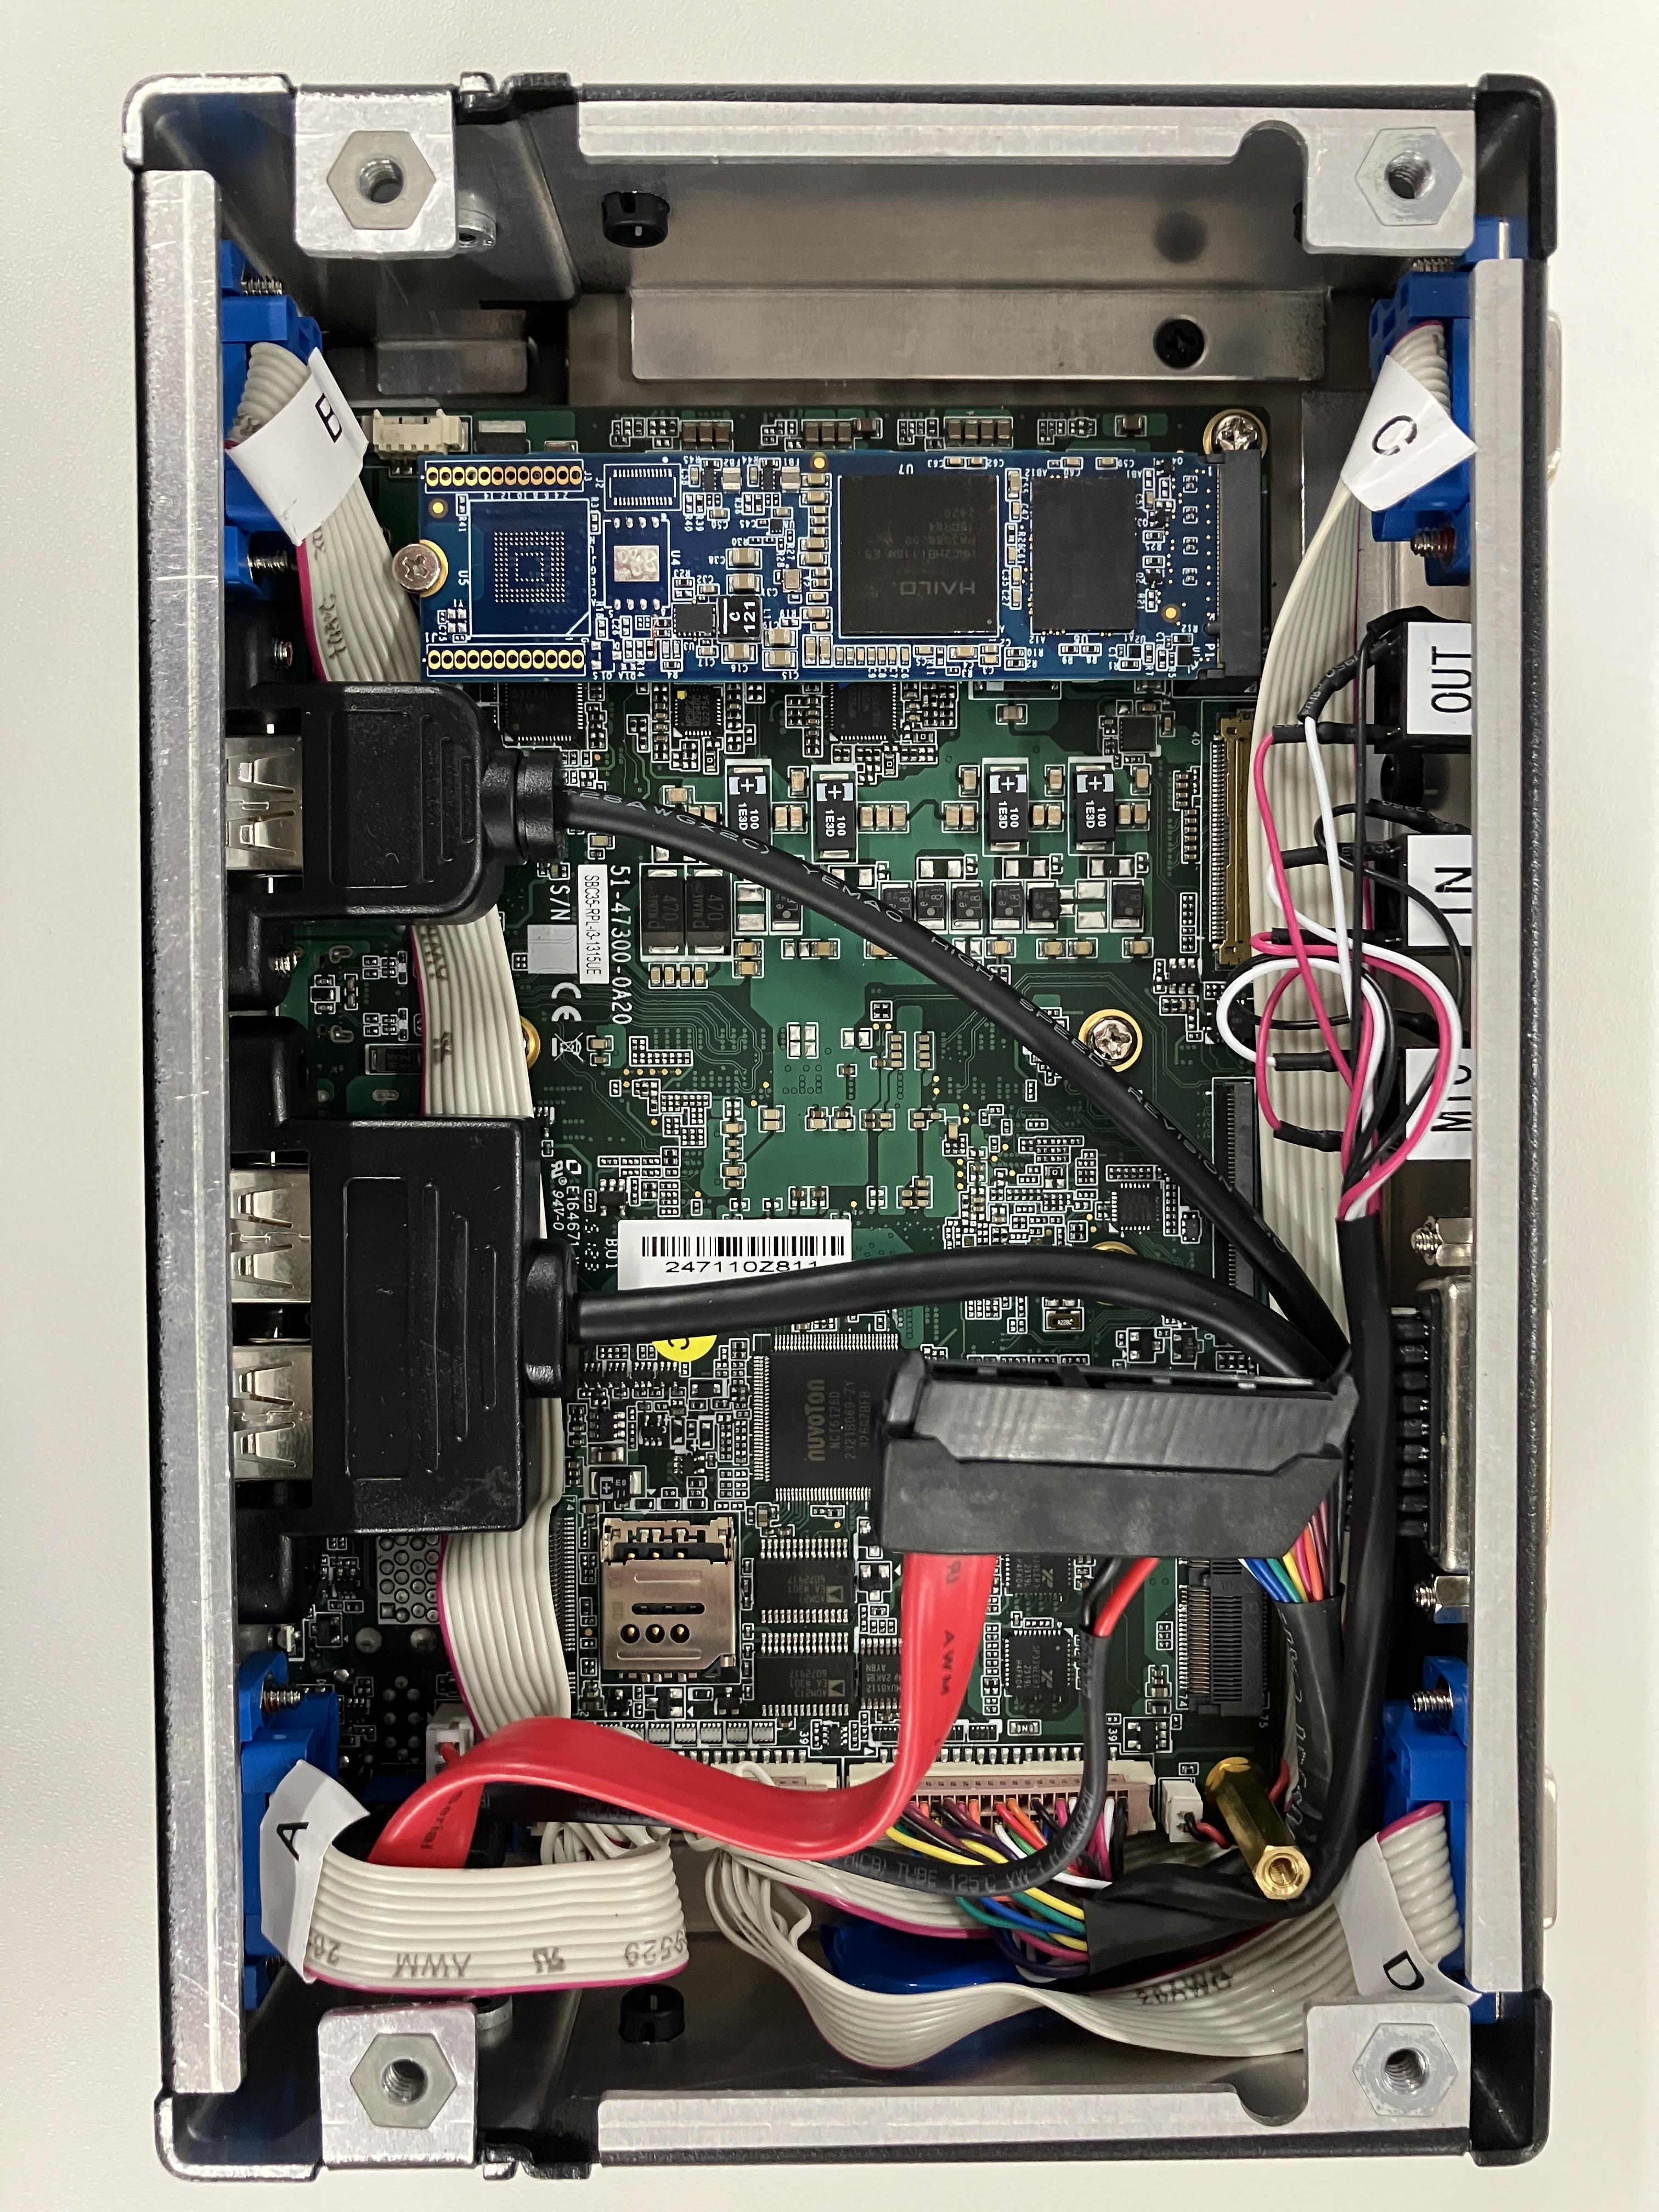
When you open the back of the MXE-310, you'll find an M.2 connector for expansion, which is where the Hailo-10H is inserted. The photo on the right shows the Hailo-10H inserted.
The back of the Hailo-10H is connected to a heat spreader, allowing heat to escape into the chassis.
Hailo-10H Setup
This time we will build a Hailo-10H environment on MXE-310's Ubuntu 22.04.
Hailo provides an API that is compatible with the Ollama API format, and we will use it by following the link below.
https://github.com/hailo-ai/hailo_model_zoo_genai
I won't go into details here, but I'll briefly explain the process:
①Install HailoRT
Follow the HailoRT User Guide to install the necessary packages, then install the deb package. Download the User Guide and deb package from Hailo's Developer Zone. The link to the Developer Zone is below, but you will need to register with Hailo Web, so please register first.
https://hailo.ai/developer-zone/
A reboot is required after installing HailoRT.
<commands used>.
$ sudo apt update
$ sudo apt install build-essential
$ sudo apt install bison
$ sudo apt install flex
$ sudo apt install libelf-dev
$ sudo apt install dkms
$ sudo apt install curl
$ sudo apt install cmake
$ sudo apt install pip
$ sudo apt install virtualenv
$ sudo apt install systemd
$ sudo dpkg --install hailort_5.0.0_amd64.deb hailort-pcie-driver_5.0.0_all.deb
②Installing Hailo Model Zoo GenAI
A deb package has been prepared, so install it (the deb package can be downloaded from the Developer Zone).
<commands used>.
$ sudo dpkg -i hailo_gen_ai_model_zoo_5.0.0_amd64.deb
The installation is now complete.
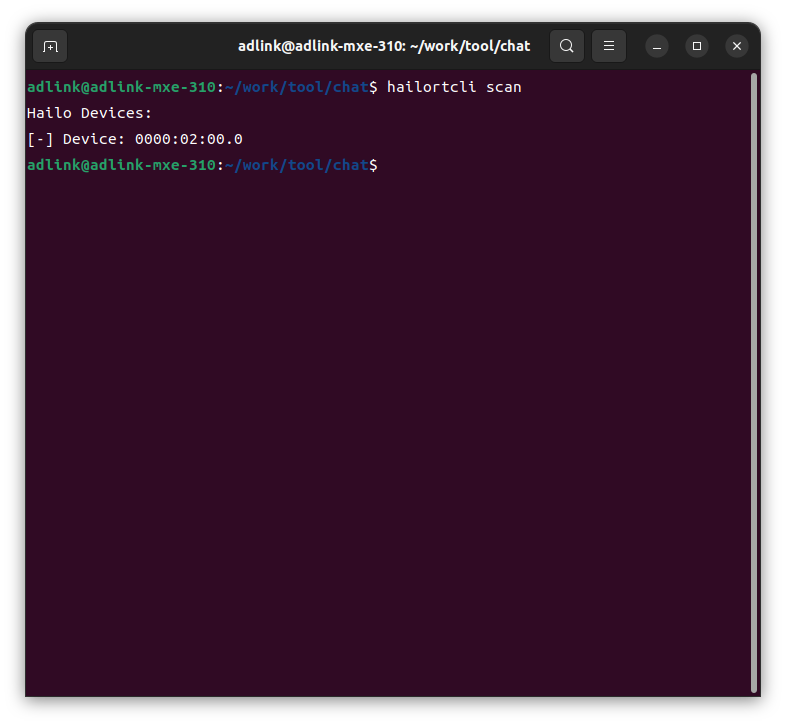
Finally, if the hailortcli scan command recognizes it as follows, there should be no problem.
Checking the operation of the ollama API
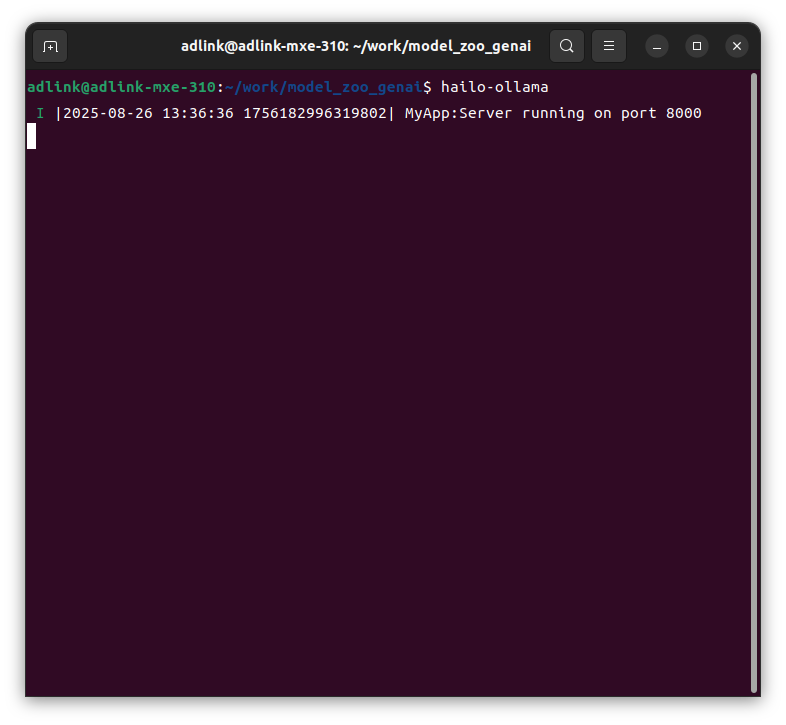
First, start Hailo's ollama.
$ hailo-ollama
When you execute the above command, hailo-ollama will start as shown below.
From now on, access hailo-ollama using the curl command in another terminal window.
- Display of compatible models
$ curl --silent http://localhost:8000/hailo/v1/list
*Compatible models as of August 2025: {"models":["deepseek_r1_distill_qwen:1.5b","qwen2.5-coder:1.5b","qwen2.5:1.5b","qwen2:1.5b"]}
*As of August 2025, hailo-ollama is not compatible with VLM models, but only with LLM models.
・Download the model
$ curl --silent http://localhost:8000/api/pull -H 'Content-Type: application/json' -d '{ "model": "qwen2:1.5b", "stream" : true }'
From here on, we will use qwen2:1.5b from the compatible models.
(I felt that this model had the best Japanese support)
I'll actually ask a question.
$ curl --silent http://localhost:8000/api/generate -H 'Content-Type: application/json' -d '{"model": "qwen2:1.5b", "prompt": "Why is the sky blue?", "stream":false}'
$ curl --silent http://localhost:8000/api/chat -H 'Content-Type: application/json' -d '{"model": "qwen2:1.5b", "messages": [{"role": "user", "content": "Why is the sky blue?"}]}'
Each response will be in the following format:
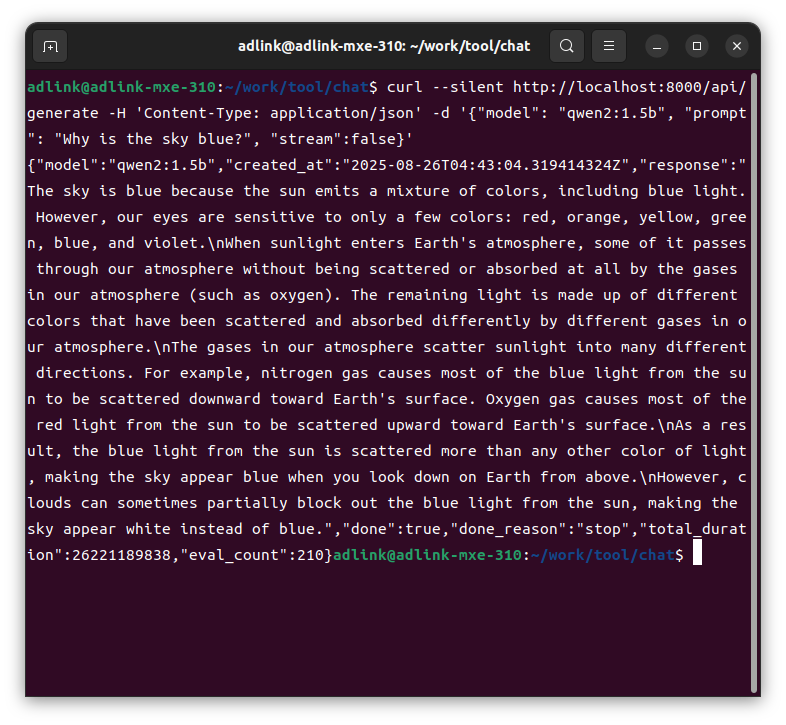
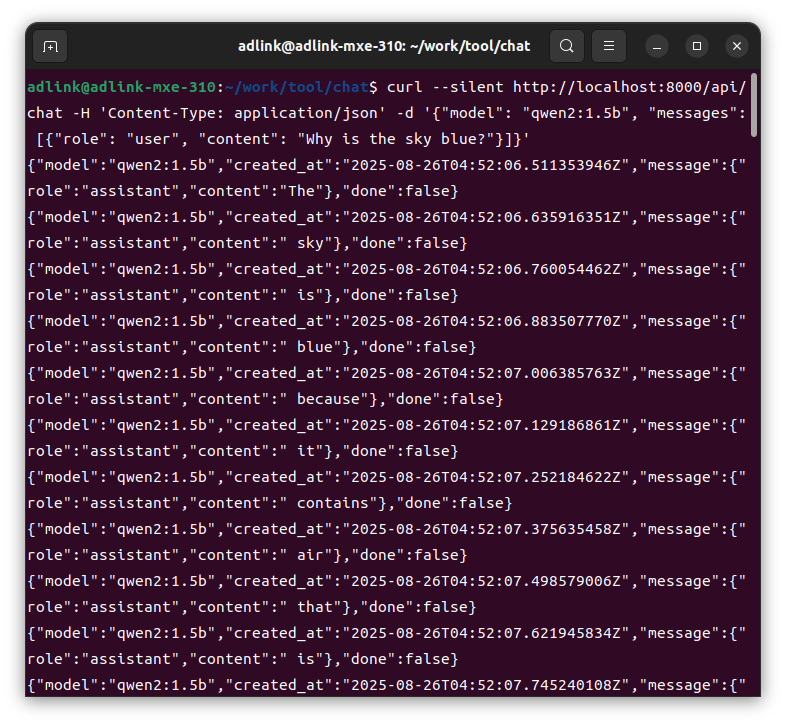
We were able to confirm that we could actually interact with the Qwen model using the curl command.
The response was about the same as asking a question to an LLM on the cloud, so I think it's quite impressive that it could be achieved on an embedded device with limited computing resources. However, I feel that further improvement in response is required when processing on an embedded device that does not use the Internet, so I feel that a little more tuning is needed in that area.
Next, since communicating using the curl command is difficult for ordinary users, I would like to create a chat Box in Python that anyone can use to communicate.
Creating a chat Box and checking its operation
I've created a system that allows you to chat on your browser with the help of generative AI, so I'd like to introduce it to you.
Actual Python code and HTML code have been pasted, but please note that these are merely samples and are not guaranteed to work.
First, the Python code:
The file name is app.py.
from flask import Flask, render_template, request, jsonify import requests import json app = Flask(__name__) # メインページを表示するルート @app.route('/') def index(): return render_template('index.html') # チャットメッセージを処理するルート @app.route('/chat', methods=['POST']) def chat(): user_message = request.form['message'] # Ollama API へリクエストを送信 response = requests.post( "http://localhost:8000/api/generate", json={ "model": "qwen2:1.5b", "prompt": user_message, "stream": False }, stream=True ) generated_text = "" # ストリーミングレスポンスを処理 for line in response.iter_lines(): if line: line_str = line.decode('utf-8') data = json.loads(line_str) if "response" in data: generated_text += data["response"] return jsonify({'response': generated_text}) if __name__ == '__main__': app.run(debug=True)Next is the html code.
The file name is index.html.