- 半導体事業HOME
- マクニカの製品・サービス
-
技術情報

-
イベント・セミナー
- 取扱メーカー
- サポート
- お問い合わせ
- 製品購入はこちら
- 半導体事業のメルマガ登録
![]()
![]() 条件を指定して絞り込む
条件を指定して絞り込む
現在2139件がヒットしています。check

iPerfのClient/Serverそれぞれのオプション
前回の記事では、Client/Server共通のオプションについて実際使用した挙動を紹介しました。
今回はClient/Serverそれぞれ個別のオプションについて実際使用してどんなことができるのか確認してみようと思います。
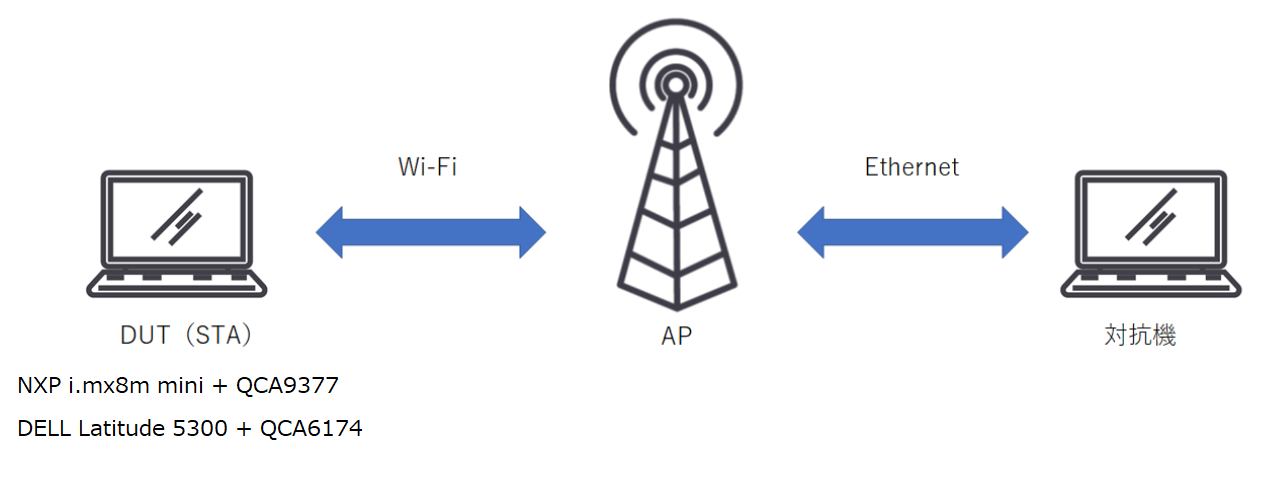
QualcommのWi-Fiデバイス(QCA9377/QCA6174A)と一般的なPCのEthernetを接続した環境になります。
※ オプションはiperf3.1.3の情報になります。
Server用オプション
| オプション | デフォルト値 | 説明 |
| D | 指定なし | iPerfをデーモンで起動します。 |
| I | 指定なし | PIDを指定ファイルに書き込みます。 |
| 1 | 指定なし | 1コネクション終了(受信完了)でiPerfが終了します。 |
実際に使ってみた
いくつか実際に使ってみて動作を確認してみました。
”-D”オプション
iperfをデーモン(バックグラウンド)として実行します。
”iperf3 -s -D”入力後コンソールはすぐに戻ってきます。
”ps”を実行するとiperf3を確認することができます。
終了するには、”kill”するか”-1”オプションで1コネクション完了で終了させることができます。
”-I”オプション
PIDを指定ファイルに記録します。
iPerf終了時に当該ファイルは削除されます。
”iperf3 -s -D -1 -I ~/pidfile”と設定すると、
デーモンでiperfサーバーを起動しpidfileにPIDを記録します。
1コネクション終了後(送信完了後)にpidfileを削除しiPerfを自動で終了します。
root@imx8mmevk:~# iperf3 -s -D
root@imx8mmevk:~# ps | grep iperf
 3643 root      6316 S    iperf3 -s -D
 3645 root      3360 R    grep iperf
root@imx8mmevk:~#
root@imx8mmevk:~# iperf3 -s -D -1
root@imx8mmevk:~# ps | grep iperf
 3640 root      3360 S    grep iperf
root@imx8mmevk:~# iperf3 -s -D -1 -I ~/pidfile
root@imx8mmevk:~# ls
pidfile
root@imx8mmevk:~# vi pidfile
3689^@
root@imx8mmevk:~# ps | grep iperf
 3689 root      6316 S    iperf3 -s -D -1 -I /home/root/pidfile
 3696 root      3360 R    grep iperf
Client用オプション
| オプション | デフォルト値 | 説明 |
| n | 0 |
指定サイズの送信完了で終了します。 <数値>[フォーマット] 例:200M(200MBytes) 200000000(200MBytes) |
| k | 0 |
送信完了までのpacket数を指定します。 <数値>[フォーマット] 例:100M(100M packet) 1000000(100M packet) |
| l |
UDP : 8192 TCP : 128*1024 |
1回の送信のデータサイズ(ブロックサイズ)になります。 |
| C |
指定なし |
使用するTCP輻輳制御アルゴリズムを設定します。 /pro/sys/net/ipv4/tcp_available_congestion_control |
| M |
Kernelのデフォルト |
mssのサイズを指定します。 |
| N | 0 |
SocketにTCP_NODELAY=1を設定し、Nagleアルゴリズムを無効化します。 ※Nagleアルゴリズム:小さいデータをなるべくまとめて送信します。 |
| 4 | 指定なし | IPv4に限定します。 |
| 6 | 指定なし |
IPv6に限定します。 フォーマットは、IPv6アドレス%インターフェース名のように設定します。 例:iperf3 -c fe80::1234:5678:1234:5678%wlan0 -6 |
| S | 0(Best Effort) | IPv4ヘッダーのType of service(DSフィールド)を0から255の範囲で指定します。 |
| L | 指定なし | IPv6のフローラベルを指定します。 |
| Z | 指定なし | 送信データを'0'で埋めます。 |
| O | 0 |
最初の数秒のデータを無視します。 スロースタートの影響を低くします。 |
| T | 指定なし | 各送信データに任意のタイトルを付けます。 |
実際に使ってみた
”-n”オプション
”-n 20M”を指定すると20MByteの送信完了で終了します。
iperf_sendに実装があります。
root@imx8mmevk:~# iperf3 -c 192.168.1.2 -n 20M
Connecting to host 192.168.1.2, port 5201
[  5] local 192.168.1.1 port 51400 connected to 192.168.1.2 port 5201
[ ID] Interval           Transfer     Bitrate         Retr  Cwnd
[  5]   0.00-1.00   sec  11.3 MBytes  94.5 Mbits/sec    0    424 KBytes
[  5]   1.00-2.00   sec  9.69 MBytes  81.4 Mbits/sec    0    424 KBytes
- - - - - - - - - - - - - - - - - - - - - - - - -
[ ID] Interval           Transfer     Bitrate         Retr
[  5]   0.00-2.00   sec  21.0 MBytes  87.8 Mbits/sec    0             sender
[  5]   0.00-2.00   sec  18.7 MBytes  78.4 Mbits/sec                  receiver
iperf Done.
”-k”オプション
”-k 1000”を指定すると1000パケットの送信完了で終了します。
1パケットの単位は実装上はデフォルトで128*1024バイト(デフォルトのTCPブロックサイズ)です。
ですが、実際はデフォルトのサイズではwrite関数でEAGAINとなるため、サイズは不定になります。
EAGAINとならなければ1パケットはブロックサイズ(-lオプション)になります。
iperf_sendに実装があります。
root@imx8mmevk:~# iperf3 -c 192.168.1.2 -k 1000
Connecting to host 192.168.1.2, port 5201
[  5] local 192.168.1.1 port 51412 connected to 192.168.1.2 port 5201
[ ID] Interval           Transfer     Bitrate         Retr  Cwnd
[  5]   0.00-1.00   sec  11.7 MBytes  97.7 Mbits/sec    0    433 KBytes
[  5]   1.00-2.00   sec  9.01 MBytes  75.6 Mbits/sec    0    433 KBytes
[  5]   2.00-3.00   sec  9.94 MBytes  83.3 Mbits/sec    0    433 KBytes
[  5]   3.00-4.00   sec  9.63 MBytes  80.8 Mbits/sec    0    433 KBytes
[  5]   4.00-5.00   sec  9.45 MBytes  79.2 Mbits/sec    0    433 KBytes
[  5]   5.00-6.00   sec  8.45 MBytes  71.0 Mbits/sec    0    433 KBytes
[  5]   6.00-7.00   sec  9.32 MBytes  78.1 Mbits/sec    0    433 KBytes
[  5]   7.00-8.00   sec  9.63 MBytes  80.8 Mbits/sec    0    433 KBytes
[  5]   8.00-9.00   sec  9.69 MBytes  81.3 Mbits/sec    0    433 KBytes
[  5]   9.00-10.00  sec  7.95 MBytes  66.7 Mbits/sec    0    433 KBytes
[  5]  10.00-10.05  sec   891 KBytes   140 Mbits/sec    0    433 KBytes
- - - - - - - - - - - - - - - - - - - - - - - - -
[ ID] Interval           Transfer     Bitrate         Retr
[  5]   0.00-10.05  sec  95.6 MBytes  79.8 Mbits/sec    0             sender
[  5]   0.00-10.05  sec  93.3 MBytes  77.9 Mbits/sec                  receiver
iperf Done.
”-C” オプション
私の環境のサポートしているTCP輻輳制御アルゴリズムは以下でした。
reno cubic
これらを指定してiperfのTCP輻輳制御アルゴリズムを指定することが可能です。
サポートしていないアルゴリズムの場合エラーとなります。
test@test-Latitude-5300:~$ cat /proc/sys/net/ipv4/tcp_available_congestion_control
reno cubic
test@test-Latitude-5300:~$ iperf3 -c 192.168.11.2 -C cubic
Connecting to host 192.168.11.2, port 5201
[  4] local 192.168.11.9 port 40872 connected to 192.168.11.2 port 5201
[ ID] Interval           Transfer     Bandwidth       Retr  Cwnd
[  4]   0.00-1.00   sec  67.3 MBytes   565 Mbits/sec    0   3.01 MBytes
[  4]   1.00-2.00   sec  73.8 MBytes   619 Mbits/sec    0   3.01 MBytes
[  4]   2.00-3.00   sec  72.5 MBytes   608 Mbits/sec    0   3.01 MBytes
[  4]   3.00-4.00   sec  72.5 MBytes   608 Mbits/sec    0   3.01 MBytes
[  4]   4.00-5.00   sec  72.5 MBytes   608 Mbits/sec    0   3.01 MBytes
[  4]   5.00-6.00   sec  70.0 MBytes   587 Mbits/sec    0   3.01 MBytes
[  4]   6.00-7.00   sec  72.5 MBytes   608 Mbits/sec    0   3.01 MBytes
[  4]   7.00-8.00   sec  72.5 MBytes   608 Mbits/sec    0   3.01 MBytes
[  4]   8.00-9.00   sec  68.8 MBytes   577 Mbits/sec    0   3.01 MBytes
[  4]   9.00-10.00  sec  72.5 MBytes   608 Mbits/sec    0   3.01 MBytes
- - - - - - - - - - - - - - - - - - - - - - - - -
[ ID] Interval           Transfer     Bandwidth       Retr
[  4]   0.00-10.00  sec   715 MBytes   600 Mbits/sec    0             sender
[  4]   0.00-10.00  sec   713 MBytes   598 Mbits/sec                  receiver
iperf Done.
test@test-Latitude-5300:~$ iperf3 -c 192.168.11.2 -C reno
Connecting to host 192.168.11.2, port 5201
[  4] local 192.168.11.9 port 40876 connected to 192.168.11.2 port 5201
[ ID] Interval           Transfer     Bandwidth       Retr  Cwnd
[  4]   0.00-1.00   sec  68.2 MBytes   572 Mbits/sec    0   6.00 MBytes
[  4]   1.00-2.00   sec  71.2 MBytes   598 Mbits/sec    0   6.00 MBytes
[  4]   2.00-3.00   sec  73.8 MBytes   619 Mbits/sec    0   6.00 MBytes
[  4]   3.00-4.00   sec  73.8 MBytes   619 Mbits/sec    0   6.00 MBytes
[  4]   4.00-5.00   sec  73.8 MBytes   619 Mbits/sec    0   6.00 MBytes
[  4]   5.00-6.00   sec  71.2 MBytes   597 Mbits/sec    0   6.00 MBytes
[  4]   6.00-7.00   sec  71.2 MBytes   598 Mbits/sec    0   6.00 MBytes
[  4]   7.00-8.00   sec  72.5 MBytes   608 Mbits/sec    0   6.00 MBytes
[  4]   8.00-9.00   sec  73.8 MBytes   619 Mbits/sec    0   6.00 MBytes
[  4]   9.00-10.00  sec  73.8 MBytes   619 Mbits/sec    0   6.00 MBytes
- - - - - - - - - - - - - - - - - - - - - - - - -
[ ID] Interval           Transfer     Bandwidth       Retr
[  4]   0.00-10.00  sec   723 MBytes   607 Mbits/sec    0             sender
[  4]   0.00-10.00  sec   722 MBytes   606 Mbits/sec                  receiver
iperf Done.
test@test-Latitude-5300:~$ iperf3 -c 192.168.11.2 -C abc
Connecting to host 192.168.11.2, port 5201
iperf3: error - unable to set TCP_CONGESTION: Supplied congestion control algorithm not supported on this host
”-M”オプション
MSSの値を指定できます。
上がデフォルト設定、下が”-M 1000”を指定したログです。
1000バイトに各ヘッダー分足されて1054バイトになっています。
実装としては、setsockoptでTCP_MAXSEGにmss値として設定しています。


”-6”オプション
以下のコマンドで<IPv6アドレス>のデバイスに<インターフェース名>を通してiPerfを実行します。
”iperf3 -c <IPv6アドレス>%<インターフェース名> -6”

”-S”オプション
TOS(DS)フィールドに値を設定します。
デフォルト->CS0
32->CS1
64->CS2
96->CS3
128->CS4
”iperf3 -c 192.168.11.2 -S 96”を設定した場合のログが以下になります。

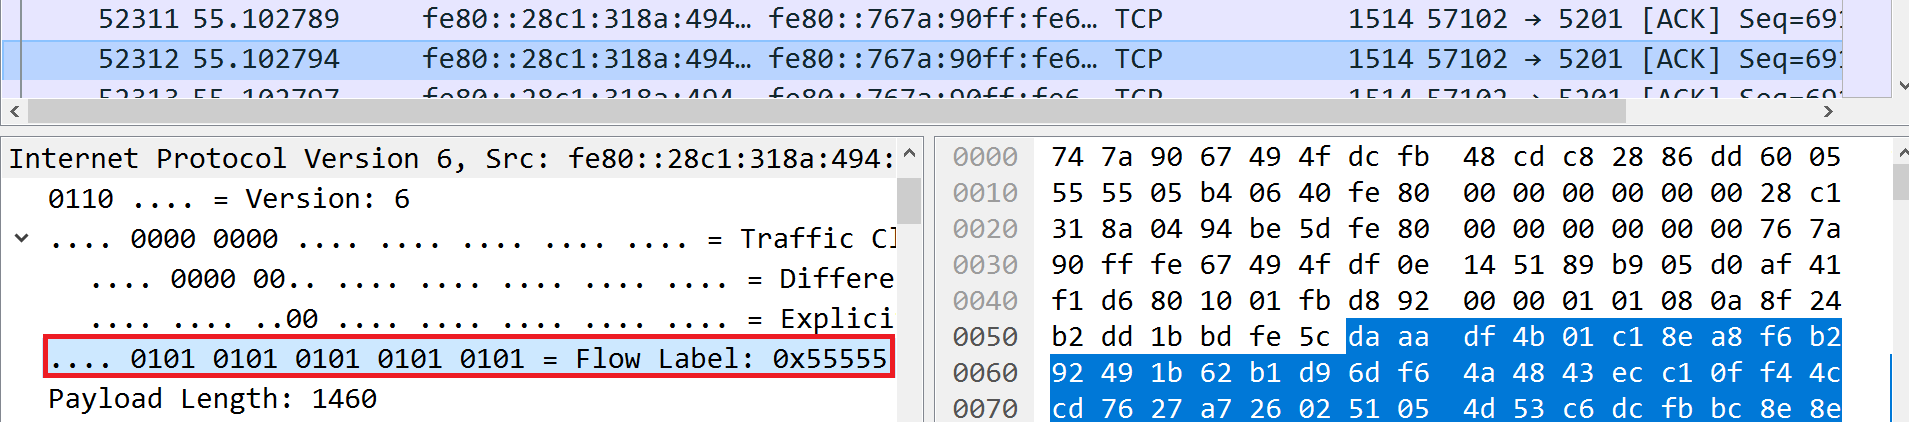
”-L”オプション
IPv6ヘッダーのFlow Labelフィールド(20bit)を指定します。
”iperf3 -c <IPv6アドレス>%wlan0 -6 -L 0x55555”を設定すると以下のログのようになります。
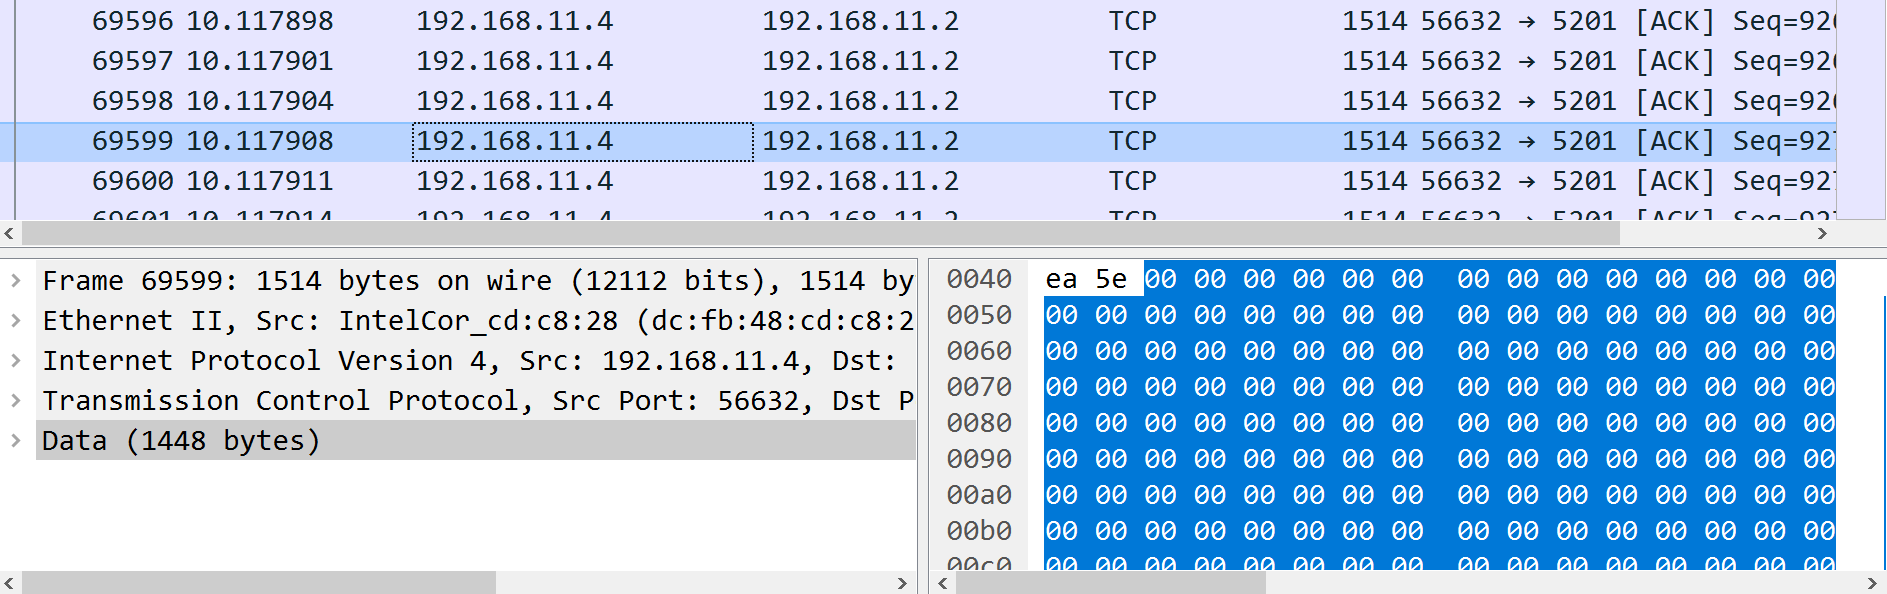
”-Z”オプション
データ部分をすべて’0’に設定します。
まとめ
今回は、iPerfのClient/Serverのそれぞれのオプションを紹介しました。
iPerfは、OSSでWi-Fiに限らずIP通信をするものであれば使用可能ですので、スループットが気になる方は使用してみてはいかがでしょうか?
お問い合わせ
Qualcomm製品に関するご質問等がございましたら、以下リンクよりお問い合わせください。
Qualcomm メーカー情報Topへ
Qualcomm メーカー情報Topページへ戻りたい方は、以下をクリックしてください。