- Semiconductor BusinessHOME
- Products and Services of Macnica,Inc.
-
technical information

-
Events and Seminars
- Handling Manufacturer
- Support
- Inquiry
- Click here to purchase products
- Semiconductor business e-mail magazine registration
![]()
![]() Narrow down by specifying conditions
Narrow down by specifying conditions
現在2183件がヒットしています。check

This article will introduce how to use "iButton data Logger".
I would like to introduce the necessary hardware and software and the series of steps from the start of data measurement to data collection while actually operating it. I hope this will be helpful when using it for the first time.
What is iButton data Logger?
iButtons are products that contain an IC chip with 280 trillion unique IDs packaged in a 16mm thick stainless steel can. They can be easily installed and used anywhere. The iButton DS192X series has a temperature control function, and taking advantage of its small size and robustness, it can be used for various temperature control purposes.
Its low cost and ease of implementation compared to other solutions are also key features. The iButton DS192x series offers a variety of variations, including differences in accuracy, measurement memory, and measurement range. However, the DS1923 temperature and humidity logger is no longer available, and only the temperature logger is currently available.
|
temperature data logger |
Product name *1 |
Temperature range (℃) |
Accuracy (℃, max) |
Number of data log points *2 |
|
-40~+85 |
±1 (-30℃/+70℃) |
2K |
||
|
+15~+46 |
±1 |
2K |
||
|
-5~+26 |
±1 |
2K |
||
|
-40~+85 |
±0.5 (-10℃/+65℃) |
4K/8K |
||
|
0~ +125 |
±0.5 (+20℃/+75℃) |
4K/8K |
||
|
+15~+140 |
±1.5 (+110℃/+140℃) |
4K/8K |
||
|
-40~+85 |
±0.5 (-40℃/+85℃) |
61K/122K |
*1: All products can be evaluated with "DS1925EVKIT".
*2: When using high resolution mode, 2 points worth of log is consumed.
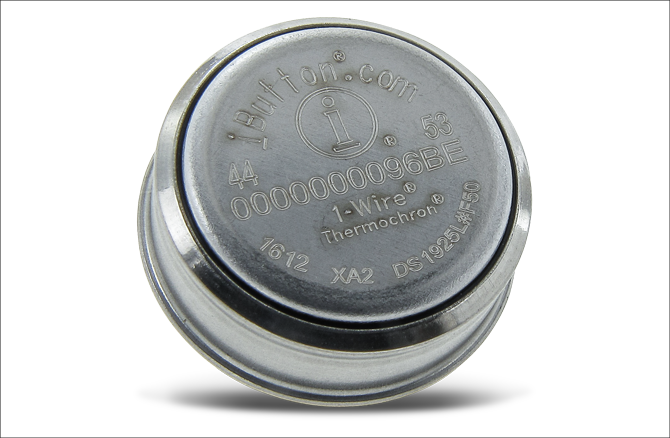
This time, I would like to explain using the DS1925, the latest release in the iButton Data Logger series.
The DS1925 can measure up to 144,000 temperatures and has a configurable logging interval. It also has a temperature measurement range of -40 to +85 and can measure with a maximum error of ±0.5 °C.
Things to prepare (hardware)
The equipment required to collect data with the iButton DS192X series is as follows. This time, iButton uses DS1925. In order to collect data with the iButton, we will use the software "OneWire Viewer" provided free of charge by Analog Devices. To collect data on a PC, you will need a USB to 1-Wire cable conversion adapter and an iButton junction adapter. I won't go into details here, but iButton uses 1-Wire. "What is 1-Wire, a 1-wire communication interface with 280 trillion security IDs? Please refer to it as it is explained in detail.
[Required hardware]
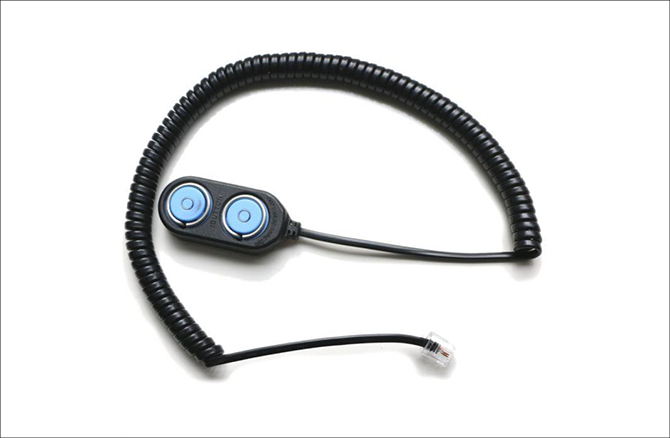
・iButton:DS1925
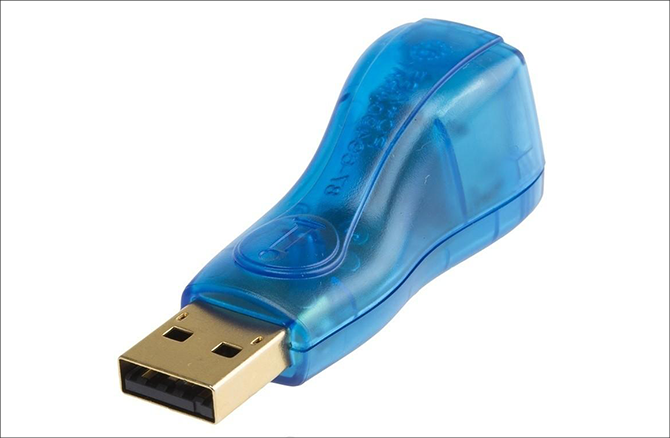
・USB to 1-Wire Adapter: DS9490R
・iButton Adapter: DS1402D-DR8+
For the DS1925 used this time, we provide the "DS1925EVKIT" as an evaluation kit. If you purchase this evaluation kit, all necessary hardware is included, including the iButton itself.

What you need to prepare (software)
To collect data with the iButton, use the software "OneWire Viewer" provided by Analog Devices.
We have organized related download links and materials, so please refer to them here.
・OneWireViewer and iButton Quick Start Guide
・ Download destination for “OneWire Viewer”
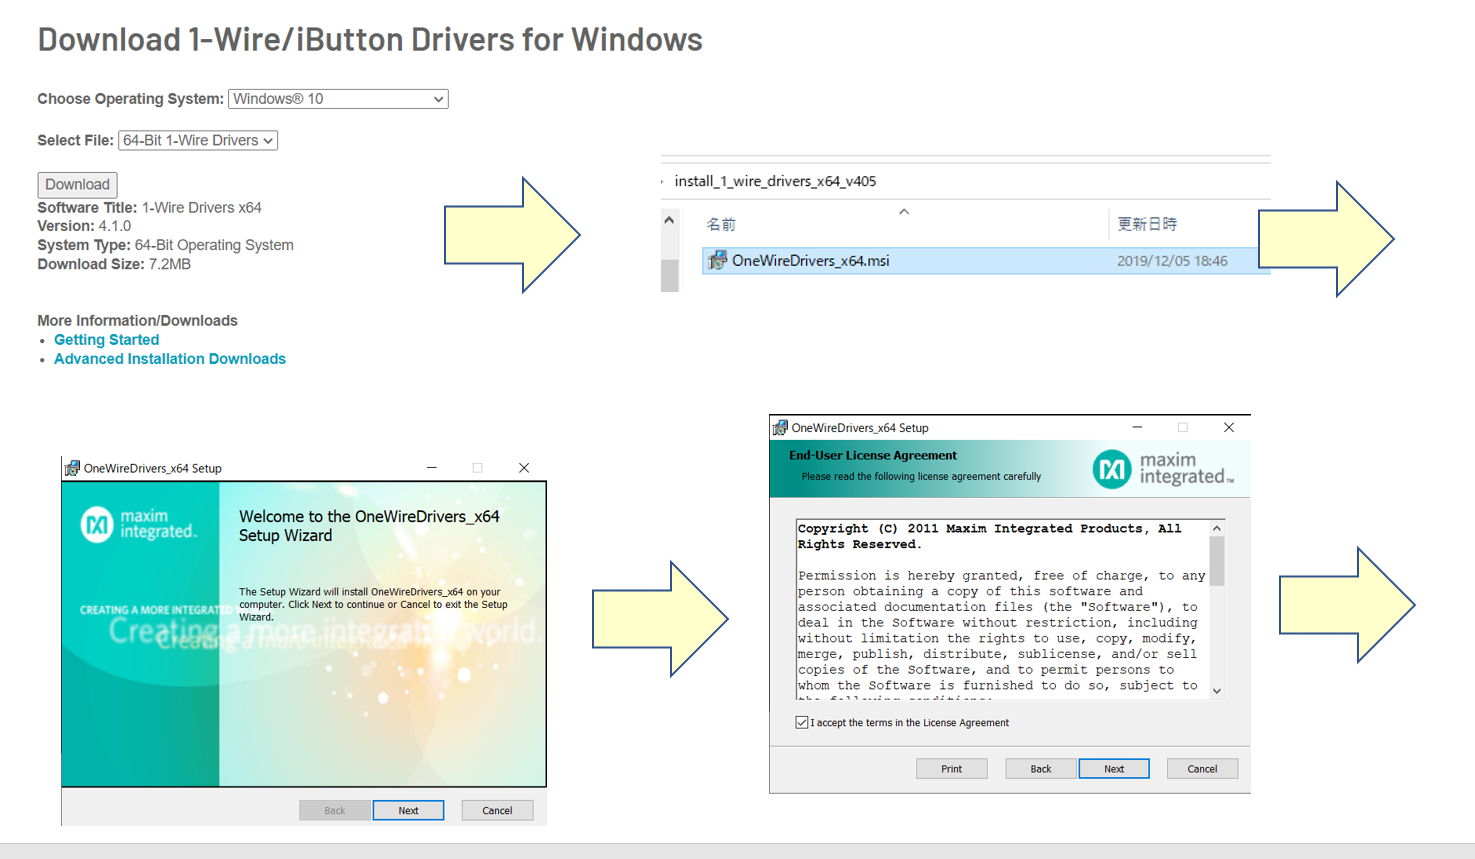
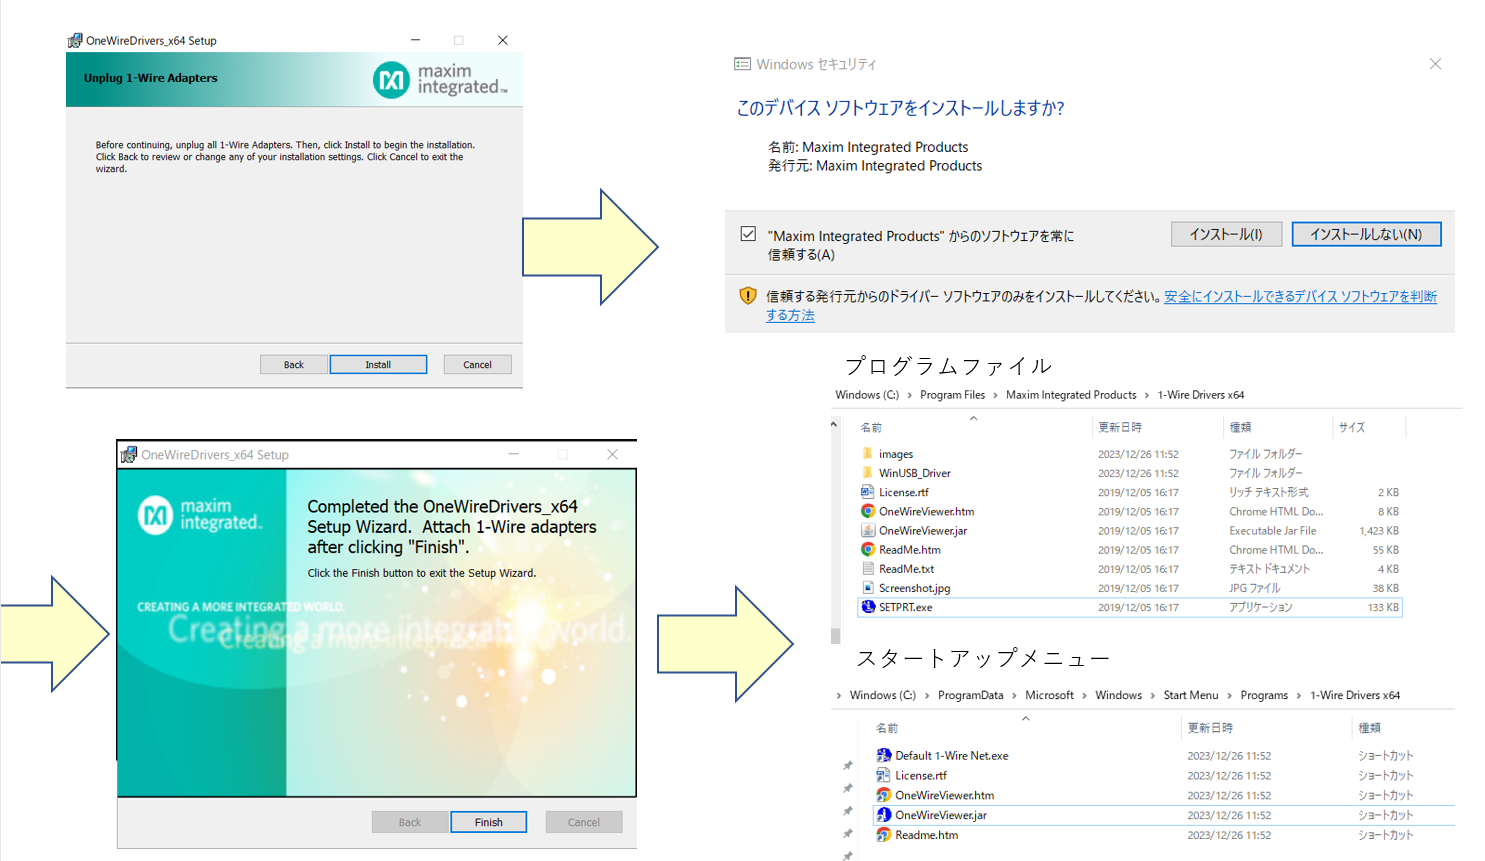
Installing OneWireViewer
From this download location, enter the conditions according to your PC environment and click [Download]. install_1_wire_drivers_x64_v405.zip will be stored in the "Downloads" folder of your PC, so when you unzip the above zip, OneWireDrivers_x64.msi will be generated.
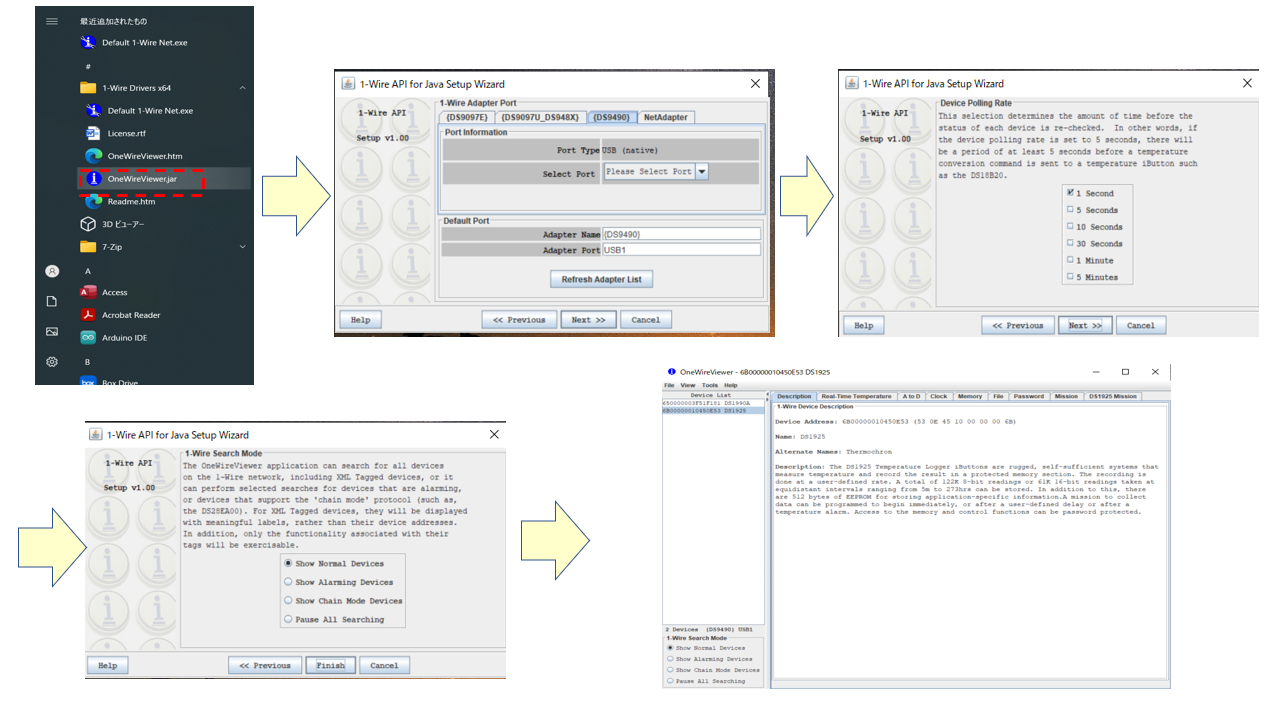
Double-click the "OneWireDrivers_x64.msi" file and install it as shown below. When the installation is complete, you can confirm that "OneWireViewer.jar" is stored in the specified folder and in the startup menu.
Measurement start procedure
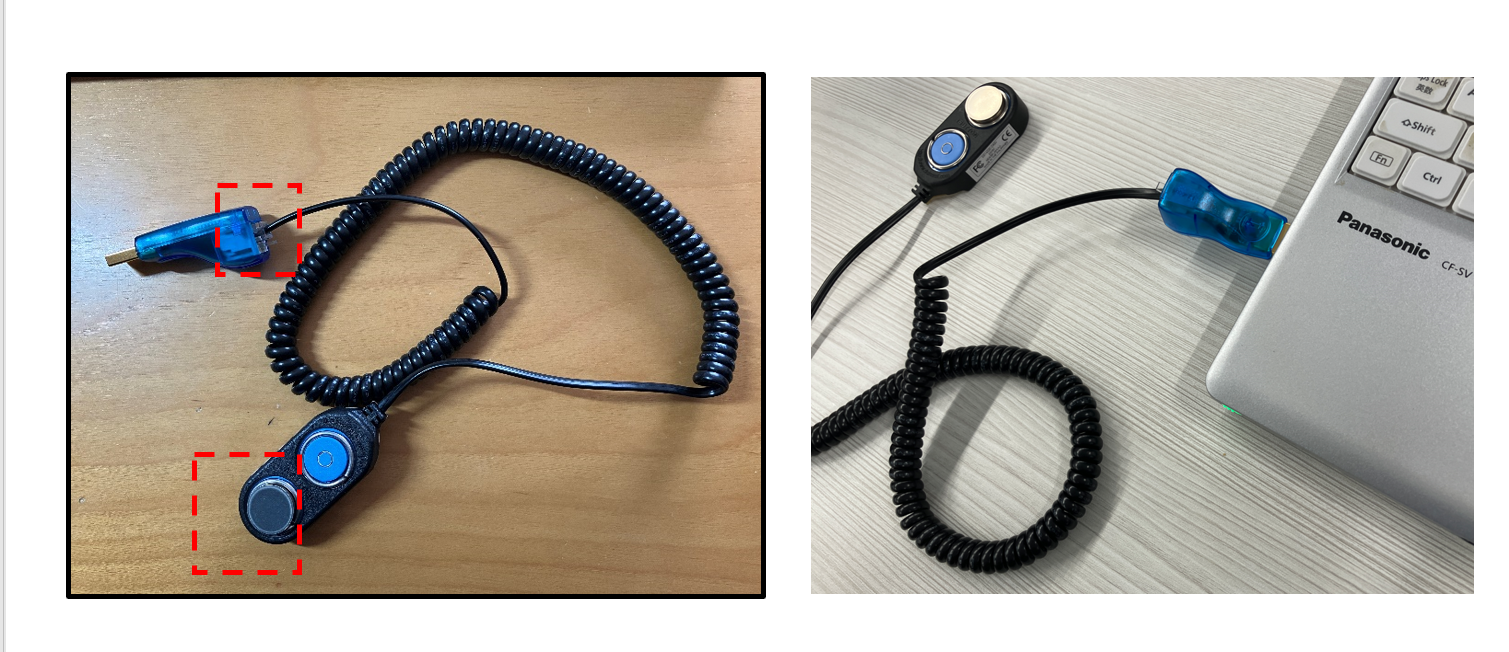
Once the software installation is complete, prepare your hardware. Push the DS1925L into the DS1402D-DR8+ as shown and connect the modular jack of the DS1402D-DR8+ to the DS9490R#. Then connect the DS9490R# to the USB Type A port on your PC.
Once the connection to the PC is complete, start "OneWireViewer.jar". You can start it from Windows start menu -> 1-Wire Driver x64-> OneWireViewer.jar. As shown in the figure below, you need to configure the 1-Wire API when starting up for the first time. This time, we will proceed with the default value settings.
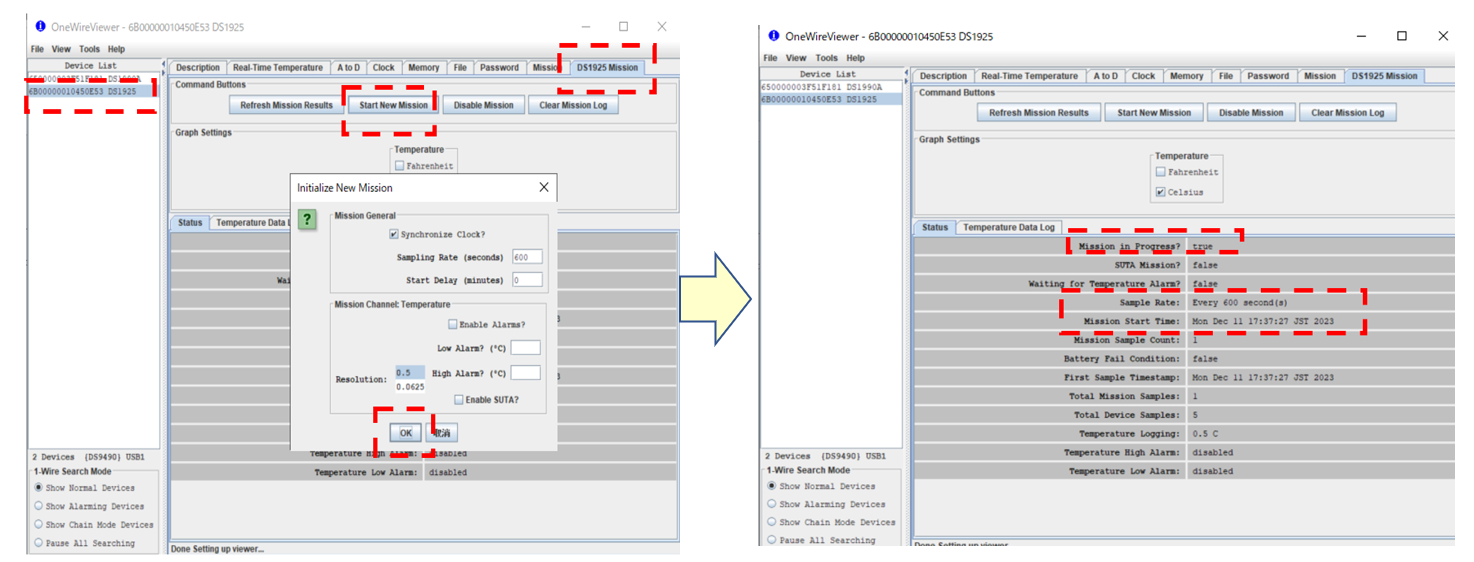
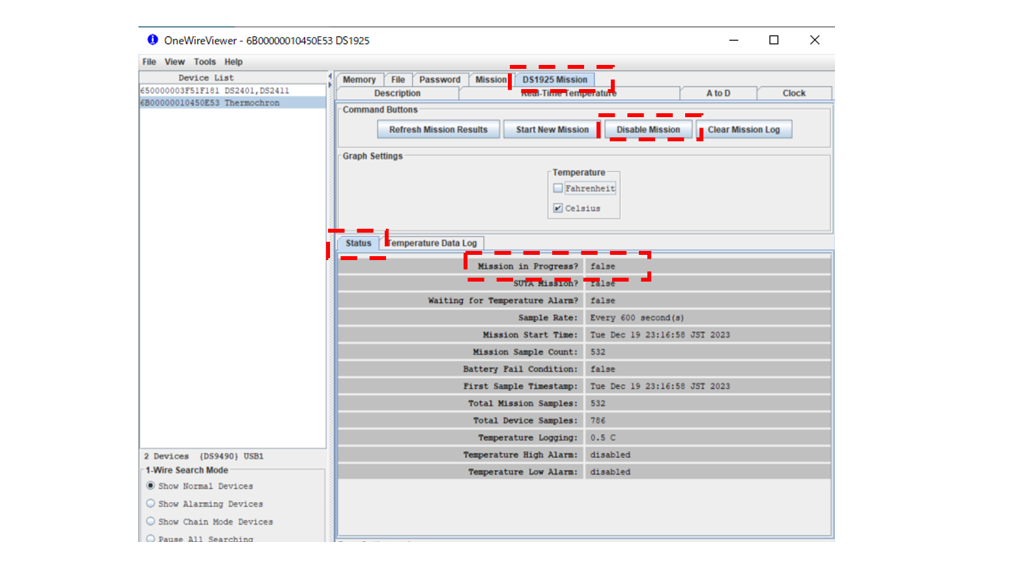
Once OneWireViewer.jar is launched, select the device "DS1925" as shown in the diagram, and select DS1925 Mission->Start New Mission to start settings. This time, we will set the default value of 600 seconds. When the settings are complete, press "OK". Then, as shown in the image below, "Mission in Progress" becomes True, and you can check the values of StartTime and SampleRate.
Once the settings are complete, place the iButton where you want to measure.
Collection of measured data
This section describes how to collect iButton measurement data. As for the measurement location this time, I left it in my room at home for about 3 days. To collect measurement data, attach the attachment and start "OneWireViewer" again in the same way as when setting up the device.
First, in order to stop the measurement, select "DS1925 Mission->Disable Mission" as shown in the figure below, the Status of "Mission in Progress" will become "false" and the measurement will stop.
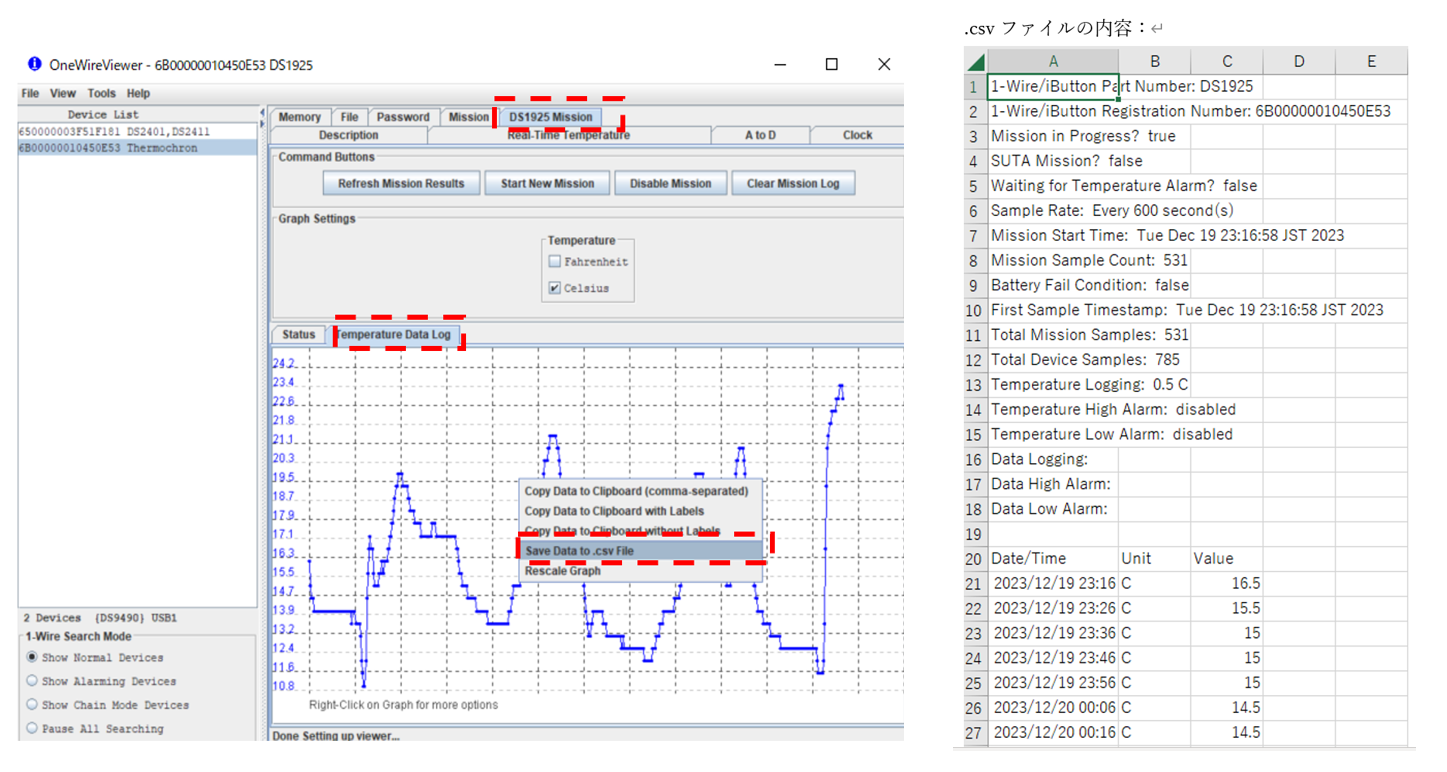
In addition, the measured data can be confirmed in a graph on the "Temperature Data Log" tag. To extract the data, you can save it as a CSV file by executing "Temperature Data Log -> Right click on the graph -> Save Data to .csv File".
The contents of the CSV fileare shown below.
Summary
This time, I introduced how to use iButton Data Logger (DS1920 series). I had a little trouble installing the software, but if you run into any problems, I think you can refer to the "OneWireViewer and iButton Quick Start Guide" and proceed without any problems. If you are using iButton for the first time, please refer to this article and manual!
Inquiry
If you have any questions about the contents of this article or if you need help selecting an iButton, please contact us using the form below.
Analog Devices Manufacturer Information Top
Analog Devices Manufacturer Information If you would like to return to the top page, please click below.

![[Introduction to accelerometer] Thumbnail image of Let's use the Free Fall function](/business/semiconductor/articles/9d56e574e3a24bcf3f076e91d90f4a53.png)