- Semiconductor BusinessHOME
- Products and Services of Macnica,Inc.
-
technical information

-
Events and Seminars
- Handling Manufacturer
- Support
- Inquiry
- Click here to purchase products
- Semiconductor business e-mail magazine registration
![]()
![]() Narrow down by specifying conditions
Narrow down by specifying conditions
現在2183件がヒットしています。check


hello.
My name is Intel F. Hanako and I provide technical support for Intel® FPGA products at Macnica.
“Cloud computing” (commonly known as the cloud) is a term that is often heard these days.
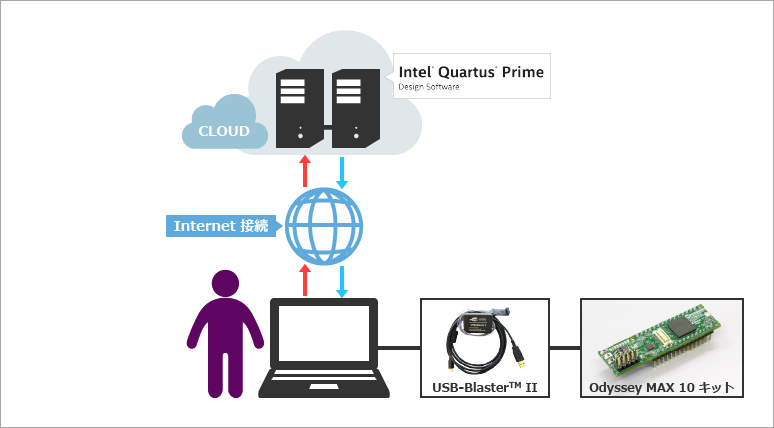
This time, I built the Intel FPGA development software Quartus® Prime.
Install a 64bit OS on the cloud and create a virtual machine (instance).
This time I used Quartus Prime Lite Edition, which does not require a license.
Starting with tool installation, design design, compilation, and programming to the development board, I went through FPGA development.
Please note that FPGA development using a cloud server is your responsibility.
In addition, regarding security measures in the cloud, please take measures in the environment of each user and each cloud service.
[Related information] Intel PSG has started full-scale provision of FPGA development environment in the cloud!
Environment used for verification this time
- Use company A's cloud computing service (free tier)
- The operating service of the virtual machine (on cloud) is Red Hat Enterprise Linux 64bit
Since the OS I work on locally is Windows, I would really like to use a Windows that I can easily connect with RDP.
- Free tier memory is 1GB
The table below summarizes the lineup of device families supported by Quartus Prime Lite Edition that have a recommended physical memory of 1 GB or less for development. (As of March 2017)
Cyclone V needs at least 6GB or more, so unfortunately I can't develop with the free usage tier and gave up.
By the way, if you want to operate Quartus Prime with GUI, you need more than this amount of memory presented. (Insufficient memory causes jerky movements and freezes.)
Please refer to the Memory Recommendations section of the document below for information on the recommended size of physical memory required for the device you are developing.
Quartus Prime Standard Edition Software and Device Support Release Notes
| family | device |
| Cyclone® IV E | EP4CE6, EP4CE10, EP4CE15, EP4CE22, EP4CE30, EP4CE40, EP4CE55, EP4CE75 |
| Cyclone IV GX | EP4CGX15, EP4CGX22, EP4CGX30 |
| MAX® 10 | 10M02, 10M04, 10M08 |
| MAX V / MAX II | ALL |
- Using Odyssey MAX 10 FPGA Eval Kit
Powered by MAX 10 FPGA (10M08)
Create a virtual machine on the cloud
Company A's cloud computing service is a web-based type of operation and management.
Register as a user, log in and start working!

First create an instance.
Select the OS, disk capacity, and memory size in a wizard format. (I chose each item designated for the free tier.)
Your virtual machine is now complete. I was able to do it in 5 minutes.
At that time, make security settings (open TCP port) to access the virtual machine from the outside.
for example
- 22 port for SSH connection with server
- 3389 port for remote desktop (RDP connection) UI work
And so on.
Also, if you want to program a board (connected to your local computer) from a virtual machine, you need a ping response, so you also need permission for the ICPM protocol.
Building an environment for remote desktop connection from Windows to Linux on the cloud
A GUI is good for connecting to a virtual machine (Linux) on the cloud from a local Windows and operating an application. By saying, the environment for GUI operation is built.
In the case of Windows, remote desktop connection can be easily performed, and a GUI operation environment can be easily constructed.
But this time, the local is Windows and the virtual machine on the cloud is Linux, so we will use a VNC server and XRDP to build a GUI operation environment.
To install and configure VNC server and XRDP on Linux on the cloud, first connect to Linux on the cloud with SSH.
1. SSH to the virtual machine with SSH client software
To connect from Windows to Linux on the cloud via SSH, you need to install SSH client software (such as Tera Term or putty). I used Tera Term this time.
When you create a virtual machine in the cloud, it will be issued a global IP. Set that IP address to Tera Term and connect.
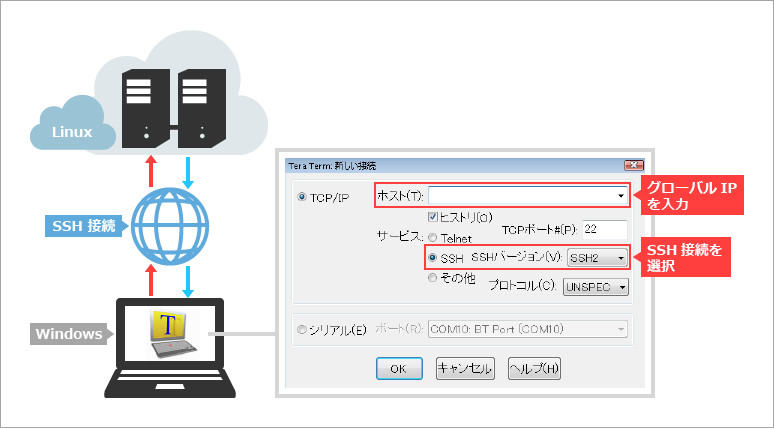
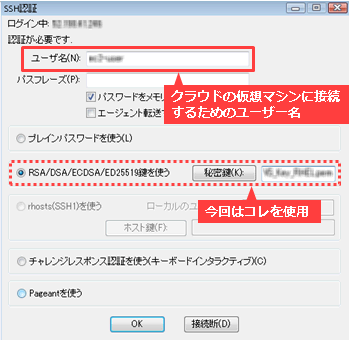
The SSH authentication screen will be displayed.
Here you will perform SSH connection login work, but the SSH connection login method differs depending on the provider of each cloud.
For details, please refer to the homepage of the provider to be used.
In the case of Company A, which I used, enter the [User Name] prepared for the Linux instance, specify the [Private Key] created in advance, and log in.
2. Install VNC server and XRDP and make initial settings for VNC server
Install XRDP and VNC server (I used TigerVNC server this time) to remotely and GUI operate Linux on the cloud using “Remote Desktop Connection” installed on local Windows.
# yum -y install xrdp tigervnc-serverAfter that, make the initial settings for the VNC service (user name, screen size, password settings, etc.).
First, copy the VNC server configuration file.
# cp /usr/lib/systemd/system/vncserver@.service /etc/systemd/system/vncserver@:1.serviceEdit the copied file.
# vi /etc/systemd/system/vncserver@:1.serviceEdit <USER> to your cloud user account name and set the screen size (-geometry) as needed.

After saving, apply the changes.
# systemctl daemon-reloadSet the password for VNC connection. (It is set, but it is not used when logging in.)
First, the root password.
# vncpasswdIf you need a user other than root, use
# vncpasswd <user_name>;Please add the VNC password in .
Next, change the default XRDP settings.
Change the color from 32bit to 24bit because the original color setting causes an error when logging in with an XRDP connection.
# vi /etc/xrdp/xrdp.iniChange max_bpp=32 to max_bpp=24 and save.
3. Install desktop environment
Install a desktop environment to operate the GUI when logging in to Linux via remote desktop connection.
# yum groupinstall graphical-server-environmentSet the operating mode (default) at system startup to boot with GUI.
# systemctl set-default graphical.target4. Disable firewall, disable SELinux
Since the security (virtual firewall) is set as a cloud instance (virtual machine), the firewall as Linux is disabled. (Because this is a bottleneck and I can't connect...)
turn off the firewall
Disable automatic startup of the firewall.
# systemctl stop firewalld # systemctl disable firewalldCheck the status with the following command.
# systemctl status firewalld
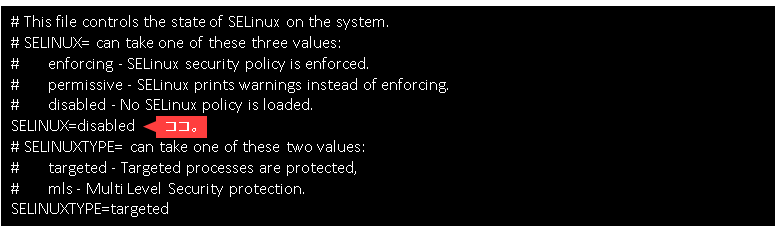
Also disabled SELinux as it can cause XRDP boot failures. This is Hanako's little point ♪
To disable SELinux, edit the configuration file,
# vi /etc/selinux/configChange SELINUX=enforcing to SELINUX=disabled.
Apply changes immediately after saving.
# systemctl daemon-reloadAfter rebooting the system, check the SELinux status and make sure it is Disabled.
# getenforce Disabled5. Set a password for the virtual machine
Use this username and password to log in when you make a remote desktop connection to your virtual machine on the cloud.
First set the root password.
# passwdIf you use a user account
# passwd <user_name>;6. Start VNC server and XRDP
Set the VNC server to start automatically.
# systemctl enable vncserver@:1.serviceStart a VNC server.
# systemctl start vncserver@:1.serviceCheck the status to see if the VNC server has started.
# systemctl status vncserver@:1.serviceNext, set the automatic startup of XRDP.
# systemctl enable xrdp.serviceStart XRDP.
# systemctl start xrdp.serviceCheck the status to see if XRDP has started.
# systemctl status xrdp.serviceAfter confirming that the VNC server and XRDP have started, the work of Tera Term is complete.
Then RDP from your local to the cloud machine.
I tried running the FPGA development tool Quartus Prime on the cloud server [#2/2]

In recent years, when trying to build a development environment for Intel's FPGAs and CPLDs, it is necessary to prepare a reasonably high-spec personal computer in order to use the development software Quartus® Prime. One of the requirements is that the CPU must be a 64bit type!
As of 2017, Quartus® Prime cannot be installed on a 32bit machine environment.
If there is insufficient memory or disk space, you can increase it somehow, but the CPU does not work that way.
For users who don't have a PC with suitable specs but want to play around with an FPGA for a while, the "CPU wall" stands in their way.
We want more users to feel free to use Quartus® Prime! With that in mind, I installed Quartus® Prime Lite Edition on the cloud.
Click here for recommended articles/materials
The real introduction: Part 1. Creating an environment to start development
Quartus - Supported Windows OS Compatibility Chart
Quartus - Supported Devices Correspondence Table
Or from another point of view, when preparing a high-spec machine that can compile Stratix® 10, Arria® 10, etc., there is an option to consider a cloud virtual machine instead of purchasing a physical computer. I think there will be in the future.
I would appreciate it if you could refer to something.

Click here for recommended articles/materials
I tried running the FPGA development tool Quartus Prime on the cloud server [#2/2]
The first LED blinking with FPGA!
The real introduction: Part 1. Creating an environment to start development
Quartus - Supported Windows OS Compatibility Chart
Quartus - Supported Devices Correspondence Table