
![]()
![]() Narrow down by specifying conditions
Narrow down by specifying conditions
現在1888件がヒットしています。check

hello.
My name is Intel F. Hanako and I provide technical support for Intel® FPGA products at Macnica.
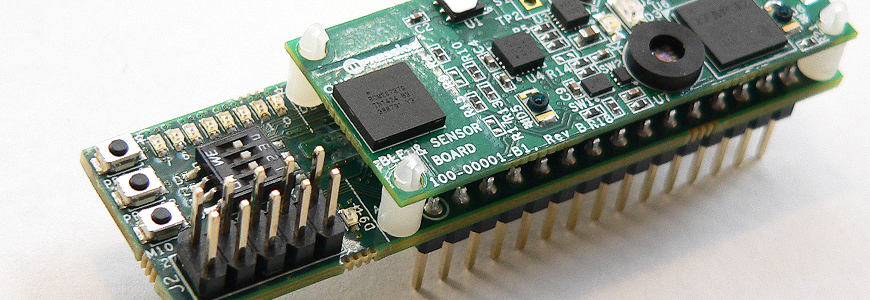
The BLE & Sensor board (top board) of the Mpression Odyssey MAX®10 FPGA Eval Kit has EFM32 and BLE.
These firmwares are updated irregularly. The other day (mid-February 2016), 2.0 was released.
Therefore, we will introduce how to update the firmware of Mpression Odyssey.
This content is based on 5. Firmware Updates in "Odyssey MAX 10 FPGA and BLE Sensor Kit User Guide".
Also, since I usually support Intel® FPGAs, this is the first time I've touched products from Silicon Labs and Broadcom. Please close your eyes if you can't reach it (laughs)
This time, I will introduce "Hanako, who is in charge of Intel FPGA, tried it! BLE firmware update".
Two updates this time!
- BLE firmware update
- Bluetooth MAC address update for that firmware version
I am new to Broadcom's Bluetooth SMART development environment and will be working with a virtual COM port script dedicated to firmware updates.
Now let's do the update.
BLE firmware update
1. Get the files you need
Obtain the following firmware and related files from the Mpression Odyssey website.
・ BLE Firmware Factory Image (Odyssey firmware for BLE)
・ BLE Firmware Factory Configuration Settings (configuration file for Bluetooth MAC address update)
・ BLE Firmware Update Utility Script (dedicated script file)
Double-byte characters and spaces cannot be used in the save path of the script file (*.bat). The script will stop working properly. Please be careful.
2. Install the driver
If you are new to USB serial communication with Odyssey's BLE & Sensor board, please install Silicon Labs' USB Virtual serial port driver (found in the Utilities section of the download page) beforehand.
3. Install WICID Smart SDK
Obtain and install the Broadcom development environment WICID Smart SDK.
I don't need to launch the GUI to do this, but I need it to run the firmware update script (BLE_Firmware_Update.bat).
Register an account on Cypress website and download WICED-Smart-SDK-xxx-IDE-Installer. Start the installer and install. (It goes without saying that double-byte characters and spaces are not allowed in the installation path.)
4. Separate Odyssey board and install jumper pins
Separate the BLE & Sensor board and the MAX® 10 board.

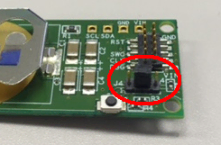
Jumper pins connect the middle two pins (2 and 3) of the 4-pin header (J4) on the battery board that comes with the Odyssey
5. Attach the battery board to the BLE & Sensor board and connect it to your computer.
Make sure that power is not supplied to the BLE & Sensor board, and attach the battery board to the BLE & Sensor board. (The battery board retainer does not require a CR2032 coin cell battery.)
Next, connect the BLE & Sensor board (with battery board) and your computer with a USB-microUSB cable.
6. Launch the firmware update utility
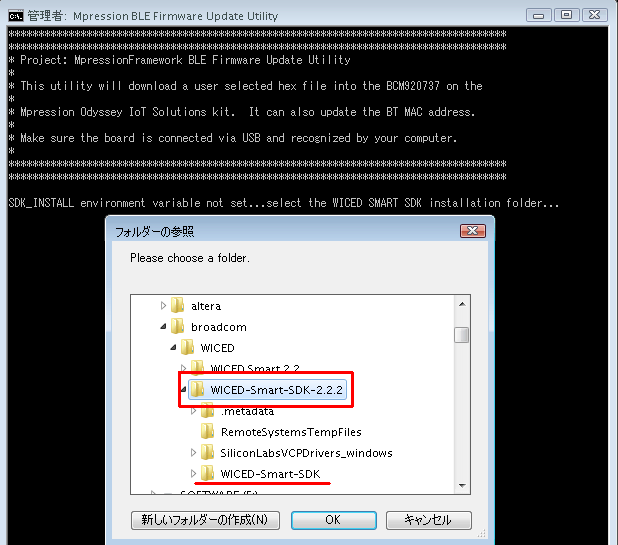
Double-click BLE_Firmware_Update.bat to launch a command prompt window.
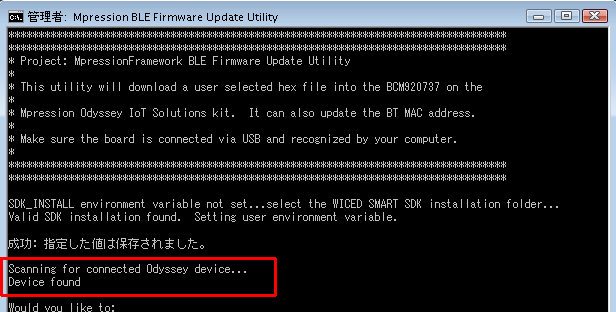
If the value of the environment variable name SDK_INSTALL is not set on your computer, you will be prompted to specify the WICED Smart SDK installation folder, and a "Browse for Folder" window will pop up. Specify the folder where the ”WICID-Smart-SDK” folder exists (“WICID-Smart-SDK-2.2.2” in the example). This step will automatically create the SDK_INSTALL environment variable setting. Subsequent script executions will skip this flow, allowing you to proceed smoothly.
The connection of the BLE & Sensor board is confirmed.
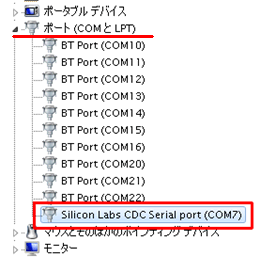
If the following message is displayed and the BLE & Sensor board is not detected, please check if “Silicon Labs CDC Serial port” exists in “Ports (COM and LTP)” in Device Manager. Virtual COM port communication cannot be established and the firmware cannot be updated.
#################################################### ##
# ERROR - No Odyssey detected
# Verify kit is connected and virtual COM port established
#################################################### ##
Make sure you have the Silicon Labs USB Virtual serial port driver from step 2 installed.
7. Download the firmware update file
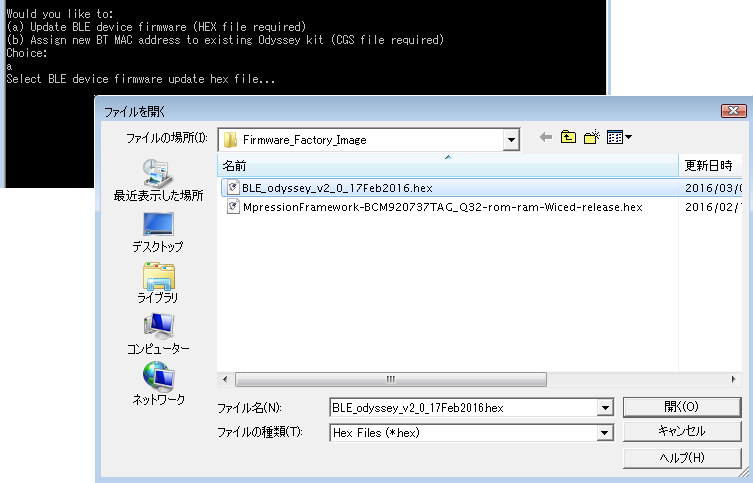
A selection appears.
(a) Type [a] on the keyboard to select Update BLE device firmware (HEX file required). Then select the firmware update file (*.hex) from the window that appears.
The download will run and after a few seconds you will see a “Download complete” message.
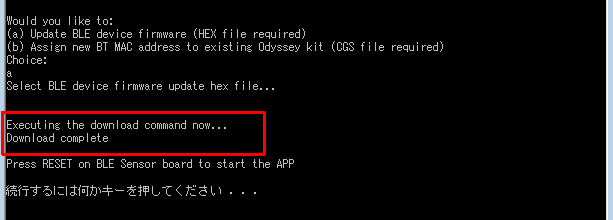

Press the BLE reset button (S1) on the BLE & Sensor board and press any key on the keyboard to close the command prompt window.
Update MAC Address
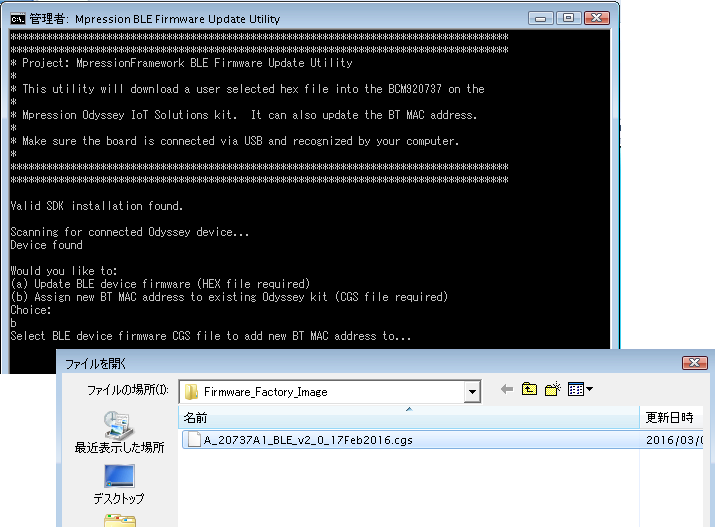
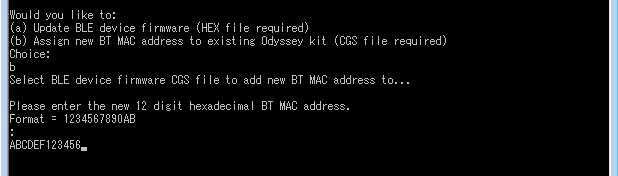
8. Select configuration settings file
Double-click to execute BLE_Firmware_Update.bat and type [b] on the keyboard to select (b) Assign new BT MAC address to existing Odyssey kit (CGS file required). Then select a configuration settings file (*.cgs) from the window that appears.
9. Enter new MAC address
You will be prompted to enter a new 12-digit MAC address (in hexadecimal). Enter 12 alphanumeric characters with no spaces, colons, etc. between alphanumeric characters. (Example: ABCDEF123456)
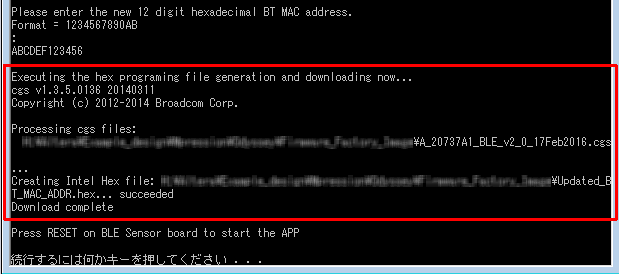
The download will run and after a few seconds you will see a “Download complete” message.
Press any key on your keyboard to close the Command Prompt window.
Update work completed
10. Removing the board
Remove the USB cable before removing the battery board. Replace the jumper pins on the 4-pin header (J4) on the battery board (connecting pins 3 and 4 on the outside).
This completes the BLE firmware update.
Hey, even I could do it♪
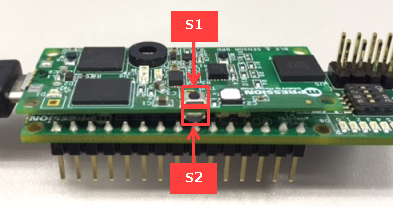
When using the BLE & Sensor board for the first time after updating the firmware, press the BLE reset button (S1) on the BLE & Sensor board before using.
Also, after connecting to the MAX® 10 board, connect to the PC with a USB cable, start Tera Term, connect to the EFM 32, and press the "S3" button on the MAX® 10 board to check the firmware version.

Note that Odyssey recommends using the same firmware version for both EFM32 and BLE.
Please see here for how to update the firmware of EFM32 in Mpression Odyssey.
Click here for recommended articles/materials
What is the Odyssey MAX 10 FPGA Eval Kit?
Let's update the Odyssey EFM32 Firmware
A work using Mpression Odyssey won the semi-Grand Prix at Minna no Raspberry Pi Contest 2016!
[Overview] Transfer configuration data to the FPGA of the MAX 10 Evaluation Kit Odyssey via the microUSB port and flash it!
[Operation] Transfer the configuration data to the FPGA of the MAX 10 Evaluation Kit Odyssey via the microUSB port and flash it!