
![]()
![]() Narrow down by specifying conditions
Narrow down by specifying conditions
現在1888件がヒットしています。check

The license for the paid Intel Quartus® Prime software or the paid IP (Intellectual Property) is linked to the NIC ID (Host ID) of the computer used in the Intel FPGA Self-Service License Center (License Center) by the licensee. is registered.
If you want to change (rehost) the linked NIC ID for your own convenience, you can do so at the License Center.
Here, we will guide you on how to change the NIC ID (Host ID) of a computer that is already linked to a paid license.
This procedure should be performed by the licensee.
Precautions when changing the NIC ID
- The NIC ID can be changed up to 3 times during the maintenance contract period. You can check the remaining number of changes that can be made in the License Center.
- If the remaining number of times the NIC ID can be changed is 0, the NIC ID cannot be changed.
・ When you renew the license maintenance contract, the number of times will be reset and will be revised to a maximum of 3 times.
There are three tasks below.
|
1 |
2 |
3 |
|
Sign in to your Intel account
Go to the homepage of "Intel FPGAs & Programmable Devices" and click the person icon on the top right of the screen.
A sign-in screen will appear, so enterthe email addressyou registered when you created your account and click [Next].
[Notes]
Don't have an account? Learn how to create a new Intel account.
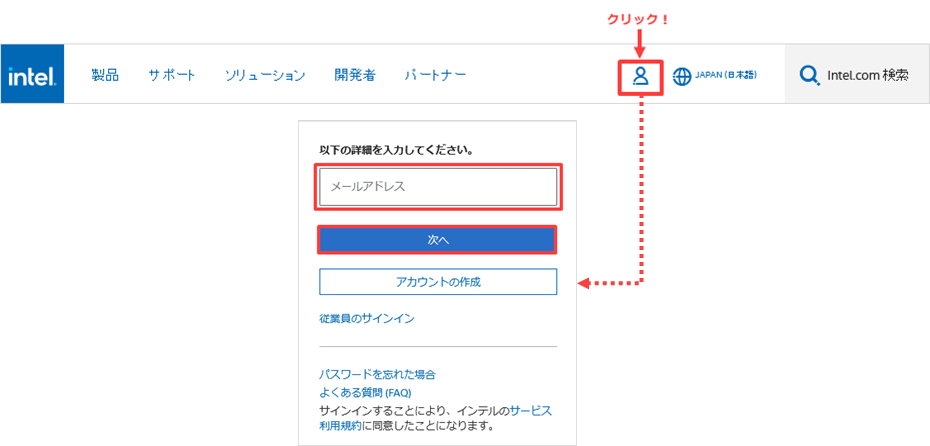
Sign-in is completed through the authentication system of Microsoft Azure AD.
If you have trouble signing in, visit Customer Support Please contact us.
[Notes]
If the email address of the existing sign-in account is a shared address, it is not currently available.
It is necessary to change the administrator's e-mail address to an e-mail address that can be used to sign in, so please contact the person in charge at our company.
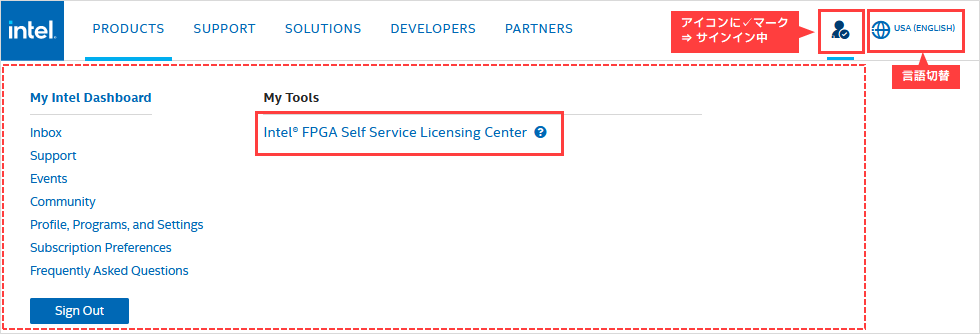
Sign in to License Center
Select "United States (English)" from the language selection at the top right of the screen, and click the human icon at the top right of the screen again to display the menu. (* The menu may not be displayed in Japanese.)
SelectIntel® FPGA Self Service Licensing Centerfrom here.
A sign-in page for the License Center appears.
Click [Already enrolled ? -Sign In here] on the left side of the screen to sign in.
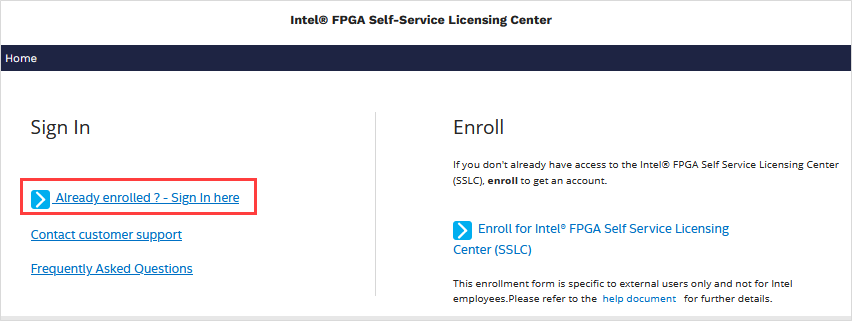
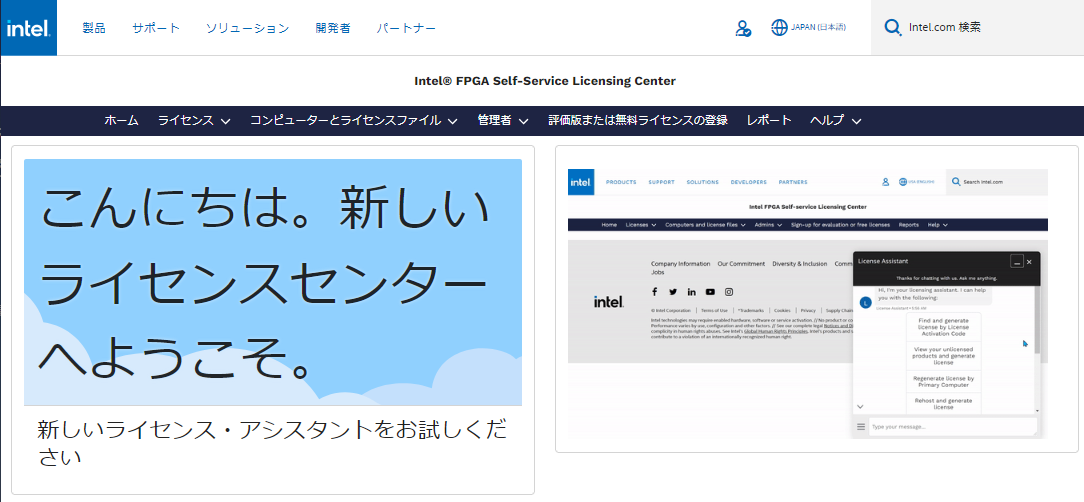
Access is completed when the top page of the license center is displayed.
Check the number of times you can change
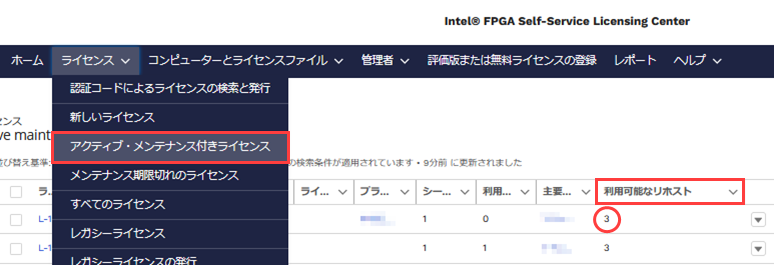
Click the License menu and select License with Active Maintenance. Licenses that are still in maintenance are displayed.
Select Maintenance Expired Licenses if you want to change the NIC ID for licenses that have expired maintenance.
In the row for that license in the list, the number displayed in the Available Rehosts column represents the number of times it can be changed.
If the display is 0, the NIC ID cannot be changed.
Change the NIC ID associated with the license
There are two methods for changing the license NIC ID, and there are two types of operation flows.
Please use your preferred method and operation flow for rehosting.
|
Part of multiple licenses tied to one NIC ID This is a convenient method when you want to rehost. |
All multiple licenses associated with one NIC ID This is a convenient method when you want to rehost all at once. |
||
|
Change with License Assistant |
Change in menu bar (Cannot be changed with this operation) |
Change with License Assistant |
Change in menu bar <Recommended! > |
[A] Change NIC ID per license
Change with License Assistant
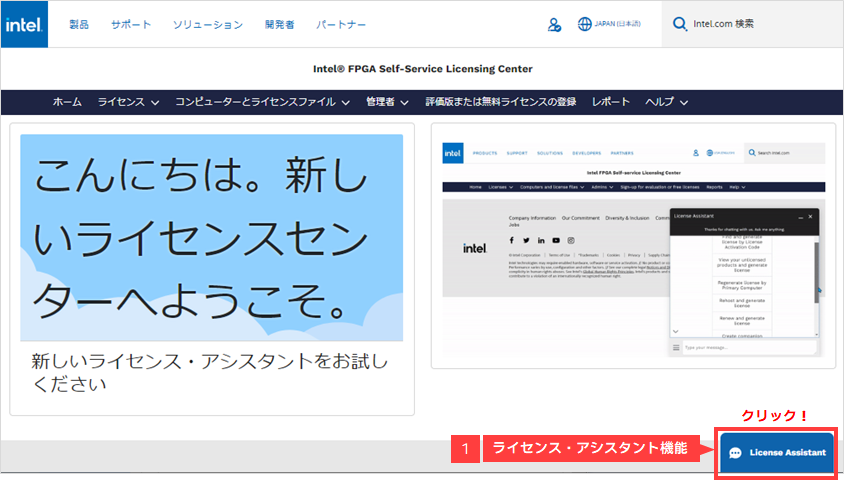
1. Click on the "License Assistant" banner in the bottom right corner of the License Center Home.
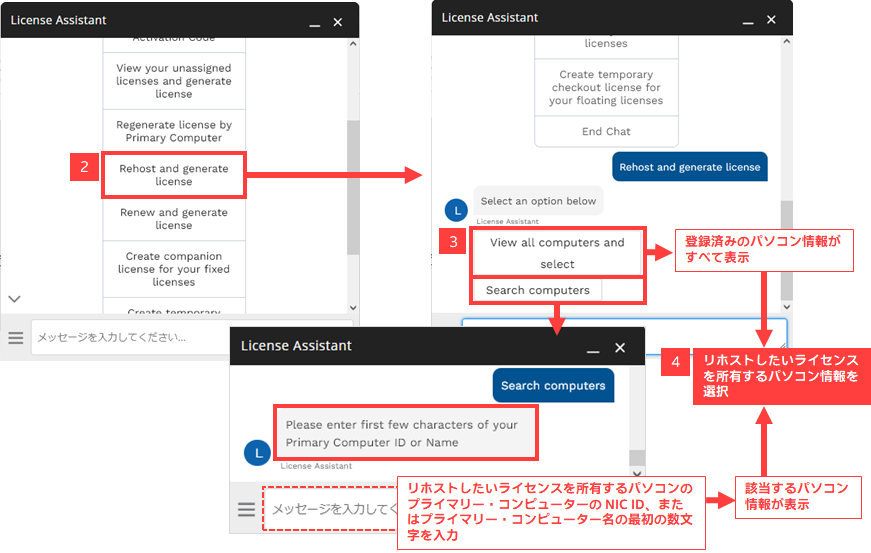
2. Rehost and generate license] from the displayed items.Select [
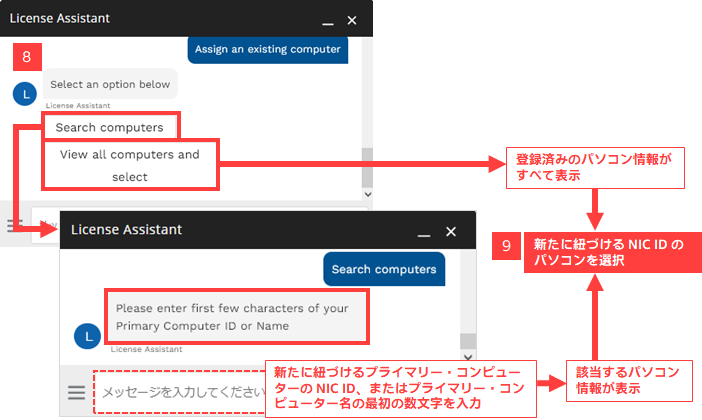
3. From the items displayed next, select one of the options to specify the information of the computer that owns the license you want to rehost.
[View all computers and select]
➡ All registered computer information is displayed
[Search computers]
➡ "Please enter first few characters of your Primary Computer ID or Name"
➡ NIC ID of the primary computer of the computer whose license you want to rehost,
Or enter the first few letters of the primary computer name
➡ Corresponding computer information is displayed
4. Select the computer information that owns the license you want to rehost.
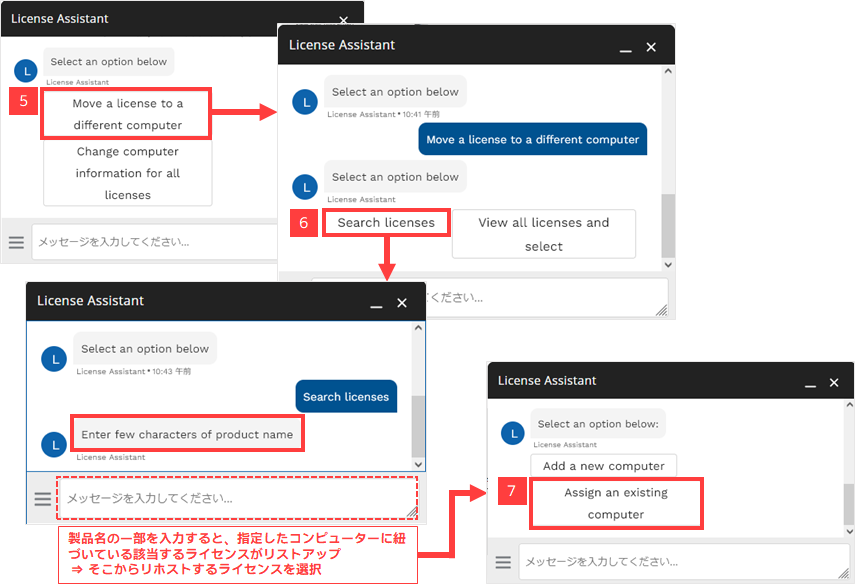
5. Move a license to a different computer from the options displayed.Select
6. Select Search licenses from the displayed options.
➡ "Enter few characters of product name"is displayed
➡ Enter part of the product name of the license you want to rehost
➡ Select the applicable license (product name)
7. Assign a existing computer from the options displayed.Select
8. From the items displayed next, select one of the options to specify a new PC to be linked to the specified license.
[Search computers]
➡ "Please enter first few characters of your Primary Computer ID or Name"
➡ NIC ID of the primary computer of the computer to be specified as the rehost destination,
Or enter the first few letters of the primary computer name
➡ Corresponding computer information is displayed
[View all computers and select]
➡ All registered computer information is displayed
9. Select the computer information of the NIC ID to be newly linked.
10. Select [Yes] to the question "Do you want to proceed with license generation?"
A license file will be sent to your registered email address.
You can also get the license file by clicking "View computer and license files."
11. Select [No] to the question "Do you want me to help you with anything else?" and exit the License Assistant.

12. Save the license file attached to the E-mail to the computer that uses the license. In the folder path to save,
Do not use double-byte characters or spaces.
It is recommended to save the file with the extension.dat. Do not use double-byte characters or spaces when renaming the file.
After that, set the license file according to the license type and use it.
The operation to change the NIC ID in License Assistant is now complete.
[B] Change the NIC ID for each PC
Change with License Assistant
* If the number of ID changes is 0 among the licenses linked to the computer, it cannot be changed by this method.
1. Click on the "License Assistant" banner in the bottom right corner of the License Center Home.
2. Rehost and generate license] from the displayed items.Select [
3. From the items displayed next, select one of the options to specify the information of the computer that owns the license you want to rehost.
[View all computers and select]
➡ All registered computer information is displayed
[Search computers]
➡ "Please enter first few characters of your Primary Computer ID or Name"
➡ NIC ID of the primary computer of the computer whose license you want to rehost,
Or enter the first few letters of the primary computer name
➡ Corresponding computer information is displayed
4. Select the computer information that owns the license you want to rehost.
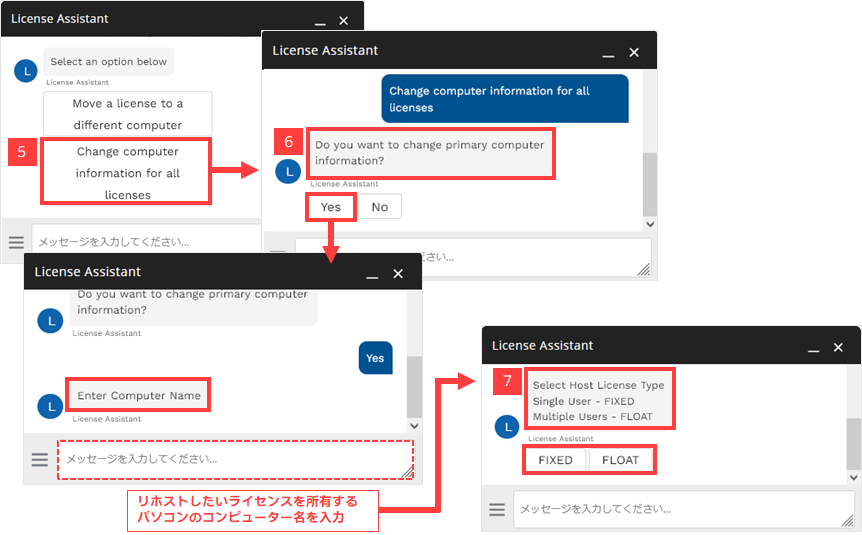
5. Change computer information for all licenses from the displayed options.Select
6." Do you want to change primary computer information?" to the question [Yes] Choose.
➡ "" Enter few characters of product name" displayed as
➡ Enter the computer name of the computer with the license you want to rehost
7. Select the appropriate license type for the question "Select Host License Type : Single User - FIXED / Multiple Users - FLOAT".
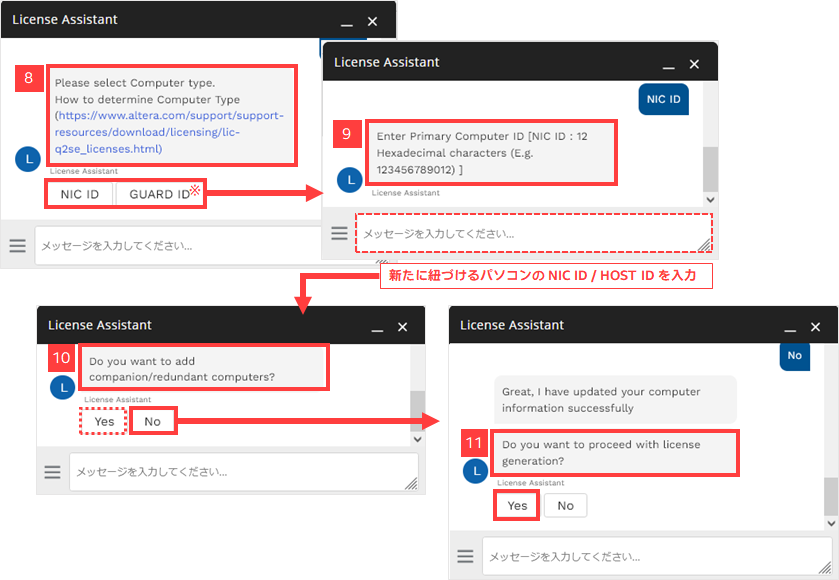
8. When the message "Please select Compute type. How to determine Computer Type"is displayed, specify the primary computer type.
(* If you select FLOAT in 7 above, the options are NIC ID and HOST ID.)
9. Enter the NIC ID or HOST ID to be newly linked.
10. Yes/No to the question "Do you want to add companion/redundant computers?"Answer
If you need companion/redundant settings, select Yes and follow the chat instructions.
Here we continue with the case where No (do not add companion/redundant) is selected.
11. Select Yes to the question "Do you want to proceed with license generation?"
A license file will be sent to your registered email address.
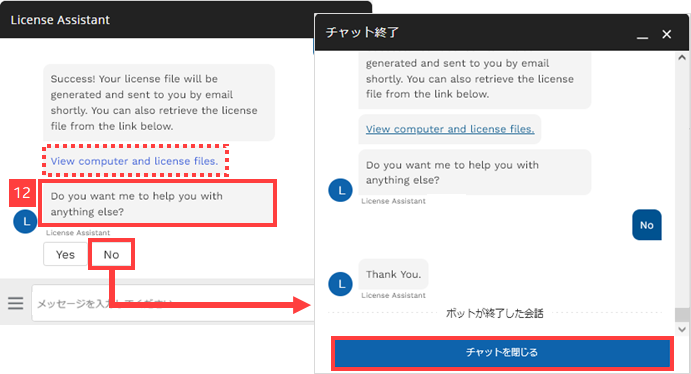
12. To the question "Do you want me to help you with anything else?" [No] Select to exit the License Assistant.
(You can also get the license file by clicking "View computer and license files.")
13. Save the license file attached to the E-mail to the computer that uses the license. In the folder path to save,
Do not use double-byte characters or spaces.
The file extension is.dat It is recommended to save in . Do not use double-byte characters or spaces when renaming the file.
After that, set the license file according to the license type and use it.
The operation to change the NIC ID in License Assistant is now complete.
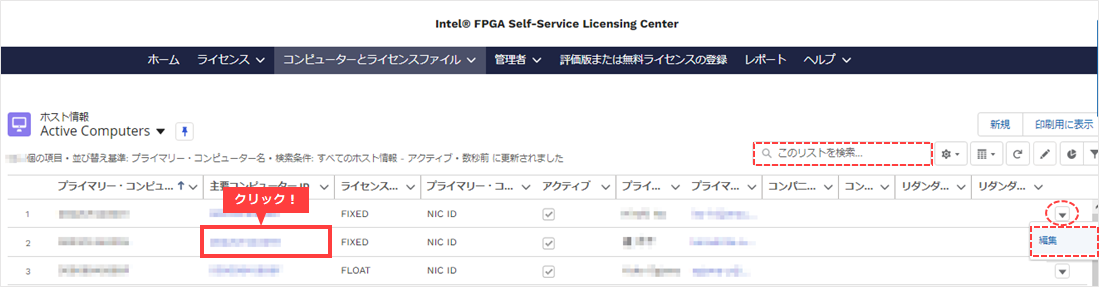
change in the menu bar
1. Click the Computers and License File menu and select Active Computers.
(The registered computer information is displayed.)

2. From the list of host information, click the "Primary computer ID" column of the primary computer row that owns the license you want to rehost.
If you have a lot of host information to manage, use the search Box on the upper right.
(You can also change the NIC ID by clicking the ▼ button on the far right and selecting [Edit].)
3. On the host (computer) information edit screen, click the pencil icon at the right end of the "Primary Computer ID" field, and
Change to the new NIC ID to rehost.
Edited items are highlighted in yellow. Other fields can be edited as required.
4. Click the Save button to update your information.

This completes the procedure for changing the NIC ID.
5. To issue a license file for the NIC ID after rehosting, click [Issue License] from the action bar on the upper right of the screen.

6. Save the license file attached to the E-mail to the computer that uses the license. In the folder path to save,
Do not use double-byte characters or spaces.
It is recommended to save the file with the extension.dat. Do not use double-byte characters or spaces when renaming the file.
After that, set the license file according to the license type and use it.
The operation to change the NIC ID on the menu bar is now complete.
Click here for recommended articles/materials
How to register a new Intel account
How to Get New Licenses for Intel® Quartus® Prime, IP and Questa* - Intel® FPGA Edition
How to Divide Intel® Quartus® Prime, IP and Questa* - Intel® FPGA Edition Licenses
How to Get a Companion License for Intel® Quartus® Prime
How to Get a Checkout License for Intel® Quartus® Prime
How to obtain a license for the Intel FPGA Development Kit
Intel® Quartus® Prime Licensing Structure
How to Manage Network Licenses for Quartus Prime and Third Party Software on the Same Server Machine