
![]()
![]() Narrow down by specifying conditions
Narrow down by specifying conditions
現在1888件がヒットしています。check

The Intel® FPGAs & Programmable Devices home page may require you to sign in to access some pages, and you will need an Intel account (formerly My Intel account) to sign in. For example, the Intel® FPGA Self-Service License Center.
Here,we will show youhow to register for an Intel account.
The working steps are:
|
1 |
2 |
[Notes]
• The Intel® sign-in method has recently changed. Click here for details.
・ If you have already registered an Intel account and have not set up multi-factor authentication, please refer to the steps after 2. Set up Microsoft Azure AD authentication process.
1. Sign up for an Intel Account
[Notes]
If you have purchased an Intel® Quartus® Prime license or Intel® IP license (License Administrator), to link your account with the Intel® FPGA Self-Service License Center,Please register the same e-mail address that you applied to us when you purchased the license to your Intel account.
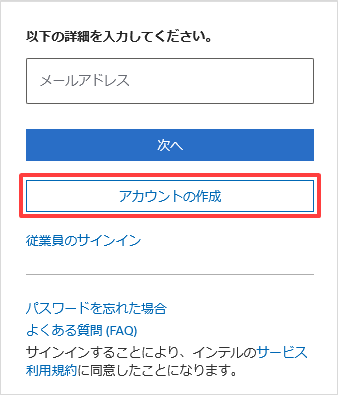
1. Access the top page of Intel FPGA & Programmable Devices and click the human icon located in the upper right corner of the screen.

2. The following screen will be displayed. Click [Create Account].
3. Enter your personal information. (Please read the "Privacy Notice and Terms of Use" at the bottom of the form in advance)
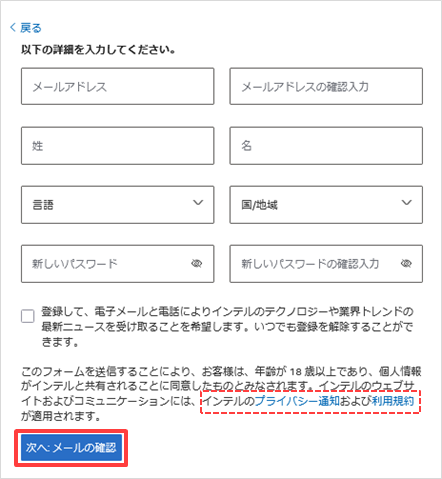
| email address |
Enter your e-mail address * Shared addresses are not accepted. |
||
| Surname | Enter your last name | Name | enter your name |
| language | Select the language you would like to use on this website | Country / Region | Select your current country name |
| New Password |
Enter password to set
[supplement] Password requirements are: ・ 8 to 29 characters ・ One or more alphabetic characters (a to z, A to Z) ・ One or more numbers (0 to 9) ・ Please use at least one half-width symbol The following items cannot be used as passwords: ・ Password including email address · Old Password ・ 3 or more consecutive same characters (“1111”, “aaa”, etc.) ・ Leading or trailing spaces |
||
| □ | Check if you would like Intel to contact you with the latest information | ||
Click Next: Check Email when you're done.
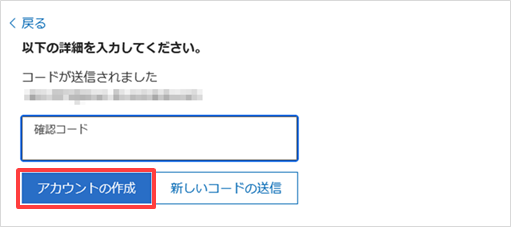
4. To confirm your email address, a verification code will be sent to your email address.
5. Enter the verification code provided in the email and click Create Account.
6. You will receive an email notifying you that your Intel account has been created.
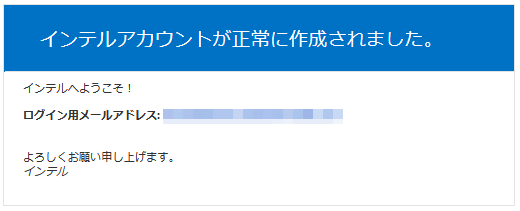
This completes the Intel account registration.
Please use the email address and password you just registered with when you sign in to Intel's website in the future.
Next, set up the multi-factor authentication process.
2. Configure Microsoft Azure AD authentication process
When signing in to certain web content (e.g. Intel FPGA Self-Service License Center), in addition to entering the email address and password for the Intel account you just registered, an authentication process via Microsoft Azure AD will be applied. . Follow the steps below to set up the authentication process in advance.
[Notes]
・ Please note that Microsoft Azure AD cannot be used for sign-in using a shared email address.
A phone number and email address are required to complete this process. (requires a mobile phone such as a smartphone or a landline phone)
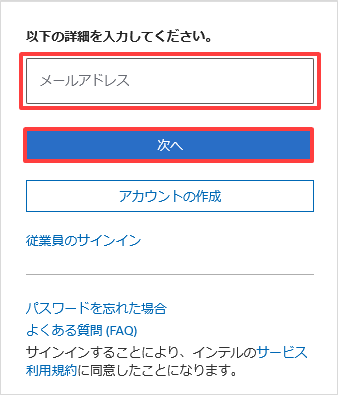
1. Access the top page of Intel FPGA & Programmable Devicesand click the human icon located in the upper right corner of the screen.

2. The following screen will be displayed. Enter the email address registered to your Intel account and click [Next].
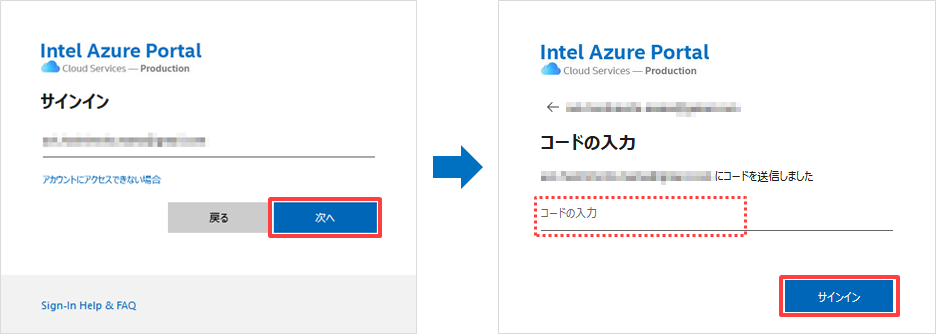
3. When the sign-in screen appears, enter the email address for your Intel account and click Next.
An account verification code will be sent to your email address. Enter it on the displayed screen and click [Sign in].
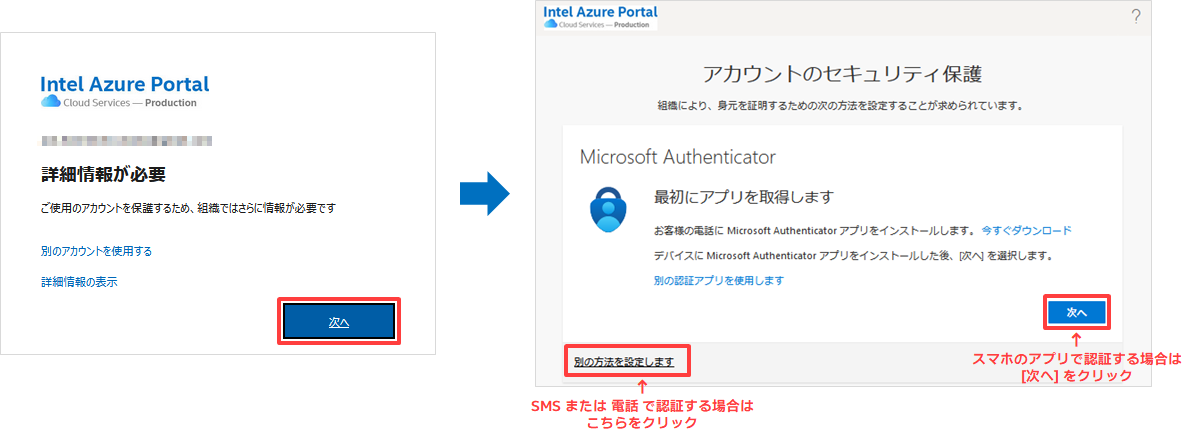
4. The "Permission Requester" page will be displayed. Check the contents and click [Accept]. (skipped if accepted)

5. After clicking Next, set up Multi-Factor Authentication (MFA).
The following two authentication methods can be selected. Please select the desired authentication method and visit the dedicated page.
*SMS or PhoneAuthenticate by
* a dedicated smartphone appAuthenticate with
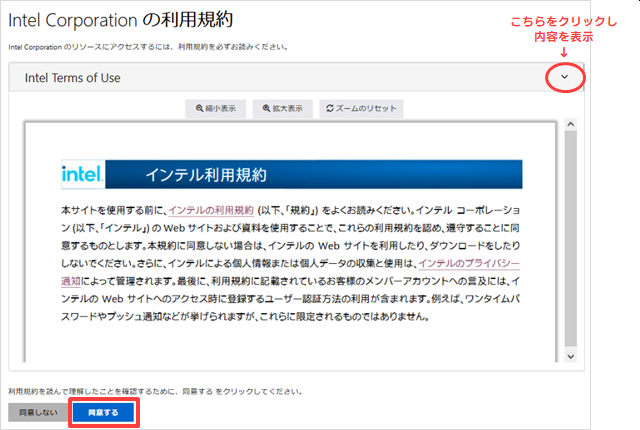
6. The "Intel Terms of Use" will appear. Read the contents and click [Agree].
This completes the configuration of the Microsoft Azure AD authentication process.
When you sign in to Intel websites in the future, use the email address you registered with and the MFA authentication process you set up.
If you have trouble signing in

If you're having trouble signing in, please see our Frequently Asked Questions (FAQ) below.
Frequently Asked Questions About Intel Sign In
You can also contact our customer support team.
I want to sign in to the Intel® FPGA Self-Service License Center
To access the Intel® FPGA Self-Service License Center, you must register with the Intel® FPGA Self-Service License Center separately from your Intel account.
See the content below for details.
How to Register for the Intel® FPGA Self-Service License Center
Click here for recommended articles/materials
Intel® FPGA Development Flow/FPGA Top Page
How to Get New Licenses for Intel® Quartus® Prime, IP and Questa* - Intel® FPGA Edition
How to Divide Intel® Quartus® Prime, IP and Questa* - Intel® FPGA Edition Licenses
Questa* - How to obtain and configure the Intel® FPGA Starter Edition license file