- Semiconductor BusinessHOME
- Products and Services of Macnica,Inc.
-
technical information

-
Events and Seminars
- Handling Manufacturer
- Support
- Inquiry
- Click here to purchase products
- Semiconductor business e-mail magazine registration
![]()
![]() Narrow down by specifying conditions
Narrow down by specifying conditions
現在2189件がヒットしています。check


This article explains how to install Quartus® Prime and Questa* - Altera® FPGA Edition, which are required for Altera® FPGA development.
[Notes]
1. The Quartus® Prime 19.1 or later installer includes the Nios® II software build tools required for Nios® II embedded processor development.
(Nios II SBT hereafter) does not come with Eclipse. Therefore, Windows Subsystem for Linux and Eclipse
installation is required. Click here for details.
2. Starting with Quartus® Prime Standard and Lite Edition 21.1 and Quartus® Prime Pro Edition 21.3, ModelSim*-Altera® FPGA Edition
Replaced by Questa*-Altera® FPGA Edition.
For details, please refer to the document below.
ADV 2122 - Replacement of ModelSim*-Intel® FPGA Edition Software
3. Quartus® Prime supports different operating systems and device families by edition and version.
Please check the following contents before installation.
Quartus® Prime Supported Devices
Please follow the flow below to install.
Download the installation file
The installation files are available on the Altera® Download Center. Please refer to the following content for details.
How to download Quartus® Prime and Questa* - Altera® FPGA Edition
Install
file to run
The installation files are available in the following formats from the Download Center.
・ Installer (Recommended) …… Installer
・ Individual Files (Complete Download / Individual Files / Add-On and Stand-Alone Software / Devices) …… Individual files
From here, we will explain how to install if you downloaded using the Installer (Recommended).
The following files will be saved in the download folder specified in the Download to field of the installer.
- Installation executable file (.exe or .run)
- Device files and tool-related files (.qdz)
The file names for the installation files for the Quartus® Prime and Questa*-Altera® FPGA Edition are shown in the table below.
|
Lite Edition |
Standard Edition |
Pro Edition |
|
|
Quartus® Prime Installation executable file |
QuartusLiteSetup-<version.build>-windows.exe or QuartusLiteSetup-<version.build>-linux.run |
QuartusSetup-<version.build>-windows.exe or QuartusSetup-<version.build>-linux.run |
QuartusProSetup-<version.build>-windows.exe or QuartusProSetup-<version.build>-linux.run |
|
Questa*-Altera® FPGA Edition Installation executable file |
QuestaSetup-<version.build>-windows.exe or QuestaSetup-<versio.buildn>-linux.run |
QuestaSetup-<version.build>-windows.exe or QuestaSetup-<version.build>-linux.run |
|
If the device files and tool-related files are saved in the same folder as the Quartus® Prime installation executable file, the Quartus® Prime installer will detect the files and begin the installation automatically.
Start installation
This guide uses the installation screens for the Quartus® Prime Pro Edition. The wizard screens and flow are similar for the Standard Edition and Lite Edition.

① Run the Quartus® Prime installation executable file (.exe/.run)
Start the installer GUI.
In this example, the executable is:
[Windows] QuartusProSetup-<version.build>-windows.exe
or
[Linux] QuartusProSetup-<version.build>-linux.run
② The installer GUI will start.
Click the Next button.

③ Check the license agreement information,
"I accept the agreement Select "Next Click the button
I will.
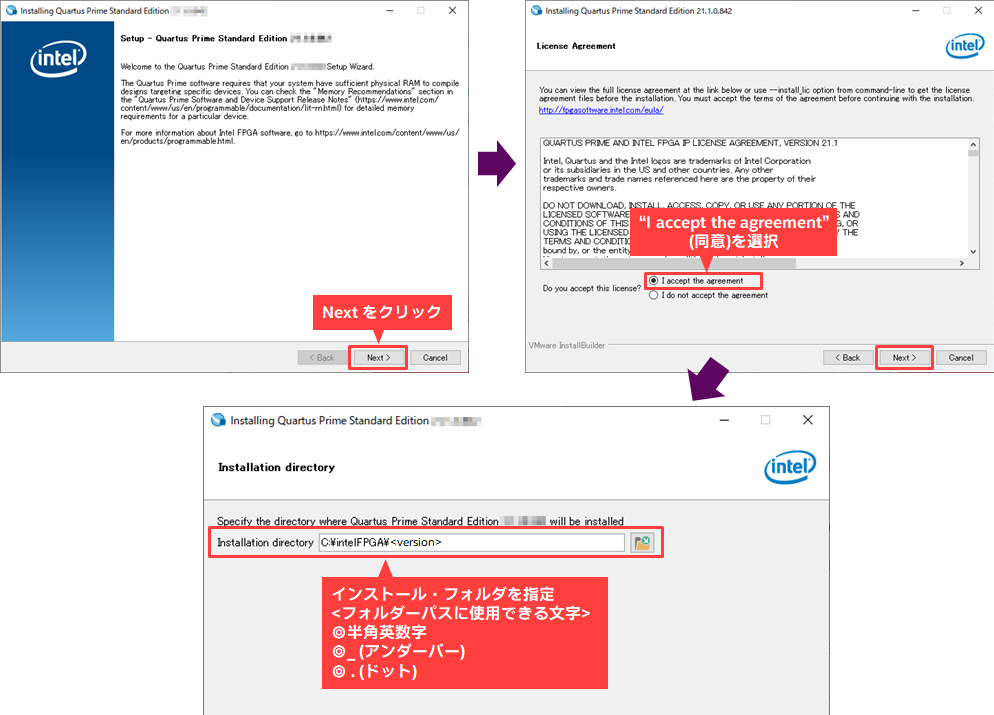
④ Specify the installation folder, Next Click the button
I will.
<Notes>
The installation folder path can be any path, but spaces cannot be used in the path.
Unless you have a specific reason, install it to the default path.
[Pro Edition] C:\altera_pro\<version>
[Standard Edition] C:\altera\<version>std
[Lite Editoin] C:\altera_lite\<version>std
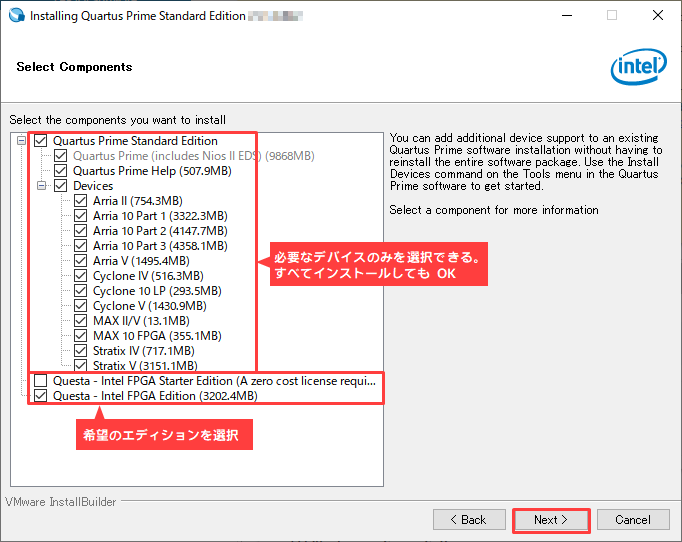
⑤ From the lineup of downloaded files
Select (☑) the items you want to install.
after that Next button.

⑥ Check the available disk space and click the Next button.

⑦ The installation will begin.
Quartus® Prime <Pro, Standard, or Lite> Edition and device files
After the installation is complete, you can install Questa*-Altera® FPGA (Starter) Edition or
If you have also downloaded the Ashling RiscFree IDE, these will also be installed automatically.
The installation will begin.

8. When the installation is complete, the screen shown on the right will be displayed.
Install USB Blaster driver
Install USB Blaster II driver
Install USB Blaster III driver
Install URAT FTDI driver
Install JTAG Server as a Windows service and run automatically when Windows starts
These options are On,
Select other options such as Create shortcuts on Desktop as per your preference.
Then click the Finish button.
If you set Install ~ to On,
After pressing the Finish button, the device driver installation will begin.
Please proceed to the next section.
Installing device drivers
① The [Device Driver Installation Wizard] will start. Click the Next button.
② The driver will be installed and then the message "Completing the Device Driver Installation Wizard" will be displayed on the screen.
Click the Finish button.

This completes the installation process.
[Notes]
If you use the Altera® FPGA download cable USB-Blaster™, you will also need a dedicated device driver.
Please see the following content for installation instructions.
Installing additional device files
After installing Quartus® Prime, you can add device families that are not already installed.
① Obtain the additional device file (.qdz) you wish to install in advance from the [Individual Files] tab of the Download Center.

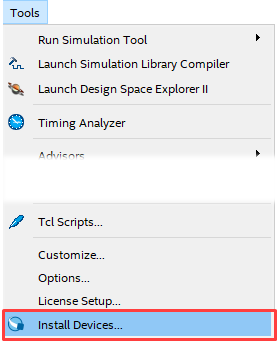
② Start Quartus® Prime.
③ Select Tools menu > Install Devices.
If the installation wizard does not start
・ For Windows → From the Windows Start menu, expand the Quartus Prime folder,
Select Device Installer.
・For Linux → Run dev_install.run in the folder below.
/<quartus_prime_install_dir>/common/devinfo/dev_install
④ The installation wizard will start. Follow the wizard to select the device file (.qdz) you want to add.
Specify the folder path where the files are saved.
⑤ Follow the wizard to start the installation.
⑥ After the installation is complete, restart Quartus® Prime.
Install WSL and Eclipse for Nios® II Development
[Notes] For new development, use the Nios® V embedded processor.
If you are developing an Altera® FPGA using the Nios® II embedded processor, you will need to install WSL and Eclipse separately.
For details and how to install, see the content below.
Setting up the license file
There is no need to obtain or set a license file for the Quartus® Prime Lite Edition. Just launch the Quartus® Prime Lite Edition and start working.
To use Quartus® Prime Pro Edition and Quartus® Prime Standard Edition, you must purchase a license and obtain and set a license file.
After purchasing a license, you will need to obtain the license file from the Serl-Service License Center in advance, and then set up the license file after installing Quartus® Prime.
If you have not yet obtained a license file, please see the content below.
How to get a new license for Quartus® Prime, IP and Questa* - Altera® FPGA Edition
How to obtain Quartus® Prime, IP and Questa* - Altera® FPGA Edition licenses for maintenance renewal
How to obtain a license for an Altera® FPGA development kit
After obtaining the license file, set the license.
The setting method differs depending on the license maintenance type. For details, please see the content corresponding to your maintenance form.
How to set up FIXED licenses for Quartus® Prime, IP and Questa* - Altera® FPGA Edition
How to set up FLOAT licenses for Quartus® Prime, IP and Questa* - Altera® FPGA Edition
Questa*-Altera® FPGA Starter Edition is a free tool, but you need to obtain and set a license file to use it.
For details, please see the content below.
-How to obtain and set the Questa* - Altera® FPGA Starter Edition license file
Click here for recommended articles/materials
Quartus® Prime Related Articles and Resources
Altera® FPGA Development Flow