Okta
Octa
Introduction
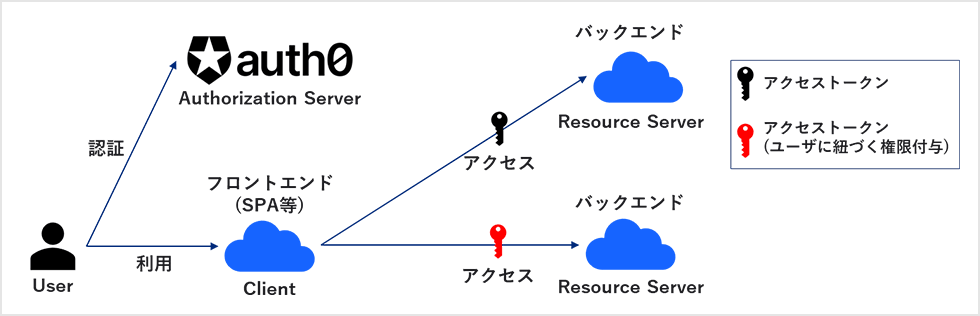
When accessing backend resources from the frontend, you can use access tokens to achieve more secure interactions between services. Specifically, the frontend makes an API request to the backend with an access token. The backend checks the validity of the received access token and decides whether or not to respond.
In Auth0, by linking Auth0 and the frontend with OpenID Connect (OIDC), in addition to issuing access tokens to the frontend, it is possible to grant permissions assigned to the login user's role to access tokens. This enables access control according to roles. Access control based on a user's role is called role-based access control (RBAC).
In this blog, we will introduce an overview of RBAC and a setting example for realizing access control of Backend API using RBAC.
premise
Due to changes in the sample app provided by Okta, which is used in the setting example, the code content to be modified may be changed from the information described in this blog.
In addition, the information regarding functions and settings described in this blog is current as of January 2023.
What is role-based access control (RBAC)?
RBAC is a method of assigning access rights according to a user's role/role in the system. Users with the same role have the same set of permissions, and users with different roles have different sets of permissions.
In order to protect company information (confidential documents, customer information, etc.), it is necessary to grant appropriate access rights to each user so that only the necessary users can access the information. It is important that this proper access is based on roles rather than on a per-user basis.
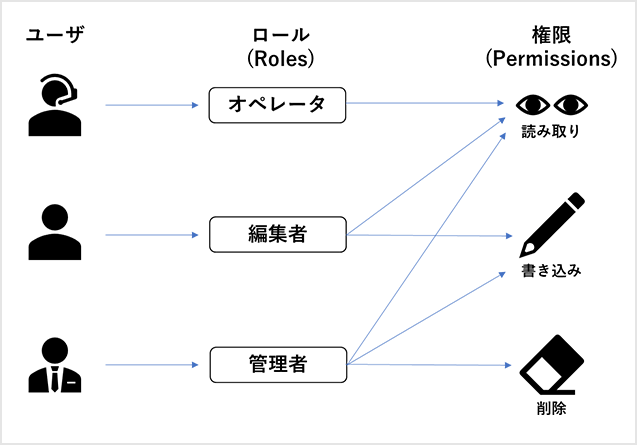
When using RBAC, access permission/denial is determined based on the role assigned to the user, so it has the following advantages compared to setting permissions on a user-by-user basis.
- Reduced man-hours by simplifying authority settings
- Complete user authorization setting only by granting/modifying roles
- User privileges can be changed all at once by changing the privileges granted to roles
- Avoid misconfigured permissions
- Prevention of unintended granting of privileges by simplifying settings
Setting example: Backend API access control using RBAC
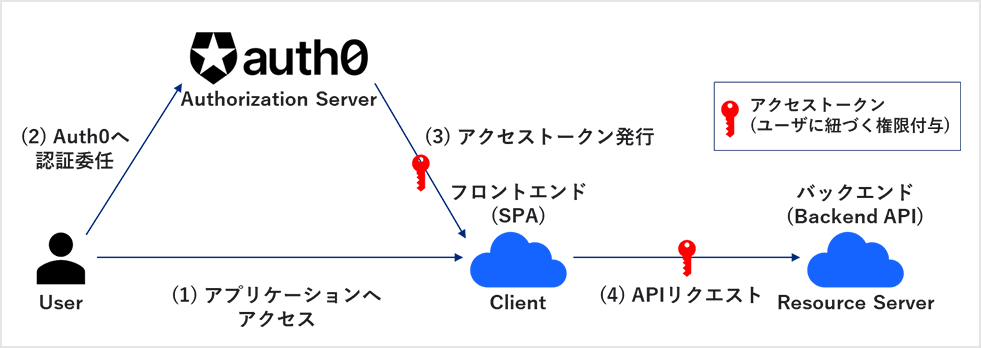
Using the sample app provided by Okta, access control of Backend API using RBAC is realized. In this setting example, JavaScript is used as the SPA program, and Node.js (Express) is used as the Backend API.
When a user logs into Auth0, the frontend (SPA) gets an access token in JSON Web Token (JWT) format from Auth0. Access the Backend API with the obtained access token, verify the access token on the Backend API side, and return the permitted resource.
The flow of settings required for implementation is as follows.
0. Preparation
1. Start the SPA sample application
2. Start Backend API
3. Add Permission
4. Role Creation and Permission Grant
5. User creation and role grant
6. Configure authorization request for Backend API
7. Backend API request button installation
From here, we will introduce the specific setting method.
0. Preparation
Before making the following settings, prepare the following.
- macOS or Windows PC
- Installing Node.js, Node Package Manager
- Issuing an Auth0 free trial account (Reference: [How to use Auth0 trial])
1. Start the SPA sample application
Start the SPA sample application (JavaScript) provided by Okta by referring to [How to set up linkage between Auth0 and sample application].
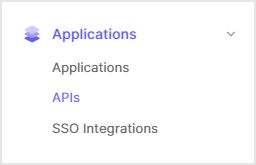
2. Start Backend API
- On the Auth0 admin screen, click Applications > APIs
- Click [+Create API]
![Click [+Create API]](/business/security/okta/image/okta_auth0_rbac_dr05.png)
- After setting each item, click [Create].
- Name: Example) My API (arbitrary name)
- Identifier: Example) api://my-auth0-workshop-api (API identifier)
![After setting each item, click [Create].](/business/security/okta/image/okta_auth0_rbac_dr06.png)
- Access the following URL and click [Node (Express) API] in Backend/API
Quickstarts - Auth0 docs
![After setting each item, click [Create].](/business/security/okta/image/okta_auth0_rbac_dr07.png)
- After transitioning to the Express.js API application page, click the [Log in] button
![After transitioning to the Express.js API application page, click the [Log in] button](/business/security/okta/image/okta_auth0_rbac_dr08.png)
- After logging in, select the Auth0 tenant to be set, and click [Download Sample] under [①Define permissions] on the page.
![After logging in, select the Auth0 tenant to be set, and click [Download Sample] under [①Define permissions] on the page.](/business/security/okta/image/okta_auth0_rbac_dr09.png)
- Select the API created in step ③ from the drop-down list and click [DOWNLOAD].
![Select the API created in step ③ from the drop-down list and click [DOWNLOAD].](/business/security/okta/image/okta_auth0_rbac_dr10.png)
- Unzip the downloaded file in any folder
- Execute the following command in the unzipped folder to start Backend API
$ npm install $ npm start
[Supplement] The API server with the following endpoints will start
| end point | explanation |
| /api/public |
|
| /api/private |
|
| /api/private-scoped |
|
3. Add Permission
Add “read:messages” to the Permission (scope) of the API created in “2. Starting Backend API”. Then enable RBAC control.
- On the Auth0 admin screen, click Applications > APIs
- After selecting the API created in "2. Starting Backend API", move to the [Permissions] tab.
![Click [+Create API]](/business/security/okta/image/okta_auth0_rbac_dr12.png)
- After setting each item, click [+Add]
- Permission (Scope): e.g. read:messages
- Description: Example) read messages (arbitrary description)
![After setting each item, click [+Add]](/business/security/okta/image/okta_auth0_rbac_dr13.png)
- On the [Settings] tab, enable RBAC Settings: [Enable RBAC] and click [Save] at the bottom of the screen
![On the [Settings] tab, enable RBAC Settings: [Enable RBAC] and click [Save] at the bottom of the screen](/business/security/okta/image/okta_auth0_rbac_dr14.png)
4. Role Creation and Permission Grant
Create a role and grant the Permission added in "3. Add Permission".
- Go to User Management > Roles and click +Create Role
![Click [+Create API]](/business/security/okta/image/okta_auth0_rbac_dr15.png)
- After setting each item, click [Create].
- Name: Example) admin (arbitrary name)
- Description: Example) admin (optional description)
![After setting each item, click [Create].](/business/security/okta/image/okta_auth0_rbac_dr16.png)
- Go to the Permissions tab and click Add Permissions
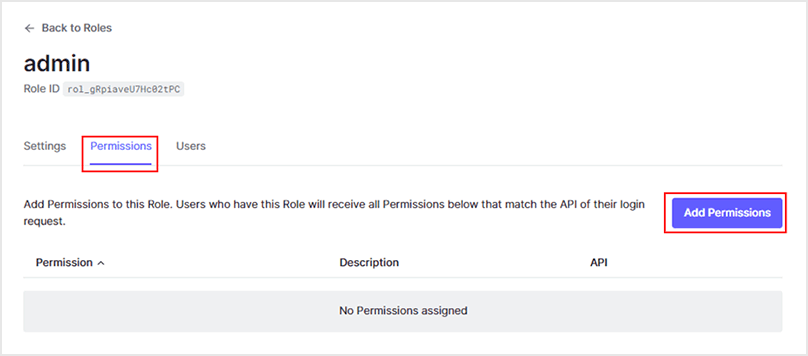
- After setting each item, click [Add Permissions].
- Select permissions from existing APIs: My API (API created in "2. Start Backend API")
- Permissions: check read:messages
![After setting each item, click [Add Permissions].](/business/security/okta/image/okta_auth0_rbac_dr18.png)
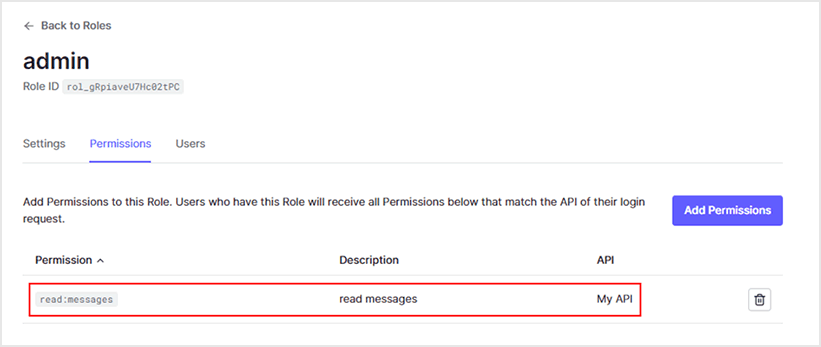
- Confirm that “read:messages” has been added to Permissions
5. User creation and role grant
Create a login user for the sample app. After that, grant the role created in "4. Role Creation and Permission Grant" to the user.
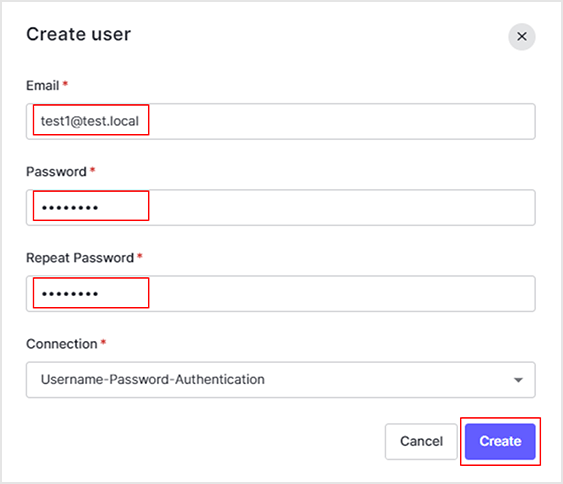
- On the Auth0 administration screen, click [User Management] > [Users]
- Click [+Create User]
![Click [+Create User]](/business/security/okta/image/okta_auth0_rbac_dr20.png)
- Create a user with any Email and Password
- On the Roles tab of the user you just created, click Assign Roles
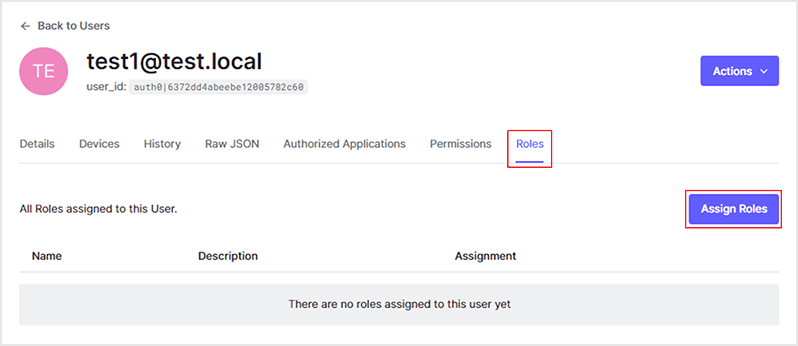
- Specify the role created in "4. Role Creation and Permission Grant" and click [Assign].
![Specify the role created in "4. Role Creation and Permission Grant" and click [Assign].](/business/security/okta/image/okta_auth0_rbac_dr23.png)
- Confirm that the role has been granted to the corresponding user

6. Configure authorization request for Backend API
Modify the code of the sample app to request authorization from the sample app to Auth0 when logging into the sample app.
- Open the "public/js/app.js" file of the sample app with any editor
- To add audience and scope as parameters, modify the code as follows (add red text range)
(Omitted) const configureClient = async () => {const response = await fetchAuthConfig(); const config = await response. json(); auth0Client = await auth0. createAuth0Client ({domain: config. domain, clientId: config. clientId, authorizationParams: { audience: "api://my-auth0-workshop-api", scope: "profile email read:messages" } }); };
7. Backend API request button installation
Place a button to call the Backend API on the sample application screen.
- Open the "index.html" file of the sample app with any editor
- Modify the code as follows to place the button that calls the Backend API (add the red letter range)
< body class = "h-100" > <div> <button class="btn btn-primary" id="publicApiRequestBtn" onclick="publicApiRequest()"> Public API Request </button> <button class="btn btn -primary" id="privateApiRequestBtn" onclick="privateApiRequest()"> Private API Request </button> <button class="btn btn-primary" id="privateScopedApiRequestBtn" onclick="privateScopedApiRequest()"> Private-Scoped API Request </button> </div> < div id = "app" class = "h-100 d-flex flex-column" > (abbreviated)
- Access the sample application (http://localhost:3000) with a web browser and check the addition of a button that calls the Backend API.
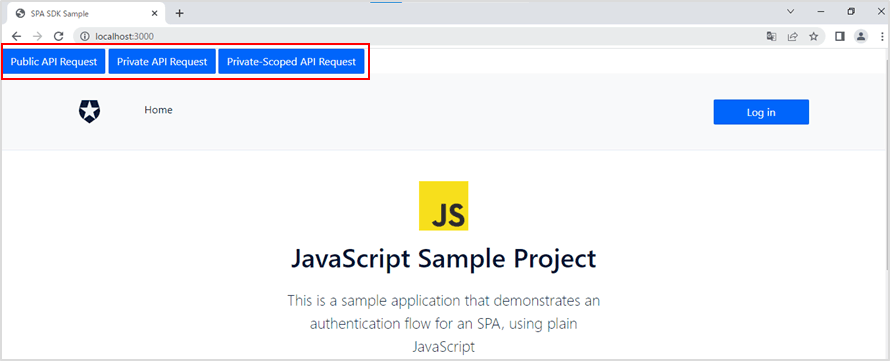
*The button does not work at this point.
- Open the "public/js/app.js" file of the sample app with any editor
- Add the following code to invoke the Backend API when the button is clicked.
// request to /api/public
const publicApiRequest = async () => {const myHeaders = new Headers (); const response = await fetch ( "http://localhost:3010/api/public", {method: "GET"}) . then ((res) => {return res. json (); }) . catch ((err) => {console. logs (err); }); alert (JSON. stringify (response)); // request to /api/private
const privateApiRequest = async () => {const myHeaders = new Headers (); const accessToken = await auth0Client. getTokenSilently (); myHeaders. sets ( "Authorization", "Bearer" + accessToken); const response = await fetch ( "http://localhost:3010/api/private", {method: "GET", headers: myHeaders}) . then ((res) => {return res. json (); }) . catch ((err) => {console. logs (err); }); alert (JSON. stringify (response)); // request to /api/private-scope
const privateScopedApiRequest = async () => {const myHeaders = new Headers (); const accessToken = await auth0Client. getTokenSilently (); myHeaders. sets ( "Authorization", "Bearer" + accessToken); const response = await fetch ( "http://localhost:3010/api/private-scoped", {method: "GET", headers: myHeaders}) . then ((res) => {return res. json (); }) . catch ((err) => {console. logs (err); }); alert (JSON. stringify (response));
- Refresh the page of the sample app on the web browser and start the developer tools *For Google Chrome, click the [F12] key
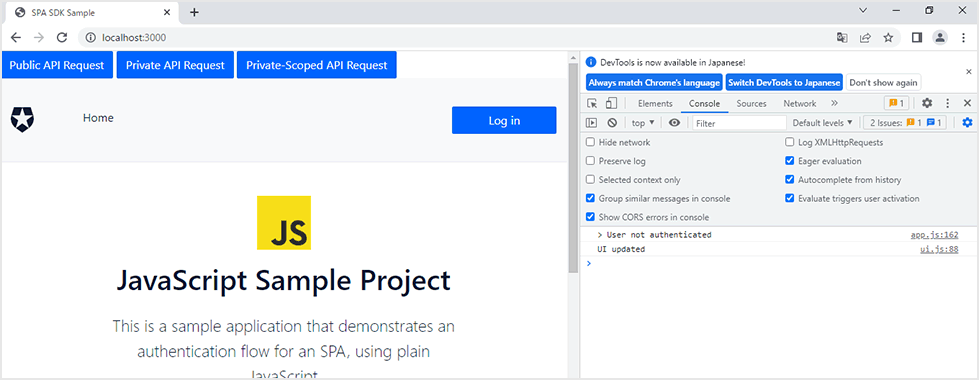
- If you are not logged in, check that the following dialog opens when you click the [Public API Request] button.
"{"message":"Hello from a public endpoint! You don't need to be authenticated to see this."}"

- Confirm that an error (Error: Login required) is displayed on the console when clicking [Private API Request] or [Private-Scoped API Request].
![Confirm that an error (Error: Login required) is displayed on the console when clicking [Private API Request] or [Private-Scoped API Request].](/business/security/okta/image/okta_auth0_rbac_dr32.png)
Backend API request operation check
Permission (scope): Confirm that the results of Backend API calls are different between users who have been granted a role with "read:messages" and users who have not been granted this role.
- Log in to the sample application with the user created in "5. User creation and role assignment"
- Confirm that the following dialog opens when the [Private-Scoped API Request] button is clicked.
"{"message":"Hello from a private endpoint! You need to be authenticated and have a scope of read:messages to see this."}"
![Confirm that the following dialog opens when the [Private-Scoped API Request] button is clicked.](/business/security/okta/image/okta_auth0_rbac_dr33.png)
- After logout operation, log in as a user who is not granted a role with Permission (scope): "read:messages"
- Confirm that the following dialog opens when the [Private-Scoped API Request] button is clicked.
"{"message":"Insufficient Scope"}" * A message will be displayed indicating that the scope is insufficient.
![Confirm that the following dialog opens when the [Private-Scoped API Request] button is clicked.](/business/security/okta/image/okta_auth0_rbac_dr34.png)
in conclusion
In this blog, we introduced an overview of role-based access control (RBAC) and an example of access control settings for Backend API using RBAC.
We hope that you will realize how easy it is to implement RBAC by using Auth0.
reference
Inquiry/Document request
In charge of Macnica Okta Co., Ltd.
- TEL:045-476-2010
- E-mail:okta@macnica.co.jp
Weekdays: 9:00-17:00