Infoblox
infoblocks
Let's use Infoblox API Part 1

Introduction
Infoblox is basically operated by GUI, but it can also be operated by PerlAPI or WebAPI. By using APIs, you can link with other systems and automate routine tasks. This time, I would like to introduce the basics of WebAPI.
What are web APIs?
WebAPI, as the name suggests, runs over HTTP or HTTPS and uses four HTTP methods to get and change settings. They are mainly used for the following purposes.
| POST | Add setting |
|---|---|
| GET | Get configuration information |
| PUT | setting change |
| DELETE | Delete setting |
WebAPI can be used by connecting to Grid Master via HTTPS. It is accessed by specifying the authentication method and connection destination (Grid Master) in URL format. The next section introduces the actual usage.
What is cURL?
It is convenient to use a language such as Python when building a script, but it is convenient to use a tool called cURL when you want to do a little test or check what kind of data you can get. cURL is a tool that allows you to send data on the command line and supports various protocols including HTTP. Let's see how to use it.
First, let's get the information with the GET command.
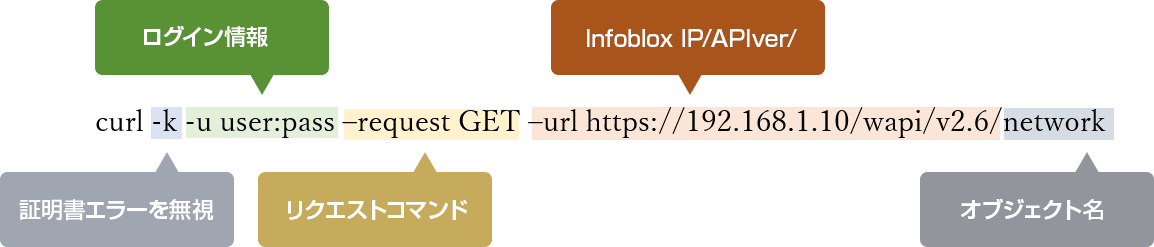
Running the above will return a result like this:
[
{
"_ref": "network/ZG5zLm5ldHdvcmskMTkyLjE2OC4xLjAvMjQvMA:192.168.1.0/24/default",
"network": "192.168.1.0/24",
"network_view": "default"
},
{
"_ref": "network/ZG5zLm5ldHdvcmskMTkyLjE2OC4yLjAvMjQvMA:192.168.2.0/24/default",
"network": "192.168.2.0/24",
"network_view": "default"
}
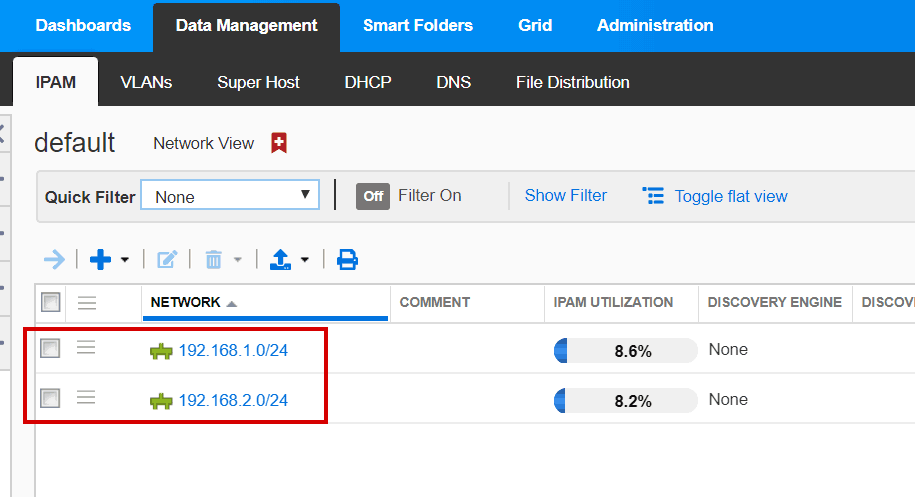
]Since the network object was specified, the set network information is returned. The networks "192.168.1.0/24" and "192.168.2.0/24" are registered.
When I looked at the GUI, two networks were registered as well.
Briefly explain the returned results.
| _ref:xxxxxx | An object-specific value. This is the field to specify when you want to change or delete this object. All objects have |
|---|---|
| Network | Network name. This field is unique to the network object. |
| network_view | Network view name. This is also a unique field. |
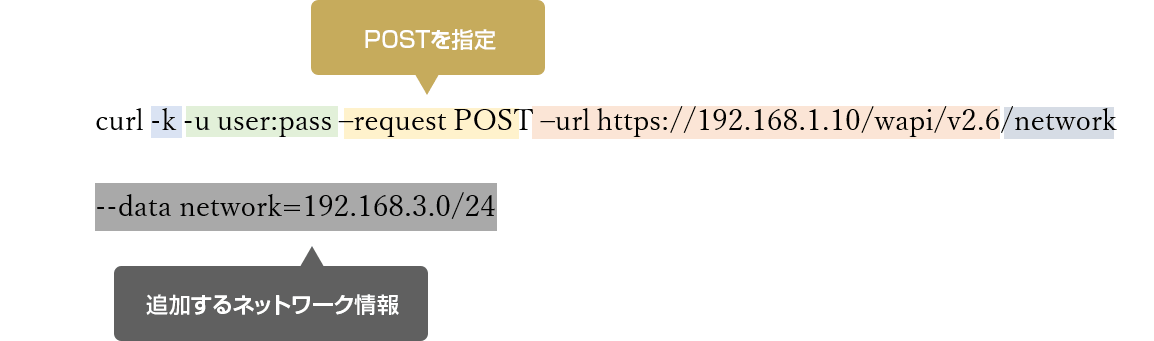
Now let's register a new network.
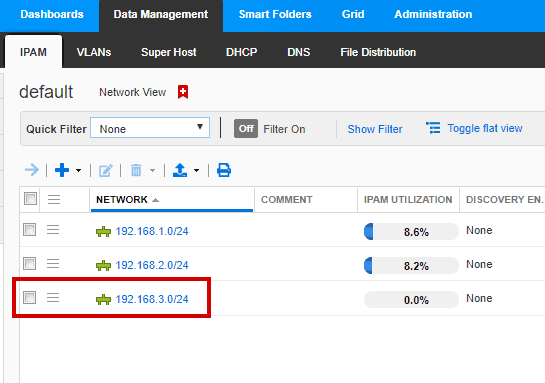
After execution, when you get the information again with the GET command, the network "192.168.3.0/24" has been added as shown below.
[
    {
        "_ref": "network/ZG5zLm5ldHdvcmskMTkyLjE2OC4xLjAvMjQvMA:192.168.1.0/24/default",
        "network": "192.168.1.0/24",
        "network_view": "default"
    },
    {
        "_ref": "network/ZG5zLm5ldHdvcmskMTkyLjE2OC4yLjAvMjQvMA:192.168.2.0/24/default",
        "network": "192.168.2.0/24",
        "network_view": "default"
    },
    {
        "_ref": "network/ZG5zLm5ldHdvcmskMTkyLjE2OC4zLjAvMjQvMA:192.168.3.0/24/default",
        "network": "192.168.3.0/24",
        "network_view": "default"
    }
]
Looking at the GUI, "192.168.3.0/24" was added.
Summary
It's easy, but I introduced an example of WebAPI execution. I hope to introduce how to write in Python from the next time.
Inquiry/Document request
Macnica Infoblox
- TEL:045-476-2010
- E-mail:infoblox-sales@macnica.co.jp
Weekdays: 9:00-17:00