
![]()
![]() Narrow down by specifying conditions
Narrow down by specifying conditions
現在2003件がヒットしています。check

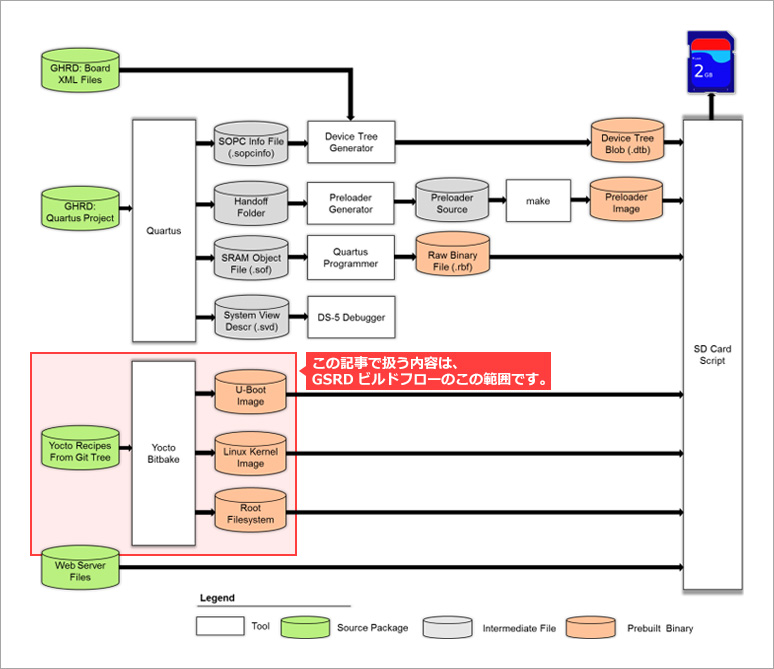
This article explains the build procedure for Angstrom Linux, which is used in the software reference environment (GSRD: Golden Software Reference Design) of Intel® SoC FPGA, in Japanese. The corresponding SoC FPGA development environment is described in the steps corresponding to the tool for Intel® SoC FPGA Embedded Development Suite (SoC EDS) version v18.1 Standard Edition.
*As of December 2020, the Linux distribution adopted by GSRD has moved from Angstrom to the Yocto standard Poky reference environment, so the conventional build procedure can no longer be used.
See the GSRD pages for each device family on Rocketboards.org for the latest build instructions.
RocketBoards.orgCyclone V SoC GSRD - Rebuilding the GSRD Binaries』
RocketBoards.org Arria 10 SoC GSRD – Rebuilding the GSRD Binaries』
RocketBoards.org Stratix 10 SoC GSRD - Rebuilding the GSRD Binaries』
RocketBoards.org Agilex SoC GSRD - Rebuilding the GSRD Binaries』
*June 2021: We also published an article introducing the build procedure for Yocto Poky on this site. Please refer to the following page for new information.
"Linux Build Method for Intel® SoC FPGA (Yocto Poky Edition)"
Below, the build procedure for Angstrom has also been maintained to include error avoidance. Please refer to it as necessary. (December 2020)
procedure
- Preparing the host machine
- Setting up the Yocto environment (first time only)
- Script execution and environment variable setting
- Run build (bitbake)
- Check build results
You can build a Linux environment for Cyclone® V SoC / Arria® V SoC / Arria® 10 SoC with this procedure.
The official instructions are published on a SoC FPGA related Linux community site called RocketBoards.org. Please also refer to the following links.
RocketBoards.org Compiling Linux
At the beginning of RocketBoards.org "Compiling Linux", it is introduced that the following three types of image creation are supported.
- U-Boot
- Linux kernel
- Linux Root Filesystem
However, for U-Boot (bootloader) and Linux device tree, it is recommended to handle them in a different flow, as hardware differences, such as board and FPGA side design, need to be considered. Another flow is posted on the following page.
[for Cyclone® V SoC / Arria® V SoC]
RocketBoards.org Generating and Compiling the Preloader
RocketBoards.org Generating the Device Tree
[for Arria® 10 SoC]
RocketBoards.org `` Generating U-boot and device tree''
RocketBoards.org Generating the Linux Device Tree
The procedure for generating the bootloader is also available in Japanese on this site.
Getting Started with SoC - How to use the Preloader Generator
The Linux build procedure introduced in this article uses the Yocto Project (hereafter Yocto) as the build system. When using Yocto, access to the external network via the git protocol is required, so please make sure that git is available in your network environment before trying the build procedure.
For more information about Yocto and how to customize your environment, see Yocto's official documentation. The instructions in this article use Yocto version 3.0.4 (zeus).
yoctoproject.org "Yocto Project"
yoctoproject.org Yocto Project 3.0.4 Documentation
1. Prepare the host machine
Prepare a Linux-based host machine. It is also possible to build with a virtual machine, but please note that a free disk space of 50 GByte or more is required. However, in reality, it is better to prepare at least 100 GByte. With 50 GByte, you will run out of free space just by building one type of image. Memory requirements are not stated. We are working fine with 8 GByte.
RocketBoards.org "Compiling Linux" recommends Ubuntu 14.04 LTS as the OS for the host machine, but since Ubuntu 14.04 LTS has already finished its maintenance period, it is recommended to use 16.04 LTS or 18.04 LTS. To do. For other distributions, please refer to the Yocto Project official documentation.
yoctoproject.org "21.1. Supported Linux Distributions"
Execute the following command to update and add the packages required for the build.
$ sudo apt-get update $ sudo apt-get upgrade $ sudo apt-get install phablet-tools sed wget cvs subversion git-core coreutils unzip texi2html texinfo libsdl1.2-dev docbook-utils gawk python-pysqlite2 diffstat help2man make gcc build-essential g++ desktop-file-utils chrpath libgl1-mesa-dev libglu1-mesa-dev mercurial autoconf automake groff libtool xterm lib32z1
Additionally, if you are using a 64bit OS, you will also need to install the 32 bit packages below.
$ sudo apt-get install ia32-libs lib32stdc++6 lib32ncurses5 lib32tinfo5For Ubuntu 14.04 LTS, the host machine is ready at this point.
The above packages are for Ubuntu 14.04, so some packages may cause errors.
If you are using a newer Ubuntu or other distribution, please also check the required packages listed in the official documentation.
yoctoproject.org21.2. Required Packages for the Build Host
Pay special attention to Git, tar, and Python versions when using a non-recommended OS.
- Git 1.8.3.1 or higher
- tar 1.27 or higher
- Python 3.4.0 or above
* The official document also introduces the procedure for installing buildtools, which includes a version of tools that meets the requirements, for users who use distributions that do not meet the above requirements, so please refer to it as necessary.
21.3. Required Git, tar, and Python Versions yoctoproject.org
2. Setting up the Yocto environment (first time only)
By executing the following command, the Yocto package (build tools) and configuration files will be deployed on the local machine. (The working directory "angstrom-build" in the command can be any name)
$ cd ~ $ mkdir angstrom-build $ cd angstrom-build $ wget http://releases.rocketboards.org/release/2019.10/src/altera.xml $ wget http://commondatastorage.googleapis.com/git-repo-downloads/repo $ chmod 777 repo $ export PATH=$PATH:~/angstrom-build $ python3 repo init -u git://github.com/Angstrom-distribution/angstrom-manifest -b angstrom-v2019.12-zeus $ sed -i 's/name="altera-opensource\/meta-altera" path="layers\/meta-altera" revision="angstrom-v2019.06-yocto2.7"/name="kraj\/meta-altera" path="layers\/meta-altera" revision="d2b76ad9ff51e4c4db60d4d40f29cb846c3b2f16"/g' altera.xml $ sed -i 's/path="layers\/meta-altera-refdes" revision="master"/path="layers\/meta-altera-refdes" revision="c41becaed98e0099e99dcba950c810d71397d18e"/g' altera.xml $ mkdir -p .repo/local_manifests $ mv altera.xml .repo/local_manifests/ $ python3 repo sync途中、sed コマンドにて meta-altera と meta-altera-refdes の入手元の指定を変更しています。meta-altera はより新しい設定ファイルを使うように変更していますが、meta-altera-refdes は Angstrom を使用する前提の古いリビジョンに変更しています。
Running the final python3 repo sync will download the meta layer structure containing recipe files (such as .bbclass .bb) with build instructions under the layers directory under the working directory "angstrom-build".
Next, rewrite part of the recipe under layers with the following command. This procedure changes the description that causes an error when running bitbake.
$ sed -i 's/LAYERSERIES_COMPAT_meta-maker = "warrior"/LAYERSERIES_COMPAT_meta-maker = "warrior zeus"/g' layers/meta-maker/conf/layer.conf
$ sed -i 's/ld-is-gold/ld-is-bfd/g' layers/meta-angstrom/conf/distro/include/angstrom-glibc.inc
$ sed -i 's/ld-is-gold/ld-is-bfd/g' layers/meta-angstrom/conf/distro/include/angstrom-eglibc.inc
$ sed -i '/meta-edison/d' .repo/manifests/conf/bblayers.conf
3. Script execution and environment variable setting
Set up the build environment by executing the following command.
$ cd ~/angstrom-build
$ export PATH=$PATH:~/angstrom-build
$ MACHINE=cyclone5 . ./setup-environment
$ sed -i '/meta-altera/a \ \ ${TOPDIR}\/layers\/meta-altera-refdes \\' conf/bblayers.conf
$ echo "DISTRO_FEATURES_remove = \" wayland \"" >> conf/local.conf
$ echo "DISTRO_FEATURES_remove = \" alsa \"" >> conf/local.conf
$ echo "PREFERRED_PROVIDER_virtual/kernel = \"linux-altera-lts\"" >> conf/local.conf
$ echo "PREFERRED_VERSION_linux-altera = \"5.4%\"" >> conf/local.conf
Specifically, in addition to executing the setup script (setup-environment), I edit the configuration files under the conf directory.
- Change "MACHINE=cyclone5" in the setup script to arria5 or arria10 depending on your target device.
- The 5 lines "$ sed -i '/meta ..." and "$ echo "..." >> conf/local.conf" don't need to be executed every time. (basic first time only OK)
- Preferred_PROVIDER_virtual/kernel and PREFERRED_VERSION_linux-altera are used to select the version to build from among the Linux kernel recipes stored under layers/meta-altera/recipes-kernel. .
4. Run build (bitbake)
Yocto build execution uses a tool called bitbake. Start the build process by running the bitbake command on the terminal where you ran the setup script in the previous step.
$ bitbake <ターゲットイメージの指定>In the <target image specification> part, specify as follows according to the build target.
- U-Boot ......... $ bitbake virtual/bootloader
- Linux Kernel ......... $ bitbake virtual/kernel
- Linux Root Filesystem ......... $ bitbake gsrd-console-image, $ bitbake angstrom-image etc.
It is also possible to specify more than one as follows.
$ bitbake virtual/bootloader gsrd-console-imageIf you're building a Linux Root Filesystem, you don't need to specify virtual/kernel as the Linux Kernel is also required. (Automatically build Linux Kernel as well)
Then wait for the build to complete. Depending on the machine specs and network speed, it will take more than 3 hours to build the complete GSRD environment including the Linux Root Filesystem.
If an error occurs, remove the cause by referring to terminal messages and log files.
(The log file to refer to is indicated in the message.) After correcting the cause, execute bitbake again.
5. Check build results
If the build is successful, each image file will be generated in the following location. (Hereafter, replace cyclone5 with arria5 or arria10 depending on the target device)
~/angstrom-build/deploy/glibc/images/cyclone5/
The required files are shown below.
Root Filesystem
gsrd-console-image-cyclone5.tar.xz ... In addition, cpio, ext3, jffs2 format files are also generated.
gsrd-console-image-cyclone5.manifest ... Package list included in Root Filesystem
Linux kernel
zImage
Linux Module format drivers (.ko) are archived and output under the following names.
modules-cyclone5.tgz
After that, create a boot SD card image based on the above image file and you are done. Please refer to the following page for the creation of the SD card image.
RocketBoards.org "Creating and Updating SD Card"
Ultima Company technical content "How to make SD card image for SoC FPGA boot"
6. Summary
You can follow the steps described in this article until you create a Linux image equivalent to GSRD. When building an original environment, understanding how to customize the Yocto environment is the key, so please refer to the Yocto official document mentioned above.
yoctoproject.org Yocto Project 3.0.4 Documentation
Click here for recommended articles/materials
SoC FPGA related articles and materials can be found here...
General FPGA / CPLD development flow / top page is here...