- Semiconductor BusinessHOME
- Products and Services of Macnica,Inc.
-
technical information

-
Events and Seminars
- Handling Manufacturer
- Support
- Inquiry
- Click here to purchase products
- Semiconductor business e-mail magazine registration
![]()
![]() Narrow down by specifying conditions
Narrow down by specifying conditions
現在2003件がヒットしています。check

*The same content as this article has also been posted on the Altera FPGA site "Macnica Altera FPGA Insights". (Please check here for the latest information.)
*December 2024: Updated to support the same version as the latest reference environment (Yocto 5.0.5 scarthgap). (See Release Notes 24.3 PRO for the version used in the latest reference environment.)
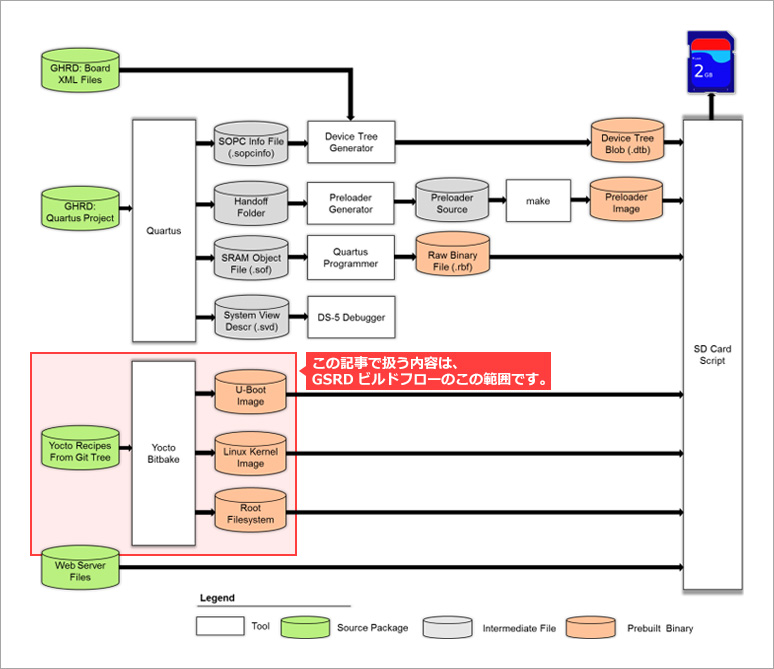
In this article, I will explain the build procedure of the Yocto Poky reference Linux environment adopted for the Intel® SoC FPGA system reference environment (GSRD: Golden System Reference Design) in Japanese.
Linux builds do not require the Intel® SoC FPGA Embedded Development Suite (SoC EDS), so you don't need to worry about whether or not you have the SoC EDS installed. The latest and final version of SoC EDS is v20.1 Standard Edition or v20.1 Pro Edition, but even if you are using an earlier SoC EDS version, you can build the Linux environment using this procedure.
For official build instructions, see Rocketboards.org or the GSRD page for each device family on the Altera FPGA Developer Site (altera-fpga.github.io).
RocketBoards.org 『Cyclone V SoC GSRD - Rebuilding the GSRD Binaries』
RocketBoards.org “Arria 10 SoC GSRD - Building the GSRD”
altera-fpga.github.io “Stratix® 10 SX SoC Development Kit - Rebuild the GSRD”
altera-fpga.github.io “Agilex™ 7 F-Series SoC Development Kit - Rebuild the GSRD”
altera-fpga.github.io “Agilex™ 7 I-Series FPGA Development Kit - Build GSRD for XX”
altera-fpga.github.io “Agilex™ 7 M-Series HBM2e Development Kit - Build the GSRD”
altera-fpga.github.io "Agilex™ 5 E-Series Premium Development Kit - Rebuilding the GSRD"
altera-fpga.github.io “Agilex™ 5 E-Series Modular Development Kit - Rebuilding the GSRD”
Most of the official steps are scripted, so you need to read the script to understand the details.In this article, we will not use the official script, but will run the commands required for the build directly on the terminal. This article is intended to help you understand the Yocto build procedure, so please use it as a reference for understanding the Yocto build procedure.
procedure
- Preparing the host machine
- Setting up the Yocto environment - getting recipes (first time only)
- Script execution and environment setting (first time only)
- Run build (bitbake)
- Check build results
This procedure targets Agilex™ 5, but can be used for each Intel® SoC FPGA device family (Cyclone® V / Arria® V / Intel® Arria® 10 / Intel® Stratix® 10 / Intel Agilex® 7 / Agilex™ 5).
If you follow the general procedure, you can generate a set of files necessary for creating an SD card image for booting Linux. Since it is necessary to consider hardware differences such as side design, we recommend using a different flow.
Please refer to the following pages for each response.
[Preloader/U-Boot (Bootloader)]
RocketBoards.org “Building Bootloader for Cyclone V and Arria 10”
RocketBoards.org “Building Bootloader for Stratix 10”
RocketBoards.org “Building Bootloader for Agilex 7”
RocketBoards.org “Building Bootloader for Agilex 5”
Ultima Company Technical Content “New U-Boot Handoff and Device Tree Configuration”
[Linux device tree]
Ultima Company Technical Content “How to create and edit a Linux device tree for Intel® SoC FPGA”
The Linux build procedure introduced in this article uses the Yocto Project (hereafter Yocto) as the build system. When using Yocto, access to the external network via the git protocol is required, so please make sure that git is available in your network environment before trying the build procedure.
Below is a list of Yocto versions and statuses.
| version | Code name | Status / Supplement |
| 5.2 | walnascar | Active Development |
| 5.1 | styhead | Current Release (Stable) |
| 5.0 | scarthgap | Current Release (LTS until Apr.2028) / Used in the latest GSRD |
| 4.3 | nanbield | Previous Release (EOL) |
| 4.2 | mickledore | Previous Release (EOL) |
| 4.1 | langdale | Previous Release (EOL) |
| 4.0 | kirkstone | Current Release (LTS until Apr.2026) |
| 3.1 | dunfell | Current Release (LTS until Apr.2024) |
| : | ||
Yocto version and code name correspondence and status (as of December 2024)
* Note: When changing from version 3.3 (hardknott) to 3.4 (honister), the format of the configuration file (recipe) required for building has been partially changed, so some procedures affected by the change are It is divided into two parts: "Yocto version 3.4 (honister) and later" and "3.3.x (hardknott) and earlier".
For more information on Yocto and how to customize your environment, please refer to the official Yocto documentation.
yoctoproject.org "Yocto Project – It's not an embedded Linux distribution – it creates a custom one for you"
yoctoproject.org Welcome to the Yocto Project Documentation — The Yocto Project ® documentation
yoctoproject.org Supported Release Manuals — The Yocto Project ® documentation』
yoctoproject.org Outdated Release Manuals — The Yocto Project ® documentation
1. Prepare the host machine
Prepare a Linux-based host machine. It is also possible to build with a virtual machine, but please note that a free disk space of 50 GByte or more is required. However, in reality, I think it is better to prepare at least 100 GByte. With 50 GByte, you will run out of free space just by building one type of image. Memory requirements are not specified. We are working fine with 8 GByte.
Please prepare the Linux distribution of the host machine by selecting it from the environment listed in the Yocto Project official document. The steps in this article have been verified on Ubuntu 20.04 (LTS) and Ubuntu 22.04 (LTS).
yoctoproject.org "Supported Linux Distributions"
In addition, recent Yocto versions seem to be compatible with Windows Subsystem for Linux (WSL). However, it seems that it is not compatible with WSLv1, so be careful that you need to build an environment with WSLv2 when trying it. Also, the procedure using WSL is clearly marked as an unofficial procedure in the official documentation. (If you try to build an environment with WSL, please try at your own risk)
yoctoproject.orgSetting Up to Use Windows Subsystem For Linux (WSLv2)
Here are the steps necessary to prepare the host machine. (for Ubuntu 20.04/22.04 (LTS))
*Caution: The command described as a procedure is described on the premise that it is executed on a terminal with user authority (prompt starting with $). Be careful not to accidentally use a root-privileged terminal (prompt starting with #).
Execute the following command to update and add the packages required for the build. These packages are the minimum required packages to build the image.
sudo apt update
sudo apt upgrade
sudo apt install gawk wget git diffstat unzip texinfo gcc build-essential chrpath socat cpio python3 python3-pip python3-pexpect xz-utils debianutils iputils-ping python3-git python3-jinja2 libegl1-mesa libsdl1.2-dev python3-subunit mesa-common-dev zstd liblz4-tool file locales libacl1
sudo locale-gen en_US.UTF-8
Additionally, install the following packages: The last " g++-multilib " is not mentioned in the official documentation. Added steps to work around an error that occurred in the past when building with dunfell (Yocto 3.1.7). Others are packages specified by Yocto's official instructions.
sudo apt install make python3-pip inkscape texlive-latex-extra
sudo pip3 install sphinx sphinx_rtd_theme pyyaml
sudo apt install g++-multilib
For Ubuntu 20.04/22.04 (LTS), the host machine preparations are now complete.
For other distributions, please check the required packages in the official documentation.
yoctoproject.org "Required Packages for the Build Host"
Also note the version of each package below. Also make sure each package meets the requirements.
・ Git 1.8.3.1 or greater
・ tar 1.28 or greater
・ Python 3.6.0 or greater (*Requirements will change to Python 3.8.0 or greater from Yocto version 4.2 (mickledore))
・ GNU make 4.0 or greater (*requirement added from Yocto version 4.1 (langdale))
・ gcc 7.5 or greater (*Yocto version 4.2 (mickledore) or later changes the requirement to gcc 8.0 or greater)
* The official document also introduces the procedure for installing buildtools, which includes a version of tools that meets the requirements, for users who use distributions that do not meet the above requirements, so please refer to it as necessary.
yoctoproject.org "Required Git, tar, Python and gcc Versions"
2. Setting up the Yocto environment - getting recipes (first time only)
By executing the following command, the meta layer structure including Yocto packages (build tools) and recipe files (. It will be expanded under the layers directory. (The working directory "poky-socfpga" can have any name)
Below is an example for Yocto 5.0.5 (scarthgap).
export YOCTO_VER=scarthgap
rm -rf ~/poky-socfpga && mkdir ~/poky-socfpga && cd ~/poky-socfpga
git clone -b $YOCTO_VER https://git.yoctoproject.org/git/poky.git
mkdir layers && cd layers
ln -s ./../poky/meta meta
ln -s ./../poky/meta-poky meta-poky
ln -s ./../poky/meta-yocto-bsp meta-yocto-bsp
git clone -b $YOCTO_VER https://git.openembedded.org/meta-openembedded
git clone -b $YOCTO_VER https://git.yoctoproject.org/git/meta-intel-fpga
git clone -b $YOCTO_VER https://github.com/altera-opensource/meta-intel-fpga-refdes.git
cd ..
* Specify the Yocto version name (nanbield, kirkstone, dunfell, etc.) as the branch name specified in the -b option of the git clone command. If you want to specify the latest version, specify -b master. (In the above example, this can be done by changing the environment variable YOCTO_VER set by export.)
* Point: Folders named meta-xxxx that store recipes are called meta layers. Each layer has a configuration file called conf/layer.conf that contains information for that layer. In layer.conf, the format of LAYERSERIES_COMPAT_meta-xxxx specifies the Yocto version that the corresponding layer corresponds to, so if you use a different Yocto version, you also need to pay attention to the contents of layer.conf .
For example, in the case of meta-intel-fpga, the setting like "LAYERSERIES_COMPAT_meta-intel-fpga = "master honister"" is described, and it corresponds to master (latest version) and honister (Yocto 3.4). I mean If it is a layer that supports multiple Yocto versions, there are cases where different versions are described like "LAYERSERIES_COMPAT_meta-intel-fpga = "dunfell gatesgarth hardknott"".
3. Script execution and environment setting (first time only)
3-1. Linux build settings (common to all device families)
Execute the following command to set up the build environment.
First, run the setup script called oe-init-build-env stored directly under poky. Executing this script will set up the environment variables required for the build, etc., and move the current directory to poky-socfpga/build. Configuration files called bblayers.conf and local.conf are generated under the build/conf directory.
cd ~/poky-socfpga # Run script to initialize the build environment for bitbake # Note: You will be redirect to "build" folder once you execute the command below source poky/oe-init-build-env
Rewrite the settings in build/conf/bblayers.conf with the following command.
Here, the setting to add the layer structure ( meta-intel-fpga, meta-intel-fpga-refdes, meta-openembedded/meta-xxxx ) acquired other than poky to the build target is added.
# Settings for bblayers.conf echo 'BBLAYERS += " ${TOPDIR}/../layers/meta-intel-fpga "' >> conf/bblayers.conf echo 'BBLAYERS += " ${TOPDIR}/../layers/meta-intel-fpga-refdes "' >> conf/bblayers.conf echo 'BBLAYERS += " ${TOPDIR}/../layers/meta-openembedded/meta-oe "' >> conf/bblayers.conf echo 'BBLAYERS += " ${TOPDIR}/../layers/meta-openembedded/meta-networking "' >> conf/bblayers.conf echo 'BBLAYERS += " ${TOPDIR}/../layers/meta-openembedded/meta-python "' >> conf/bblayers.conf echo 'BBLAYERS += " ${TOPDIR}/../layers/meta-openembedded/meta-gnome "' >> conf/bblayers.conf echo 'BBLAYERS += " ${TOPDIR}/../layers/meta-openembedded/meta-xfce "' >> conf/bblayers.conf echo 'BBLAYERS += " ${TOPDIR}/../layers/meta-openembedded/meta-initramfs "' >> conf/bblayers.conf echo 'BBLAYERS += " ${TOPDIR}/../layers/meta-openembedded/meta-multimedia "' >> conf/bblayers.conf echo 'BBLAYERS += " ${TOPDIR}/../layers/meta-openembedded/meta-webserver "' >> conf/bblayers.conf echo 'BBLAYERS += " ${TOPDIR}/../layers/meta-openembedded/meta-filesystems "' >> conf/bblayers.conf echo 'BBLAYERS += " ${TOPDIR}/../layers/meta-openembedded/meta-perl "' >> conf/bblayers.conf
Rewrite the settings in build/conf/local.conf with the following command.
local.conf contains various variables for specifying various build options.
Only this procedure has different contents for Yocto 3.4 (honister) and later and Yocto 3.3.x (hardknott) and earlier versions.This is due to changes in some of the recipes and the configuration format for .conf files. Please check the Yocto 3.4 release details for details.
yoctoproject.org Release 3.4 (honister) — The Yocto Project ® 3.4 documentation
*Note: From here on, the instructions for Yocto 3.4 (honister) and later are written with the content targeted at Yocto 4.3 (nanbield). The recipes included in meta-intel-fpga differ depending on the specified Yocto version (Branch), so there are differences in the versions of Linux and boot loader that can be specified.
3-1-1. For new environments: Yocto 3.4 (honister) and later versions
# Set the MACHINE from "stratix10", "arria10", "cyclone5", "agilex7_xxx (ex. agilex7_dk_si_agf014ea)", or "agilex5"
sed -i 's/^MACHINE .*=.*$/MACHINE = "agilex5"/g' conf/local.conf
# Set the Path for download directory
sed -i 's/#DL_DIR ?= "${TOPDIR}\/downloads"/DL_DIR = "${TOPDIR}\/..\/downloads"/g' conf/local.conf
# Use the LTS kernel and set version
echo 'PREFERRED_PROVIDER_virtual/kernel = "linux-socfpga-lts"' >> conf/local.conf
echo 'PREFERRED_VERSION_linux-socfpga-lts = "6.6.%"' >> conf/local.conf
# Use systemd
echo 'DISTRO_FEATURES:append = " systemd usrmerge"' >> conf/local.conf
echo 'VIRTUAL-RUNTIME_init_manager = "systemd"' >> conf/local.conf
# Build additional rootfs type
echo 'IMAGE_FSTYPES += "jffs2 tar.gz"' >> conf/local.conf
# Ensure we build in all kernel-modules
echo "MACHINE_ESSENTIAL_EXTRA_RRECOMMENDS += \"kernel-modules\"" >> conf/local.conf
# Other settings
echo 'INHERIT += "rm_work"' >> conf/local.conf
echo 'DEPLOY_DIR = "${TOPDIR}/../deploy"' >> conf/local.conf
echo 'BB_GENERATE_MIRROR_TARBALLS = "1"' >> conf/local.conf
echo 'BB_DANGLINGAPPENDS_WARNONLY = "1"' >> conf/local.conf
echo 'DISTRO_FEATURES:remove = "ptest"' >> conf/local.conf
echo 'IMAGE_FSTYPES:remove = "multiubi"' >> conf/local.conf
echo 'INHERIT += "archiver"' >> conf/local.conf
echo 'ARCHIVER_MODE[src] = "original"' >> conf/local.conf
echo 'COPY_LIC_MANIFEST = "1"' >> conf/local.conf
echo 'COPY_LIC_DIRS = "1"' >> conf/local.conf
echo 'LICENSE_CREATE_PACKAGE = "1"' >> conf/local.conf
3-1-2. For older environments: Yocto 3.3.x (hardknott) and earlier versions
# Set the MACHINE from agilex, stratix10, arria10, or cyclone5"
sed -i 's/^MACHINE .*=.*$/MACHINE = "arria10"/g' conf/local.conf
# Set the Path for download directory
sed -i 's/#DL_DIR ?= "${TOPDIR}\/downloads"/DL_DIR = "${TOPDIR}\/..\/downloads"/g' conf/local.conf
# Use the LTS kernel and set version
echo 'PREFERRED_PROVIDER_virtual/kernel = "linux-socfpga-lts"' >> conf/local.conf
echo 'PREFERRED_VERSION_linux-socfpga-lts = "5.4.104%"' >> conf/local.conf
# Use systemd
echo 'DISTRO_FEATURES_append = " systemd"' >> conf/local.conf
echo 'VIRTUAL-RUNTIME_init_manager = "systemd"' >> conf/local.conf
# Build additional rootfs type
echo 'IMAGE_FSTYPES += "jffs2 tar.gz"' >> conf/local.conf
# Ensure we build in all kernel-modules
echo "MACHINE_ESSENTIAL_EXTRA_RRECOMMENDS += \"kernel-modules\"" >> conf/local.conf
# Other settings
echo 'INHERIT += "rm_work"' >> conf/local.conf
echo 'DEPLOY_DIR = "${TOPDIR}/../deploy"' >> conf/local.conf
echo 'BB_GENERATE_MIRROR_TARBALLS = "1"' >> conf/local.conf
echo 'BB_DANGLINGAPPENDS_WARNONLY = "1"' >> conf/local.conf
echo 'DISTRO_FEATURES_remove = "ptest"' >> conf/local.conf
echo 'INHERIT += "archiver"' >> conf/local.conf
echo 'ARCHIVER_MODE[src] = "original"' >> conf/local.conf
echo 'COPY_LIC_MANIFEST = "1"' >> conf/local.conf
echo 'COPY_LIC_DIRS = "1"' >> conf/local.conf
echo 'LICENSE_CREATE_PACKAGE = "1"' >> conf/local.conf
The following are mainly specified here.
・MACHINE: Specifies the model to be built.
(For SoC FPGA, select from cyclone5 / arria5 / arria10 / stratix10 / agilex)
*If you are targeting agilex in version 4.1 (langdale) or later, you will need to select a model from multiple options.
[For version 4.1 (langdale)]
- agilex_fm61 ... Intel Agilex® 7 FPGA F-Series Transceiver-SoC Development Kit (P-Tile and E-Tile)
- agilex_fm86 ... Intel Agilex® 7 FPGA F-Series Development Kit (2x F-Tile)
- agilex_fm87 ... Intel Agilex® 7 FPGA I-Series Transceiver-SoC Development Kit (4x F-Tile)
[For version 4.2 (mickledore) and later]
- agilex7_dk_si_agf014ea/agf014eb ... Intel Agilex® 7 FPGA F-Series Transceiver-SoC Development Kit (P-Tile and E-Tile)
- agilex7_dk_si_agi027fa/agi027fb ... Intel Agilex® 7 FPGA I-Series Transceiver-SoC Development Kit (4x F-Tile)
- agilex7_dk_dev_agf027f1es ... Intel Agilex® 7 FPGA F-Series Development Kit (2x F-Tile)
- agilex7_dv_dev_agm039fes ... Intel Agilex® 7 FPGA M-Series Development Kit - HBM2e Edition (3x F-Tile & 1x R-Tile)
*From version 5.0.5 (scarthgap) onwards, the number of agilex5 options has increased. Please refer to the information below when specifying MACHINE.
If you are building the bootloader and Linux using a flow other than Yocto, you do not need to specify the target board details.
(The Root File System can be reused for other boards as long as the device family is suitable.)
The string that can be specified for MACHINE is determined by the file name stored under conf/machine in the meta-intel-fpga layer.
Please refer to the link below for the actual content. You can also select the Yocto version from the pulldown or switch button at the top right of the page.
machine « conf - meta-intel-fpga - Layer containing Intel SoCFPGA hardware support metadata (yoctoproject.org)

・PREFERRED_PROVIDER_virtual/kernel, PREFERRED_VERSION_linux-socfpga-lts : Specify the Linux kernel version.
(select the kernel version you want to build from the recipes under meta-intel-fpga/recipes-kernel )
・DISTRO_FEATURES:append, VIRTUAL-RUNTIME_init_manager : Specify to use "systemd" for Linux startup and system management.
・IMAGE_FSTYPES : Specify the format of the file system to be generated.
*Supplement: 3-1-1. In the procedure for a new environment, specify "IMAGE_FSTYPES:remove = "multiubi"" in local.conf so that UBIFS is not generated.
This change has been made to prevent an error from occurring due to the UBIFS size exceeding the size of the generated image, so if you want to generate UBIFS, please delete the relevant description.
The following options are specified to organize the configuration under the working directory. (Any)
・DL_DIR : Specify the storage destination of the file that is fetched (downloaded) when executing the build.
・DEPLOY_DIR : Specify the storage destination of the image generated as a result of the build execution.
Other options are not essential, so if you are interested, please check the Yocto official document.
3-2. Extended settings: Settings for bootloader build (optional for V series, required for other families)
The following settings are also required when targeting Intel® Arria® 10 / Intel® Stratix® 10 / Intel Agilex® 7 / Agilex™ 5. If you are targeting the V-series and want to build the bootloader with Yocto, you will also need to make these settings.
The required settings vary depending on the boot flow. If you are targeting V-series or Intel® Arria® 10, you only need to configure U-Boot. For Intel® Stratix® 10 / Intel Agilex® 7 / Agilex™ 5, in addition to the U-Boot settings, you also need to specify the Arm Trusted Firmware (ATF) version. Here, you will specify the versions for both U-Boot and ATF for all families.
Please note that where the device family is specified in the command, such as 'require conf/machine/agilex5-*.conf', please replace it with cyclone5 or arria10 depending on the target you are using.
3-2-1. For new environments: Yocto 3.4 (honister) and later versions (U-Boot and ATF settings)
echo 'PREFERRED_PROVIDER_virtual/bootloader = "u-boot-socfpga"' >> conf/local.conf
echo 'PREFERRED_VERSION_u-boot-socfpga = "v2024.04%"' >> conf/local.conf
echo 'PREFERRED_VERSION_arm-trusted-firmware = "v2.11"' >> conf/local.conf
echo 'require conf/machine/agilex5-gsrd.conf' >> conf/local.conf
# Set the UBOOT_CONFIG:xx from MACHINE-socdk-atf (ex. "stratix10-socdk-atf") or MACHINE-socdk (ex. "cyclone5-socdk").
# xx is MACHINE Name (ex. "agilex7_dk_si_agf014ea").
echo 'UBOOT_CONFIG:agilex5 = "agilex5-socdk-atf"' >> conf/local.conf
echo 'IMAGE_TYPE:agilex5 = "gsrd"' >> conf/local.conf
As of February 2024, if you use Yocto 4.3 (nanbield) to target Arria® 10 or Stratix® 10, please also perform the following settings.
echo 'EXTRA_IMAGEDEPENDS:remove:arria10 = "u-boot-socfpga-env"' >> conf/local.conf
echo 'EXTRA_IMAGEDEPENDS:remove:stratix10 = "u-boot-socfpga-env"' >> conf/local.conf
When targeting Cyclone® V using Yocto 4.1 (langdale) or Yocto 4.2 (mickledore), please also perform the following settings.
This setting (RBO_RELEASE_VER) specifies the location of the rbf-source folder on Rocketboards.org's Release site. Use the FPGA configuration data (.rbf) located at Index of /2022.10/rbf-source/ (rocketboards.org) by specifying "2022.10". *This setting is not necessary for Yocto 4.3 (nanbield).
echo 'RBO_RELEASE_VER:cyclone5 = "2022.10"' >> conf/local.conf3-2-2. For old environments: Yocto 3.3.x (hardknott) or earlier versions (U-Boot and ATF settings)
echo 'PREFERRED_PROVIDER_virtual/bootloader = "u-boot-socfpga"' >> conf/local.conf
echo 'PREFERRED_VERSION_u-boot-socfpga = "v2021.01%"' >> conf/local.conf
echo 'PREFERRED_VERSION_arm-trusted-firmware = "v2.4%"' >> conf/local.conf
echo 'require conf/machine/arria10-extra.conf' >> conf/local.conf
# Set the UBOOT_CONFIG from "agilex-socdk-atf", "stratix10-socdk-atf", "arria10-socdk", or "cyclone5-socdk"
echo 'UBOOT_CONFIG = "arria10-socdk"' >> conf/local.conf
echo 'IMAGE_TYPE = "gsrd"' >> conf/local.conf
The following are mainly specified here.
・PREFERRED_PROVIDER_virtual/bootloader, PREFERRED_VERSION_u-boot-socfpga : Specify U-Boot version.
(Select the U-Boot version you want to build from the recipes under meta-intel-fpga/recipes-bsp/u-boot )
・PREFERRED_VERSION_arm-trusted-firmware : Specify the ATF version.
(select the ATF version you are building against from the recipes under meta-intel-fpga/recipes-bsp/arm-trusted-firmware )
・require conf/machine/xxxx-extra.conf (xxxx-gsrd.conf) : Specifies an extended configuration file that includes bootloader-related settings.
・UBOOT_CONFIG: Used to select defconfig during U-Boot build.
(Choose from "agilex7_dk_si_agf014ea-socdk-atf", "stratix10-socdk-atf", "arria10-socdk", "cyclone5-socdk". Please refer to the recipe description for other options.)
・IMAGE_TYPE : Specify "gsrd" for the reference design for the evaluation board (Golden System Reference Design).
(Usually specify "gsrd". You may specify other than "gsrd" when targeting other designs.)
4. Run build (bitbake)
Yocto build execution uses a tool called bitbake. Start the build process by running the bitbake command on the terminal where you ran the setup script in the previous step. If you start a new terminal and run the build again under the previously built Yocto environment, please run the setup script ( poky/oe-init-build-env ) in advance.
If you want to change options or recipes, edit build/conf/local.conf and files under layers with a text editor after running the setup script and before running bitbake.
cd ~/poky-socfpga
source poky/oe-init-build-env
bitbake <ターゲットイメージの指定>
In the <target image specification> part, specify as follows according to the build target.
・U-Boot ................................ virtual/bootloader
・ Linux Kernel ................ virtual/kernel
・ Linux Root Filesystem ... gsrd-console-image, console-image-minimal, etc. (choose from recipes below recipes-images)
It is also possible to specify more than one as follows.
bitbake virtual/bootloader gsrd-console-imageIf you're building a Linux Root Filesystem, you don't need to specify virtual/kernel as the Linux Kernel is also required. (Automatically build Linux Kernel as well)
Then wait for the build to complete. Depending on the machine specs and network speed, it will take more than 3 hours to build the complete GSRD environment including the Linux Root Filesystem.
If an error occurs, remove the cause by referring to the terminal message and log file.
(The log file to refer to is indicated in the message.) After correcting the cause, execute bitbake again.
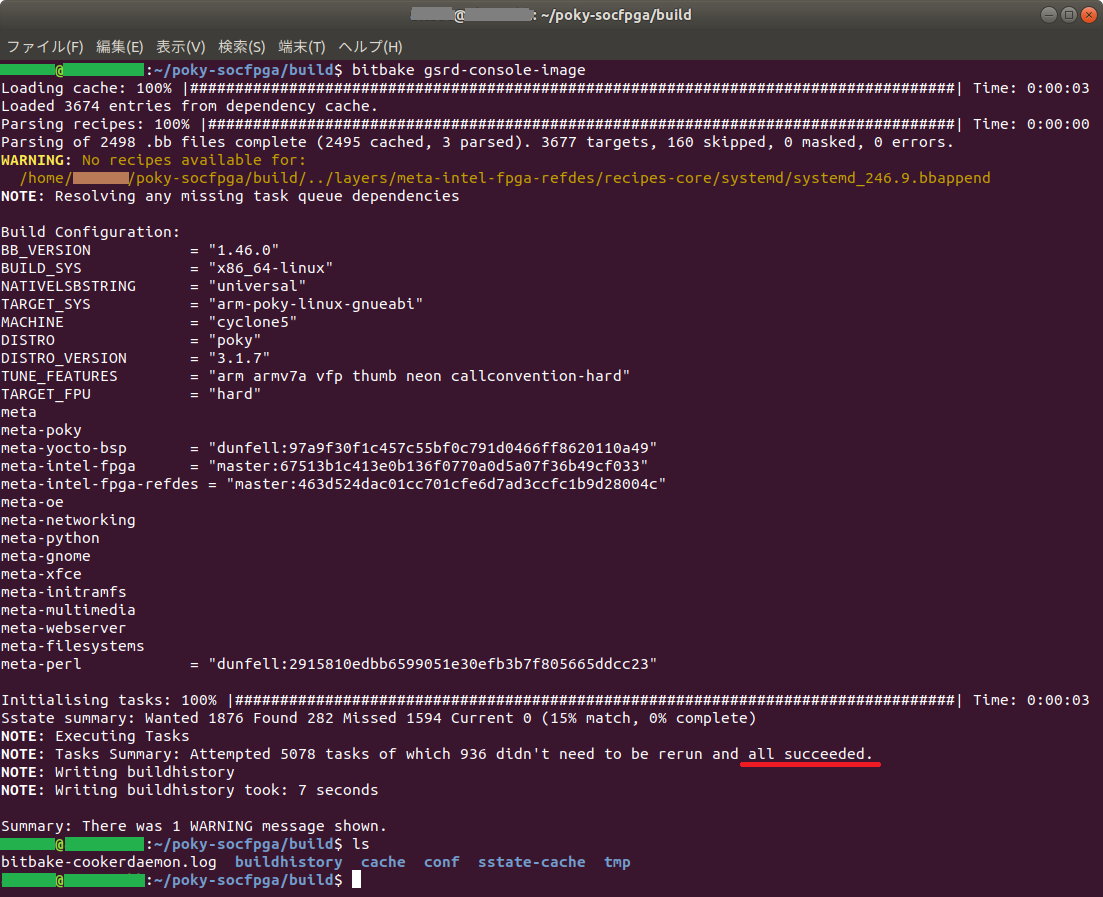
If the build succeeds to the end, "all succeeded." is displayed in the message starting with "NOTE: Tasks Summary: " as shown below.
5. Check build results
If the build is successful, each image file will be generated in the following location. (In the following, replace agilex5 with arria5 or cyclone5 depending on the target device.)
~/poky-socfpga/deploy/images/agilex5/
The required files are listed below.
Root Filesystem
gsrd-console-image-agilex5.rootfs.tar.gz ... Other files in jffs2 format will also be generated.
gsrd-console-image-agilex5.rootfs.manifest ... Package list included in Root Filesystem
Linux Kernel
Image, Image.lzma ... Other device families may use different formats, such as zImage.
The Linux Module format driver (.ko) will be archived and output to the following name:
modules-agilex5.tgz
Linux Device Tree (.dtb)
socfpga_agilex5_socdk.dtb etc.
Linux FIT (Flattened uImage Tree) Image (required only if you are using the FIT Image boot method)
kernel.itb ... Image that combines the kernel and device tree into one file
Linux boot options file (only required if you are using an extlinux-capable bootloader)
extlinux.conf
All that's left to do is create a boot SD card image based on the image file above. For information on creating an SD card image, please refer to the following page.
RocketBoards.org “Creating and Updating SD Card”
Ultima Company Technical Contents "How to create an SD card image for SoC FPGA boot"
6. Summary
You can follow the steps described in this article until you create a Linux image equivalent to GSRD. When building an original environment, understanding how to customize the Yocto environment is the key, so please refer to the Yocto official documentation.
yoctoproject.org Welcome to the Yocto Project Documentation — The Yocto Project ® dev documentation』
Click here for recommended articles/materials
SoC FPGA related articles and materials can be found here...
General FPGA / CPLD development flow / top page is here...