- 半導体事業HOME
- マクニカの製品・サービス
-
技術情報

-
イベント・セミナー
- 取扱メーカー
- サポート
- お問い合わせ
- 製品購入はこちら
- 半導体事業のメルマガ登録
![]()
![]() 条件を指定して絞り込む
条件を指定して絞り込む
現在2158件がヒットしています。check


こんにちは.
マクニカでインテル® FPGA 製品の技術サポートをしているインテル・F・ハナコ です。
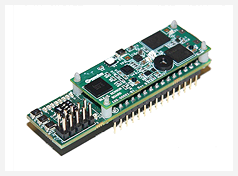
Mpression 製の Odyssey MAX® 10 評価キット は、FPGA やマイコン、センサをスマホで動かせる開発キットで、非常に安価にインテル® の MAX® 10 FPGA を検証できるボードの一つです。
以前、「FPGA ではじめてのLチカ!」や「FPGA に Nios® II を入れてLチカ!」と言う記事を書きましたが、この方法は MAX® 10 にコンフィギュレーションやプログラミングをする場合に、インテル® FPGA ダウンロード・ケーブルの USB-Blaster™ II を使用しなければなりません。
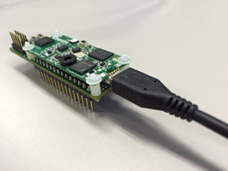
でも実はこの Odyssey、USB-Blaster™ II ダウンロード・ケーブルを使用しなくても、一般的な USB-microUSB ケーブルを使って MAX® 10 FPGA の開発ができちゃうんです!!
今回は、Odyssey に搭載されている MAX® 10 FPGA に microUSB ポート経由でコンフィギュレーション・データを転送して “Lチカ” したいと思います。
今回も BLE & Sensor ボード と MAX® 10 ボード をコネクタで接続して使用します。
必要なもの
Odyssey の microUSB 経由で FPGA をコンフィギュレーションさせるために、以下を準備します。
・Mpression 製 Odyssey MAX® 10 FPGA 評価キット
・USB-microUSB ケーブル
・Quartus® Prime ライト・エディション (有償エディションでもOK)
・Tera Term
・SiliconLabs(シリコン・ラボ)の USB Virtual シリアル・ポート・ドライバ
Odyssey(FPGA にフォーカス)の接続構成はざっくりこんな感じ
下図は、Odyssey において FPGA にフォーカスした構図(全体)です。
(Odyssey の MAX® 10 ボードの回路図、および BLE & Sensorボードの回路図はコチラからご覧ください。)
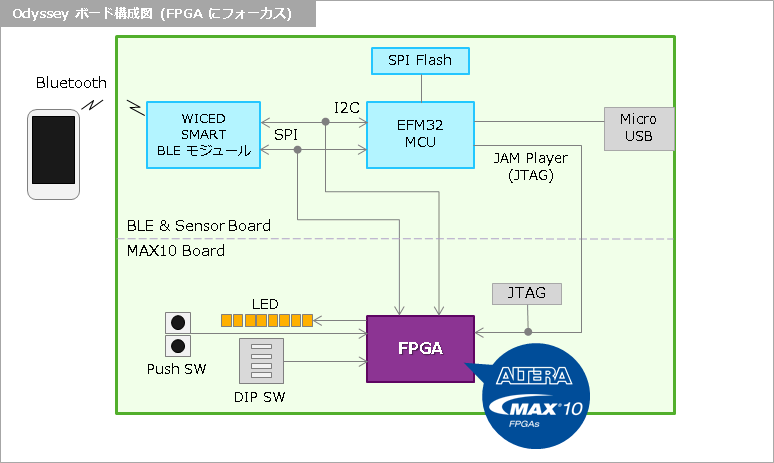
BLE & Sensor ボード上の microUSB から FPGA へは、EFM32 マイコンを経由して FPGA の JTAG ポートへアクセスします。
microUSB ポート経由で FPGA をコンフィギュレーションさせる構成図はこんな感じ
上図から、今回のテーマである “microUSB 経由で MAX® 10 のコンフィギュレーション・データを転送させる構成” だけをハイライトさせて、作業工程を付け加えたイメージ図が下図です。
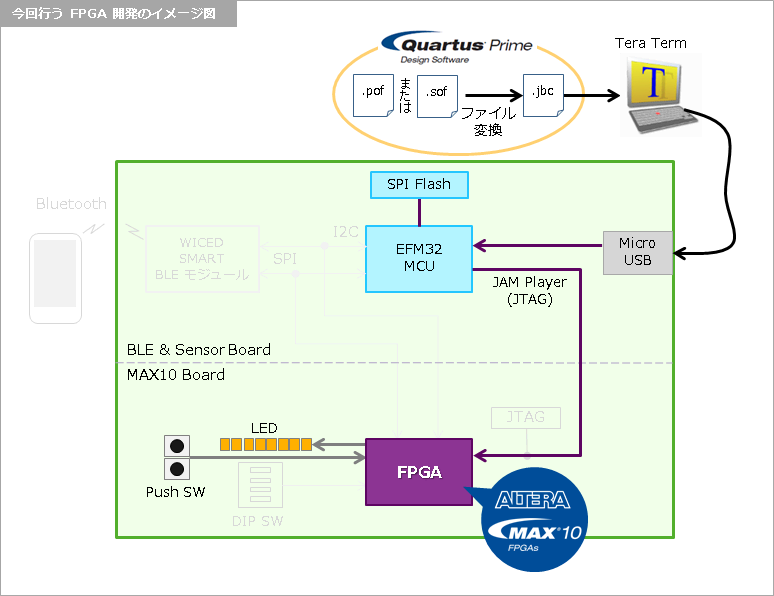

今回のデモにおいて、MAX® 10 のコンフィギュレーション・データをパソコンから転送するには Tera Term を使います。Tera Term とは、Windows OS 向けのターミナルソフトで、オープンソースで公開されているツールです。使用するパソコンにインストールしていない場合には、事前にTera Term をインストールしてください。またMpression の WEB サイトでは、Odyssey 開発向けの Tera Term 環境設定ファイル(TERATERM.INI) が公開されていますので、必要に応じてインストールしてください。
さらに、あらかじめシリコン・ラボの USB Virtual シリアル・ポート・ドライバをインストールしておけば、パソコン上で Tera Term を使って Odyssey 上の EFM32 と通信ができます。

その EFM32 には JAM Player(ジャム・プレーヤー)というソフトウェアがあらかじめ実装されています。この JAM Player は、外部コントローラ(マイコン、PCなど)から JTAG 経由で FPGA にコンフィギュレーション・データを転送するためのソフトウェアです。(JAM Player についてはコチラをご覧ください。)
Odyssey ではこの JAM Player を利用することで、パソコン上にある MAX® 10 用のコンフィギュレーション・データを SPI Flash メモリに書き込んだり、SPI Flash メモリから読み出して MAX® 10 にデータを転送したりができます。
作業ステップの概要
以下のフローで作業します。
- Quartus® Prime で MAX® 10 の設計をして、コンフィギュレーション用データ(.sof)およびプログラミング用データ(.pof)を作成
- Quartus® Prime で 1. のファイルを JAM ファイル “.jbc”(Jam Byte Code)ファイルに変換
- Tera Term で EFM32 に接続
- Tera Term で jbc ファイルを Flash にダウンロード
- Tera Term で Flash から 4. のファイルを読み出し、MAX® 10 に転送(プログラミング)
- Lチカを確認
いよいよ作業スタ-ト!
具体的な操作は、以下のページでご覧ください。
[操作編] MAX® 10 評価キットOdyssey の FPGA に microUSB ポート経由でコンフィギュレーション・データを転送してLチカ!
関連商品