- Semiconductor BusinessHOME
- Products and Services of Macnica,Inc.
-
technical information

-
Events and Seminars
- Handling Manufacturer
- Support
- Inquiry
- Click here to purchase products
- Semiconductor business e-mail magazine registration
![]()
![]() Narrow down by specifying conditions
Narrow down by specifying conditions
現在2183件がヒットしています。check


Hello.
My name is Intel F. Hanako and I provide technical support for Intel® FPGA products at Macnica.
Can't recognize silicon ID for device
If you receive this error message when using the Intel FPGA Download Cable II (commonly known as USB-Blaster™ II) to transfer data to the FPGA or program an Intel configuration device, Check out the FAQ below.
I get the error Can't recognize silicon ID for device and can't program.
If the fifth factor is "noise effect", I would like you to try it.
It changes the TCK frequency of the USB-Blaster II! !
The TCK frequency of USB-Blaster II is 24MHz by default.
Depending on the degree of signal quality (signal integrity) degradation, it may be possible to avoid this by lowering the TCK frequency. It is also a good method when the download timing to the FPGA does not allow for 24MHz operation.
Notes:
・ The USB-Blaster cannot change the TCK frequency. The TCK frequency is 6MHz (typ).
How many TCK frequencies can be changed?
The lineup that can be specified for the TCK frequency is as follows.
- 24MHz
- 16MHz
- 6MHz
- 24/n MHz (10 KHz to 6 MHz; n is an integer)
How to change the TCK frequency
The method to change the TCK frequency of the USB-Blaster II depends on the Quartus® Prime edition and version.
| Quartus Prime | Change method |
|
* Please see here also if you are using Quartus Prime Standard and Lite Edition 19.1 or later. |
Changed by Programmer GUI |
| Quartus Prime Standard Edition / Lite Edition (ver.18.1 or earlier) | Changed by command |
Notes:
Please connect the PC and USB-Blaster II in advance before making changes.
The changed TCK frequency will be initialized when the cable is disconnected from the PC. Please make changes accordingly.
How to change TCK in Quartus Prime Pro Edition
1. Launch the Quartus Prime Pro Edition Programmer.
2. Click the Hardware Setup button in Programmer,
Select USB-Blaster II from the Currently selected hardware pull-down list.
The Hardware frequency column shows 24000000 (Hz).
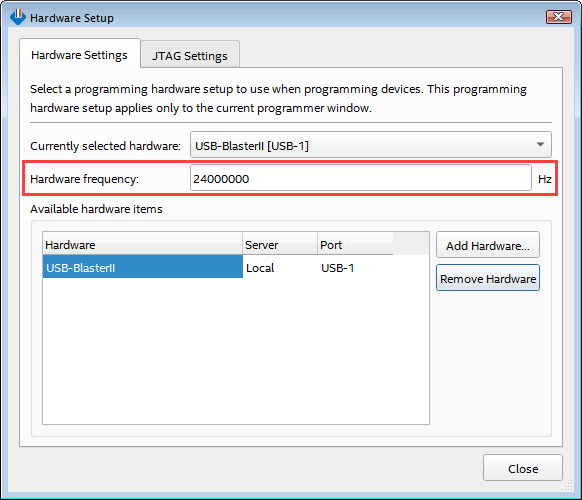
3. Enter the desired TCK frequency value in the Hardware frequency field.
For example, if you want to change to 16MHz, set like this.

4. Click the Close button.
This completes the TCK frequency change operation!
5. (Optional work) The currently set TCK frequency can be confirmed by starting the Programmer's Hardware Setup screen again.
How to change TCK in Quartus Prime Standard and Lite Editions
1. Launch the Quartus Prime Standard (Lite) Edition Programmer.
2. Click the Hardware Setup button in Programmer,
Select USB-Blaster II from the Currently selected hardware pull-down list.
3. Launch Command Prompt. (Nios® II Command Shell is also OK.)
4. cd to the bin64 folder under the Quartus Prime installation folder.
5. Check the “cable number” with the jtagconfig command.
jtagconfigThe number of USB-Blaster download cables installed in the computer is displayed.
Below is the state with only one download cable attached.
Remember this number (cable number) displayed at the beginning of the USB-Blaster II.

6. Set the TCK frequency with the following command.
jtagconfig --setparam <cable number> JtagClock <frequency><unit prefix>| cable numbers | Number confirmed in step 3 |
| frequency | Configured TCK frequency value |
| unit prefix | Units of frequency (except Hz). Enter M for MHz or K for KHz. Not entered for Hz. |
For example, if you want to change to 16MHz, set like this.

If you want to change to TCK = 150KHz, enter "150K" or "150000" instead of "24/160".

This completes the TCK frequency change operation!
7. (Optional work) The currently set TCK frequency can be checked with the following command.
jtagconfig --getparam <cable number> JtagClockThe current settings are displayed as shown below.

Below are some of the error messages I was able to confirm when I verified. These errors could be avoided by lowering the frequency of TCK.
[Example of error message]
・ Can't recognize silicon ID for device 1
・ Connected stsyem ID hash not found on target at expected base address.
・ Flash Loader IP not loaded on device 1
・ No Nios II target connection paths were located. Check connections and that a Nios II .sof is downloaded.
please refer.
Click here for recommended articles/materials
Let's install the USB-Blaster II driver
Intel® FPGA Development Flow/FPGA Top Page