
![]()
![]() Narrow down by specifying conditions
Narrow down by specifying conditions
現在1888件がヒットしています。check

----------------------------------------------------------------------------------------------------------------
[Important] 2020.12.10 postscript
For information on how to set up a license for Arm® DS, the successor to Arm® DS-5™, please refer to the technical information page below.
How to license Arm® Development Studio (DS) for Intel® SoC FPGA Edition
-------------------------------------------------- -------------------------------------------------- ------------
This article describes licensing Arm® Development Studio 5™ (Arm® DS-5™), a software development tool for Intel® SoC FPGA devices.
1.First of all
2. Advance preparation
3. How to get the license file directly from the Arm website
4. How to set the license for Arm® DS-5™ Community Edition (free version)
5. How to set license for Arm® DS-5™ Intel® SoC FPGA Edition (30-day evaluation version)
6. Arm® DS-5™ Intel® SoC FPGA Edition (paid version) license setting method
7. How to Rehost Arm® DS-5™
1.First of all
Arm® DS-5™ is a bundled product of the Intel® SoC FPGA Embedded Development Suite (SoC EDS), which includes Community Edition (free), Intel® SoC FPGA Edition (30-day evaluation), Intel® SoC FPGA Edition ( paid version) exists.
In addition, when you purchase the Cyclone® V SoC Development Kit, Arria® V SoC Development Kit, and Arria® 10 SoC Development Kit, the license for Intel® SoC FPGA Edition is bundled. To do.
It also describes how to obtain the license file directly from the Arm website and how to rehost the Arm® DS-5™.
Most of the explanations are based on the information as of v18.0.
1-1. Differences between Arm® DS-5™ Editions
The differences between each edition of Arm® DS-5™ are summarized below.
- Community Edition (free version)
Free license available in SoC EDS Standard and Pro editions
Arm® DS-5™ Community Edition enables Linux application development and debugging over an Ethernet connection for an unlimited period of time. However, there are functional limitations compared to Intel® SoC FPGA Edition. Supports code editor, Linux native application debugger and system performance analyzer. Created and maintained by Arm, Arm® DS-5™ Community Edition is available free of charge to all users.
- Intel® SoC FPGA Edition (30-day evaluation)
30-day evaluation license issued with SoC EDS Standard Edition
Arm® DS-5™ Intel® SoC FPGA Edition 30-day evaluation allows you to try Arm® DS-5™ Intel® SoC FPGA Edition (part of SoC EDS Standard Edition) before you buy. It has no functional restrictions, but is limited to a 30-day trial period.
- Intel® SoC FPGA Edition (paid version)
Paid licensing available in SoC EDS Standard and Pro editions
All features of the Arm® DS-5™ Intel® SoC FPGA Edition software are available. License-controlled, licenses included with select Intel® SoC FPGA Development Kits provide support and maintenance from Intel for a period of one year from the date of purchase or renewal. It supports all Arm® processor subsystems in Intel® SoC FPGAs and provides excellent bare-metal debug and trace capabilities.
It also includes Arm® Compiler 5/6 so you can optimize your code for size and performance. Designed for firmware and application software developers, it can be used with Intel® FPGA Download Cable II, Arm® DSTREAM / DSTREAM-ST or Ethernet connectivity.
| function | Community Edition | Intel® SoC FPGA Edition | |
| application Performance analysis |
Streamline Performance analysis |
Limited subset | ● |
| of bare metal debug |
Intel® FPGA Download Cable II | ● | |
| DStream | ● | ||
| Linux* kernel debugging | ● | ||
| RTOS debugging | ● | ||
| of the processor trace |
Coresight STM trace of |
● | |
| compiler | Linaro GCC | ● | ● |
| Bare metal GCC | ● | ● | |
| ARM Compiler 5 | ● | ||
| ARM Compiler 6 | ● | ||
| OS awareness | Linux, Android, RTOS | ● | ● |
| Debugging OS applications | Debugging Linux* Applications (GDB) | ● | ● |
| Debugging Android Applications (ADB) | ● | ● | |
| price | Activation code or serial number | Included free with SoC EDS installation | Please contact us. Included free with select Intel® SoC FPGA development kits |
For details on each Arm® DS-5™ Edition, please see the following pages.
ARM® DS-5™ Intel® SoC FPGA Edition Toolkit (Intel site)
1-2. Related information
Please refer to the following page for SoC EDS information (as of November 2018).
SoC EDS product introduction page
SoC EDS download page
For more information on Arm® DS-5™ license management, please see the guidebook below (as of November 2018).
ARM® DS-5 Version 5 License Management Guide
2. Advance preparation
This section explains the necessary preparations before setting the license.
2-1. Downloading and installing SoC EDS
Download the files for the corresponding edition and version from the "SoC EDS Download Page" introduced in "1-2. Related Information", then follow the on-screen instructions to install. For details on how to download and install SoC EDS, please refer to the following page.
How to install SoC EDS
SoC EDS has two editions:
| SoC EDS Standard Edition | SoC EDS Pro Edition | |
| Support content | Includes broad support for 28nm SoC FPGA device families (Cyclone® V SoC and Arria® V SoC). | Optimized support for the latest features of the next-generation SoC FPGA device families (Intel® Arria® 10 SoC and Intel® Stratix® 10 SoC). |
| Download files for 18.0 | SoCEDSSetup-18.0.0.614-windows.exe | SoCEDSProSetup-18.0.0.219-windows.exe |
Intel® Arria® 10 SoC is supported in both Standard and Pro Editions, but we recommend using Pro Edition for specific optimizations for Intel® Arria® 10 SoC .
SoC EDS is differentiated between Arm® DS-5™ Community Edition (free version) and Arm® DS-5™ Intel® SoC FPGA Edition (paid version) depending on how the license is set. Therefore, different editions of SoC EDS (Standard or Pro) do not result in different editions of Arm® DS-5™.
2-2. User registration with Arm
You will be asked to register user information during license registration. Please register in advance from the following page of Arm, and make a note of the registered email address and password.
https://login.arm.com/register.php
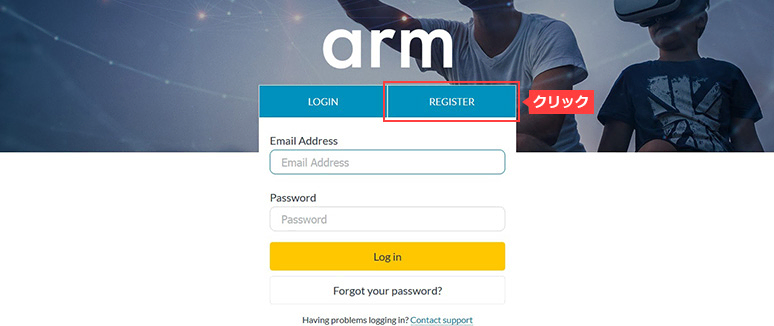
① Click the “REGISTER” tab on the Arm page.
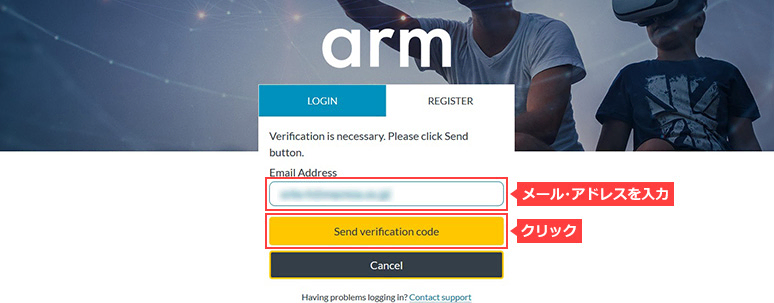
② Enter “Email Address” and click [Send verification code].
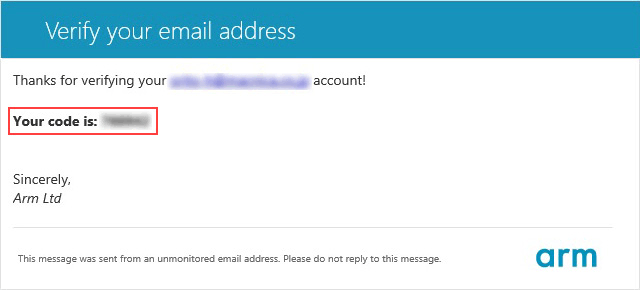
③ A verification code will be sent by E-mail from Arm.
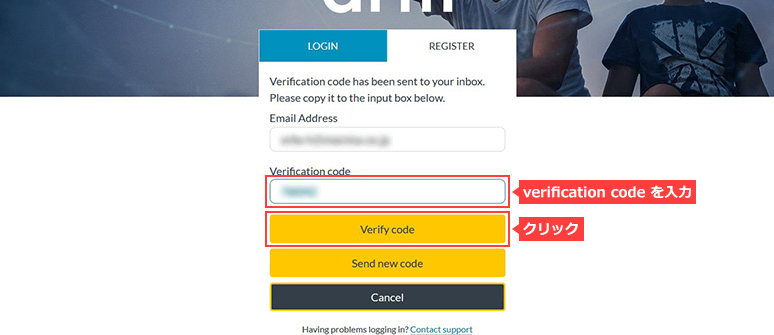
④ Enter the verification code sent to you and click [Verify code].
⑤ Enter “First name”, “Last name”, “Country”, “Password” and “Confirm password” and click [Create].
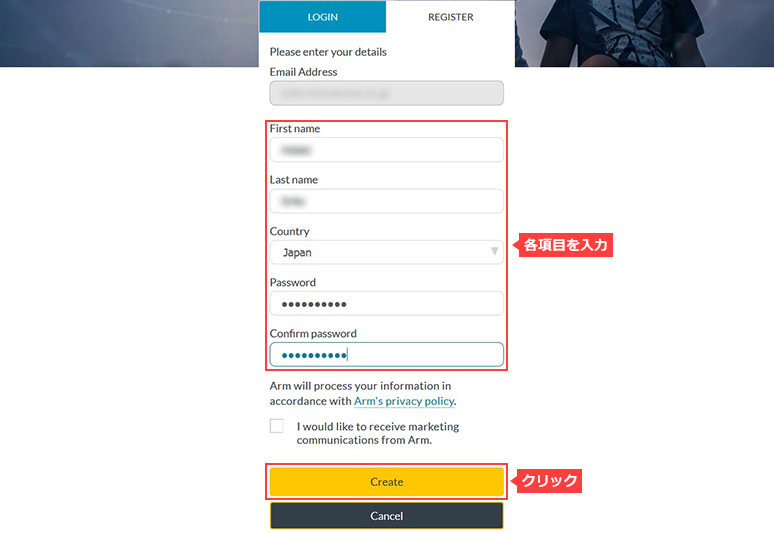
⑥ You will receive an e-mail confirming that your account registration has been completed. Click [Log in] to confirm that you can log in.

2-3. Ethernet MAC Address (Host ID)
In order to install and use Arm® DS-5™, it is necessary to register the Ethernet MAC address as the host ID associated with the license.
The host ID can also be the MAC address of the Ethernet device built into the computer, but in this case the computer will be fixed to the Arm® DS-5™. Also, if you install and connect a commercially available USB connection Wi-Fi (WAN) adapter, etc., and use it as a host ID, you can use it on multiple computers with Arm® DS-5™ installed by replacing the adapter. It is convenient in terms of portability. (Arm® DS-5™ cannot be used on multiple computers at the same time. It can only be used on one computer whose host ID is recognized by USB connection.)
You can check the Ethernet MAC address (physical address) by entering the following command from the command prompt of your computer.
ipconfig -all
2-4. Start Arm® DS-5™
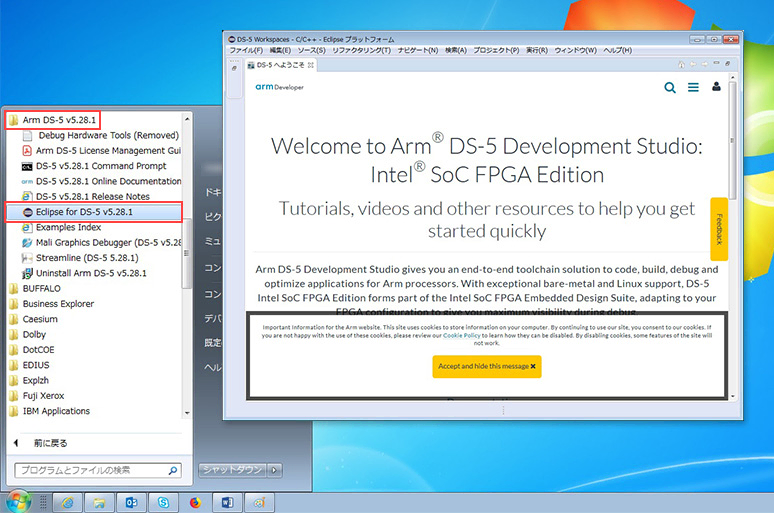
After installing SoC EDS, launch Arm® DS-5™ for licensing. Run Windows Start Menu ⇒ All Programs ⇒ ARM DS-5 v5.28.1 ⇒ Eclipse for DS-5 v5.28.1.
3. How to get the license file directly from the Arm website
To activate licenses from Arm® DS-5™, the ARM License Manager on Arm® DS-5™ must be able to connect to the internet. If the computer on which Arm® DS-5™ is installed is not connected to the Internet, or if you would like to obtain the license file directly from the Arm website, please have your serial number (15 digits) and Ethernet MAC address available. If so, you can generate and download the license file directly from the Arm Software Licensing page below. Then, on the Arm® DS-5™ 'Obtain a new license' screen, select the 'Use an existing license file or license server address' option to configure the license.
The advantage of obtaining the license file directly from the Arm Software Licensing page is that the user can explicitly decide where to store the obtained license file, so the ARM License Manager on Arm® DS-5™ licenses This is easier to understand than the implicit file storage location. The License Manager of Arm® DS-5™ usually places the license file in the following location.
C:\Users\<username>\AppData\Roaming\ARM\DS-5\licenses\XXX.lic
Arm Software Licensing Page
3-1. Obtaining the license file
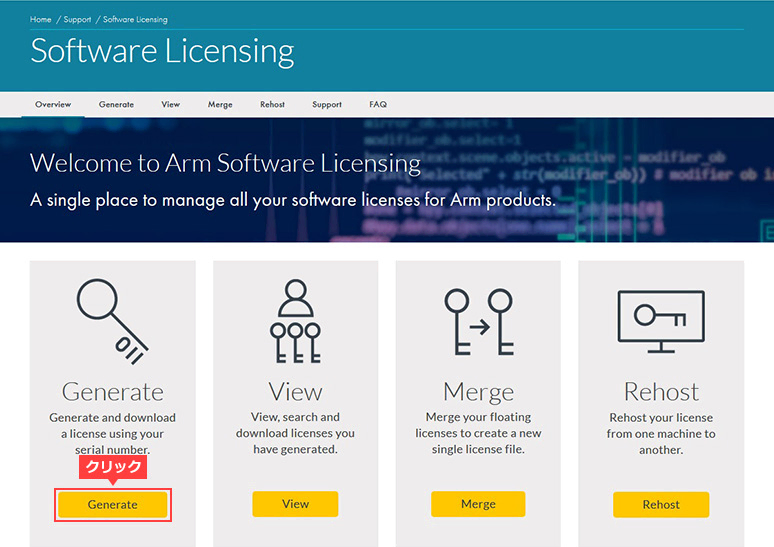
① Go to the "Software Licensing Page". Click Generate.
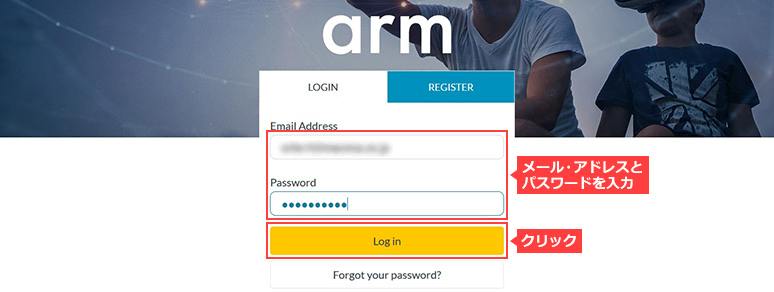
② If the LOGIN screen shown below appears, enter your email address and password and click [Login].
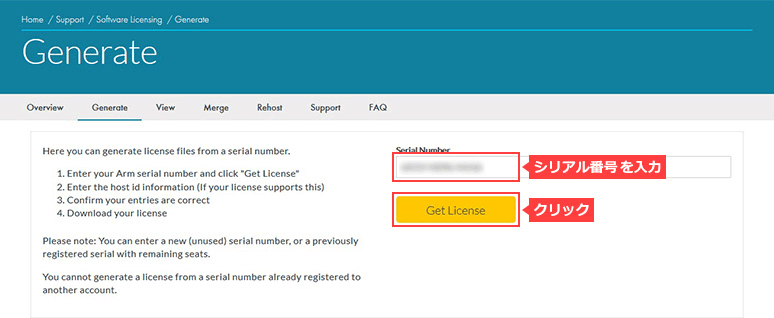
③ A Generate screen like the one below will appear. Enter the serial number (15 digits) including two dashes (-) and click [Get License].
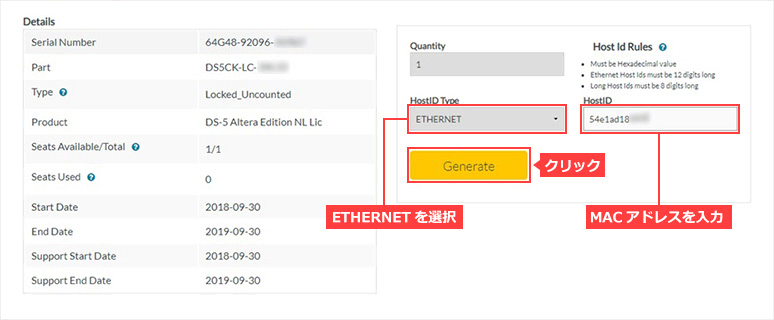
④ Select ETHERNET for “HostID Type”, enter the Ethernet MAC address for “HostID”, and click [Generate].
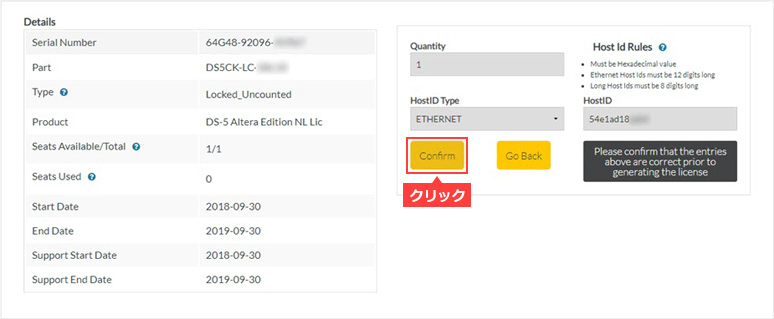
⑤ Click [Confirm].
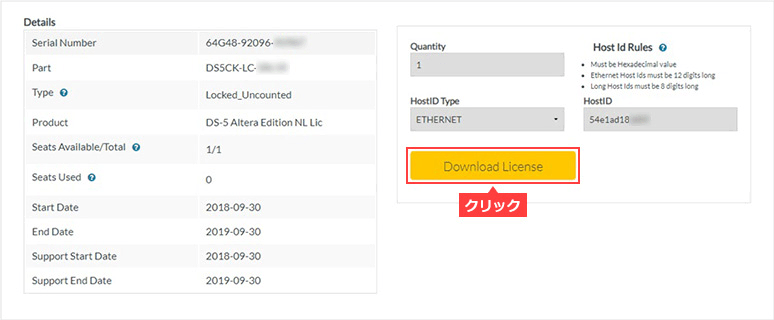
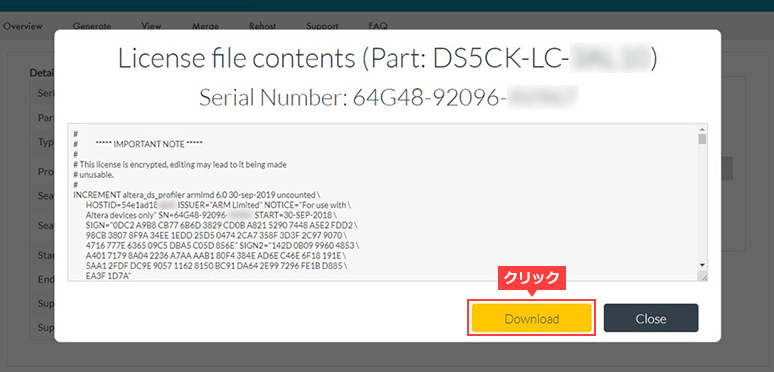
⑥ Click [Download License].
⑦ Click [Download] to download the generated license file.
3-2. License file settings
The following describes how to set up your license using a license file downloaded from the Arm Software Licensing page.
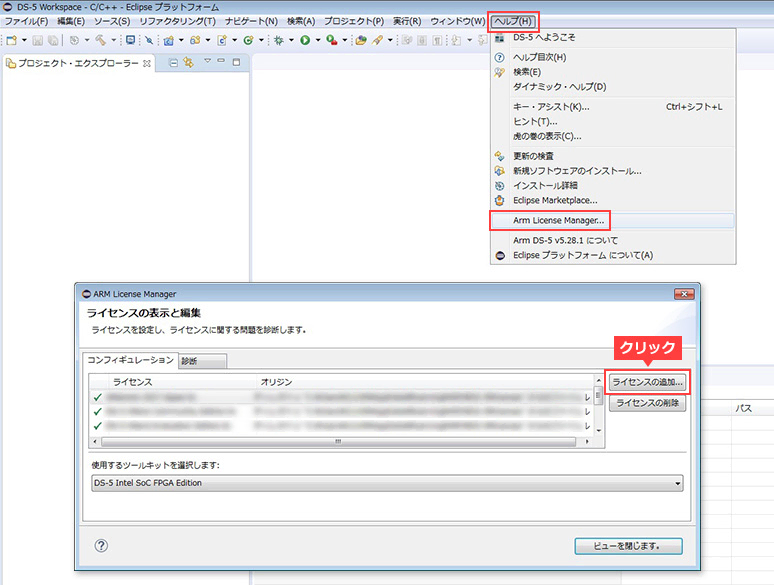
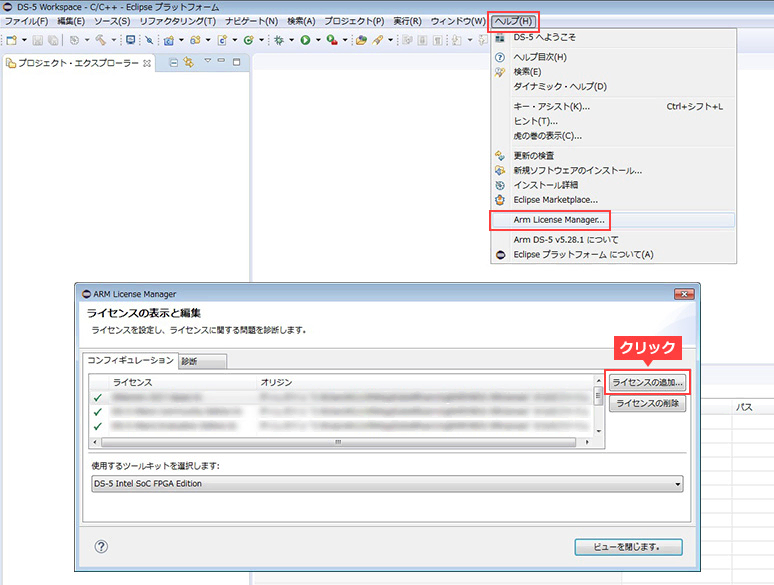
① From Arm® DS-5™, run Help menu ⇒ ARM License Manager. The ARM License Manager will launch, click the Add License button to open the Add License Box.
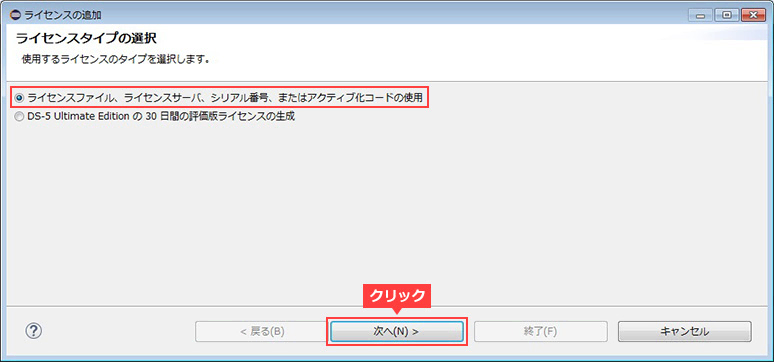
(2) On the license type selection screen, select “License File, License Server, Serial Number, or Activation Code” and click [Next].

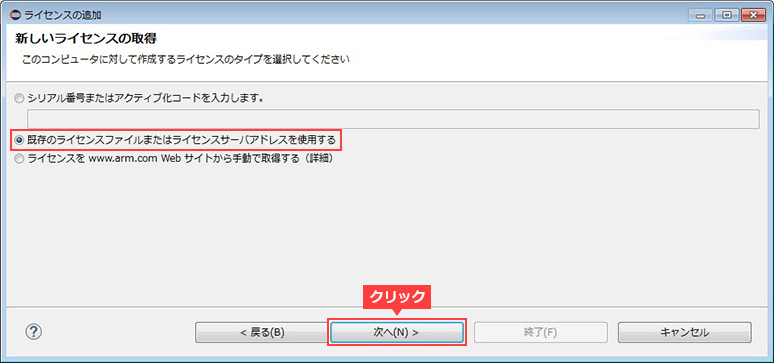
(3) Select “Use an existing license file or license server address” and click [Next].
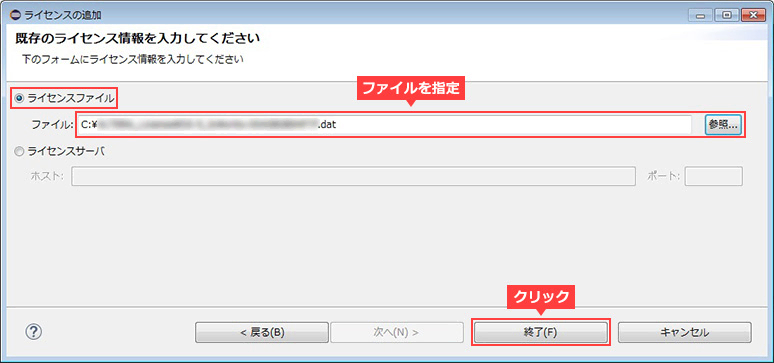
(4) Select “License File” and click [Browse]. Locate (open) the downloaded license file and click Finish.
⑤ Confirm that the downloaded license file (.lic) has been added to the ARM License Manager screen, and select the desired toolkit (in this example, DS-5 Intel SoC FPGA Edition) and click Close View.
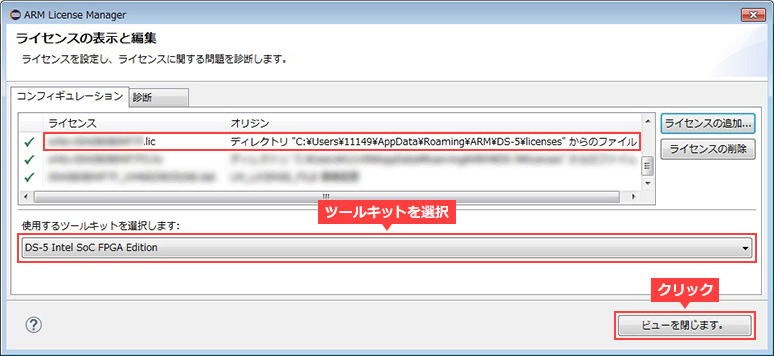
⑥ To apply the license, click [Restart Eclipse] to restart Arm® DS-5™.
If the selected Arm® DS-5™ toolkit (Intel® SoC FPGA Edition in this example) is displayed and Arm® DS-5™ starts, the license setting is complete.

4. How to set the license for Arm® DS-5™ Community Edition (free version)
4-1. Acquisition of activation code
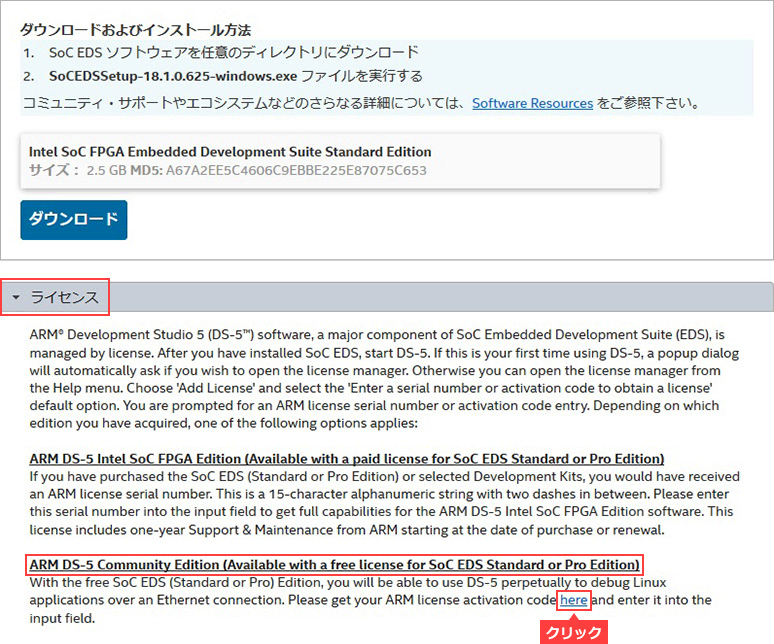
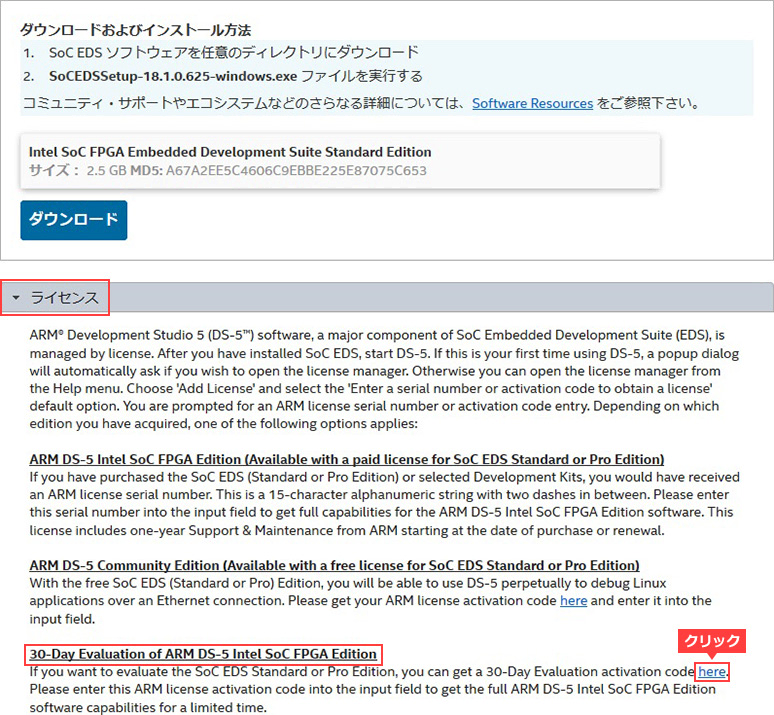
① Open the license explanation tab from the "SoC EDS download page" introduced in "1-2. Related information" and click the activation code link (here) in the red frame in the figure below.
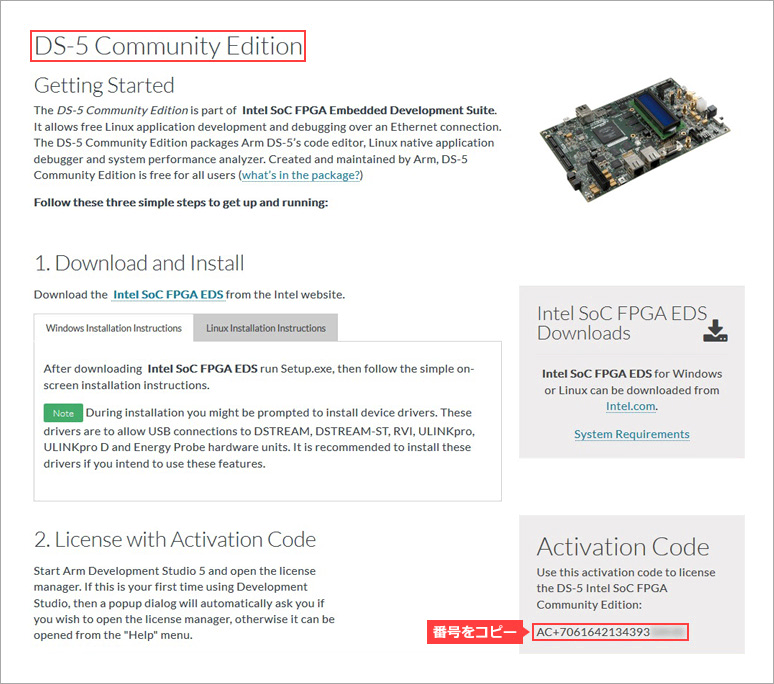
(2) Go to the Arm page and the DS-5 Community Edition page will be displayed as shown below. Copy the Activation Code number at the bottom right.
4-2. License settings
(1) Return to the Arm® DS-5™ Intel® SoC FPGA Edition screen and run Help menu ⇒ ARM License Manager. The ARM License Manager will launch, click the Add License button to open the Add License Box.
(2) On the license type selection screen, select “License File, License Server, Serial Number, or Activation Code” and click [Next].
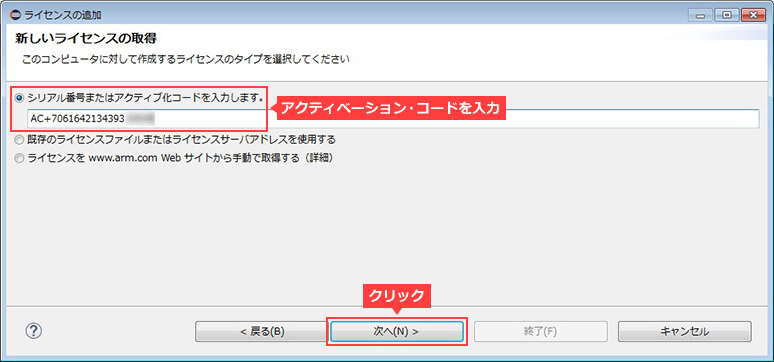
③ Here, enter the activation code you obtained earlier and click [Next].
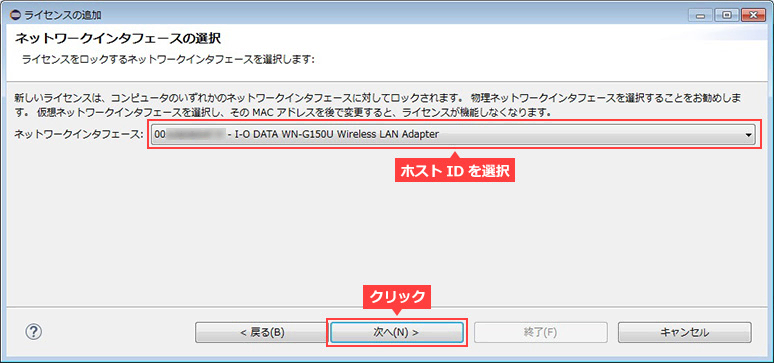
④ Select the host ID and click [Next]. The figure below is an example of selecting the USB WAN adapter attached to the PC.
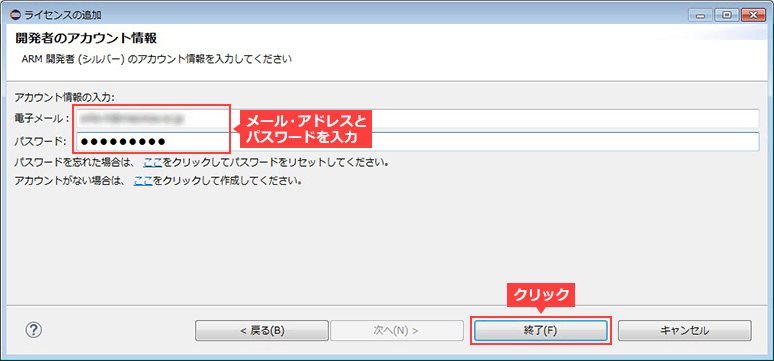
⑤ Enter the e-mail address and password set in the Arm user registration, and click [Finish].
* ARM License Manager must be able to connect to the Internet to activate the license.
* ARM License Manager may not be able to connect to the Internet due to proxy or security software settings, so please review the settings in that case.
⑥ Confirm that DS-5 Altera Community Edition.lic has been added to the ARM License Manager screen, select DS-5 Community Edition from the "Select a toolkit to use:" pull-down, and click [Close view ]Click.
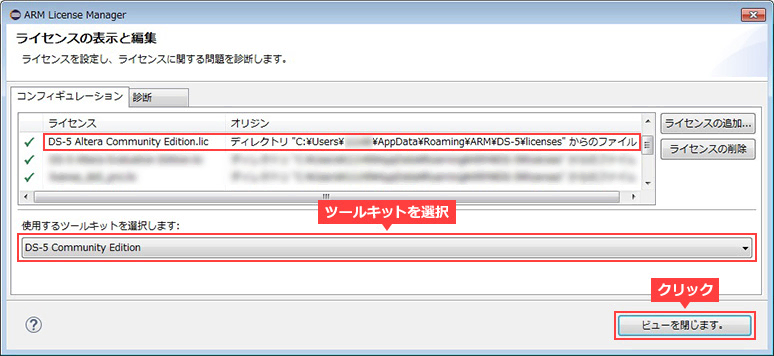
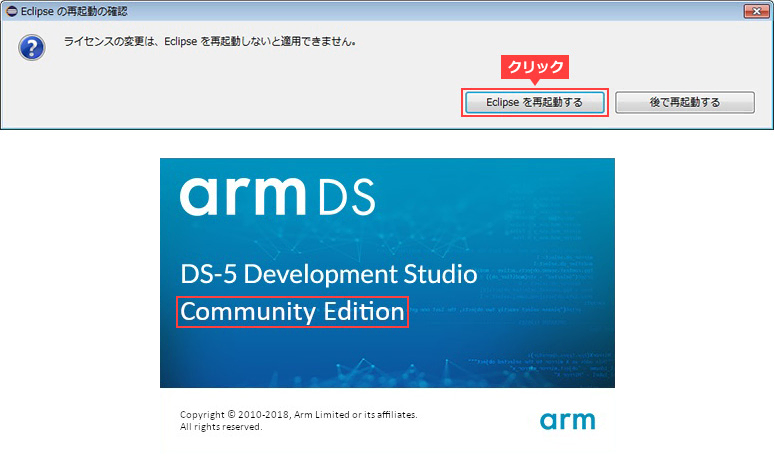
⑦ Click [Restart Eclipse] to restart Arm® DS-5™ to apply the license.
If the Community Edition is displayed and Arm® DS-5™ starts up, the license setting is complete.
5. How to set license for Arm® DS-5™ Intel® SoC FPGA Edition (30-day evaluation version)
The basic procedure for setting the license for Arm® DS-5™ Intel® SoC FPGA Edition (30-day evaluation version) is the same as that for Arm® DS-5™ Community Edition (free version).
5-1. Acquisition of activation code
① From the "SoC EDS download page" introduced in "1-2. Related information", open the license explanation tab and click the 30-day evaluation version activation code link (here) in the red frame in the figure below. To do.
(2) Go to the Arm page, and the DS-5 Intel FPGA Edition 30-Day Evaluation page will be displayed as shown below. Copy the Activation Code and the number at the bottom right.
5-2. License settings
After that, set the license in the same way as for Arm® DS-5™ Community Edition (free version), and finally, it is OK if DS-5 Altera Evaluation Edition.lic is set on the ARM License Manager screen.
① From Arm® DS-5™, run Help menu ⇒ ARM License Manager. The ARM License Manager will launch, click the Add License button to open the Add License Box.
② On the license type selection screen, select “License File, License Server, Serial Number, or Activation Code” and click [Next].
③ Here, enter the activation code you obtained earlier and click [Next].
④ Select the host ID and click [Next]. The figure below is an example of selecting the USB WAN adapter attached to the PC.
⑤ Enter the e-mail address and password set in the Arm user registration, and click [Finish].
* ARM License Manager must be able to connect to the Internet to activate the license.
* ARM License Manager may not be able to connect to the Internet due to proxy or security software settings, so please review the settings in that case.
⑥ Confirm that DS-5 Altera Evaluation Edition.lic has been added to the ARM License Manager screen, and select DS-5 Intel SoC FPGA Edition (Evaluation) from the "Select a toolkit to use:" pull-down menu. and click [Close View].
⑦ Click [Restart Eclipse] to restart Arm® DS-5™ to apply the license.
If the Intel® SoC FPGA Edition is displayed and Arm® DS-5™ starts, the license setting is complete.
6. Arm® DS-5™ Intel® SoC FPGA Edition (paid version) license setting method
The basic procedure for setting the license for Arm® DS-5™ Intel® SoC FPGA Edition (paid version) is the same as the license setting method for Community Edition (free version). For the paid version, the method of obtaining the activation code is different.
6-1. Customers who purchased Arm® DS-5™ Intel® SoC FPGA Edition alone
Please enter the "Guard ID" (15 digits), including two dashes (-), included in the Intel® Development Support Tools annual license contract notice sent by the distributor when you purchased the product.
6-2. Customers who purchased the development kit (development kit bundle version)
The serial number (15 digits) is written on the sheet included in the development kit, so enter it including two dashes (-).
6-3. License settings
① From Arm® DS-5™, run Help menu ⇒ ARM License Manager. The ARM License Manager will launch, click the Add License button to open the Add License Box.
(2) On the license type selection screen, select “License File, License Server, Serial Number, or Activation Code” and click [Next].
③ Here, enter "Guard ID" (15 digits) or serial number (15 digits) including two dashes (-) and click [Next].
④ Select the host ID and click [Next]. The figure below is an example of selecting the USB WAN adapter attached to the PC.
⑤ Enter the e-mail address and password set in the Arm user registration, and click [Finish].
* ARM License Manager must be able to connect to the Internet to activate the license.
* ARM License Manager may not be able to connect to the Internet due to proxy or security software settings, so please review the settings in that case.
⑥ Confirm that the license file has been added to the ARM License Manager screen, select DS-5 Intel SoC FPGA Edition from the "Select a toolkit to use:" pull-down, and click [Close view]. Click.
⑦ Click [Restart Eclipse] to restart Arm® DS-5™ to apply the license. If the Intel® SoC FPGA Edition is displayed and Arm® DS-5™ starts, the license setting is complete.
7. How to Rehost Arm® DS-5™
To move your Arm® DS-5™ license from the computer where it was generated to another computer within your company, you will need to obtain a new license file from Arm with a new host ID.
A host ID is generated from the Ethernet MAC address. Also, license transfers must be between computers within the same legal entity.
You can apply for rehosting from the Arm Software Licensing page below.
Arm Software Licensing Page
7-1. Rehosting procedure
① Go to the "Software Licensing Page" and click [Rehost].
(2) Click [I Accept] if you agree with the disclaimer for the license reissue request.
③ Check the serial number and host ID you want to rehost, check “Rehost”, and click [Rehost].
(4) You will be prompted to enter the reason for rehosting. Select from the pull-down menu (Moving to a new workstation in this example) and click [Rehost].
⑤ Your request has been sent successfully, and you will be informed that Arm Support will contact you later. Click [OK].
⑥ You will receive a license rehost request e-mail from Arm, so click on the “casereference number” in the e-mail.
⑦ Go to the Arm case details page, enter the required details (product serial number or computer host ID) and click [Update case].
7-2. License file settings
Once you have obtained the new license file, set the license in the same way as in "3-2. Setting the License File".
Click here for recommended articles/materials
Articles and materials related to DS-5 utilization
SoC FPGA related articles and resources
Intel® FPGA Development Flow/FPGA Top Page