- Semiconductor BusinessHOME
- Products and Services of Macnica,Inc.
-
technical information

-
Events and Seminars
- Handling Manufacturer
- Support
- Inquiry
- Click here to purchase products
- Semiconductor business e-mail magazine registration
![]()
![]() Narrow down by specifying conditions
Narrow down by specifying conditions
現在2189件がヒットしています。check
![[Introduction to accelerometer] Let's use the tap detection function](/business/semiconductor/articles/Article_136529_cover.png)
In the [Introduction to Accelerometer] series, we will explain the basic usage and application methods, focusing on analog devices' accelerometers. In the previous article, we introduced the "activity/inactivity detection function" using the accelerometer "ADXL345" and "Arduino". In this article, we will introduce the "self-test function" installed in the ADXL345.
[Introduction to accelerometer] Click here for the series list
What is the self-test function?
MEMS accelerometers with mechanical parts generally have a self-test function as a self-diagnosis function. By using the self-test function, you can check the operation of the sensor element and signal processing circuit inside the IC.
When the ADXL345 self-test function is enabled, an electrostatic force acts on the sensor element. This electrostatic force moves the sensor element in the same way as if acceleration were input, resulting in changes in the x, y, and z axis outputs. By confirming whether this output change is within the "SELF-TEST" value specified in the electrical characteristics of the data sheet, it is possible to utilize it as a self-diagnostic function.
In general, accelerometers have data sheets that specify the upper limit of the allowable acceleration value (absolute rating), and applying an excessive shock may damage the IC. The self-test function does not require any intentional impact or force, and the self-diagnosis function is performed only by controlling electrical signals.
Please refer to the following application note for the sensor configuration and the operating principle of the IC.
・ ANJ-0005: What is an Accelerometer?
・Sonic Nirvana: Using MEMS Accelerometers as Acoustic Pickups in Musical Instruments
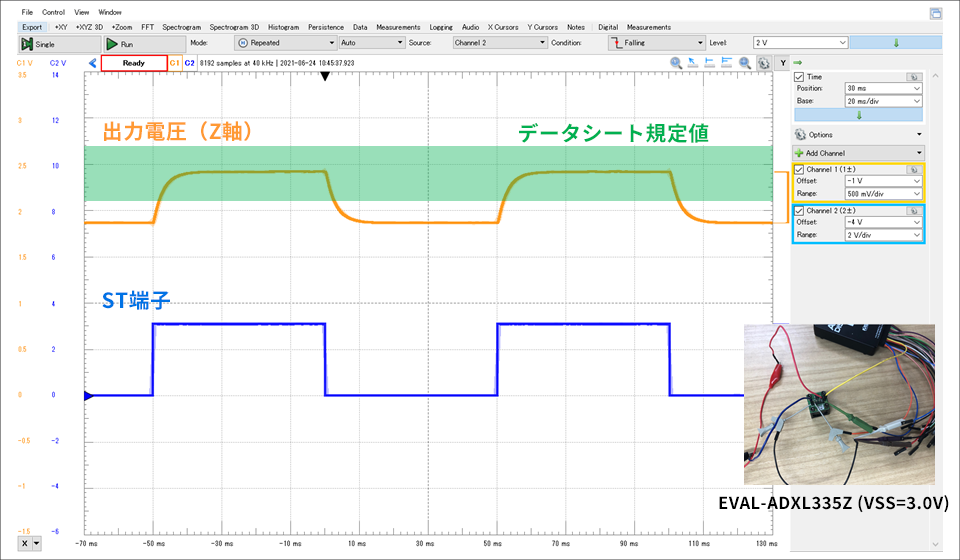
For reference, here are the waveforms when the ADXL335 self-test function is enabled. Since it is an analog output type accelerometer, changes in acceleration can be checked with an oscilloscope. When voltage is applied to the ST pin, the self-test function turns ON during that period, and you can see how the output changes.
Try using the self-test function
We will create a sample program for the "self-test function" using the acceleration sensor "ADXL345" and the hardware open platform "Arduino".
Things to prepare
Here is what I prepared to evaluate the accelerometer this time.
・PC with Arduino IDE installed (Download Arduino IDE from here)
・ Arduino Nano compatible board
・Others (USB cable (for Arduino and PC connection), breadboard, wires)
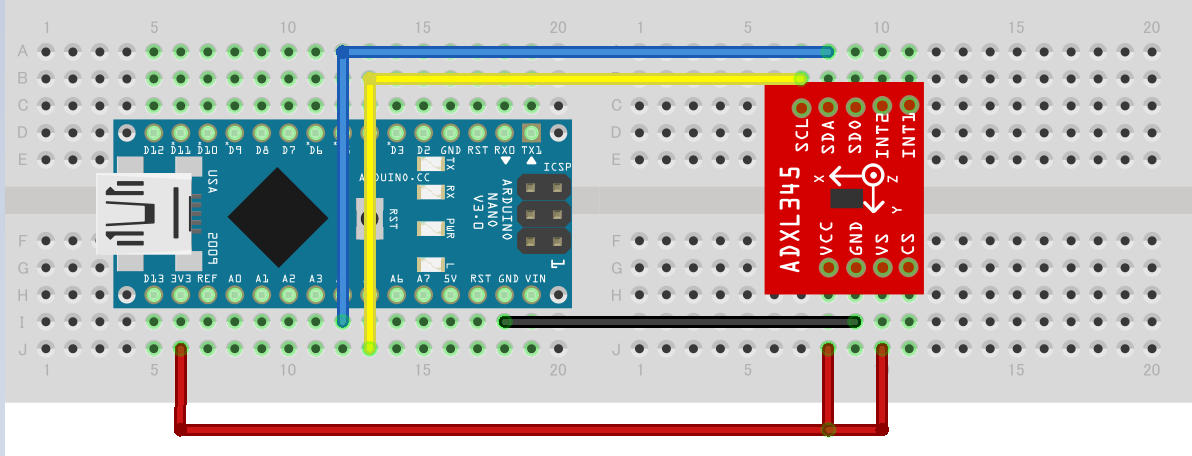
Combine the above parts to form a circuit as shown in the figure below. Power supply to Arduino Nano is supplied by USB bus power from PC. The ADXL345 supports SPI and I2C interfaces, but this time we will use the I2C interface. It also uses the INT1 pin of the interrupt pin.
Program content
The self-test feature is activated by enabling the SELF_TEST bit in the DATA_FORMAT register (address 0x31).
In this program, the board is placed in a stable state without vibration or movement. After that, acquire the acceleration data with the self-test function disabled, then acquire the acceleration data when the self-test function is enabled, and calculate the difference. If the difference is within the specified value, the operation is normal and "self test pass!" is displayed on the serial console.
There are some precautions to be taken when performing the self-test.
・When performing a self-test, measure in a stable state without external vibration.
・In order to ensure a sufficient dynamic range, be careful of the G-range setting when making measurements.
・Because it fluctuates depending on the power supply voltage, consider the scale factor described in the data sheet.
・When the Self-Test mode is ON, it takes a certain amount of time for the output to stabilize.
(The formula is specified in the data sheet, and from "4 x τ (τ = 1/ODR)", in the case of 100 Hz, 4 * 0.01 = 40 msec)
・The ADXL345 recommends 100 to 800Hz and 3200Hz for ODR during self-test.
Detail is data sheet and Application Note "ADXL345 Quick Start Guide" Please refer to
You can download the project file created with the Arduino IDE, so if you are interested, please get it from the "Document Download" below.
operation check
Let's check the operation with the created program. I placed the device on my desk and ran the self-test function, and I could see "self test pass!" displayed on the console. In the video, the self-test time has been adjusted to make it easier to see. The actual time required for the self-test depends on the average number of data acquisitions and the data rate, so please check the evaluation.
Download the sample code verified this time
We provide the Arduino project file that we implemented this time. Please apply from here and give it a try.
About Accelerometer ADXL345
The ADXL345 used this time is a 3-axis digital output acceleration sensor. The main features are as follows.
・A standard accelerometer that is very easy to use with built-in ADC, operation function block, and FIFO
・Acceleration data adopts general I2C/SPI in digital serial method
・The 3-axis type sensor is a rectangular coordinate (X, Y, Z), and the acceleration acting on each axis can be obtained.
・The maximum detectable acceleration can be set in the range of 2g to 16g, and the sampling range is as wide as ~3.2kHz, so it can be applied to various applications such as impact, tilt, and motion detection.
・Flexible mode to reduce current consumption
For more information on the ADXL345, visit www.adxl345.com. data sheet Please refer to. Also, this accelerometer is very easy to use, so if you want to evaluate an accelerometer from now on, please try it on the evaluation board.
At the end
If you have any questions about the contents of this article, or if you have any problems with selecting or using accelerometers, please contact us from the following.
Analog Devices Manufacturer Information Top
If you want to return to Analog Devices Manufacturer Information Top, please click the button below.
![[Introduction to accelerometer] Thumbnail image of Let's use the interrupt function](/business/semiconductor/articles/9d56e574e3a24bcf3f076e91d90f4a53.png)