- Semiconductor BusinessHOME
- Products and Services of Macnica,Inc.
-
technical information

-
Events and Seminars
- Handling Manufacturer
- Support
- Inquiry
- Click here to purchase products
- Semiconductor business e-mail magazine registration
![]()
![]() Narrow down by specifying conditions
Narrow down by specifying conditions
現在2183件がヒットしています。check
Introduction
When considering a CMOS image sensor, I believe that many people would like to use an actual device to evaluate the characteristics and image quality of the CMOS image sensor. However, there may be many people who feel that building an evaluation environment is a hurdle.
ONSEMI provides a smooth evaluation environment that eliminates these concerns. You can immediately evaluate ONSEMI's various CMOS image sensors simply by preparing the evaluation environment and evaluation software introduced here.
environment to prepare
First of all, CMOS This section introduces the environment prepared for evaluating image sensors.
Only the following environment is required.
・ DEMO3 Baseboard: *USB3.0 cable included
Common board base board (USB3.0 using cable computer connected)
・ ISP (Image Signal Processor), image processing chip) Headboard (option) :
For ISP products, DEMO3 and sensor Headboard connect between
・Image sensor Headboard (HB):
Headboards prepared for each sensor
The DEMO3 Baseboard is a board that can be used in common when evaluating all sensors.
Various dockable connectors on this board CMOS image sensor, ISP was implemented Headboard to connect and use. Are considering CMOS image sensor Headboard can be prepared for immediate evaluation.


Evaluation software (DevWareX)
Next, I would like to introduce the evaluation software (DevWareX) for ONSEMI's CMOS image sensors.
Install DevWareX on your own PC and use it by connecting it to the evaluation board with a USB cable. DevWareX allows you to evaluate image sensor image quality, sensor characteristics (noise, etc.), register settings, and create configuration files.
The figure below shows the screen of DevWareX.


The Info Window allows you to check the sensor model number, I/F information, operating temperature conditions, operating clock, output size, frame-rate, etc.
Also, in the register window, you can check the details of each register and set / change the registers. Smooth evaluation is possible by making arbitrary settings while checking the image quality.
Image Sensor Control
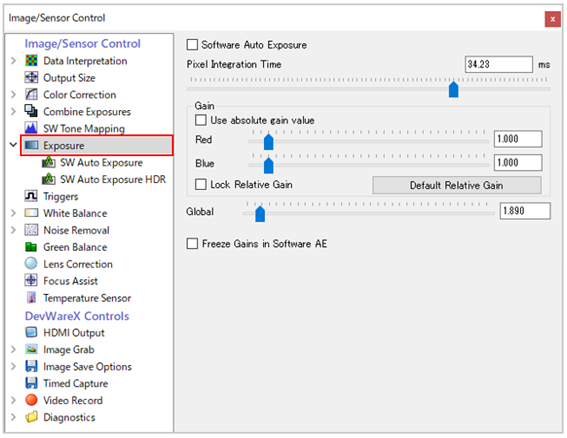
Next is an introduction to the Image Sensor Control provided on the Control Tab.
Here you can set various adjustments of the image sensor (exposure time setting, gain setting, etc.) on the GUI.
The figure below shows the exposure time setting screen. The shutter speed and gain settings can be set / changed arbitrarily on the GUI.
Other convenient functions include image capture, video save, Watch function (displays fluctuating register values in real time), and Log function.
screen capture

Screen captures can be saved by selecting “Image Save Options” on the right. As saved data, it is possible to save raw data (RAW/PNG, etc.), displayed image data, register information at the time of capture, etc.
Log function

Next is an introduction to the Log function.
By using this function, you can save the register values that have been set / changed in Sensor Control.
For example, if Gain is changed in the Exposure setting item of Sensor Control, the register information of which register was accessed / changed can be saved as a Log value as shown in the right figure.
Preservation method
You can save it as a setting file (.ini) by clicking “Save to Ini..” below. The sensor can be activated based on the register setting information created using the created ini file.

Graph function

In addition, it also has a Graph function that allows you to see the output value of the sensor in real time, and you can also evaluate Intensity (strength) and Noise.


lastly
By using Onsemi's image sensor evaluation software (DevWareX), you can easily evaluate image sensors and create configuration files.
Inquiry
Please contact us if you are considering purchasing an evaluation board or considering an image sensor.
*Evaluation software required for sensor setup is subject to NDA. Therefore, a bilateral NDA between Onsemi and the customer is required prior to purchase of the evaluation board.
Onsemi Manufacturer information Top
If you want to go back to ONSEMI Manufacturer Information Top, please click below.