- Semiconductor BusinessHOME
- Products and Services of Macnica,Inc.
-
technical information

-
Events and Seminars
- Handling Manufacturer
- Support
- Inquiry
- Click here to purchase products
- Semiconductor business e-mail magazine registration
![]()
![]() Narrow down by specifying conditions
Narrow down by specifying conditions
現在2189件がヒットしています。check
In this series, we will explain various video encoding using Jetson Multimedia API over 3 episodes.
This first article is about using the video encoder provided by the Jetson Multimedia API.
[Video encoding by Jetson Multimedia API]
Episode 1 How to use the encoder
Episode 2 Encoding with Libargus (CSI) camera as input
Episode 3 Slice encoding
Introduction
NVIDIA's Jetson module has a built-in hardware accelerator dedicated to video encoding. This accelerator frees the CPU from heavy video encoding processing.
A common way to perform video encoding with Jetson is to use GStreamer, which is covered in another article.
Jetson Video Processing Programming Episode 6 Video Encoding
GStreamer can easily realize multiplexing with audio streams, distribution, video analysis, etc., and can easily be multi-channeled. However, there are times when finer control and lower latency are desired, in which case the Jetson Multimedia API, which is located below GStreamer, can be effective.
V4L2 Video Encoder
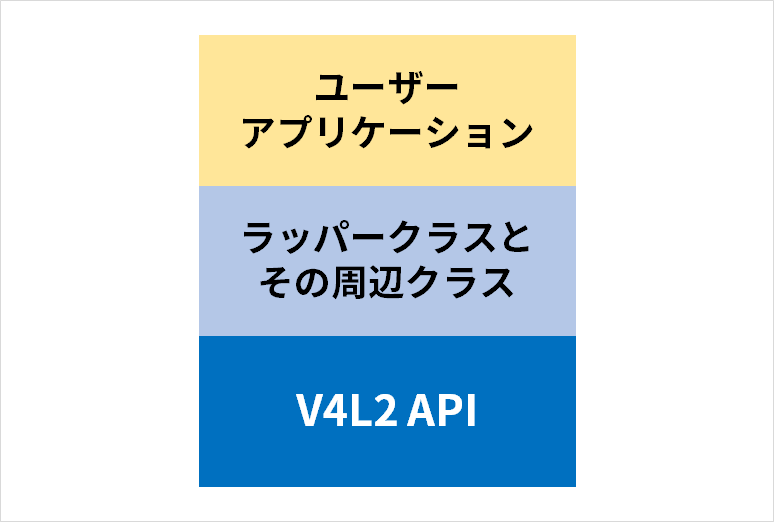
The video encoder provided by Jetson Multimedia API is Video for Linux 2 (V4L2) compliant. In other words, it is possible to develop applications that do not depend on NVENC, which is specific to NVIDIA's platform (or that do not depend on it as much as possible). However, Jetson Multimedia API provides a wrapper class and its peripheral classes for the V4L2 Video Encoder, and provides an easier-to-use API at the same time.
The Jetson Multimedia API includes 01_video_encode sample code that demonstrates how to use this wrapper class, NvVideoEncoder.
In this article, we will explain how to use NvVideoEncoder based on the contents of this sample code.
How to try the sample code
First, copy the complete Jetson Multimedia API to your user directory so that you can freely modify the sample code.
cd ~cp -r /usr/src/jetson_multimedia_api/ ./Build all sample code.
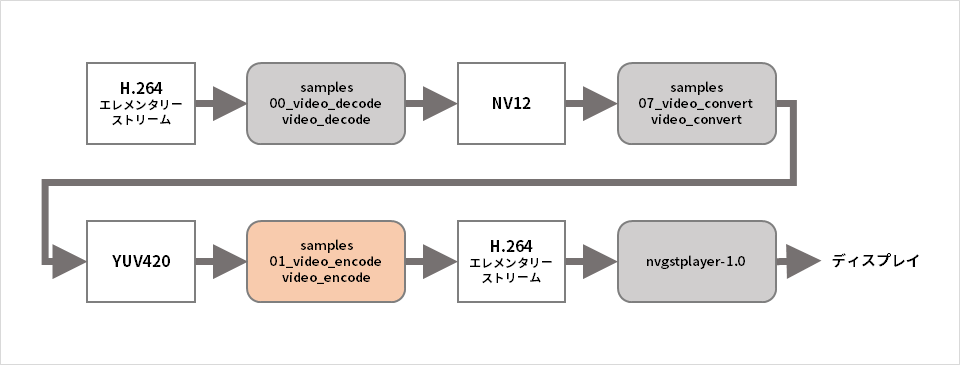
cd jetson_multimedia_apimakeThe encoder sample program takes a YUV file as input, but since this type of test input file does not exist, we will start by generating a test input file. A test H.264 file comes with the Jetson Multimedia API, so let's decode it to generate a YUV file.
cd samples/00_video_decode./video_decode H264 --disable-rendering -o test.nv12 ../../data/Video/sample_outdoor_car_1080p_10fps.h264I was able to generate a YUV file above, but there are many formats for YUV files. The NV12 format was generated above, but this time, convert it to the YUV420 format that the encoder sample program can handle.
cd ../07_video_convert/./video_convert ../00_video_decode/test.nv12 1920 1080 NV12 test.yu12. 1920 1080 YUV420The test input file has been generated. Let's run the encoder sample program.
cd ../01_video_encode/./video_encode ../07_video_convert/test.yu12.0 1920 1080 H264 output.h264The encoded bitstream was saved in output.h264. Play it back to see if it's encoded correctly.
nvgstplayer-1.0 -i output.h264The above flow is illustrated below.
Encoder usage procedure
Finally, let's summarize the procedure for using the encoder from the contents of the 01_video_encode sample program.
application thread
1. Open the input YUV file
2. Open output bitstream file
3. Create NvVideoEncoder object
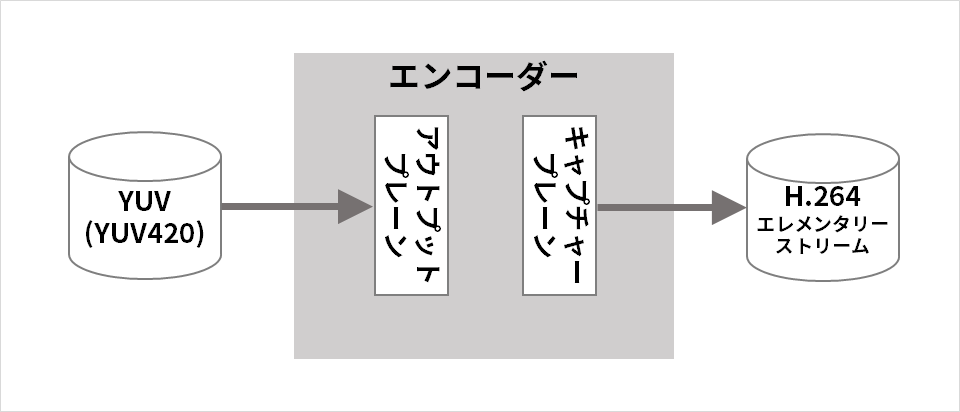
4. Capture plane (encoder output side) settings (video codec selection H.264/H.265/VP8/VP9, encoded frame size, etc.)
5. Setting the output plane (input side of the encoder) (input image format and input frame size)
6. Other encoding settings
7. Start streaming output plane
8. Start streaming capture plane
9. Register capture plane dequeue callback function
10. Start capture plane dequeue thread
11. Put an empty buffer in the capture plane (queue)
12. Read YUV data from file into buffer and put the buffer into output plane (queue)
Below, repeat until all the contents of the input YUV file are encoded
13. Remove used buffers from the output plane (dequeue)
14. Read YUV data from file into buffer and put the buffer into output plane (queue)
callback function
1. The buffer extracted by the capture plane dequeue thread is passed as an argument of the callback function, so the bitstream (encoding result) stored in that buffer is written to the output file.
2. Return used buffers to the capture plane (queue)
Next time, I will explain about encoding with Libargus (CSI) camera as input
In this article, we introduced how to use NvVideoEncoder. What did you think?
In the next two episodes, we will introduce encoding using Libargus (CSI) camera input and slice encoding. Clicking the button will take you to a simple form input screen. After completing the input, you will be notified by email of the URL for episodes 2 and 3.
Inquiry

