- Semiconductor BusinessHOME
- Products and Services of Macnica,Inc.
-
technical information

-
Events and Seminars
- Handling Manufacturer
- Support
- Inquiry
- Click here to purchase products
- Semiconductor business e-mail magazine registration
![]()
![]() Narrow down by specifying conditions
Narrow down by specifying conditions
現在2168件がヒットしています。check

Part 6 of this series will introduce how to encode a video.
[Jetson video processing programming]
Episode 1 What you can do with JetPack and SDK provided by NVIDIA
Episode 2 Video input (CSI-connected Libargus-compliant camera)
Episode 3 Video input (USB-connected V4L2-compliant camera)
Episode 4 Resize and format conversion
Episode 6 Video encoding
Episode 9 Deep Learning Inference
Episode 10 Maximum Use of Computing Resources
Now let's think about how to encode a video. Video encoding is a very computationally intensive process. Although it can be processed by the CPU, it is inefficient because it occupies a lot of CPU resources in the video encoding process. Jetson is equipped with the NVIDIA Video Encoder Engine(NVENC), a hardware accelerator dedicated to video encoding, so normally video is encoded using this NVENC. Don't worry if it's a hardware accelerator. High-speed encoding with NVENC is available using GStreamer, a well-known multimedia processing framework. Alternatively, high-speed encoding with NVENC is also available from the Jetson Multimedia API that conforms to the V4L2 API.
Implementation method
Here's how to implement video encoding with NVENC.
| APIs | programming language | comment |
| GStreamer |
C Python |
|
| Jetson Multimedia API | C |
|
Use GStreamer
The GStreamer framework assembles multimedia processing by combining components called plug-ins. Video encoding plug-ins are provided by NVIDIA, so use them. There is a plug-in for each corresponding codec (H.264, H.265, VP8, VP9). It's included in JetPack, so it's ready to use.
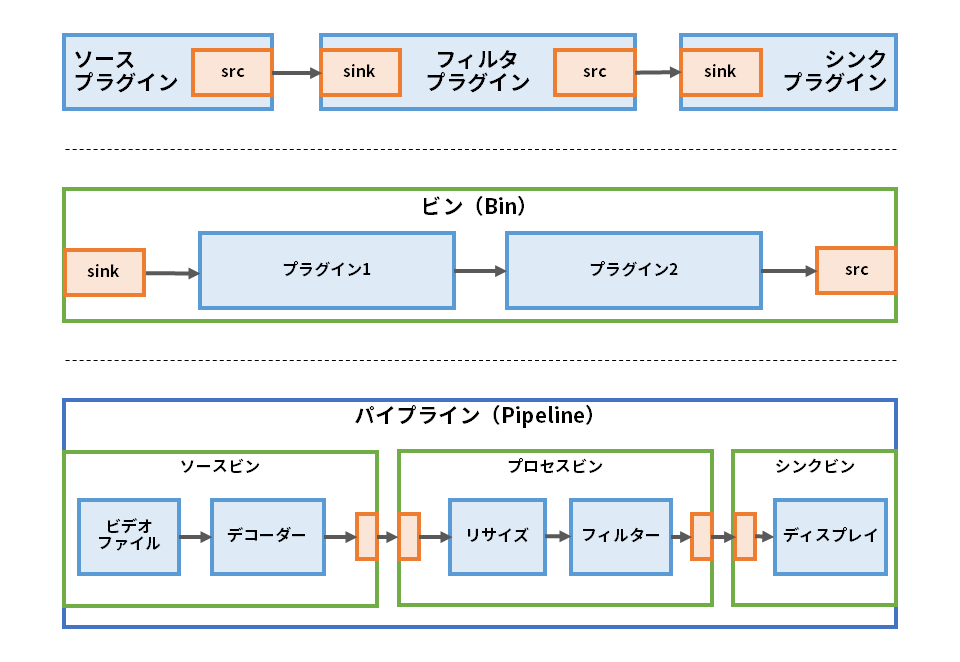
| component | function |
|
Plugin |
|
| bottle BIN |
|
| pipeline PIPELINE |
|
Prototyping the GStreamer pipeline
Incorporating GStreamer into an application usually requires programming in C or Python. However, the command gst-launch-1.0 allows prototyping of GStreamer pipelines on the command line.
We have prepared a shell script that generates sample commands so that you can easily try this prototyping. Please download it from the following GitHub repository and use it.
https://github.com/MACNICA-CLAVIS-NV/nvgst-venc-pipes
For details on how to use the shell script, please refer to the explanation written in the GitHub repository, so let's try it first.
Encode image from V4L2 camera and save file
$ ./v4l2cam_enc.shEncode images captured from V4L2 compliant cameras such as webcams with H.264 codec and save the generated bitstream as a file in MP4 format. You can change to H.265 codec by command option. What is displayed during operation is the image being captured from the camera.
Exit is Ctrl-C.
The commands generated by this script are saved in the pipeline.txt file.
gst-launch-1.0 -e v4l2src device=/dev/video0 ! "video/x-raw, width=(int)640, height=(int)480, framerate=(fraction)30/1" ! videoconvert ! "video/x-raw, format=(string)NV12" ! nvvidconv ! "video/x-raw(memory:NVMM), format=(string)NV12" ! tee name=t t. ! queue ! nvv4l2h264enc bitrate=4000000 control-rate=1 iframeinterval=30 bufapi-version=false peak-bitrate=0 quant-i-frames=4294967295 quant-p-frames=4294967295 quant-b-frames=4294967295 preset-level=1 qp-range="0,51:0,51:0,51" vbv-size=4000000 MeasureEncoderLatency=false ratecontrol-enable=true maxperf-enable=false idrinterval=256 profile=0 insert-vui=false insert-sps-pps=false insert-aud=false num-B-Frames=0 disable-cabac=false bit-packetization=false SliceIntraRefreshInterval=0 EnableTwopassCBR=false EnableMVBufferMeta=false slice-header-spacing=0 num-Ref-Frames=1 poc-type=0 ! h264parse ! qtmux ! filesink location=output.mp4 t. ! queue ! nvegltransform ! nveglglessinkEncode images from V4L2 cameras and display decoded results in real time
$ ./v4l2cam_encdec.shThis time, the bitstream generated by the encoding is decoded by the GStreamer pipeline on the receiver side via shared memory and displayed in real time.
Command executed on the sender side (automatically started from v4l2cam_encdec.sh)
gst-launch-1.0 -e v4l2src device=/dev/video0 ! "video/x-raw, width=(int)640, height=(int)480, framerate=(fraction)30/1" ! videoconvert ! "video/x-raw, format=(string)NV12" ! nvvidconv ! "video/x-raw(memory:NVMM), format=(string)NV12" ! queue ! nvv4l2h264enc bitrate=4000000 control-rate=1 iframeinterval=30 bufapi-version=false peak-bitrate=0 quant-i-frames=4294967295 quant-p-frames=4294967295 quant-b-frames=4294967295 preset-level=1 qp-range="0,51:0,51:0,51" vbv-size=4000000 MeasureEncoderLatency=false ratecontrol-enable=true maxperf-enable=false idrinterval=256 profile=0 insert-vui=false insert-sps-pps=false insert-aud=false num-B-Frames=0 disable-cabac=false bit-packetization=false SliceIntraRefreshInterval=0 EnableTwopassCBR=false EnableMVBufferMeta=false slice-header-spacing=0 num-Ref-Frames=1 poc-type=0 ! h264parse config-interval=1 ! shmsink socket-path=/tmp/foo wait-for-connection=false shm-size=268435456Command executed on receiver side (automatically started from v4l2cam_encdec.sh)
GST_SHARK_CTF_DISABLE=TRUE GST_DEBUG="*:0" GST_TRACERS="" gst-launch-1.0 -e shmsrc socket-path=/tmp/foo is-live=true ! h264parse ! queue ! nvv4l2decoder ! nvegltransform ! nveglglessinkEncode image from CSI camera and save file
$ ./arguscam_enc.shThe commands executed are:
gst-launch-1.0 -e nvarguscamerasrc sensor-id=0 ! "video/x-raw(memory:NVMM), width=640, height=480, format=NV12, framerate=(fraction)30/1" ! tee name=t t. ! queue ! nvv4l2h264enc bitrate=4000000 control-rate=1 iframeinterval=30 bufapi-version=false peak-bitrate=0 quant-i-frames=4294967295 quant-p-frames=4294967295 quant-b-frames=4294967295 preset-level=1 qp-range="0,51:0,51:0,51" vbv-size=4000000 MeasureEncoderLatency=false ratecontrol-enable=true maxperf-enable=false idrinterval=256 profile=0 insert-vui=false insert-sps-pps=false insert-aud=false num-B-Frames=0 disable-cabac=false bit-packetization=false SliceIntraRefreshInterval=0 EnableTwopassCBR=false EnableMVBufferMeta=false slice-header-spacing=0 num-Ref-Frames=1 poc-type=0 ! h264parse ! qtmux ! filesink location=output.mp4 t. ! queue ! nvegltransform ! nveglglessinkEncode the image from the CSI camera and display the decoding result in real time
$ ./arguscam_encdec.shThe commands executed are:
Commands executed on the sender side (automatically started from arguscam_encdec.sh)
gst-launch-1.0 -e nvarguscamerasrc sensor-id=0 ! "video/x-raw(memory:NVMM), width=640, height=480, format=NV12, framerate=(fraction)30/1" ! queue ! nvv4l2h264enc bitrate=4000000 control-rate=1 iframeinterval=30 bufapi-version=false peak-bitrate=0 quant-i-frames=4294967295 quant-p-frames=4294967295 quant-b-frames=4294967295 preset-level=1 qp-range="0,51:0,51:0,51" vbv-size=4000000 MeasureEncoderLatency=false ratecontrol-enable=true maxperf-enable=false idrinterval=256 profile=0 insert-vui=false insert-sps-pps=false insert-aud=false num-B-Frames=0 disable-cabac=false bit-packetization=false SliceIntraRefreshInterval=0 EnableTwopassCBR=false EnableMVBufferMeta=false slice-header-spacing=0 num-Ref-Frames=1 poc-type=0 ! h264parse config-interval=1 ! shmsink socket-path=/tmp/foo wait-for-connection=false shm-size=268435456Command executed on receiver side (automatically started from arguscam_encdec.sh)
GST_SHARK_CTF_DISABLE=TRUE GST_DEBUG="*:0" GST_TRACERS="" gst-launch-1.0 -e shmsrc socket-path=/tmp/foo is-live=true ! h264parse ! queue ! nvv4l2decoder ! nvegltransform ! nveglglessinkGStreamer API
After prototyping on the command line, integrate it into your application with the GStreamer API.
The NVIDIA DeepStream SDK is based on GStreamer, so the information on the DeepStream SDK is also helpful.
Using GStreamer from OpenCV
The default OpenCV installed by JetPack does not have a Jetson-specific hardware accelerator enabled, but by using GStreamer as the backend of OpenCV VideoWriter, high-speed video encoding by Jetson's NVENC can be used from OpenCV. .
You can get stream data from OpenCV with appsrc plugin.
import cv2 import sys FILE = 'test.mp4' GST_COMMAND = 'appsrc ! videoconvert ! nvvidconv ! video/x-raw(memory:NVMM), format=(string)I420 ! nvv4l2h264enc bitrate=10000000 ! video/x-h264, stream-format=(string)byte-stream ! h264parse ! qtmux ! filesink location={}'.format(FILE) WIDTH = 640 HEIGHT = 480 cam_id = 0 cap = cv2.VideoCapture(cam_id) cap.set(cv2.CAP_PROP_FRAME_WIDTH, WIDTH) cap.set(cv2.CAP_PROP_FRAME_HEIGHT, HEIGHT) out = cv2.VideoWriter(GST_COMMAND, 0, 30, (WIDTH, HEIGHT)) if not cap.isOpened(): print("Cannot open camera") sys.exit() while True: ret, frame = cap.read() cv2.imshow("Test", frame) out.write(frame) key = cv2.waitKey(1) if key == 27: # ESC break cv2.destroyAllWindows() cap.release() sys.exit()Leverage Multimedia APIs
Video encoding using NVENC can also be used with the V4L2 Video Encoder included in the Jetson Multimedia API.
Please refer to the sample code included in JetPack for usage. The sample code exists in the following path on Jetson.
/usr/src/jetson_multimedia_api/samples
Next time, I will explain video decoding!
How did you like the 6th episode of the series "Jetson Video Processing Programming", introducing video encoding?
Next time, I will introduce video decoding.
If you have any questions, please feel free to contact us.
We offer selection and support for hardware NVIDIA GPU cards and GPU workstations, as well as facial recognition, route analysis, skeleton detection algorithms, and learning environment construction services. If you have any problems, please feel free to contact us.


Related information
![[Knowledge required for AI image analysis application development] Episode 1 Thumbnail image of NVIDIA DeepStream SDK](/business/semiconductor/articles/134117_thumb_r_17.png)
![[Acceleration of deep learning inference] Episode 1 Thumbnail image of the overview of NVIDIA TensorRT](/business/semiconductor/articles/136485_thumb_6.png)