- Semiconductor BusinessHOME
- Products and Services of Macnica,Inc.
-
technical information

-
Events and Seminars
- Handling Manufacturer
- Support
- Inquiry
- Click here to purchase products
- Semiconductor business e-mail magazine registration
![]()
![]() Narrow down by specifying conditions
Narrow down by specifying conditions
現在2168件がヒットしています。check

Introduction
hello! I'm Kurami.
In the previous article, I found out which pin of FPGA has what kind of role.
But here comes another question.
"Even if the user can freely arrange the user I/O, how should I actually use Quartus® Prime to arrange the pins?"
This time, we will solve such questions.
Explanation of pin placement using Pin Planner
First, set the part number of the FPGA used in Quartus® Prime. Analysis & Elaboration is performed to check the syntax and connection status of the language and schematic design that you want to implement in FPGA.
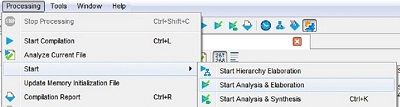
If you get an error, fix it. After correcting the error, perform pin assignment.
Select Pin Planner from the Assignments menu on the toolbar.
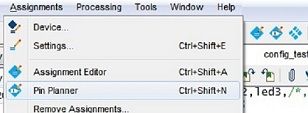
When selected, the following screen will appear.
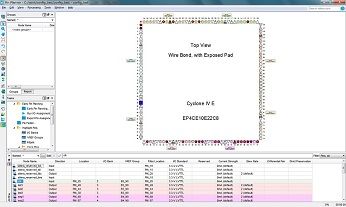
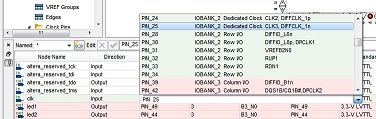
The Top View in the upper right shows the pins of the device.
The All Pins list below shows a list of Input/Output signals at the top level of the project.
Select a pin name from the All Pins list on this screen, and drag and drop it where you want to place it.
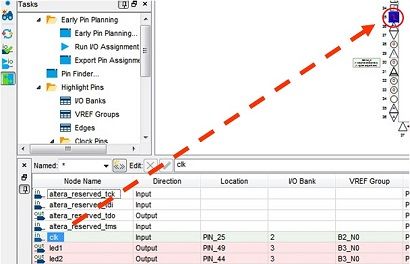
For example, if you place (drag and drop) a signal called clk on pin 25, PIN_25 will be entered in the Location field as shown above. Now you can place the pins.
Another option is to select from a spreadsheet.
Double-click the Location item of the pin name you want to set in the All Pins list.
Then you can select the available pin numbers from the screen shown below.
You can also enter the pin number directly in the Location item. Please do it in an easy way.
After finishing the pin placement, close the Pin Planner without saving.
The settings are reflected in Quartus® Prime at the time the pins are arranged in the Pin Planner.
Finally, let's check to see if everything is set up as expected.
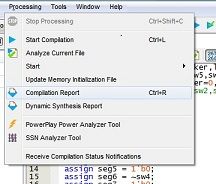
Now that Pin Planner has completed pin placement, start Compilation.
Then select Processing → Compilation Report from the toolbar.
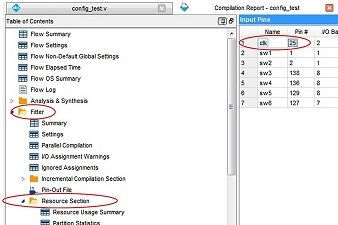
If you select Fitter → Resource Section from the Table of Contents on the screen, you can see that the set pinout is reflected.
Now you know how to do pinouts in Quartus® Prime.
Summary
Finally, we summarize the pinout method.
1. Start Pin Planner after Analysis & Elaboration
2. Enter the pin number directly in the Location field or select from the spreadsheet
3. Execute Start Compilation to complete pin placement
You've rescued the lost pins!
Be sure to check out our next article! !