
![]()
![]() Narrow down by specifying conditions
Narrow down by specifying conditions
現在1888件がヒットしています。check

This article describes licensing for Arm® Development Studio (DS) for Intel® SoC FPGA Edition (Arm® DS Intel® SoC FPGA Edition), a software development tool for Intel® SoC FPGA devices.
1.First of all
2. User registration with Arm
3. Preparing the Ethernet MAC Address (Host ID)
4. How to obtain a license file from the Arm website
5. Launch Arm® DS Intel® SoC FPGA Edition
6. Setting up the license file
7. How to Rehost Arm® DS Intel® SoC FPGA Edition
1.First of all
1-1. SoC EDS License
● Arm® DS Intel® SoC FPGA Edition is the only licensed component in the Intel® SoC FPGA Embedded Development Suite (hereafter referred to as SoC EDS).
● From Intel® Quartus® Prime software (hereafter referred to as Quartus® Prime) v20.1, the standard software integrated development environment adopted by SoC EDS has shifted to Arm® DS Intel® SoC FPGA Edition.
The legacy Arm® DS-5™ can be used with Quartus® Prime v19.4 and earlier, but please note the following:
◦ New licenses for Arm® DS-5™ Intel® SoC FPGA Edition have been discontinued (for new adoption, please use Arm® DS).
◦ According to Arm's policy, there are no plans to update Arm® DS-5™ in the future (we recommend migrating to Arm® DS whenever possible).
● For license information, please refer to the Arm® DS Intel® SoC FPGA Edition Toolkit page.
◦ A paid license is required to use Arm® DS Intel® SoC FPGA Edition.
◦ You can purchase a standalone license for Arm® DS Intel® SoC FPGA Edition or use the license included with some Intel® SoC FPGA development kits.
◦ Paid licenses include support and maintenance from Intel for 1 or 3 years from date of purchase or renewal. The license period is as follows.

◦ For obtaining and setting a 30-day trial evaluation license, please refer to "6-2. Obtaining and Setting a Trial Evaluation License".
◦ The evaluation license is for Arm® DS Gold Edition, which is supported by Arm, not Intel® SoC FPGA Edition, but there is no functional difference (can be used for trial evaluation of Intel® SoC FPGA Edition). .
1-2. License acquisition
● If you purchased a standalone license for some Intel® SoC FPGA Development Kits or Arm® DS Intel® SoC FPGA Edition, an Arm license serial number will be issued and notified separately.
● This is a 15-digit alphanumeric string containing two dashes (-). □□□□□ ー □□□□□ ー □□□□□
◦ Use this Arm license serial number to obtain a license file to activate Arm® DS Intel® SoC FPGA Edition.
◦ The Arm license serial number will be sent to the customer (orderer) by e-mail from Intel.
1-3. Related information
● Please refer to the following page for SoC EDS information (as of December 2020).
◦ SoC EDS product introduction page
◦ SoC EDS download page
● For details on Arm® DS license management, please see the following page (as of December 2020).
◦ Licensing Arm Development Studio
2. User registration with Arm
● You will be asked to register user information during license registration. Please register in advance from the following page of Arm, and make a note of the registered email address and password.
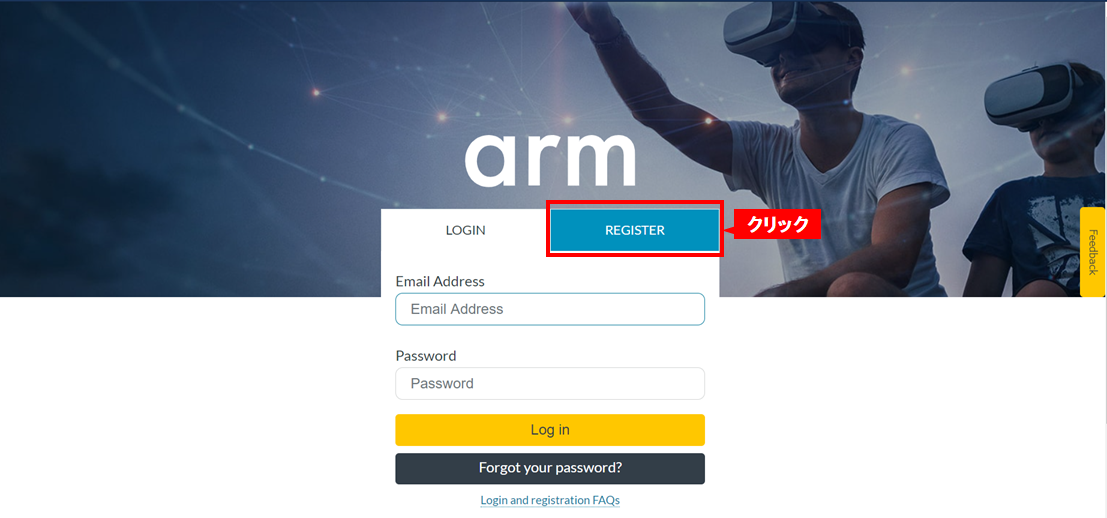
① Click the “REGISTER” tab on the Arm page.
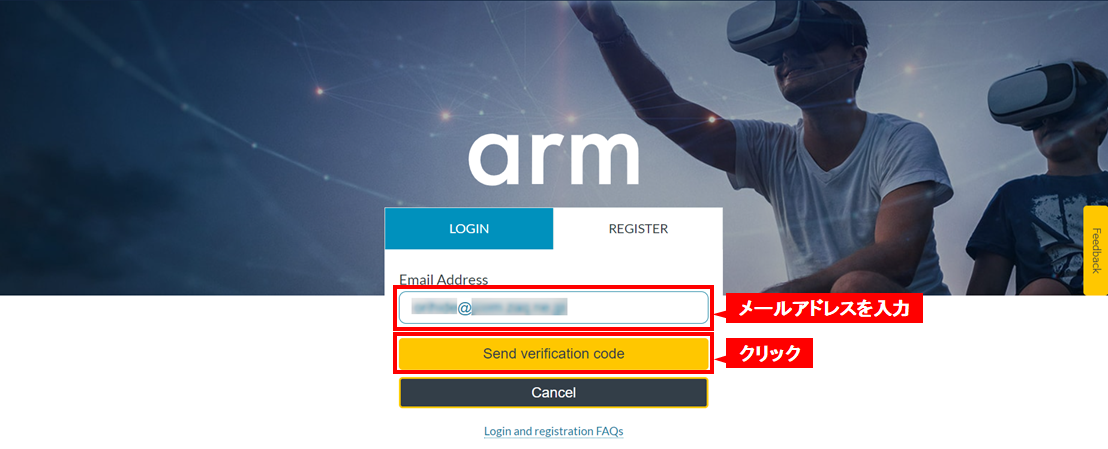
② Enter “Email Address” and click [Send verification code].
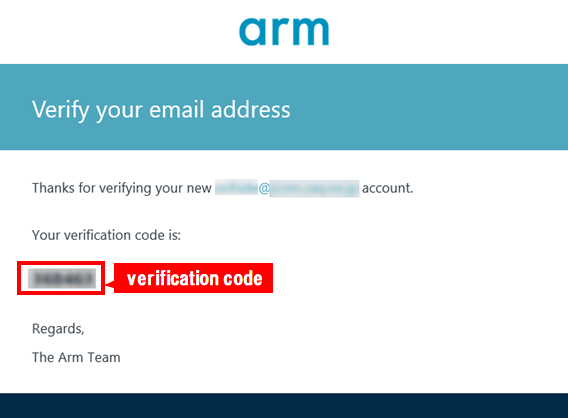
③ A verification code will be sent by E-mail from Arm.
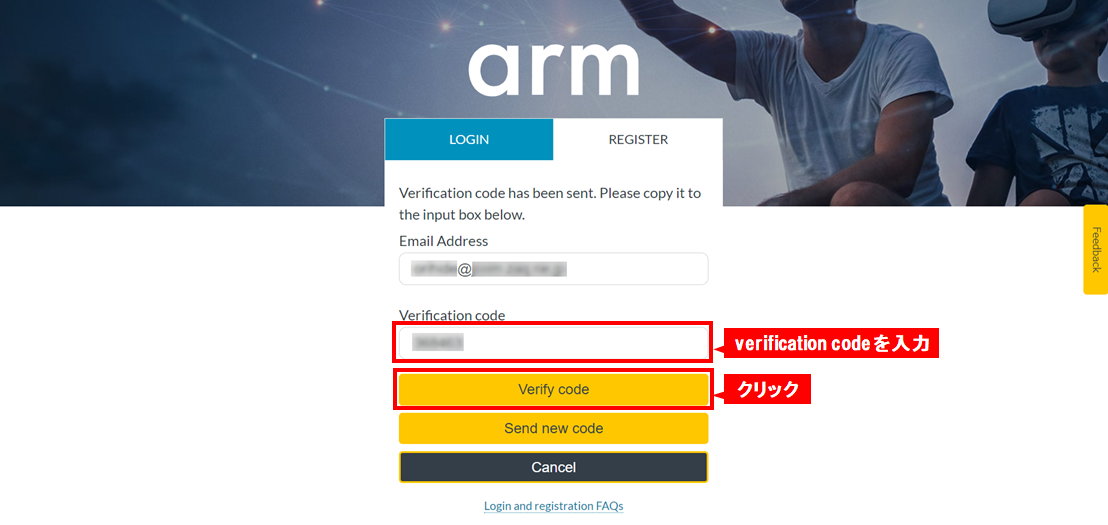
④ Enter the verification code sent to you and click [Verify code].
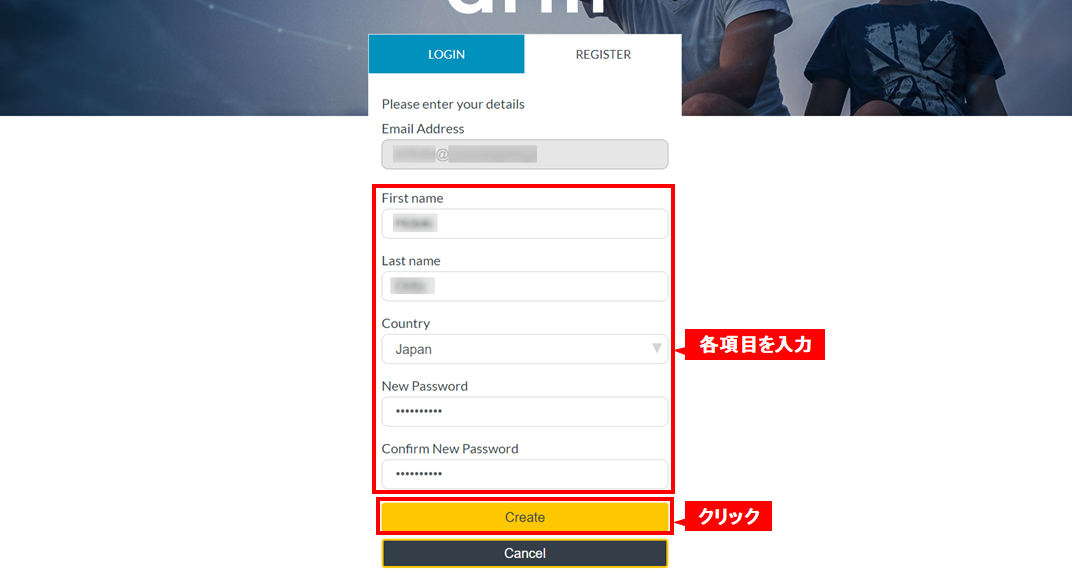
⑤ Enter “First name”, “Last name”, “Country”, “Password” and “Confirm password” and click [Create].
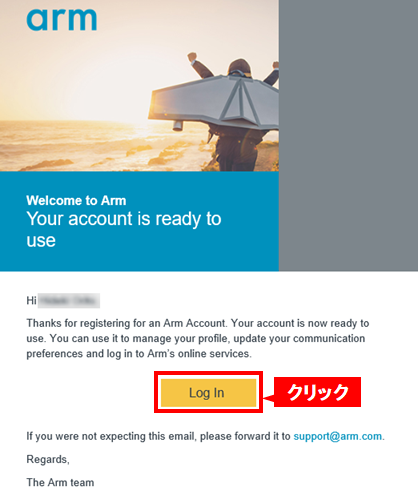
⑥ You will receive an e-mail confirming that your account registration has been completed. Click [Log in] to confirm that you can log in.
3. Preparing the Ethernet MAC Address (Host ID)
● In order to install and use Arm® DS Intel® SoC FPGA Edition, it is necessary to register the Ethernet MAC address as the host ID associated with the license.
● For the host ID, the MAC address of the Ethernet device built into the personal computer is used, but in this case, the Arm® DS Intel® SoC FPGA Edition is used for that personal computer.
● It is also possible to register a license using a USB-connected Ethernet adapter. In this case, multiple computers with Arm® DS Intel® SoC FPGA Edition installed can be used by replacing the adapter, which is convenient in terms of portability. DS Intel® SoC FPGA Edition cannot be used, it can only be used on one computer whose host ID is recognized by USB connection).
● You can check the Ethernet MAC address (physical address) by entering the following command from the computer's command prompt.
◦ Windows environment: ipconfig /all
◦ Linux environment: ifconfig or ip a
● To move (rehost) an Arm® DS Intel® SoC FPGA Edition license from the Host ID (Ethernet MAC address) that generated the license to a different Host ID, obtain a new license file from Arm with the new Host ID. Must get. Please refer to "7. How to rehost Arm® DS Intel® SoC FPGA Edition" for the rehosting procedure.
4. How to obtain a license file from the Arm website
● If you have your serial number (15 digits) and Ethernet MAC address, you can generate and download a license file directly from the Arm Software Licensing page.
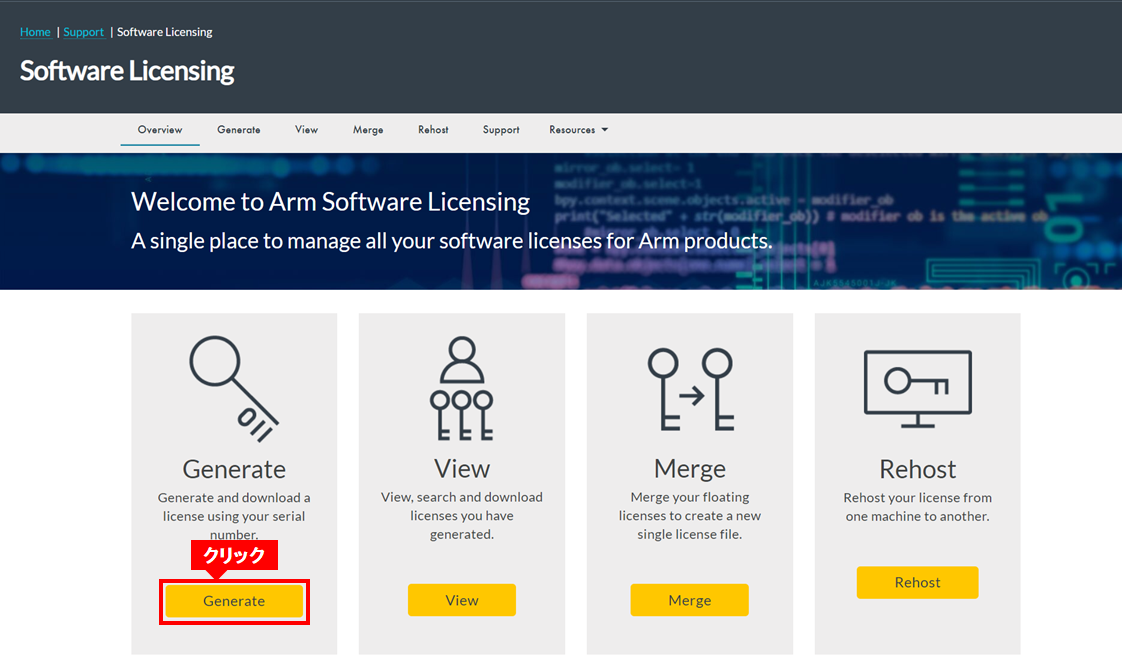
① Go to the "Software Licensing Page". Click Generate.
② If the LOGIN screen shown below appears, enter your email address and password and click [Log in].

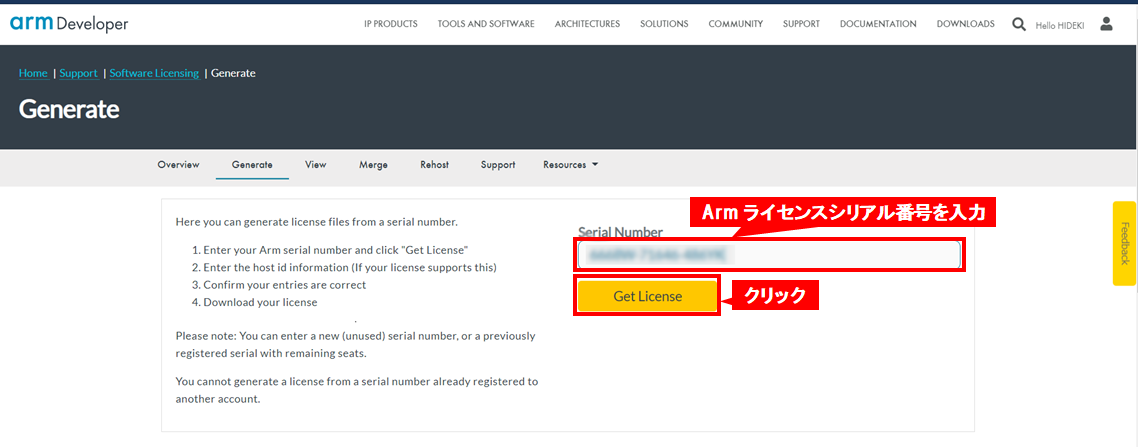
③ The Generate screen as shown below appears. Enter the serial number (15 digits) including two dashes (-) and click [Get License].
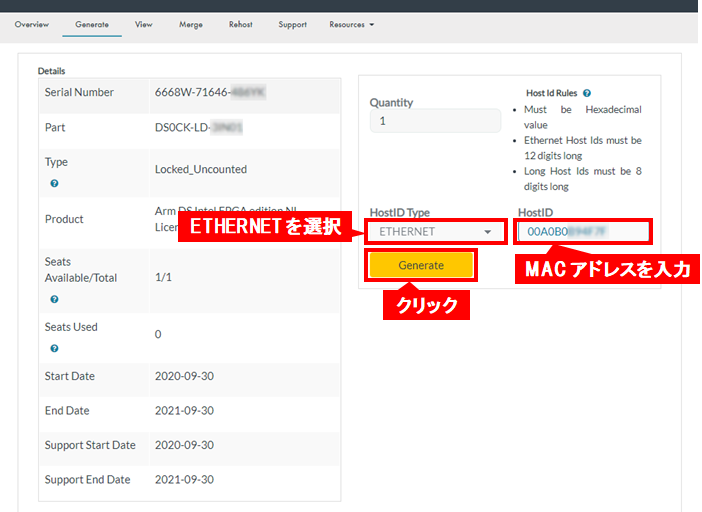
④ Select ETHERNET for “HostID Type”, enter the Ethernet MAC address for “HostID”, and click [Generate].
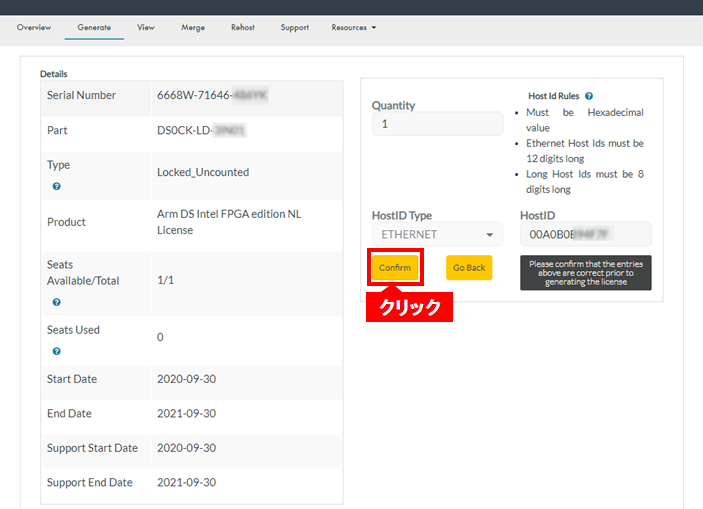
⑤ Click [Confirm].
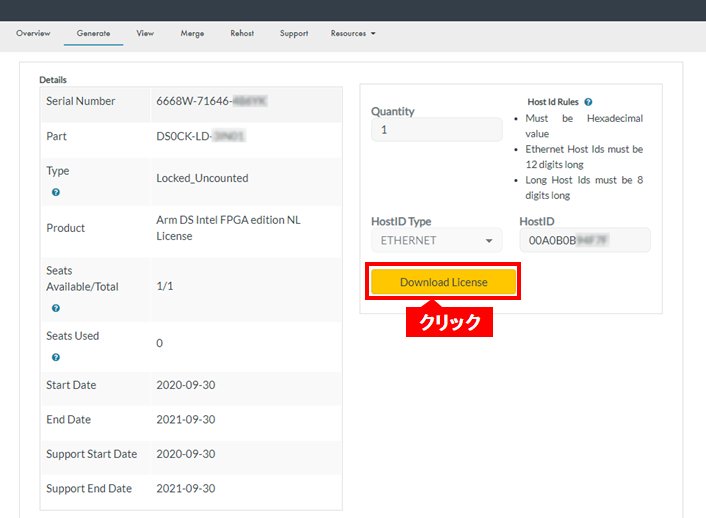
⑥ Click [Download License].
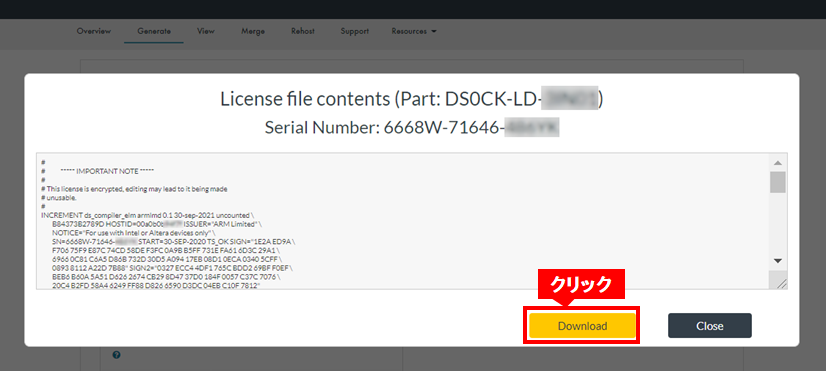
⑦ Click [Download] to download the generated license file.
5. Launch Arm® DS Intel® SoC FPGA Edition
5-1. Starting Embedded Command Shell
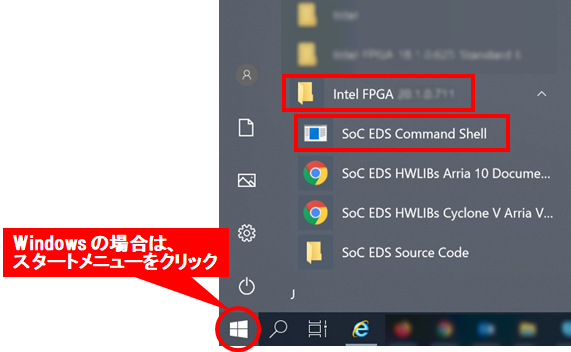
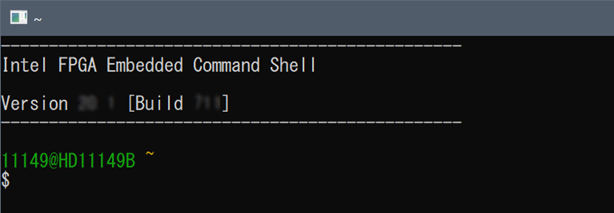
● You can start the following Embedded Command Shell from the Windows Start menu.
◦ For 20.1 Pro: Start Menu → Intel FPGA 20.1 Pro Edition → SoC EDS Command Shell
◦ For 20.1 Std: Start menu → Intel FPGA 20.1 → SoC EDS Command Shell
● For Linux, run embedded_comand_shell.sh on a terminal.
◦ For 20.1 Pro: ~/intelFPGA_pro/20.1/embedded/embedded_command_shell.sh
◦ For 20.1 Std: ~/intelFPGA/20.1/embedded/embedded_command_shell.sh
5-2. Launching the Arm® DS shell
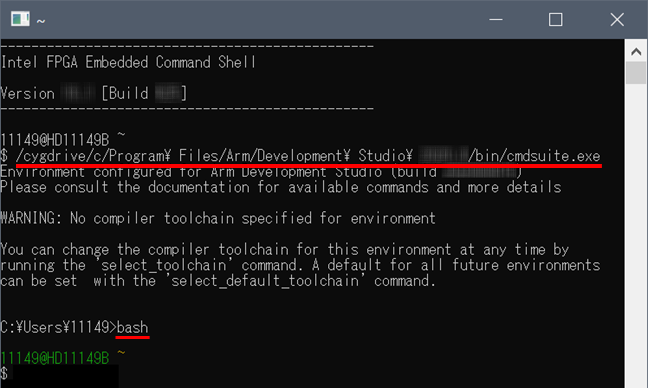
① Run the cmdsuite program (suite_exe) from the Embedded Command Shell (example for Arm® DS version 2020.1).
◦ cmdsuite is the Arm® DS command prompt, an internal batch job for licensing and database configuration.
・ Windows environment: /cygdrive/c/Program\ Files/Arm/Development\ Studio\ 2020.1/bin/cmdsuite.exe
・ Linux environment: /opt/arm/developmentstudio-2020.1/bin/suite_exec -t "Arm Compiler 5" bash
(2) After executing the bash program, the prompt color of the Embedded Command Shell returns.
◦ By executing bash, the PATH to the Quartus® Prime tools is passed (in Linux environment, bash is already specified when suite_exe is executed)
bash
5-3. Launching Arm® DS Eclipse
(1) Execute the armds_ide command from Embedded Command Shell.
armds_ide &
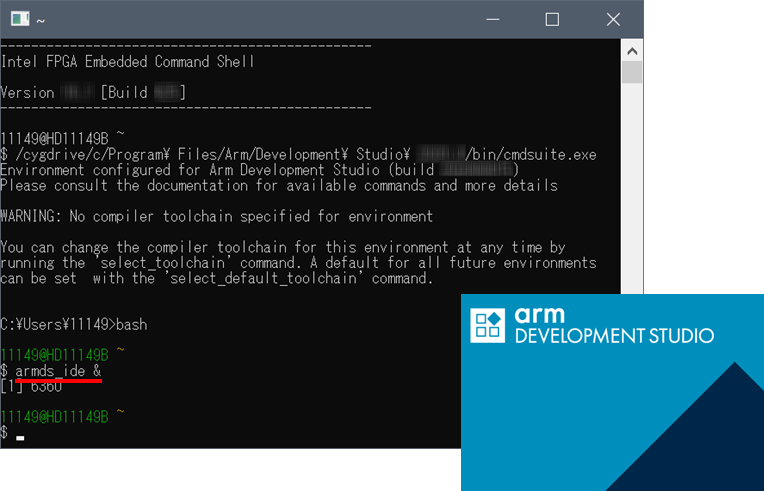
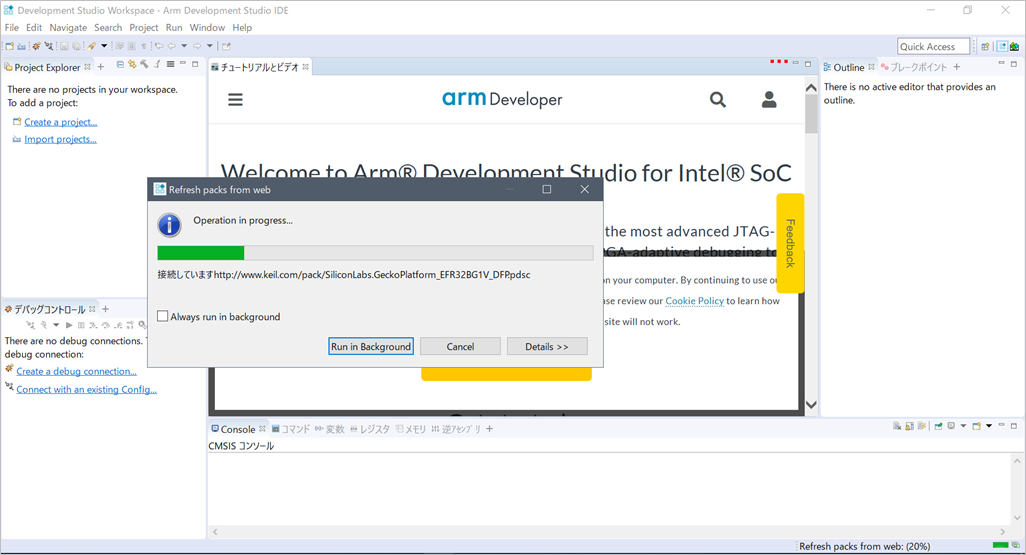
(2) Arm® DS Eclipse opens. Updates may be made from the web for the first time.
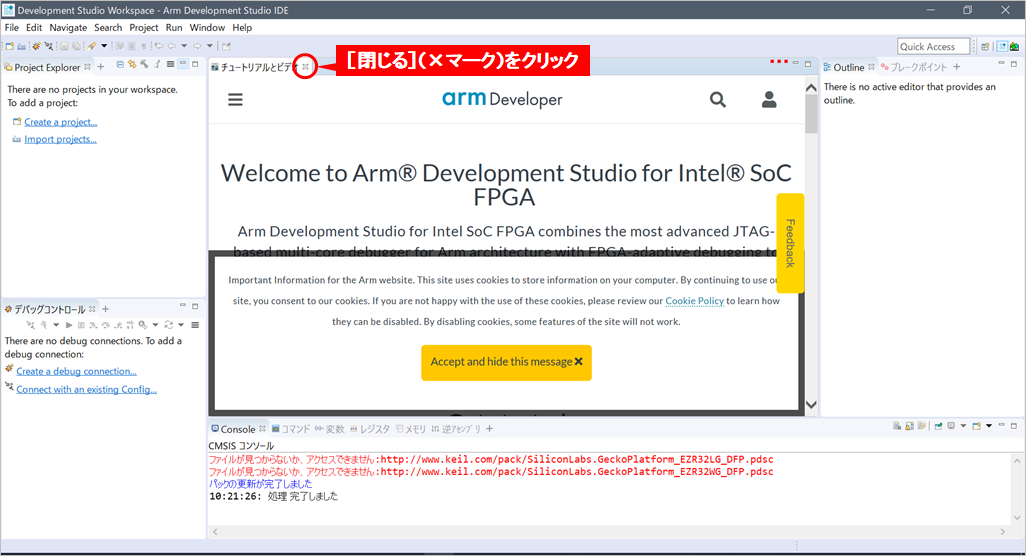
③ The Welcome screen of Arm® DS will be displayed. This can be used to access documentation, tutorials and videos. If not necessary, click [Close] (X mark).
6. Setting up the license file
6-1. Add Product License
① When you run Arm® DS Intel® SoC FPGA Edition for the first time, the "Add Licenses" Box will open asking you to add your production licenses.
Select Add Product License and click Next >.
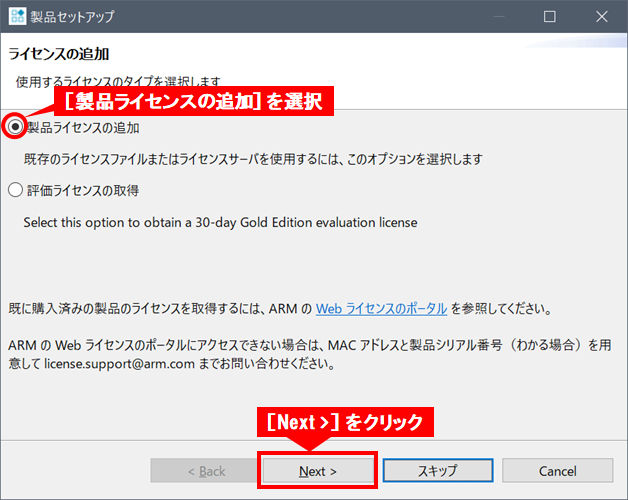
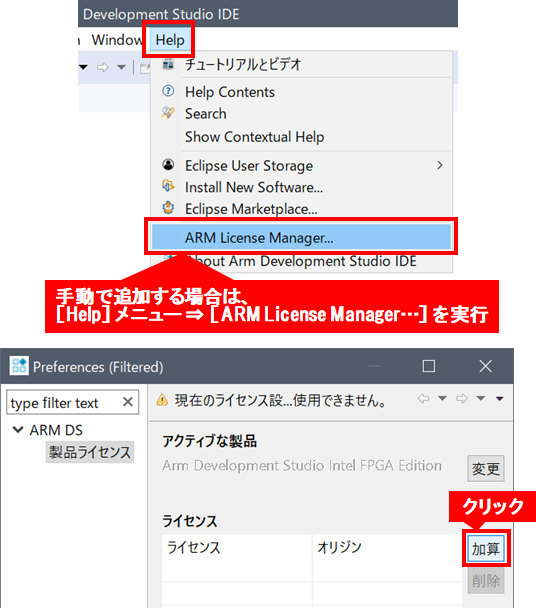
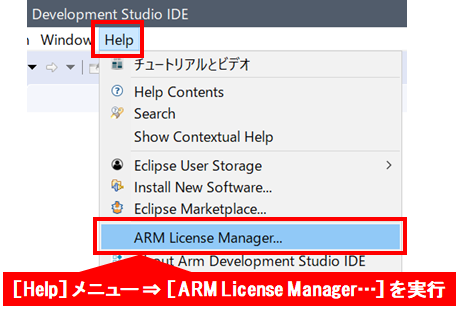
* To add a license from the menu, execute [Help] menu ⇒ [ARM License Manager…].
② Click the [Add] button to open the [Add License] Box.
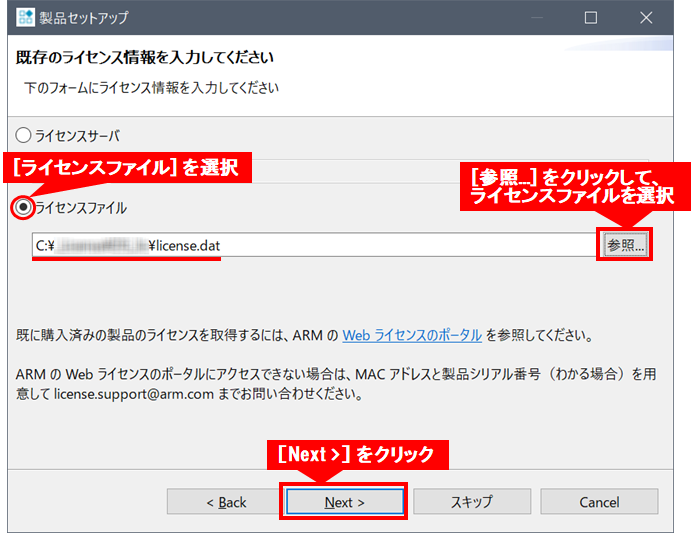
(3) Select [License File] and then [Browse...], and select the license file that you downloaded earlier from the Arm website.
Then click Next >.
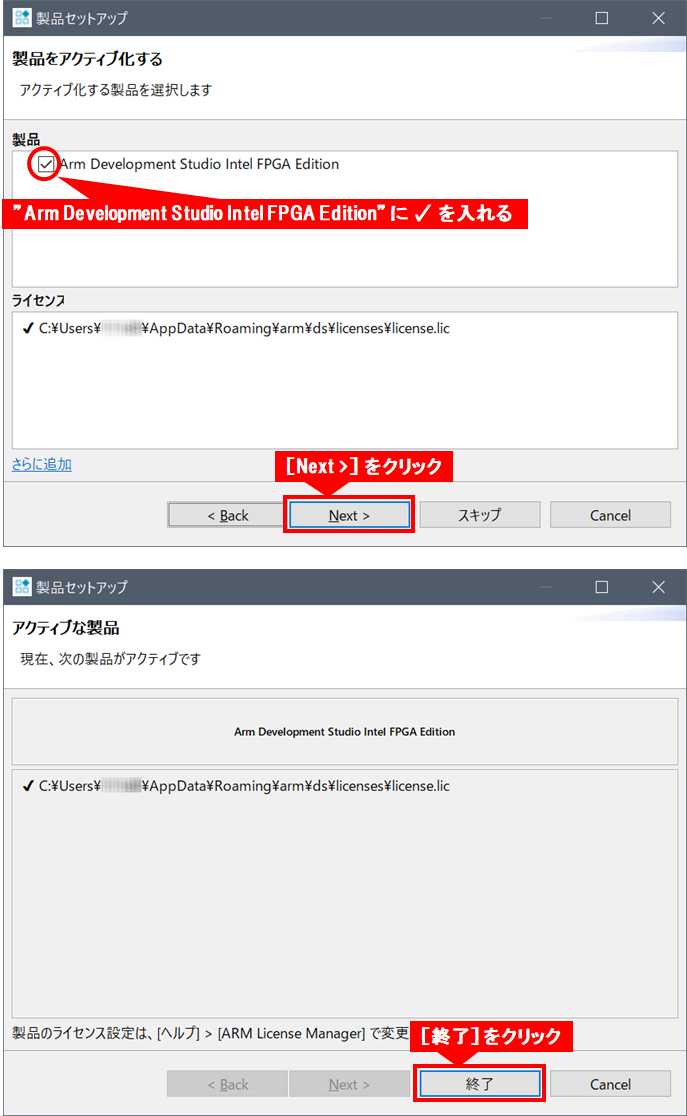
④ Select the product to activate. Put ✓ in ”Arm Development Studio Intel FPGA Edition” and click [Next >].
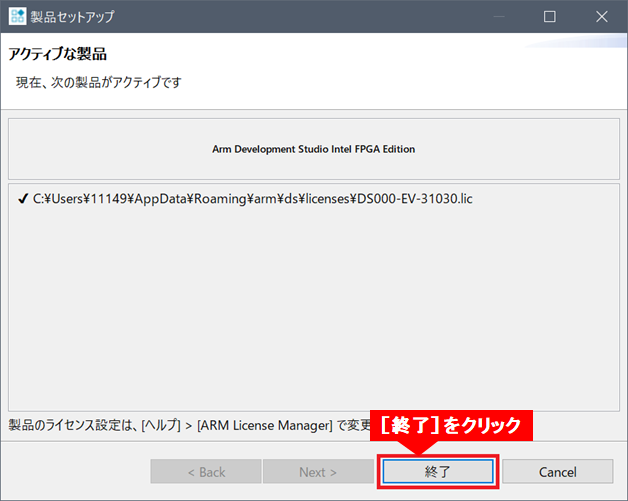
⑤ Click [Exit].
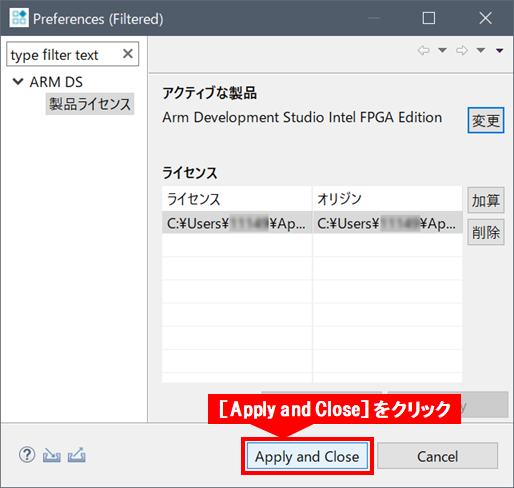
⑥ Click [Apply and Close].
6-2. Obtaining and setting a trial evaluation license
① Execute Arm® DS Intel® SoC FPGA Edition [Help] menu ⇒ [ARM License Manager…].
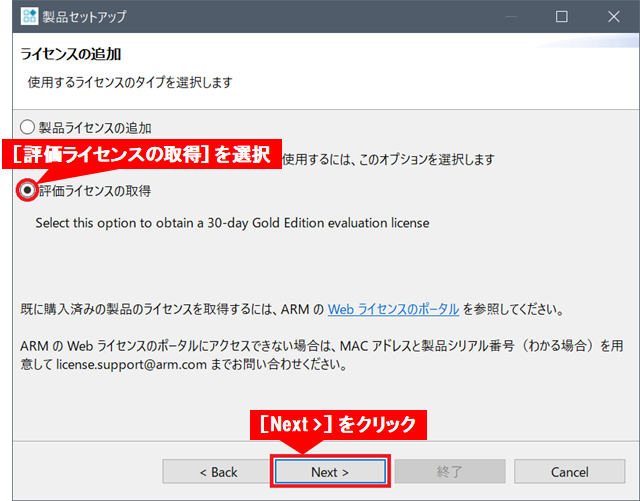
(2) When the “Add license” Box opens, select [Get evaluation license] and click [Next >].
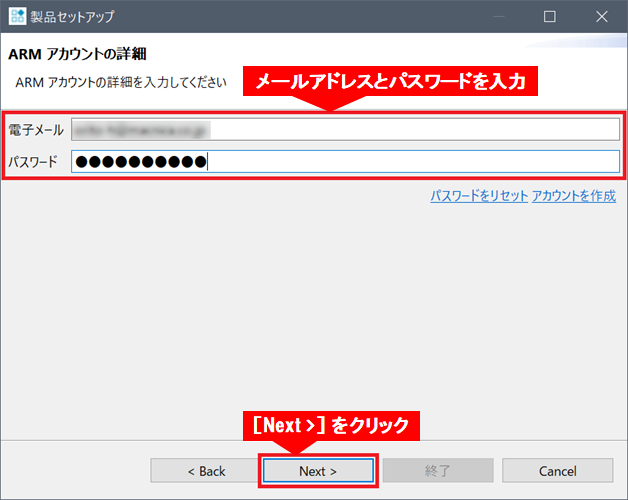
③ When the “ARM account details” Box opens, enter the email address and password you registered in chapter “2.
Click Next>.
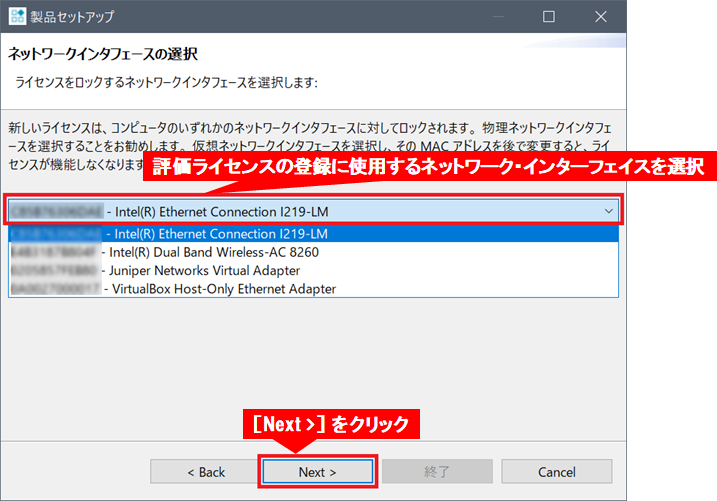
(4) Select the network interface that will be used to register the evaluation license, and click [Next >].
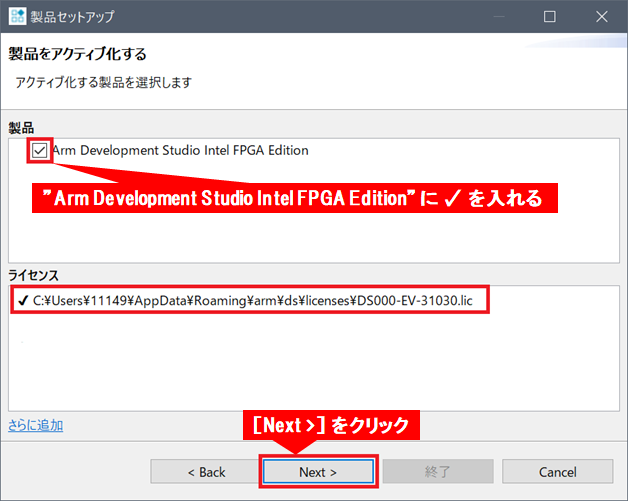
⑤ Select the product to activate. Put ✓ in ”Arm Development Studio Intel FPGA Edition” and click [Next >].
⑥ Click [Finish].
⑦ Click Apply and Close to complete the trial evaluation license configuration.
7. How to Rehost Arm® DS Intel® SoC FPGA Edition
● To move your Arm® DS Intel® SoC FPGA Edition license from the PC that generated it to another PC within your company, you will need to obtain a new license file with a new host ID from Arm.
● A host ID is generated from the Ethernet MAC address. Also, license transfers must be between PCs within the same legal entity.
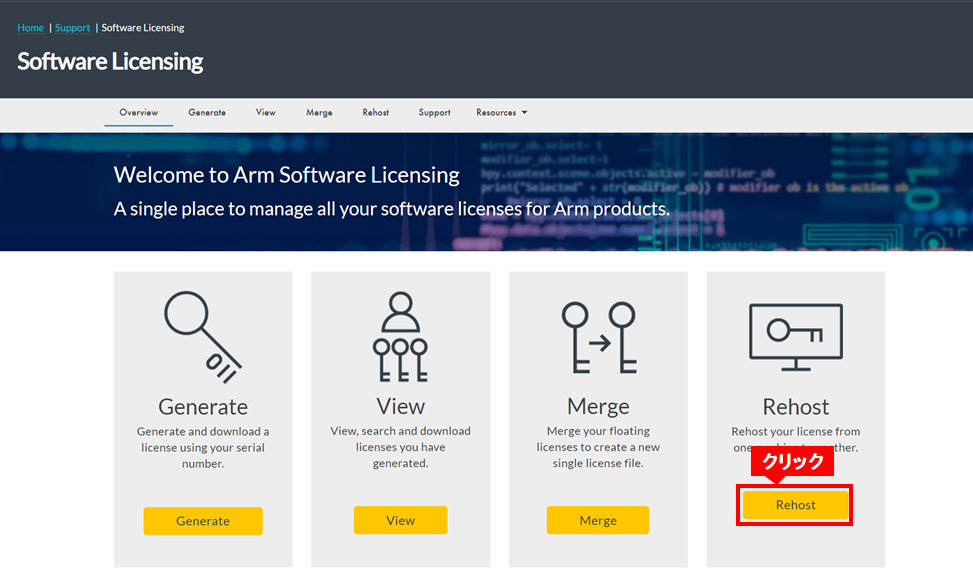
● You can apply for rehosting from the Arm Software Licensing page.
① Go to “Software Licensing Page” and click [Rehost].
* If the LOGIN screen appears, enter your email address and password and click [Login].
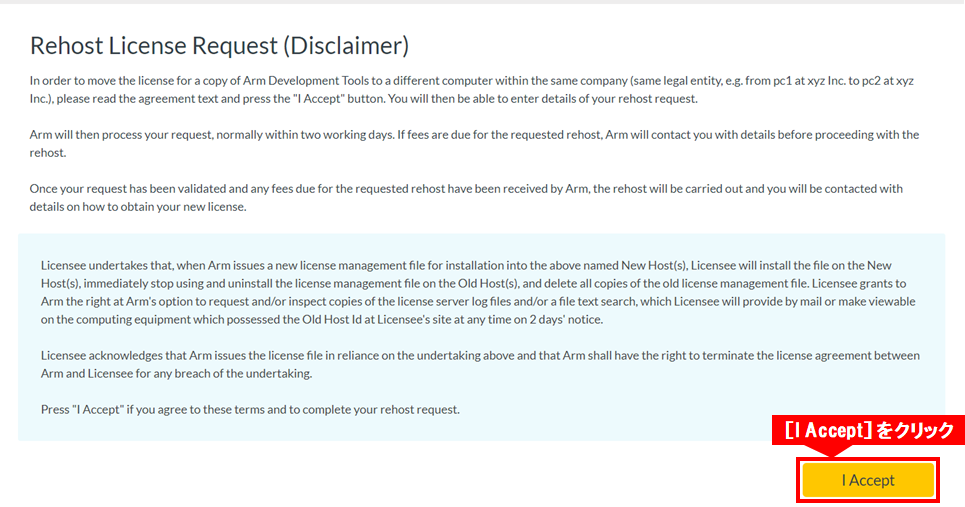
(2) A license reissuance request disclaimer will be displayed. If you agree, click [I Accept].
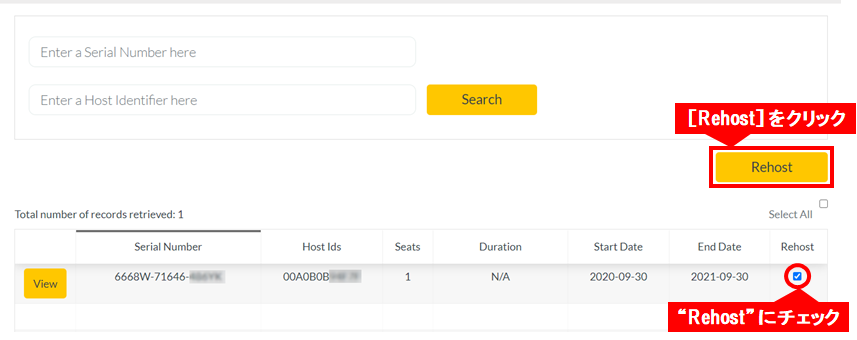
③ Check the serial number and host ID you want to rehost, check “Rehost” and click [Rehost].
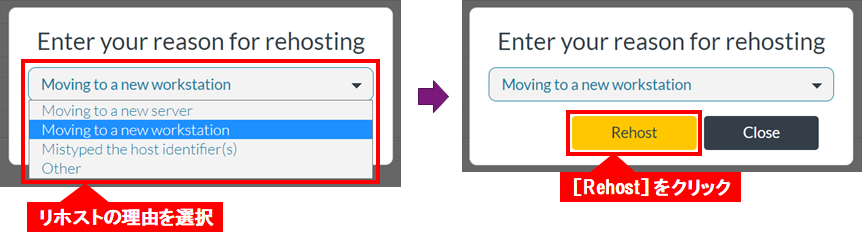
(4) You will be prompted to enter the reason for rehosting. Select from the pull-down menu (Moving to a new workstation in this example) and click [Rehost].
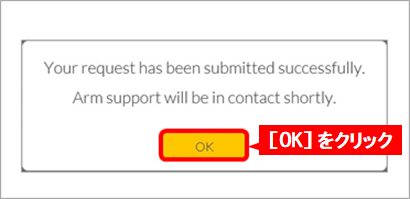
⑤ Your request has been sent successfully, and you will be notified that Arm Support will contact you later. Click OK.
⑥ As a result of requesting rehosting, a support case will be issued from Arm, and an Arm License Rehost Request e-mail will be sent.
⑦ After that, proceed with the correspondence according to the e-mail (instructions posted to the support case).
Click here for recommended articles/materials
Articles and materials related to DS-5 utilization
SoC FPGA related articles and resources
Intel® FPGA Development Flow/FPGA Top Page