- Semiconductor BusinessHOME
- Products and Services of Macnica,Inc.
-
technical information

-
Events and Seminars
- Handling Manufacturer
- Support
- Inquiry
- Click here to purchase products
- Semiconductor business e-mail magazine registration
![]()
![]() Narrow down by specifying conditions
Narrow down by specifying conditions
現在2189件がヒットしています。check


hello.
My name is Intel F. Hanako and I provide technical support for Intel® FPGA products at Macnica.
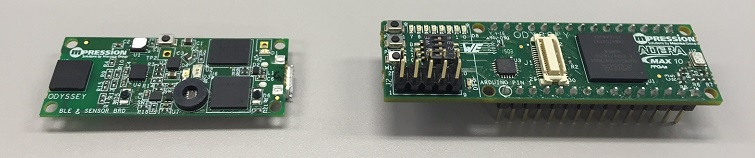
The BLE & Sensor board (top board) of the Mpression Odyssey MAX®10 FPGA Eval Kit has EFM32 and BLE.
These firmwares are updated irregularly. The other day (mid-February 2016), 2.0 was released.
Therefore, we will introduce how to update the firmware of Mpression Odyssey.
This content is based on 5. Firmware Updates in "Odyssey MAX® 10 FPGA and BLE Sensor Kit User Guide".
Also, since I usually support Intel® FPGAs, this is the first time I've touched products from SiliconLabs and Broadcom. Please close your eyes if you can't reach it (laughs)
This time, I would like to introduce "Hanako, who is in charge of Intel FPGA, tried it! EFM32 firmware update".
Introduction
There are two ways to update the EFM32's firmware:
・ Update with Simplicity Studio
・ Update via serial console (Tera Term)
I've never done EFM32 development, so I don't have Simplicity Studio installed or used it.
So, update the firmware with Tera Term.

Tera Term is a terminal software for Windows OS and is an open source tool. If you have not installed Tera Term on your computer, please install Tera Term in advance. Also, the Tera Term environment setting file (TERATERM.INI) for Odyssey development is published on the Mpression website, so please install it if necessary.
Update work started!
1. Get the latest firmware
Download the Odyssey EFM32 firmware (EFM32 Firmware Factory Image) from the Mpression Odyssey website.
2. Install the driver
If this is your first USB serial connection to Odyssey's EFM32, please install Silicon Labs' USB Virtual Serial Port Driver (found in the Utilities section of the download page) beforehand. Now you can communicate with EFM32 using Tera Term.
3. Separate the Odyssey board and attach the BLE & Sensor board and battery board
Separate Odyssey into BLE & Sensor board and MAX® 10 board.
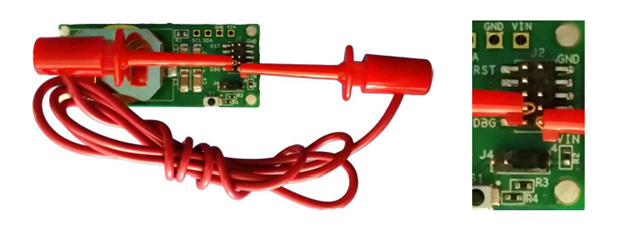
Make sure that power is not supplied to the BLE & Sensor board, and attach the attached battery board to the BLE & Sensor board. (The battery board retainer does not require a CR2032 coin cell battery.)
Connect a jumper with a microclip between VIN (pin 1) and CLK (pin 4) on the 10-pin header (J2) on the battery board. Be careful not to short adjacent pins.
4. Connect to PC
Connect the BLE & Sensor board (with battery board) and PC with a USB-microUSB cable.
5. Connect to EFM32 with Tera Term
Check which COM port the EF32 is assigned to in the computer's device manager, and start Tera Term. From the "File" menu > "New Connection", select "Serial" to connect to the EFM32.
6. Configure COM port
From the “Settings” menu > “Serial Port”, set the COM port confirmed in 5. as follows.
・ Port (P): COM port number to which EFM32 is connected
・ Baud rate (B): 115200
・ Data (D): 8 bits
- Parity (A): none
・ Stop (S): 1 bit
・ Flow control (F): none
・ Transmission delay : 0 ms/character (C), 0 ms/line (L)
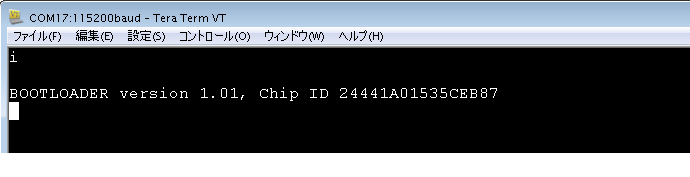
7. Start bootloader
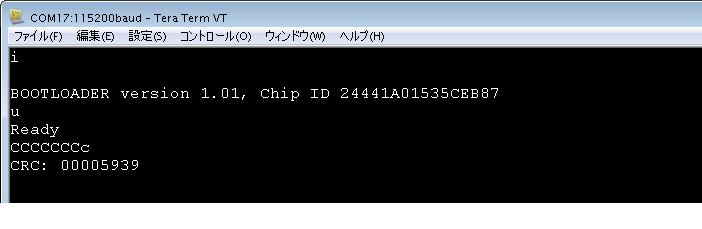
Type [i] on your keyboard. Bootloader information is displayed.
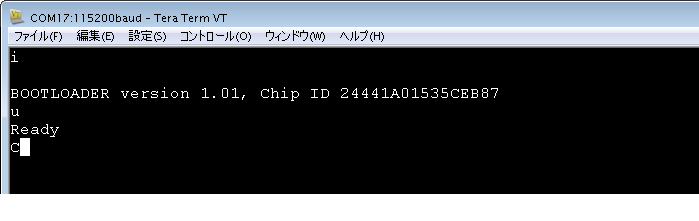
8. Enter programming mode
Type [u] on your keyboard to start the programming procedure. The console displays the letter [C] (uppercase). This means "ready". The [C] display is repeated approximately every 5 seconds until the file transfer starts.
9. Programming
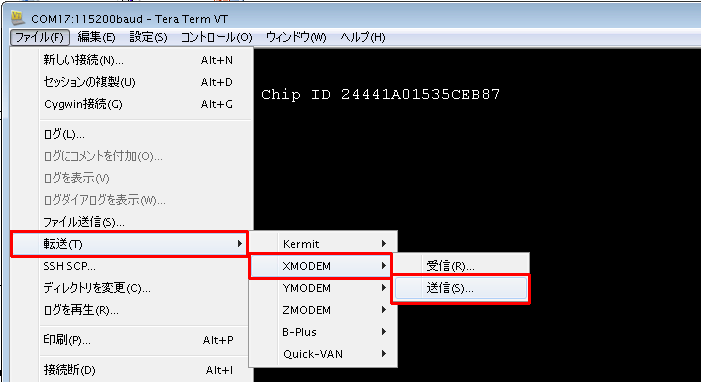
Select "File" menu > "Transfer" > "XMODEM" > "Send".
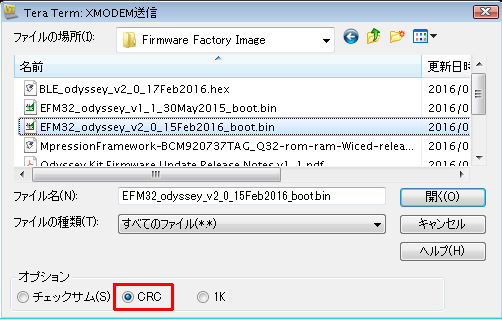
A file selection screen will appear. Select the EFM32 update image file you downloaded in advance, select the CRC option, and click the “Open” button.
The files are transferred and the EFM32 is programmed. It takes about 2-3 seconds.
Update work completed
10. Programming completed
Programming is completed. You can check the CRC by typing [c] (lowercase). The EFM32 Firmware 2.0 CRC is ”00005939”.
11. Disconnecting Tera Term and removing the board
Disconnect from the EFM32 by selecting “File” menu > “Disconnect”. Remove the USB cable, then remove the jumper, battery board.
This completes the EFM32 firmware update.
Hey, I could do it too ♪

When using the BLE & Sensor board for the first time after updating the firmware, press the EFM32 reset button (S2) on the BLE & Sensor board before using.
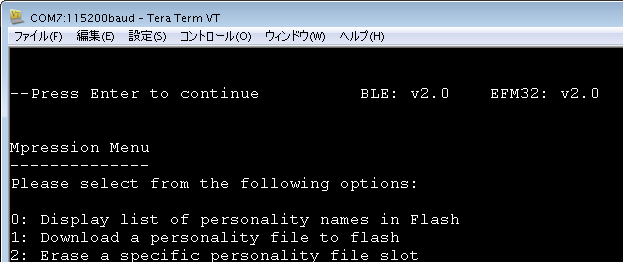
Also, after connecting the MAX® 10 board, connect it to a computer with a USB cable, start Tera Term, connect to EFM 32, and press the [S3] button on the MAX® 10 board to check the firmware version.
Odyssey recommends using the same firmware version for both EFM32 and BLE.
See here for how to update the BLE firmware of Mpression Odyssey.
Click here for recommended articles/materials
What is the Odyssey MAX 10 FPGA Eval Kit?
Let's update the firmware of Odyssey BLE
A work using Mpression Odyssey won the semi-Grand Prix at Minna no Raspberry Pi Contest 2016!
[Overview] Transfer configuration data to the FPGA of the MAX 10 Evaluation Kit Odyssey via the microUSB port and flash it!
[Operation] Transfer the configuration data to the FPGA of the MAX 10 Evaluation Kit Odyssey via the microUSB port and flash it!