- Semiconductor BusinessHOME
- Products and Services of Macnica,Inc.
-
technical information

-
Events and Seminars
- Handling Manufacturer
- Support
- Inquiry
- Click here to purchase products
- Semiconductor business e-mail magazine registration
![]()
![]() Narrow down by specifying conditions
Narrow down by specifying conditions
現在2159件がヒットしています。check


Before compiling in FPGA development, it is important to check whether the created logic circuit (design) operates as expected.
It's important.
Today, hardware language (HDL) is the mainstream of design, and logic simulation is also done in language.
Input pattern information is indispensable for simulation, and the input pattern is also described by the designer in HDL, which is called a "testbench".
Here is a very basic description of a testbench.
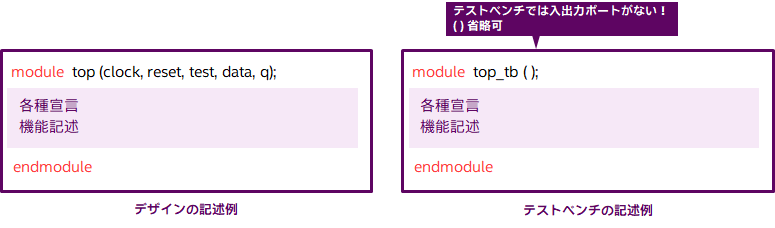
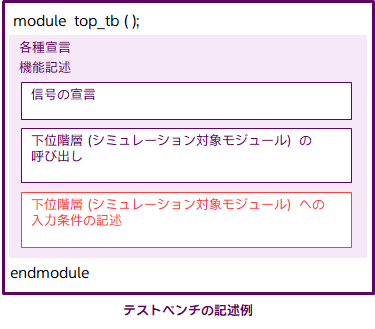
モジュールの書式
For Verilog-HDL, when creating a testbench, you start with module <module name> just like when creating a design. However, since testbench generally does not have input/output ports, there is no need to write the port list after the module name. Also, no input/output port declarations are required. Therefore, the input conditions of signals to be input to the design to be verified are described in HDL in various declarations and function descriptions.
モジュールの書式(詳細) & 信号の宣言
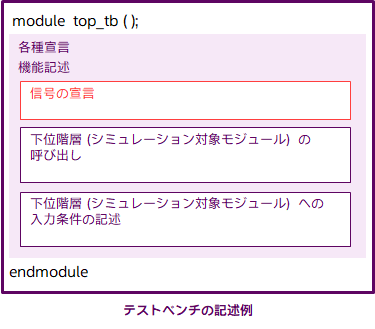
"Various declarations and function descriptions" can be divided into "signal declarations", "calls to the lower layer (simulation target module)", and "description of input conditions to the lower layer (simulation target module)". increase. As mentioned earlier, there is no input/output port in the testbench, so there is no need to declare port attributes using input, output, and inout. In the test bench, declare the data type of the signal used as the test input as a register (reg declaration), and conversely declare the data type of the signal that does not give a value in the test bench connected to the output port to be verified as a wire declaration (wire declaration)..
example)
reg clock, reset, test;
reg [7:0] data;
wire [7:0] q;
Calling the lower layer (simulated module)
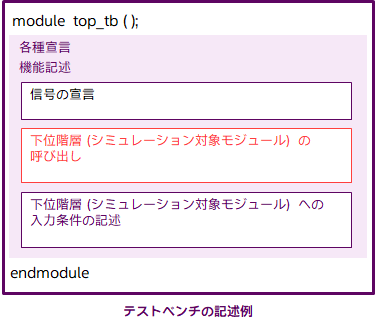
The section "Calling the lower level (simulated module)" is exactly the same as the description of calling the lower level generally used in the design.
The following is an example where the instance name of the simulation target module is “u1”.
example)
top u1 (
.clock (clock),
.reset (reset),
.test (test),
.data (data),
.q (q)
);
Description of input conditions to the lower layer (simulation target module)
Next, I will explain "Description of input conditions to the lower layer (simulation target module)". Here we mainly
- 常にレベルが固定している信号の記述
- 一定間隔で値がインクリメントする信号の記述
- 非定期的に ‘1’(Hレベル)と‘0’(Lレベル)を繰り返す信号の記述
- 定期的に‘1’(Hレベル)と‘0’(Lレベル)を繰り返す信号の記述
について説明します。これらをマスターすれば、テストベンチを自分で書けるようになります。
なお、ここで紹介した以外の記述方法もありますので、後々勉強して習得してください。
1. 常にレベルが固定している信号の記述
Write the initial statement at the beginning of the simulation. The expression you have written is executed only once. For signals whose level does not change during the simulation run, the initial statement should be followed by the signal name and level.

2. 一定間隔で値がインクリメントする信号の記述
First, write the initial value after initialbegin. Then use the always statement to write an expression that increments at regular intervals.

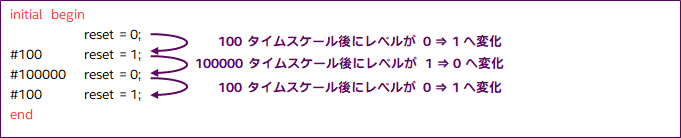
3. 非定期的に ‘1’(H レベル)と ‘0’(L レベル)を繰り返す信号の記述
For a signal whose level changes irregularly, use begin to end in one initial statement and describe multiple expressions between them.
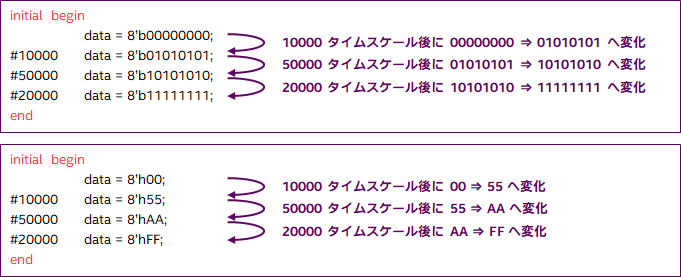
バスなどの複数ビットがまとまった信号は、以下のように記述します。8ビットの信号であれば、8’b の後に各ビットのレベルを記述します。b は 2進数 の意味です。h を使って 16進数 表示も可能です。
4. 定期的に ‘1’(H レベル)と ‘0’(L レベル)を繰り返す信号の記述
クロックのように定期的に‘1’(Hレベル)と‘0’(Lレベル)を繰り返す信号を記述する時は、先ほどのような方法で永遠に記述する必要はなく、以下のように記述します。ここでは、2つの記述方法を紹介します。どちらも同じ入力条件になります。
- Method 1

- Method 2

sample design
以下のページから、演習データを参考としてダウンロードできます。このサンプルではテストベンチの記述も使われているので、参考にしてください。
コーヒー・ブレイク:`timescale

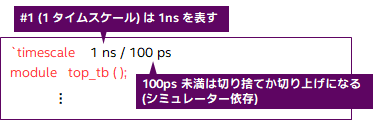
テストベンチの冒頭に `timescale の記述を見かけたことはありませんか?これはシミュレーション時刻の単位を指定するための記述です。
単位(fs,ps,ns, us, ms,s)を添えて記述します。`timescale の記述は、通常はテストベンチにのみに記述します。
`timescale <1タイムスケールあたりの実時間>/ <丸めの精度>
それから、式の中におけるシミュレーション時刻を記述する位置については、下記のどちらでも大丈夫です。

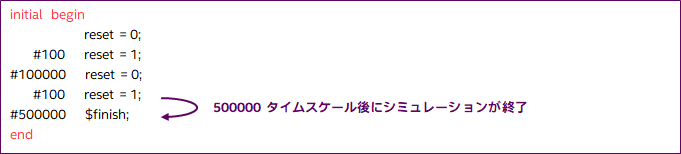
コーヒー・ブレイク:$finish

テストベンチ中の式に $finish という記述を見かけます。これは、この行まで実行されるとシミュレーションが終了するというものです。この $finish がないと、シミュレーションが終了しません。時間指定してシミュレーションすれば $finish がなくても終わりますが、時間指定なしでシミュレーションを実行した場合は、この $finish を見付けてそこまで到達したら終了させます。どこか1か所で良いので、この $finish を入れましょう!