- Semiconductor BusinessHOME
- Products and Services of Macnica,Inc.
-
technical information

-
Events and Seminars
- Handling Manufacturer
- Support
- Inquiry
- Click here to purchase products
- Semiconductor business e-mail magazine registration
![]()
![]() Narrow down by specifying conditions
Narrow down by specifying conditions
現在2182件がヒットしています。check
The Sitara processor series from Texas Instruments (hereafter, TI) is offered mainly for industrial communication and FA-related applications as a lineup equipped with flexible peripherals with built-in Arm® Cortex®-A cores. The details of the product are introduced in another article.
Introducing the Sitara Processor Series
Supports multiple industrial Ethernet standards! Processor without ASIC or FPGA
Introducing the Sitara Processor AM437x
Realize a smart factory with an industrial processor! Sitara™ AM437x
This time, we will introduce a demonstration of operating a brushless DC motor and encoder using the AM437x development kit of the Sitara processor series. It includes procedures for using the software provided by TI (Processor SDK RTOS, PRU-ICSS-INDUSTRIAL-DRIVES) and points for measuring the rotation speed of the motor, so please read to the end. Please give me.
what to prepare
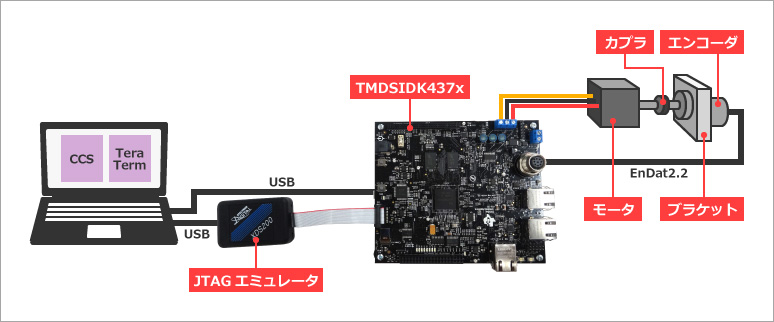
- Sitara AM437x Development Kit (TI TMDSIDK437X)
- JTAG emulator (TI TMDSEMU200-UE)
- Brushless DC motor (Anaheim Automation BLY171D-24V-400)
- Encoder (HAIDENHAIN ROQ437)
- Bracket (HAIDENHAIN)
- Coupler (HAIDENHAIN)
- Personal computer (Tera Term, TI Code Composer Studio version 7.1.0.00015)
The actual hardware configuration is as follows.
Software Setup ~Creating a project~
I downloaded and installed the software below. Each version is also listed, so please refer to it.
PRU-ICSS-INDUSTRIAL-DRIVES (version 1.00.02)
http://www.tij.co.jp/tool/jp/PRU-ICSS-Industrial-SW
PROCESSOR-SDK-RTOS-AM437X (version 03.03.00.04)
http://www.tij.co.jp/tool/en/PROCESSOR-SDK-AM437X
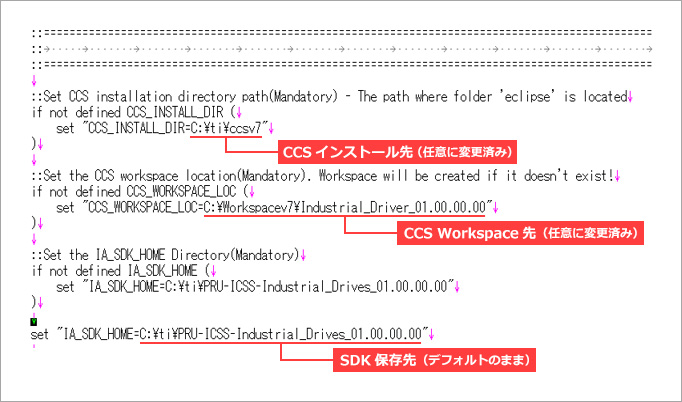
Next, open the batch file in the following path with a text editor, and you can freely edit the CCS installation destination, Workspace destination, etc. Save the file after editing to any path.
Path: C:\ti\PRU-ICSS-Industrial_Drives_01.00.00.00\examples\motor_control\projects
File name: projectCreate.bat
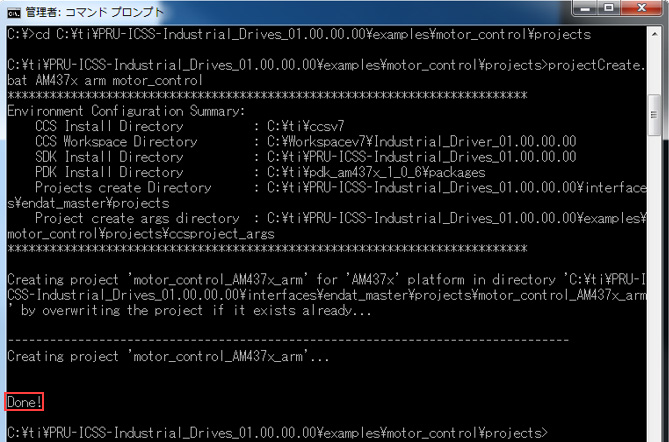
Then open a command prompt and run:
Create a new Project.
>cd C:\ti\PRU-ICSS-Industrial_Drives_01.00.00.00\examples\motor_control\projects >projectCreate.bat AM437x arm motor_controlIf "Done!" is displayed, it is successful. It may take some time to complete.
Software Setup ~Setting up CCS~
Let's actually run the project we created earlier.
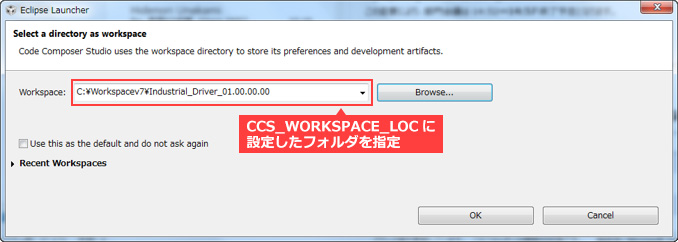
First, start CCS, enter the Workspace folder specified in the batch file earlier, and click OK.
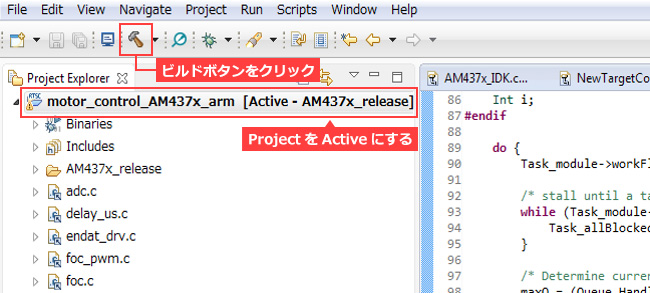
When CCS starts up, I think there is a project called "motor_control_AM437x_arm". After setting it to Active, click the Build button.
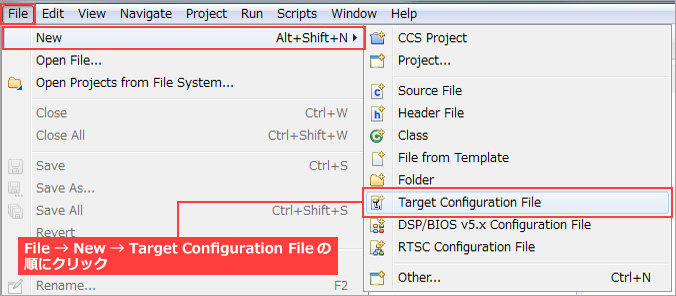
Next, create a Target Configuration File.
On CCS, select File → New → Target Configuration File.
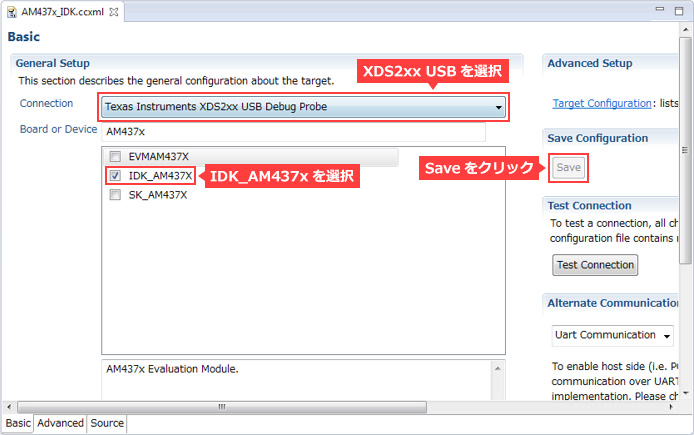
Set the Target Configuration as shown. The JTAG emulator used is optional.
This time, we will use TMDSEMU200-U=XDS2xx. Finally save and you're done.
Let's actually run the project we created earlier.
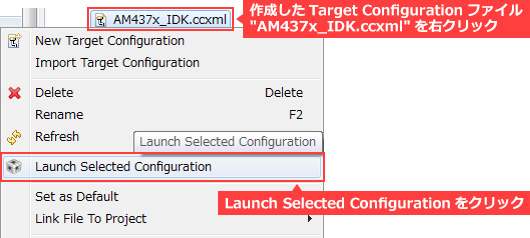
From CCS, select View → Target Configuration to display the Target Configuration Window. So right click on the Target Configuration file you just created and click Launch Selected Configuration.
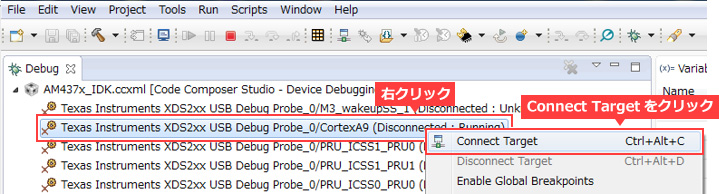
Right click on "Texas Instruments XDS2xx USB Debug Probe_0/CortexA9" and select Connect Target.
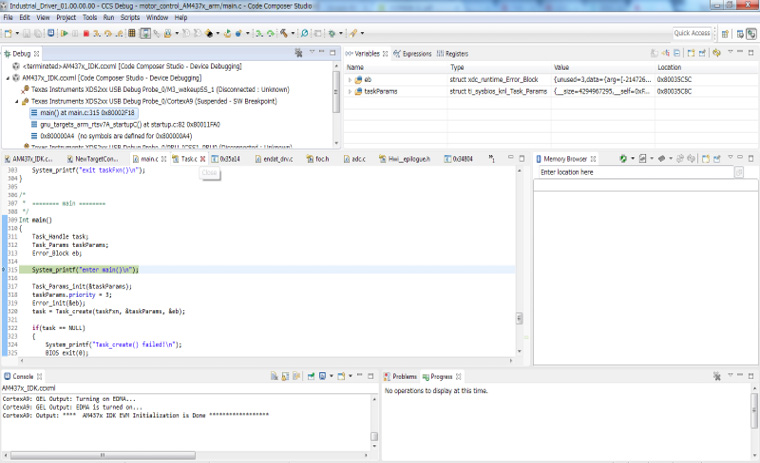
Next, load the out file you just built from Run → Load → Load Program.

When loading is completed, the following screen is displayed, and the PC is stopped at the beginning of the main function.
Setup is now complete.
Let's actually move the motor!
Now that the preparations are complete, let's actually move the motor.
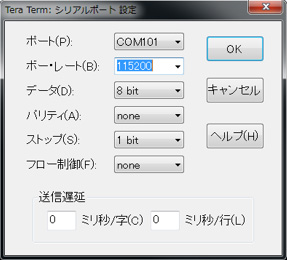
Launch Tera Term and make settings. Set the baud rate to 115200, data to 8bit, and parity to none.
After setting up Tera Term, click the Run button on CCS.
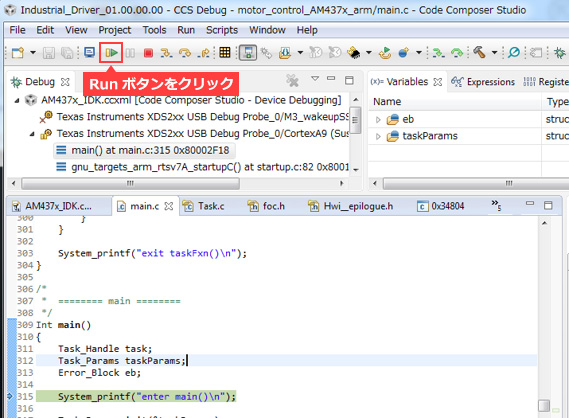
If you run it, some will be displayed on Tera Term, and if you enter Enter twice, it will be displayed as follows.
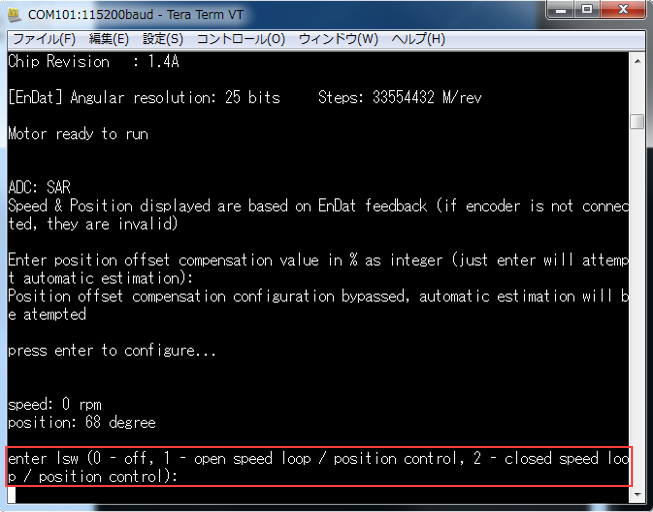
Here we explain the meaning of the words displayed in Tera Term.
lsw (Loop Switch) = You are being asked to choose how to control the motor. The meaning of each option is as follows.
0 - off : Motor control OFF
1 - open speed loop / position control : Motor control ON, no feedback of motor operation status
2 - closed speed loop / position control : Motor control ON, feed back the operating status of the motor
This time type lsw=2 and press Enter. You should see something like this:
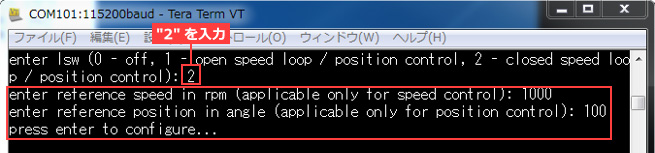
reference speed in rpm = You are asked for the motor's rotational speed (rpm = rotations per minute).
According to the specs of the motor, it seems that it can operate from 0-4000RPM, but as far as I checked in this environment, I was able to operate it from about 500-3000RPM. To the last, the value changes depending on how the software is built, but with the software provided by TI, which was used this time, a Fault occurred when the RPM exceeded 3000RPM.
Here, enter RPM=1000 and press Enter.
reference position in angle = You are being asked for the rotation angle of the motor.
This time we're controlling the speed, so the rotation angle doesn't really matter. Any value will do, but enter 100 and press Enter.
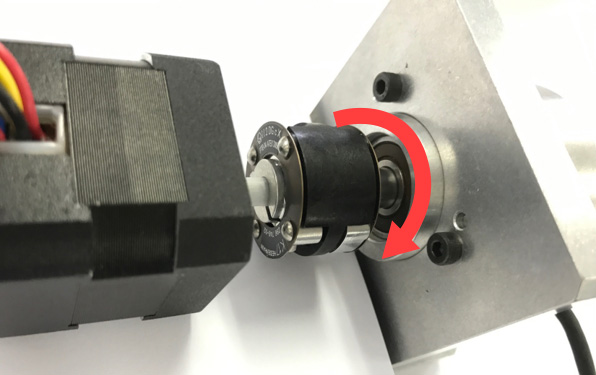
Then the motor worked fine.
While the motor is rotating, it says "press enter to configure…", so I tried pressing Enter.
The following is displayed on Tera Term, and the speed (rotational speed) and position (position information during rotation) when pressing Enter are displayed.
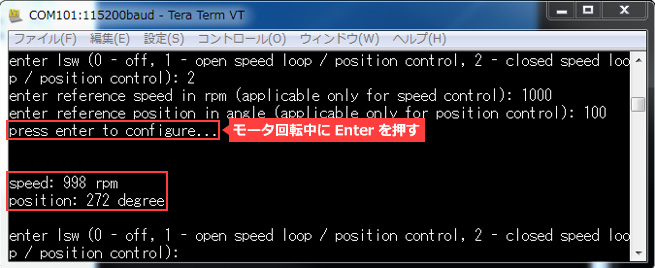
By the way, if you put a negative value in the RPM value, it will rotate in the opposite direction.
Easy motor control with a processor!
I have introduced the procedure for achieving motor control using the Sitara series AM437x.
If you would like more information about TI's products related to the Sitara processors and Industrial Ethernet mentioned in this article, please contact us.
Contact Us


Related Information
Click here for recommended articles/materials
Realize a smart factory with an industrial processor! Sitara AM437x
Supports multiple industrial Ethernet standards! Processor without ASIC or FPGA
Let's make a speech recognition demo that responds to phrases
No expertise required! What is "OpenCV", a library that can perform complex image processing?
Let's detect people with OpenCV compatible ARM processor
This is different from a microcomputer! What is a DSP specialized for digital signal processing?
Click here to purchase products
Click here for manufacturer site/other related links
product
AM437x
TPS65218 Power Management for AM335x/AM437x ARM® Cortex™-A8/A9 SoCs
Evaluation board, tools
TMSIDK437X
TMDSEMU200-U
software development kit
PROCESSOR-SDK-RTOS-AM437X
PRU-ICSS-INDUSTRIAL-DRIVES