- Semiconductor BusinessHOME
- Products and Services of Macnica,Inc.
-
technical information

-
Events and Seminars
- Handling Manufacturer
- Support
- Inquiry
- Click here to purchase products
- Semiconductor business e-mail magazine registration
![]()
![]() Narrow down by specifying conditions
Narrow down by specifying conditions
現在2183件がヒットしています。check
Introduction
In this four-part series, we will create an application that uses a Qualcomm® QCA4020 reference board to establish a Wi-Fi connection via switch operation. We will introduce how to create the application and the necessary documentation, and hopefully this will be helpful when considering the introduction of the QCA4020.
The first session will cover setting up the QCA4020 development environment and running "Hello World".
Before we begin creating applications, let me give you a brief explanation of the QCA4020. The QCA4020 is Qualcomm®'s wireless LAN SoC with a built-in application CPU for IoT devices. In addition to wireless LAN, it also supports BLE (*Bluetooth is not supported) and Zigbee. Because it has a built-in application CPU (Arm Cortex-M4F), users can create and run their own applications.
The supported operating systems are FreeRTOS and ThreadX. This time, we will use FreeRTOS. Although we will be using FreeRTOS, the API we will actually be using is the OS layer wrap API provided by Qualcomm®. For detailed specifications of QCA4020, please refer to this link (link to an external site).
Environment
In this tutorial, we will build and run a HelloWorld application on Windows using the SDK provided by Qualcomm®.
*The development environment supports Windows/Linux.
The following tools are required. Different versions may cause problems.
- SDK(QCA4020 Development Kit)
- Python 2.7
- Eclipse IDE for C/C++ (Oxygen version - Release 4.7.2)
- OpenOCD(version 0.10.0 [2017-06-09])
- JDK (8 or higher)
- GNU Arm Embedded toolchain(gcc-arm-none-eabi-6-2017-q2-update)
- Zadig
- tera term
The SDK is available here (external site).
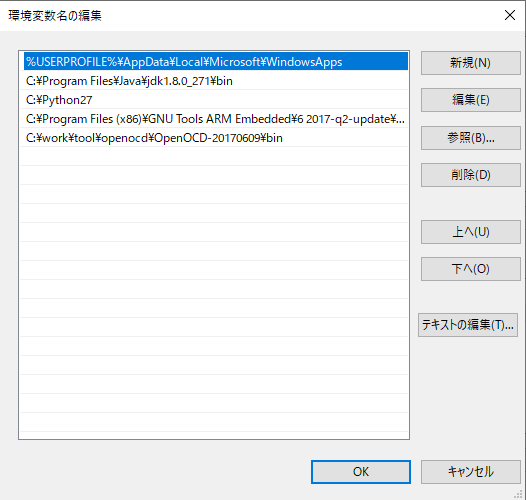
After installing the above tools, add the paths to the necessary tools.
Install the FTDI driver for JTAG using Zadig.
We won't be using Eclipse this time, but if you do, you'll need the OpenOCD plugin. Please refer to this (external site) documentation to configure OpenOCD and import the sample project in Eclipse.
Build and run
Unzip the SDK.
The HelloWorld sample code is located in the following folder.
{SDK_TOP}\target\quartz\demo\Helloworld
Build:
Navigate to {SDK_TOP}\target\quartz\demo\Helloworld\build\gcc and execute the following command.
build.bat prepare 4020 cdb
build.bat f 4020 cdb
*Depending on your Windows settings, you may not be able to run Python 2.7.
In that case, please turn off the Python setting in "Settings" -> "Apps" -> "App execution aliases".
Flash:
Configure the following Jumper on the reference board.
- J30(1 - 2)
- J31(1 - 2)
- J32(1 - 2)
- J36(1 - 2)
- J37(2 - 3)
- J38:2 - J39:3, J38:3 - J39:2
- J40(2 - 3)
- J57(1 - 2)
Connect the J85 to your Windows PC via USB. Turn on the power to the reference board.
Navigate to {SDK_TOP}\target\quartz\demo\Helloworld\build\gcc and execute the following command.
flash_openocd.bat
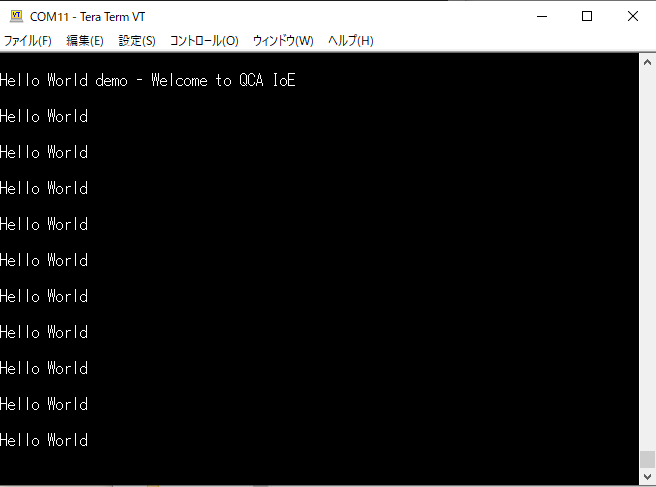
execution:
Remove the J31 jumper and power it on. If "Helloworld" is displayed as shown in the image below, it is successful.
Summary
This time, we briefly introduced how to set up the environment for creating apps. For more details, please refer to the following page.
External page: Hello World w/ QCA4020 Dev Kit
This document describes how to set up the environment using Eclipse, rather than the command line-based approach used this time. Next time, we will create an LED blinking application based on the HelloWorld example we created and ran this time.
Inquiry
For product inquiries, please use the link below.
To Qualcomm manufacturer information Top
If you want to return to the Qualcomm manufacturer information top page, please click below.