- Semiconductor BusinessHOME
- Products and Services of Macnica,Inc.
-
technical information

-
Events and Seminars
- Handling Manufacturer
- Support
- Inquiry
- Click here to purchase products
- Semiconductor business e-mail magazine registration


 Narrow down by specifying conditions
現在2254件がヒットしています。check

What should I decide before starting a power supply design?
For example, let's say we want to design a power supply that outputs 12V. So, if we have the condition that "the output voltage is 12V," can we start designing the power supply? In reality, the output voltage alone is not enough of a design condition.
To begin power supply design, you first need to define the required power supply as a "specification." For example, here are some conditions you should consider before designing:
• Input conditions: What input voltage will be used?
• Output conditions: What voltage, current, and wattage will be supplied? How many outputs are needed?
Other conditions: presence or absence of insulation, operating temperature, EMI (electromagnetic noise), size, etc.
Even with power supplies that output the same 12V, the conditions to consider for the power supply will change depending on the required output current, power, and input conditions. In other words, power supply design starts not just with "what voltage to output," but with clarifying "what conditions and how much power is needed from a power supply."
So, how do we organize these conditions and translate them into concrete designs? This time, we'll look at the flow of power supply design by actually using Power Integrations' PI Expert.
Let's start designing using PI Expert.
Once we've organized the necessary requirements for the power supply, the next step is to consider a specific design based on those requirements.
This time, we'll look at the process using "PI Expert," a power supply design support tool provided by Power Integrations. PI Expert Online is a web-based design support tool that allows you to input power supply specifications and then concretize a power conversion design proposal using Power Integrations ICs. The design results allow you to check circuit diagrams, bills of materials (BOMs), transformer design information, and more.
PI expert official page
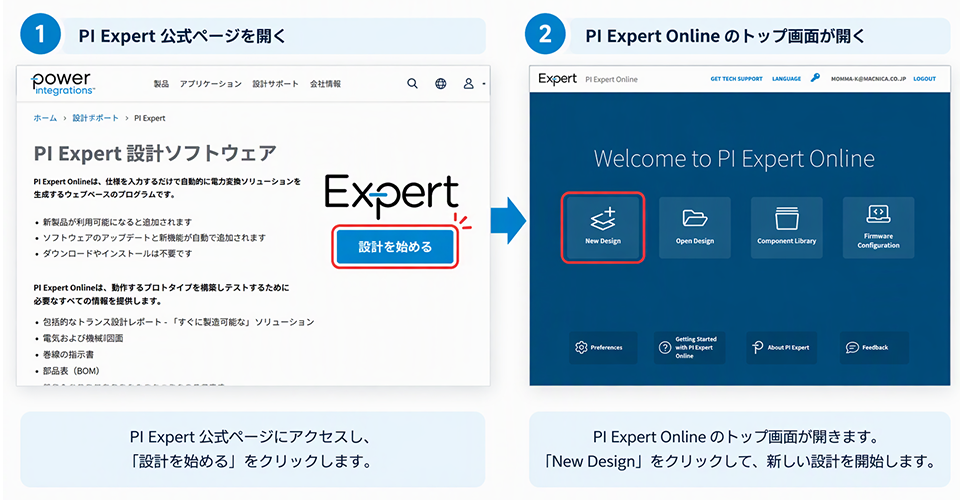
Let's start with "New Design" and see how the power supply specifications translate into concrete design proposals.
Let's consider the design conditions using PI Expert.
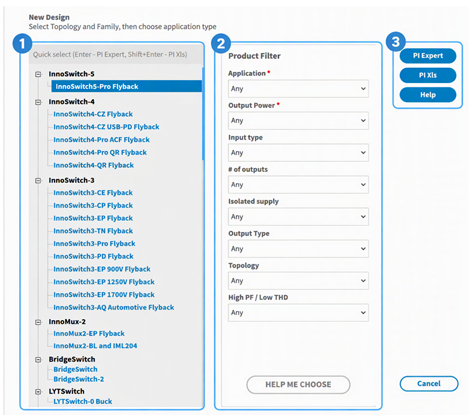
Selecting "New Design" will display the "Product Portfolio" screen, where you can choose a product family and design requirements.
On this screen, you can select a Power Integrations product family or circuit configuration, and then narrow down the target products by setting conditions such as application, power, input method, and isolation requirements using the filters on the right. The items set here correspond to the "power supply specifications," and by using PI Expert, you can proceed to concrete design while organizing the necessary conditions.
① Selection of product family topology
Select your design target from the Power Integrations product family and circuit architecture.
② Filtering of design conditions
We narrow down the product candidates based on conditions such as application, output power, input method, number of outputs, presence or absence of isolation, and topology.
③ Tool Selection
In addition to PI Expert (a design support tool using a GUI), you can also choose PI Xls (a spreadsheet-type tool).
This time, we'll focus on an isolated flyback power supply using the TinySwitch-5. From the product family list, select "TinySwitch-5 Flyback," and then click "PI Expert." Note that at this stage, we haven't decided on a specific TinySwitch-5 model number. We'll enter the actual design conditions and see which device PI Expert suggests.
Set the input voltage conditions.
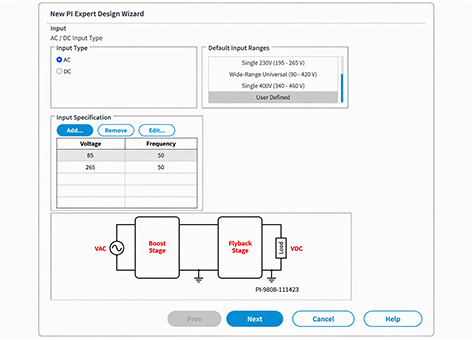
First, you need to set the voltage requirements for the power supply. In this example, we'll assume a power supply that supports inputs from 85VAC to 265VAC. PI Expert allows you to select from pre-defined input conditions, or you can individually set the input voltage and frequency from "User Defined".
In this case, we set the "Input Specification" to 85V / 50Hz and 265V / 50Hz. Power supplies must be designed to provide the necessary output within the expected input voltage range. Therefore, determining the input voltage range is one of the important design conditions.
Set the output voltage and output power.
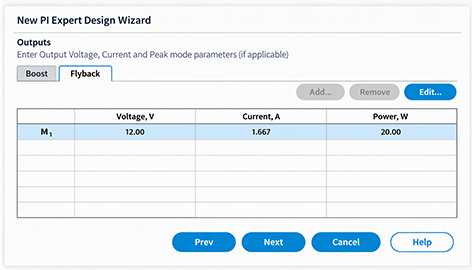
Next, we set the output conditions. In this case, we will assume a single output power supply of 12V / 20W. Output power is calculated by the product of the output voltage and the output current.
Output power (W) = Output voltage (V) x Output current (A)
Under these conditions, 20W ÷ 12V ≈ 1.67A. Click "Edit..." in the "Flyback" tab of PI Expert to change the output voltage and output current. In this case, we set it to 12V and 1.667A and confirmed that the output power was displayed as 20.00W. Even with the same 12V power supply, the power supplied will change if the required output current is different. Thus, determining not only the output voltage but also how much current and power is needed is essential for power supply design.
Check the design conditions and execute.
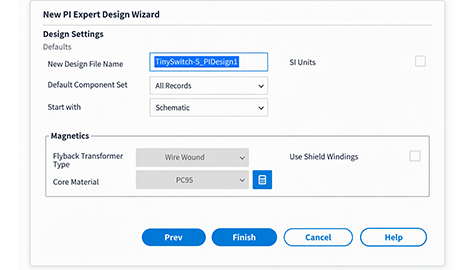
After setting the input and output conditions, the final step is to review the design settings on the "Design Settings" screen. Here, you can set the design file name, the set of components to be used, and conditions related to the transformer.
This time, we used the default settings and clicked "Finish" to start generating the design proposal. Up to this point, we have set the conditions for creating the design proposal based on specifications such as input voltage, output voltage, and power. So, what kind of design proposal will PI Expert present based on these conditions? Next, let's look at the actual design result.
Let's take a look at the design proposal created with PI Expert.
Clicking "Finish" will start generating design proposals based on the conditions you set in PI Expert. Please wait until the calculation process reaches 100%. Once the calculation is complete, the schematic will be displayed in the "Schematic" tab.
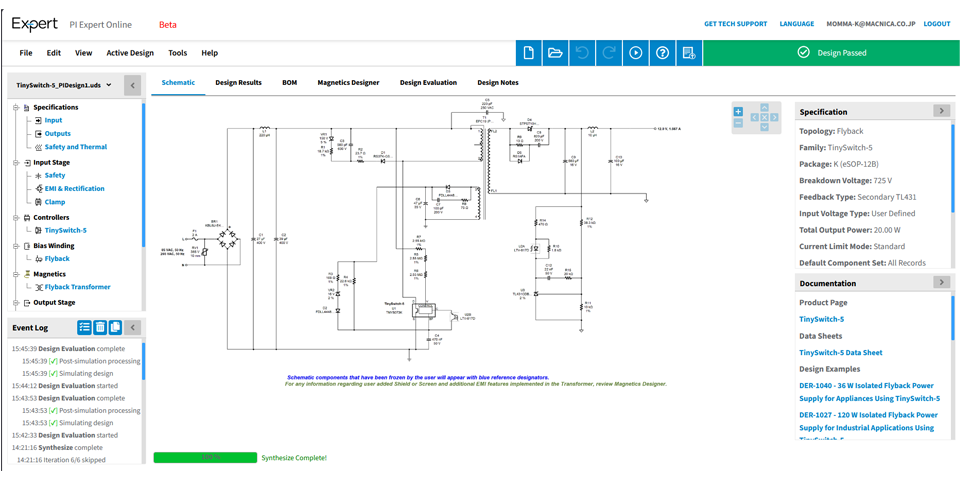
Looking at the circuit diagram, you can see that not only the TinySwitch-5 but also various other components that make up the power supply, such as transformers, diodes, and capacitors, are used. Also, the model number of the TinySwitch-5 selected for this project is displayed near the bottom center of the circuit diagram. In this design, "TNY5073K" was selected.
To summarize the design results of PI Expert this time, they are as follows:
|
item |
PI Expert design results |
|
device family |
TinySwitch-5 |
|
Selected device |
TNY5073K |
|
topology |
Flyback |
|
package |
K (eSOP-12B) |
|
Breakdown Voltage |
725V |
|
Feedback Type |
Secondary TL431 |
|
input voltage |
85VAC ~265VAC |
|
output voltage |
12V |
|
output current |
1.667A |
|
output power |
20.00W |
|
Design check |
Design Passed |
*Based on the design results obtained from PI Expert Online. "Design Passed" is a design check result on PI Expert and does not guarantee operation or performance on actual hardware.
Let's see what we can learn from the design results.
PI Expert allows you to view various design information in addition to schematics. Multiple tabs are available at the top of the screen, each displaying the following information:
| tab | What can be confirmed |
| Schematic | Circuit diagrams and component connections for power supply |
| Design Results | Input/output specifications, component ratings and design values, calculation and simulation results. |
| BOM | Required parts, quantities, constants, manufacturer part numbers, etc. |
| Magnetics Designer | Transformer core, winding structure, winding information, etc. |
| Design Evaluation | Breakdown of losses, operating waveforms, changes in design parameters, frequency characteristics of the control system, etc. |
| Design Notes | Area for recording and managing design notes, evaluation reports, etc. |
For example, in "Design Results," you can compare component ratings and specifications with calculation and simulation results. Furthermore, in "Design Evaluation," you can specify conditions such as input voltage and load to check losses and operating waveforms. Thus, power supply design requires considering various factors, not just ICs and circuits, but also component selection, transformer design, and verification of losses and operating conditions.
Looking at the design results from PI Expert reveals the overall picture of what needs to be considered and checked in power supply design. In this design, the "TNY5073K" was selected, but why was this device chosen? Furthermore, transformers and peripheral components each have their own roles and reasons for selection.
When learning power supply design, it's important not only to review the design results presented by PI Expert, but also to consider "why this design was chosen." In this article, we reviewed the overall design process, but there are still many "why?" questions hidden within the design results.
Understand that the results from PI Expert do not mean "design complete."
Up to this point, we have used PI Expert to set design conditions and review the design proposal, including the circuit diagram and component information. However, just because PI Expert has generated a design proposal does not mean that the power supply design is complete. PI Expert displays a Warning if a design problem is detected. In this design, warnings regarding switching operation and transformer windings were displayed during the calculation process. It is important to review these warnings and design results, and revise the design conditions and components as needed.
Furthermore, the calculation and simulation results from PI Expert do not guarantee the actual operation or performance of the power supply. Ultimately, it is necessary to verify the design, create a prototype, and measure and evaluate voltage and current waveforms, temperature, etc., on the actual device. Power supply design proceeds as follows:
Define specifications → Create a design proposal using PI Expert → Review the design → Create a prototype → Measure and evaluate → Adjust as needed
This time, we used PI Expert to verify everything from setting design conditions to creating a design proposal. The design results from PI Expert include a variety of information necessary for understanding power supply design, such as ICs, circuits, transformers, and peripheral components. As a first step in grasping the flow of power supply design, we encourage you to use PI Expert and start by creating a design proposal.
* The circuit output by PIExpert is a standard circuit. It should work, but the exact constants have not been verified. There may be issues with noise or fine-tuning. When we design, we select peripheral circuits by referring to the abundant design examples provided by Power Integrations. For example, phase compensation circuits and snubber circuits. We also create layout diagrams based on these design examples. We also recommend obtaining the evaluation kits that are available. Please see the manufacturer's website below for design examples and more.
TinySwitch-5 Resources
Inquiry
If you have any questions regarding this article, please contact us below.
Power Integrations Manufacturer Information Top Page
To return to the Power Integrations Manufacturer Information top page, please click below.