
![]()
![]() Narrow down by specifying conditions
Narrow down by specifying conditions
現在2003件がヒットしています。check

What is OpenCV?
Recently, there are increasing opportunities to see applications that use face recognition in various situations, such as smartphone/tablet applications, facility entrance/exit records, and surveillance cameras.
I think it is well known that these applications are realized by technologies such as "AI" and "machine learning", which are hot topics these days, but considering the actual introduction of these technologies into product development, etc. I think there is an image that the hurdle seems to be high.
Therefore, in this article, I would like to introduce how to easily implement a face detection algorithm using an open source library called OpenCV.
OpenCV is an algorithm specialized for computer vision, and by using it, you can easily implement algorithms such as object recognition, pattern recognition, and action recognition.
Face detection by running OpenCV on Snapdragon 410
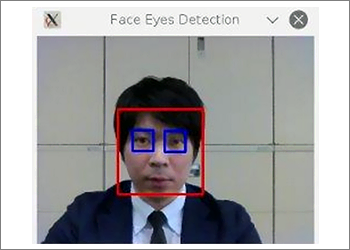
This time, using Intrinsyc's Open-Q™ 410 Development Kit equipped with Qualcomm Snapdragon 410,
I would like to run OpenCV with Snapdragon 410 and create a demo where an image captured by a USB camera is output to an HDMI monitor in real time, and when a person's face/eyes are detected, they are surrounded by a frame. (Left image: Image photo)
There is also a video at the end of the article, so please take a look.
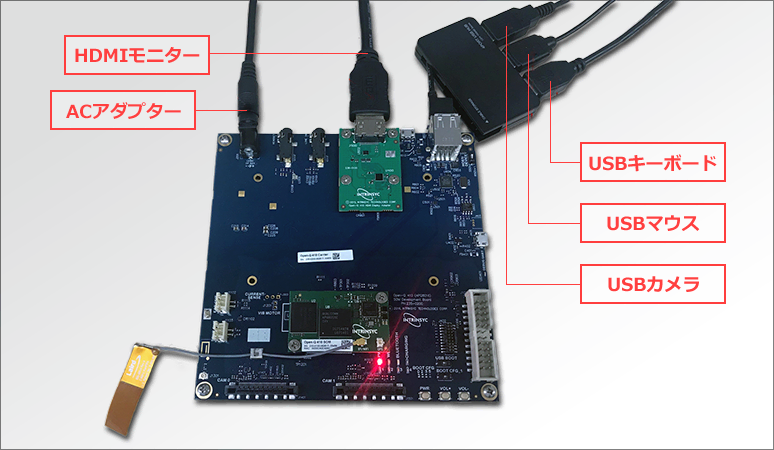
Preparation of demo equipment
For this demo, we will use the following equipment:
- Open-Q™ 410 Development Kit (Devkit)
- USB hub
- USB mouse
- USB keyboard
- USB camera
- HDMI monitor
- USB memory
- Windows PC
Also, connect each device as shown below.
Linux is used as the OS. For how to install Linux, please refer to the article "Installing Linux® on Qualcomm® Snapdragon™ 410".
Installing Python-OpenCV
OpenCV officially supports packages for C++, JAVA and Python.
I would like to use Python this time. First install the required packages.
The procedure is very simple, start Qterminal and execute the following apt-get command. This demo can be run with the following packages.
linaro@linaro-alip:~$ sudo apt-get install python python-dev python-opencv python-numpyPreparation of training data
In order to accurately discriminate between target and non-target images, it is necessary to collect a huge amount of data, but OpenCV has officially released the data of trained cascade classifiers, and it is possible to utilize them. can easily detect objects. The files ``haarcascade_frontalface_alt.xml'' and ``haarcascad_eye.xml'' seem to correspond to the learning data for detecting frontal faces and eyes, so I will download these two types this time.
The training data file downloaded here will be read in the Python script later. These files can be obtained from the Github repository linked below.
OpenCV GitHub repository
Preparing the Python script
Now we will write some Python code. I wrote the following code with reference to Python and OpenCV related code on Github.
import cv2 # カスケード分類器データの読み込み face_cascade = cv2.CascadeClassifier('haarcascade_frontalface_alt.xml') eye_cascade = cv2.CascadeClassifier('haarcascade_eye.xml') frame_width = 320 frame_height = 240 esc = 27 # ESCキーはASCIIコードで27 # USBカメラのIDを設定して初期化 cap = cv2.VideoCapture(0) # キャプチャ画像のフレームサイズ設定 cap.set(cv2.cv.CV_CAP_PROP_FRAME_WIDTH, frame_width) cap.set(cv2.cv.CV_CAP_PROP_FRAME_HEIGHT, frame_height) while True: # キャプチャ ret, img = cap.read() # グレースケール変換 gray = cv2.cvtColor(img, cv2.COLOR_BGR2GRAY) # 検出スタート faces = face_cascade.detectMultiScale(gray, scaleFactor=1.7, minNeighbors=3) # 顔/目検出を実行して検出したら矩形で囲む枠を描写 for x, y, w, h in faces: cv2.rectangle(img, (x, y), (x + w, y + h), (0, 0, 255), 2) face = img[y: y + h, x: x + w] face_gray = gray[y: y + h, x: x + w] eyes = eye_cascade.detectMultiScale(face_gray) for ex, ey, ew, eh in eyes: cv2.rectangle(face, (ex, ey), (ex + ew, ey + eh), (255, 0, 0), 2) # 検出結果表示ウィンドウの名前 cv2.imshow('Face Eyes Detection', img) # ESCキーで検出ストップ key = cv2.waitKey(1) if key == esc: break cap.release() cv2.destroyAllWindows()Save the created script with the extension for Python (.py).
This time, a file called “face_eyes_detect.py” is created. Put this script file in the same folder as the learning data file created earlier. Now we are finally ready to run the demo.
Running Face/Eye Detection Demo
Start QTerminal and type the command (python <.py file name>) to execute the python file in the directory containing the Python script (.py) and training data file (.xml). The image acquired by the camera was displayed on the monitor in real time, and a rectangle surrounding the face and eyes was displayed.
linaro@linaro-alip:/media/linaro/8089-CA45/faceeyesdetect$ ls face_eyes_detect.py haarcascade_eye.xml haarcascade_frontalface_alt.xml linaro@linaro-alip:/media/linaro/8089-CA45/faceeyesdetect$ python face eyes detect.pyBy using OpenCV in this way, we were able to easily implement a face/eye detection demo. OpenCV also provides various classifier data. By making good use of these convenient resources, it becomes possible to develop applications that require advanced image processing more efficiently.
In addition, for applications that require heavy loads such as image processing and machine learning, using a high-performance SoC like the Snapdragon series used this time will enable speedy processing. Why don't you try it?
For those who want to know more about our products
If you would like more information about any of the products mentioned in this article, please contact us here.
Click here for recommended articles/materials
Click here for manufacturer site/other related links
Qualcomm Snapdragon is a product of Qualcomm Technologies, Inc. Qualcomm and Snapdragon are trademarks of Qualcomm Incorporated, registered in the United States and other countries.