- 半導体事業HOME
- マクニカの製品・サービス
-
技術情報

-
イベント・セミナー
- 取扱メーカー
- サポート
- お問い合わせ
- 製品購入はこちら
- 半導体事業のメルマガ登録
![]()
![]() 条件を指定して絞り込む
条件を指定して絞り込む
現在2189件がヒットしています。check

ソフトウェアの開発手順
“Nios II IDE + HAL”でのソフトウェア開発手順は、アルテラ社提供のチュートリアルに詳しく書かれているのでそちらを参考にしていただくとして、ここではそれ以外の2手法について解説してきます。
Nios II IDE (non-HAL)でのソフトウェアの開発手順
ここでは初期化プログラムやヘッダーファイル等を“Nios II IDE + HAL”の方法で生成されたものを流用する方法を紹介します。図 2に開発フローを示します。
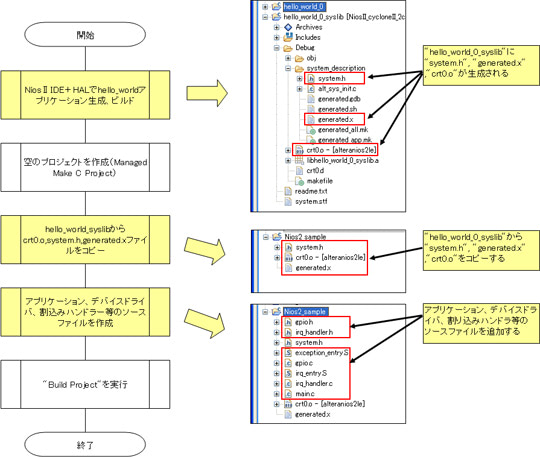
図 2 Nios II IDE(non-HAL)での開発フロー
まずは、 “Nios II IDE + HAL”の方法で“hello_world”アプリケーションテンプレートを使用してプロジェクトを生成します。“hello_world_0”、“hello_world_0_sysllib”プロジェクトが生成されます。このまま、“Build Project”を実行します。“hello_world_0_syslib/Debug”フォルダに“crt0.o”が“hello_world_0_syslib/Debug/system_description”フォルダに“system.h”と“generated.x”が生成されます。
なお、ここで生成されたリンカスクリプトはProgram MemoryやStack Memoryが“sdram”に設定されているので変更したい場合はビルドの前に“System Library Properties”で設定を変更するか、リンカスクリプトファイルを直接書き換えてください。
次に“File ⇒ New ⇒ Project”から“Managed Make C Project”を選択し、空のプロジェクトを生成します。ここに先ほどのhello_world_0_syslibプロジェクトから初期化プログラムのオブジェクトファイル(crt0.o)、ヘッダーファイル(system.h)、リンカスクリプトファイル(generated.x)をコピーします。
最後にアプリケーションやデバイスドライバ等のソースファイルを追加します。Makefileは自動的に生成されるのでビルドを実行すれば、実行可能なバイナリファイルが生成されます。なお、ここで作成したプロジェクトには割り込みハンドラやハードウェアの初期化処理は含まれていないので実際に動かすときは注意してください。必要に応じて、HALから流用することも可能です。
Command Shell + nios2-elf-gccでのソフトウェア開発手順
ここでは“Nios II IDE(non-HAL)”で作成したソースコードでのMakefileのサンプルとビルドの方法、デバッグ方法を解説します。図 3にソフトウェア開発フローを示します。

図 3 Command Shell + nios2-elf-gccでの開発フロー
まずはプロジェクトとして管理するため、フォルダを作成します。ここでは“Nios2_make_app”としています。ここに必要なソースコードをコピー、または作成していきます。
次に“Makefile”を用意します。あまり規模の大きくないアプリケーションであればコマンドラインで“nios2-elf-gcc”にオプションをつけてビルドすることも可能ですが、ここではMakefileを使用する方法を紹介します。
図 4にMakefileの記述例を示します。
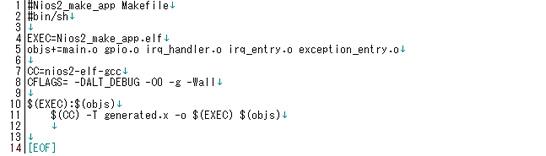
図 4 Makefile記述例
最後にコマンドシェルを起動し、“Nios2_make_app”フォルダをカレントにして、“make”を実行します。実行バイナリが作成されます。

図 5 make実行結果
次にデバッグの方法です。Nios II用のGNU開発環境の中にはコマンドラインのGDBとGUIデバッガであるインサイトデバッガも含まれています。
GDBやインサイトを使う場合はgdbstubプログラムをターゲット側で実行し、JTAG-Debugモジュール経由で接続します。
コマンドシェル上で“nios2-gdb-server.exe”にポート番号のオプションを付けて実行し、ターゲットを接続待ち状態にします。この状態で別のコマンドシェルを起動し、“nios2-elf-insightexe”を実行し、インサイトデバッガが起動します。“File ⇒ Target Setting”から“Target Selection”画面を起動し、以下のように設定します。
・target:“Remote/TCP”
・Hostname:“localhost”
・Port:nios2-gdb-server.exeで指定したポート番号
Runボタンをクリックすると実行バイナリがダウンロードされ、mainプログラムの先頭でプログラムが停止します。
インサイトデバッガでは、実行と停止、ブレークポイントの設定、ステップイン/ステップオーバ実行、また、レジスタやメモリダンプ、ソースコードのミックス表示やアセンブラ表示も可能です。簡単にソースレベルデバッグが可能です。
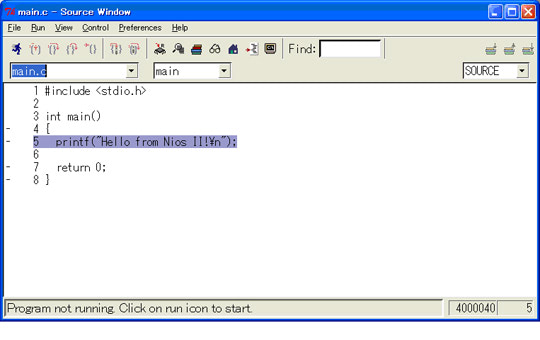
図 6 インサイトデバッガ
おわりに
今回は統合開発環境を使用したソフトウェア開発の方法について解説しました。様々な方法があることがお分かりいただけたと思いますが、是非一度実際に使われてみることをお勧めします。
ソフトコアCPUはその論理からツールサポートまで、様々なニーズに対応出来るように考えられていますので、これをうまく活用することがユーザの醍醐味なのです。
「ユーザオリエントなSoC(System On Chip)をミニマムオーダ1個から実現できる」ソフトコアCPU+FPGAを、是非皆さんも体験してみて下さい。
次回は「Command Shell + nios2-elf-gcc手法を用いたOS搭載事例」について解説する予定です。