- Semiconductor BusinessHOME
- Products and Services of Macnica,Inc.
-
technical information

-
Events and Seminars
- Handling Manufacturer
- Support
- Inquiry
- Click here to purchase products
- Semiconductor business e-mail magazine registration
![]()
![]() Narrow down by specifying conditions
Narrow down by specifying conditions
現在2183件がヒットしています。check
What is SigmaStudio
SigmaStudio is a graphical development tool for developing and tuning SigmaDSP® audio processors.
Audio processing blocks can be wired with easy-to-understand parts, and parameters can be adjusted easily with a GUI.
Not only engineers who are familiar with DSP design, but also people who are new to DSP design can easily create sufficient designs, so it can be said to be a very powerful support tool for evaluation.
Also, this software is free to use, so even if you are new to it, you can start using it without worry.
This time, using SigmaStudio, even beginners who have never used a DSP can easily create an equalizer with a volume control function! I wrote an introductory article.
what to prepare
1. Sigma Studio
A graphical development tool for easy evaluation using SigmaDSP®. Various functions can be evaluated using the audio process block.
The software installation procedure is as follows.
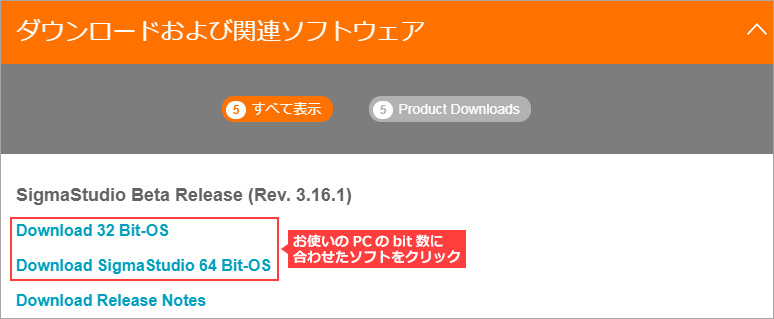
- Access the official website of Analog Devices, SigmaStudio page.
- Download SigmaStudio from the Downloads and Related Software section.
After downloading, run the exe file and install it on your PC.
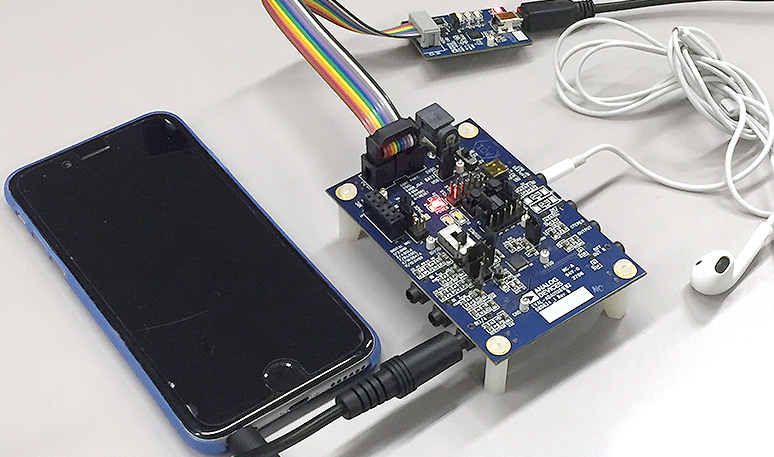
2. EVAL-ADAU1761
Low power stereo audio codec evaluation board.
It is an excellent DSP evaluation board with built-in digital audio processor, stereo audio ADC and DAC with sample rate from 8kHz to 96kHz and support for digital volume control.
EVAL-ADAU1761
Try running SigmaStudio and the evaluation board
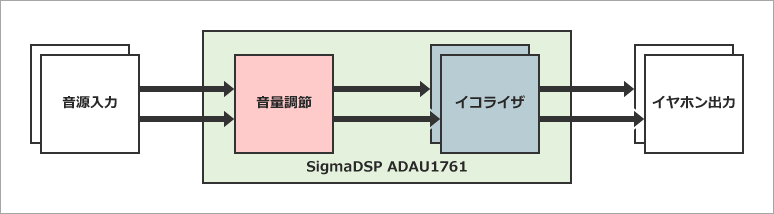
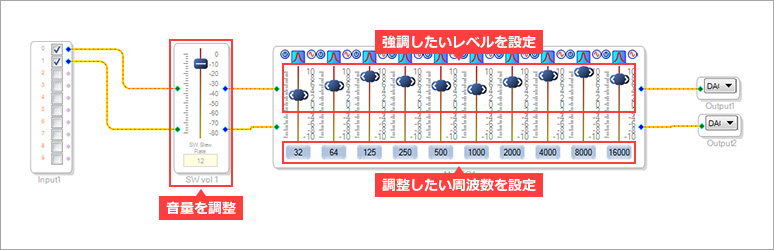
DSP internal configuration
First, consider the internal circuit that writes to the DSP with SigmaStudio. The functions I want to realize this time are equalizer and volume control.
An equalizer is a function that raises or lowers a specific frequency to appropriately change the sound quality, and this is created inside the DSP.
The functional block diagram is shown below.
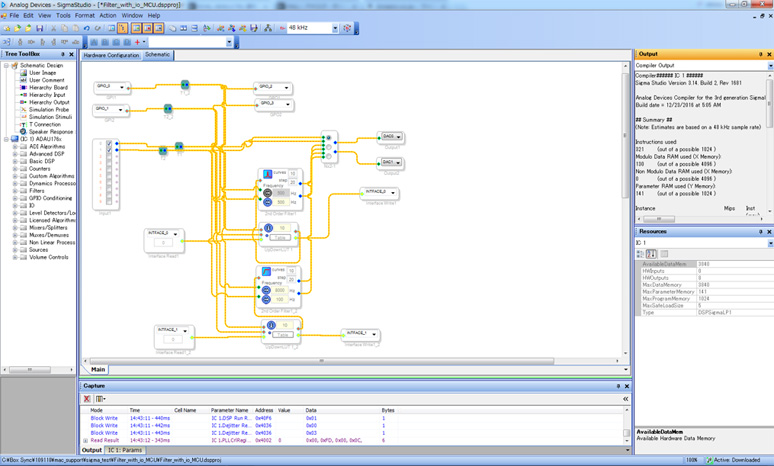
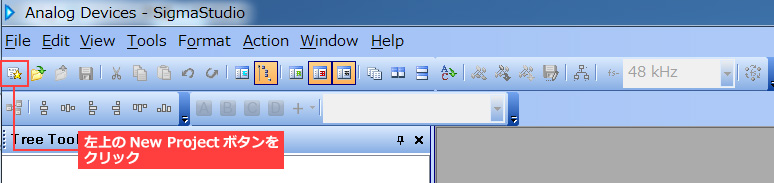
SigmaStudio project creation
Create a project file using the installed SigmaStudio.
- First, start SigmaStudio and create the original project.
- Drag the ADAU1761 cell and the USBi cell to be used this time to the blank area where the hardware configuration tabs are displayed. Click and drag to wire from the blue output pin of each cell to the green input pin.
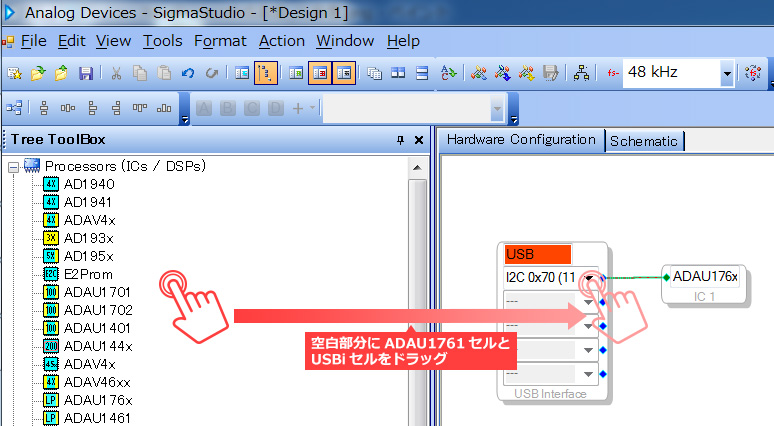
This is the end of creating the hardware configuration for now.
Next, let's consider the internal circuit configuration of the ADAU1761.
- Click the Schematic tab at the top of the screen and place the required cells in the blank area from the Box on the left.
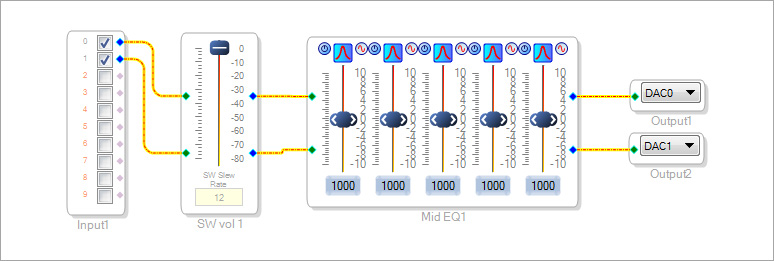
What you need is below.- Input cell: 1
- Single SW slew vol cell: 1 piece
- Medium Size Eq cell (equalizer): 1
- Output cell: 2
- Also, here there is still one equalizer, but this time I want to create 5 equalizers, so right-click and select "Glow Algorithm" and select the number you want to increase (4 in this case).
Also, since two Volume Control terminals are required, increase them in the same way.
After increasing the number of sockets and terminals, click and drag all green input and blue output terminals to connect.
The circuit to write to the SigmaDSP is now complete!
equalizer verification
Write the equalizer created on SigmaStudio to the ADUA1761 and check if the sound quality can actually be changed.
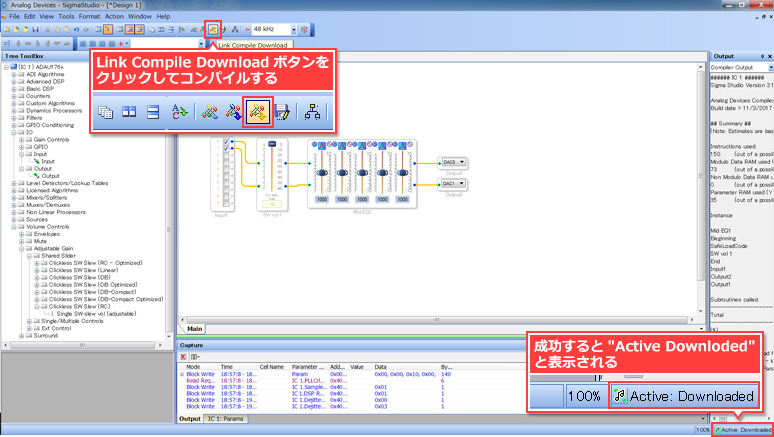
Connect the evaluation board and PC with a USB cable, and click the "Link-Compile-Download button" on the SigmaStudio menu tab to compile.
If there are no problems, "Active Downloaded" will be displayed in the lower right corner of the window.
By connecting the sound source and earphones to the evaluation board and adjusting the volume settings and equalizer settings created inside the DPS, you can adjust the sound quality played from the earphones.
By further improving the equalizer I made this time and setting it, I was able to listen to music with a better sound quality!
Impressions after using it for the first time
As a hardware engineer, I thought that designing a processor like a DSP would be a very difficult hurdle.
However, when I tried using SigmaStudio, I was able to easily create a design that included the functions I wanted, even though I was an amateur designing a processor for the first time.
A super-easy tool that allows you to design processors with click and drag!
I hope that you, who are reading this article right now, will also feel this excitement.
Click here for a video of the actual screen operation
To use SigmaStudio / SigmaDSP
I made an equalizer this time, but it is possible to build various other systems!
Why don't you make your DSP debut with this?
For more detailed usage, please refer to the wiki page created by Analog Devices.
SigmaStudio and SigmaDSP Documentation
Click here for recommended articles/materials
Easy! Gesture Sensor: Introduction to Analog Devices ADUX1020
Easy! Gesture sensor: Try moving the Analog Devices ADUX1020
Gesture sensor ADUX1020 usage example -Key lock authentication system-
DSP technical information database