- 半導体事業HOME
- マクニカの製品・サービス
-
技術情報

-
イベント・セミナー
- 取扱メーカー
- サポート
- お問い合わせ
- 製品購入はこちら
- 半導体事業のメルマガ登録
![]()
![]() 条件を指定して絞り込む
条件を指定して絞り込む
現在2004件がヒットしています。check

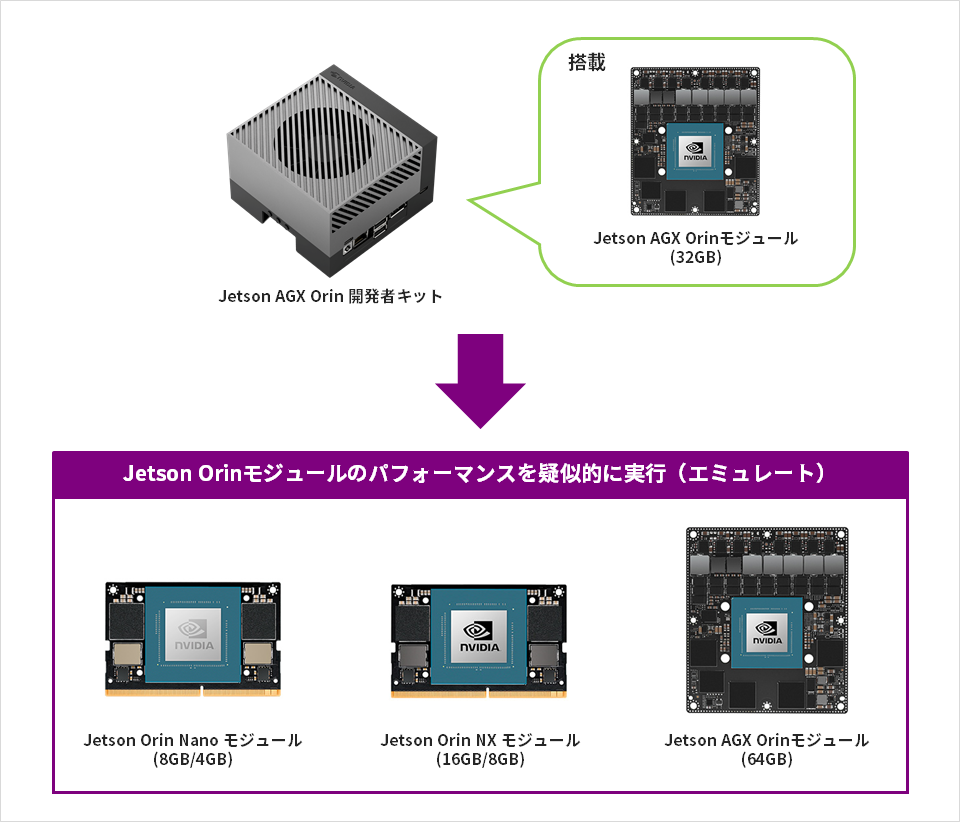
NVIDIA® Jetson™ AGX Xavier™と同じ形状でタワーPCクラスの性能を誇るNVIDIA® Jetson AGX Orin™は、モジュール評価用の「Jetson AGX Orin開発者キット」がリリースされております。Jetson AGX Orin開発者キットは、Jetson AGX Orinモジュールの評価だけでなく、NVIDIA® Jetson Orin™ NX、NVIDIA® Jetson Orin™ Nano をエミュレートさせて評価することが可能です。
本記事では、そもそもエミュレートとは何か?エミュレーションモードで何ができるのか、という疑問にお答えしていきます。
エミュレート・エミュレーションとは?
「エミュレート」「エミュレーション」は、「模倣」という意味で、コンピューターの世界では「特定のデバイスで動作するソフトウェアを、別の環境で擬似的に実行させる」という意味で使用されます。
すべての Jetson Orin モジュールは 1 つの SoC アーキテクチャーを共有しているため、開発者キットは任意のモジュールのパフォーマンスを疑似的に実行(エミュレート)することが可能です。実際にJetson AGX Orin 開発者キットでソフトウェアの変更により、以下に挙げるJetson Orinシリーズを一つのハードウェア上で疑似的な動作環境をつくり評価することが可能となります。
エミュレーションモードの使用手順
- ハードウェアの準備
- ソフトウェアの準備
- エミュレーションモードの設定
*補足)
今回はJetson AGX Orin開発者キットにて、以下のソフトウェア(バージョン)を使用した手順をご紹介しております。
・L4T(Linux):Jetson Linux 35.1
・Jetpack:JetPack 5.0.2
・DeepStreamSDK: DeepStream 6.1.1
1:ハードウェアの準備
1.以下のような構成でホストPC(Linux:Ubuntu20.04)にJetson AGX Orin開発者キットを付属のUSBケーブルで接続します。
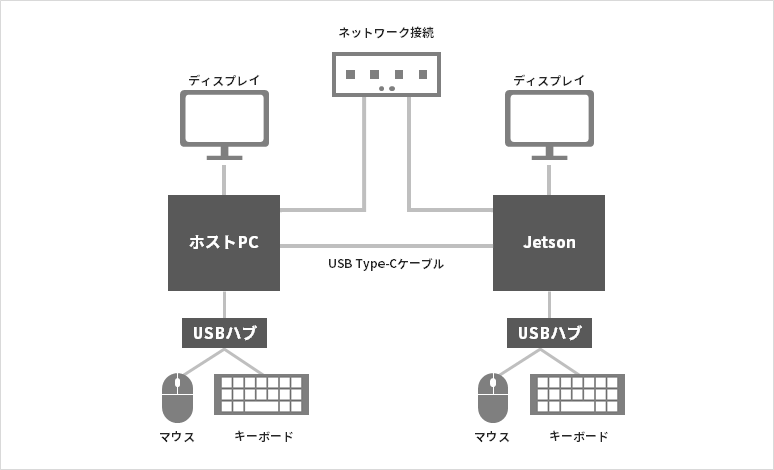
2.Jetson AGX Orin開発者キットに付属のACアダプターを接続します。

3.メーカーサイトのガイドに従い、以下の手順でForce Recovery Modeで起動します。
Step1: キャリアボードの電源を入れ、RECOVERY ボタンを押し続けます。
Step2: リセットボタンを押します。
Step3: 電源ライトがついていながら、ディスプレイに何も映らないことを確認します。
4.ホストPCで以下のコマンドを入力し、Jetson AGX Orin開発者キットのUSBインターフェースが認識されていることを確認します。
host$ lsusb以下のように”Nvidia Corp.”の表示を確認します。

2:ソフトウェアの準備
メーカーサイトのガイドを参考に、エミュレーション設定に必要なソフトウェアを準備します。
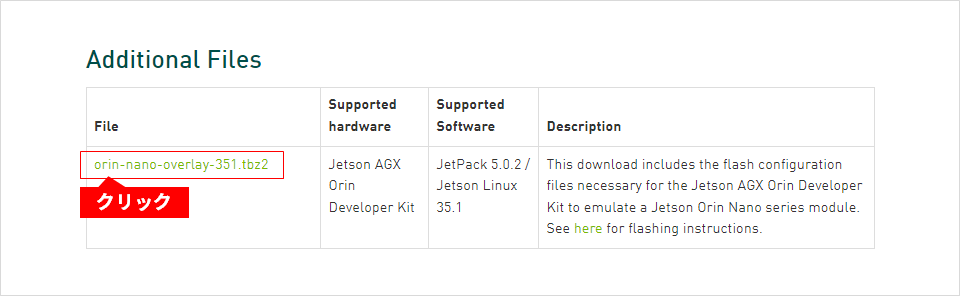
今回は以下サイトの手順を参考に、Jetson Orin Nano (8GB)の構成に設定する手順を例にご紹介します。

1. Orin_Nano_Overlay_35.1.tbz2をダウンロードします。
2.メーカーサイトのガイドを参照し、以下のようにホストPCでコマンドを実行し、必要なソフトウェアを準備します。
host$ cd ~/Downloads
host$ wget https://developer.nvidia.com/embedded/l4t/r35_release_v1.0/release/jetson_linux_r35.1.0_aarch64.tbz2
host$ wget https://developer.nvidia.com/embedded/l4t/r35_release_v1.0/release/tegra_linux_sample-root-filesystem_r35.1.0_aarch64.tbz2
host$ sudo tar -xpf jetson_linux_r35.1.0_aarch64.tbz2
host$ cd Linux_for_Tegra/rootfs
host$ sudo tar -xpf ~/Downloads/tegra_linux_sample-root-filesystem_r35.1.0_aarch64.tbz2
host$ cd ../
host$ sudo apt-get install qemu-user-static
hsot$ sudo ./apply_binaries.sh
host$ cd ../
host$ sudo tar -xpf ~/Downloads/Orin_Nano_Overlay_35.1.tbz2
host$ cd Linux_for_Tegra
3:エミュレーションモードの設定
以下のようなコマンドを実行し、Jetson AGX Orin開発者キットをJetson Orin Nano (8GB)の構成に設定します。
(所要時間:30分程度)
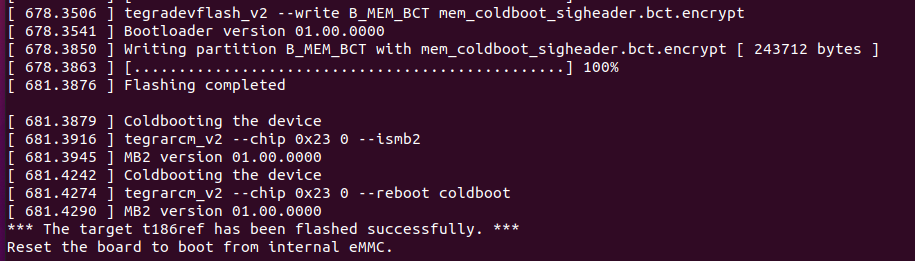
host> sudo ./flash.sh jetson-agx-orin-devkit-as-nano8gb mmcblk0p1ホストPCのコンソール画面に以下のようなメッセージが表示された後、Orinは自動的に再起動します。
Orinに接続されたディスプレイには起動画面が表示されますので、所望の設定をおこなってください。
設定を完了すると、スタート画面が表示されます。
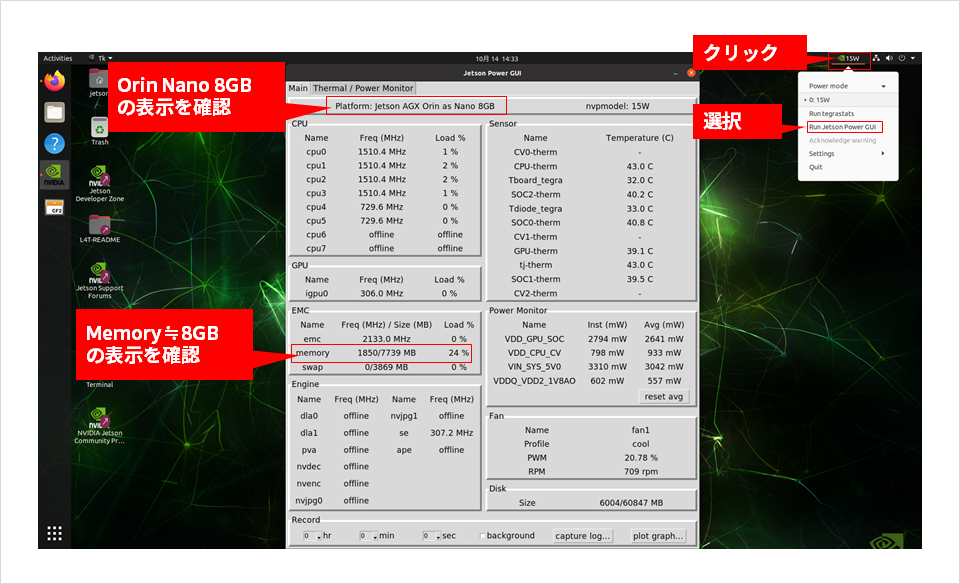
右上の"Power表示"のところを左クリックし、"Run Jetson Power GUI"を選択すると、NVIDIA Jetson AGX Orin開発者キットの構成内容が確認できます。
以下のようにNano8GBの設定で構成されていることが確認できると思います。
動作の確認
Nano8GBの構成で設定できましたので、具体的にアプリケーションを動かして動作を確認してみましょう。
今回は、以下の手順でPeopleNetの推論サンプルを使用した手順を紹介します。
・Jetpackのインストール
・DeepStreamSDKのインストール
・PeopleNetの推論サンプルの動作確認
Jetpackのインストール
メーカーサイトのガイドを参照し、以下のようなコマンドを実行し、Jetpackのインストールをおこないます。
(所要時間:30分程度)
$ sudo apt update
$ sudo apt dist-upgrade
$ sudo reboot
$ sudo apt install nvidia-jetpack
DeepStreamSDKのインストール
メーカーサイトのガイドを参照し、以下のようなコマンドを実行し、DeepStreamSDKのインストールをおこないます。
(所要時間:30分程度)
<実行例>
$ sudo apt install \
libssl1.1 \
libgstreamer1.0-0 \
gstreamer1.0-tools \
gstreamer1.0-plugins-good \
gstreamer1.0-plugins-bad \
gstreamer1.0-plugins-ugly \
gstreamer1.0-libav \
libgstreamer-plugins-base1.0-dev \
libgstrtspserver-1.0-0 \
libjansson4 \
libyaml-cpp-dev
$ cd ~/Downloads
$ git clone https://github.com/edenhill/librdkafka.git
$ cd librdkafka
$ git reset --hard 7101c2310341ab3f4675fc565f64f0967e135a6a
$ ./configure
$ make
$ sudo make install
$ sudo mkdir -p /opt/nvidia/deepstream/deepstream-6.1/lib
$ sudo cp /usr/local/lib/librdkafka* /opt/nvidia/deepstream/deepstream-6.1/lib
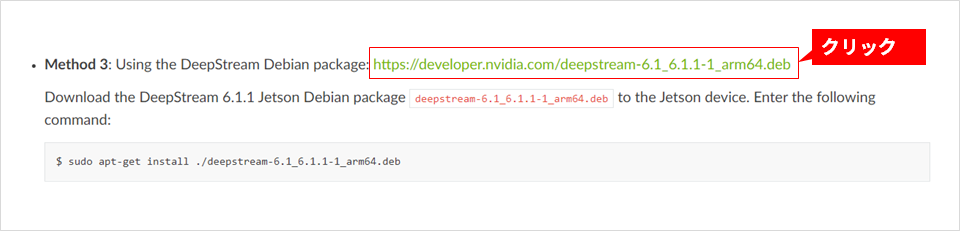
メーカーサイトの以下のガイドに従い”DeepSreamSDK”をダウンロードし、インストールします。
PeopleNetの推論サンプルの動作確認
DeepSteeamSDKに付属の以下の手順を参考にPeopleNetの推論サンプルを実行して動作を確認してみましょう。
/opt/nvidia/deepstream/deepstream-6.1/samples/configs/tao_pretrained_models/README
まず、以下の実行例のように実行のために必要なファイルをダウンロードし、実行のためのセットアップをおこないます。
<実行例>
$ cd /opt/nvidia/deepstream/deepstream-6.1
$ cd sources/apps/sample_apps
$ sudo git clone https://github.com/NVIDIA-AI-IOT/deepstream_reference_apps.git
$ cd ../../../
$ sudo cp ./sources/apps/sample_apps/deepstream_reference_apps/deepstream_app_tao_configs/* samples/configs/tao_pretrained_models/
$ cd /opt/nvidia/deepstream/deepstream-6.1/samples/configs/
$ sudo apt-get install git-svn
$ sudo git svn clone https://github.com/NVIDIA-AI-IOT/deepstream_reference_apps/trunk/deepstream_app_tao_configs
$ sudo cp deepstream_app_tao_configs/* tao_pretrained_models/
$ cd /opt/nvidia/deepstream/deepstream-6.1/samples/configs/tao_pretrained_models/
$ sudo ./download_models.sh
セットアップができましたら、以下のコマンドを実行し、Peoplenetのサンプルを実行してみましょう。
$ sudo deepstream-app -c deepstream_app_source1_peoplenet.txt
以下のような推論画像の動画表示が確認できると思います。
今回の実行結果としては約30[FPS]程度となっているようです。

次に映像表示に関する処理を削除などを含め、処理性能を向上させる例をご紹介します。
まず、以下のようなコマンドで、動作クロックをMAXに設定しておきます。
$ sudo nvpmodel -m 0
$ sudo jetson_clocks
以下のように最大周波数で動作する設定になっていることが確認できます。

次に以下のファイルを修正し、画像表示に関する処理を含め推論の処理の高速化をおこないましょう。
deepstream_app_source1_peoplenet.txt
以下のように画像表示に関する処理の無効化をおこないます。(修正箇所は赤字で記載)
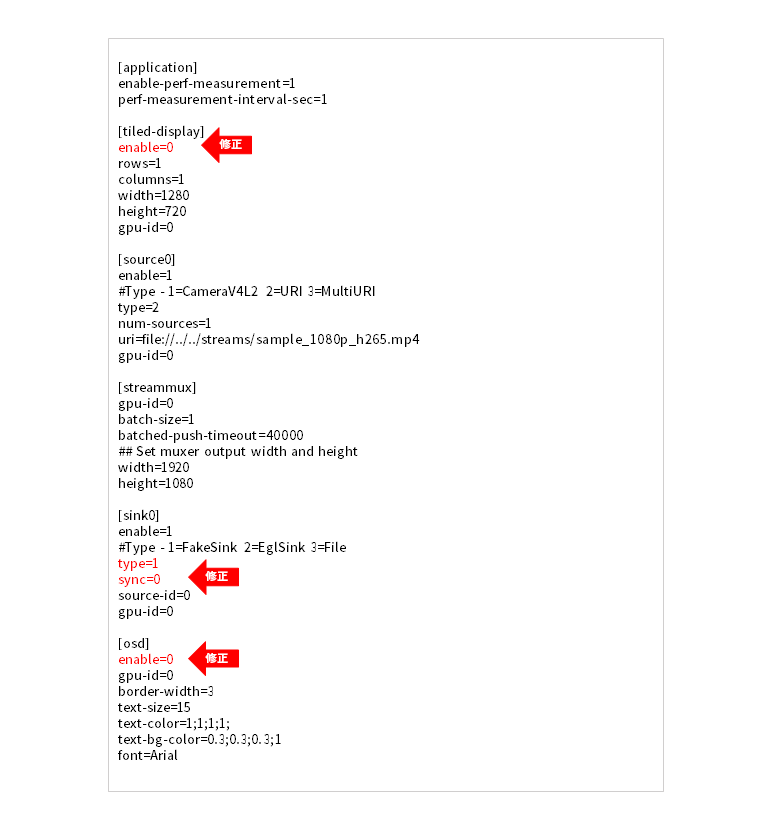
以下のようにTrackerに関し、maxのコンフィグファイルに修正をおこないます。(修正箇所は赤字で記載)

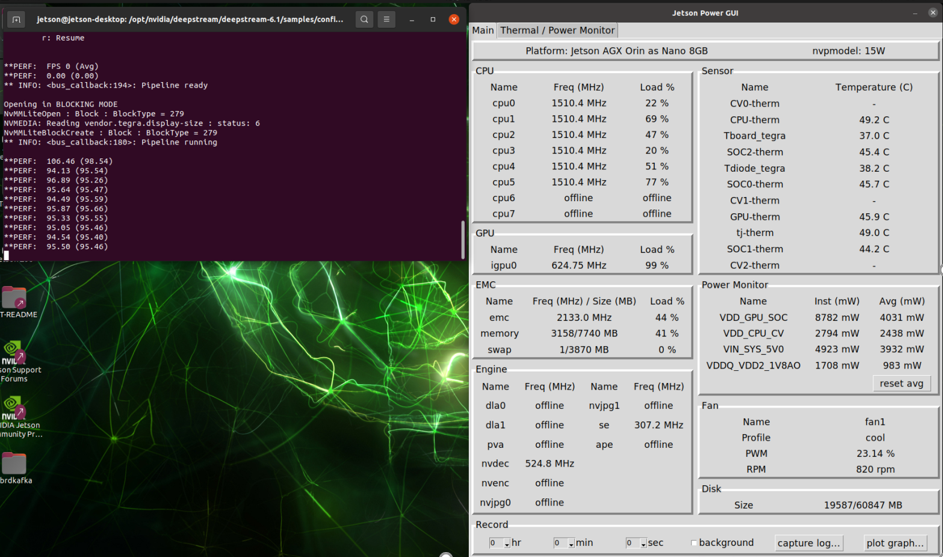
再実行して動作を確認してみましょう。
以下のように処理の高速化が確認できると思います。(今回の実行結果としては約96[FPS]程度となっているようです。)
最後に
本記事では、Jetson AGX Orin開発者キットのエミュレーションモードについてご紹介しました。
今回はnano-8GBの構成での手順を例にご紹介しましたが、他の構成でのエミュレーションも可能です。
以下に他の構成での実行結果も記載していますのでご参考となれば幸いです。
|
画像表示あり |
画像表示なし |
|
|
Jetson AGX Orin 64GB |
30 |
354 |
|
Jetson Orin NX 16GB |
30 |
140 |
|
Jetson Orin Nano 8GB |
30 |
96 |
単位[FPS]