- 半導体事業HOME
- マクニカの製品・サービス
-
技術情報

-
イベント・セミナー
- 取扱メーカー
- サポート
- お問い合わせ
- 製品購入はこちら
- 半導体事業のメルマガ登録
![]()
![]() 条件を指定して絞り込む
条件を指定して絞り込む
現在2004件がヒットしています。check
NVIDIA Jetsonを用いてAI画像解析アプリケーションの開発を始められる方が非常に多くなりました。ただし入門者にとってはアプリケーション自体の開発にたどり着くまでに、開発をするうえで必要となるソフトウェア・ツールを理解するところにハードルがあり、なかなか前に進まないといった現状があります。本記事ではNVIDIA Jetson上で画像処理アルゴリズムを動作させる際に活用できるNVIDIA Vision Programming Interfaceについてご紹介していきます。
VPIとは?
VPI (NVIDIA Vision Programming Interface)はNVIDIA Jetson向けに実装されたコンピュータビジョンおよび画像処理アルゴリズムのソフトウェアライブラリーです。従来は、デバイス内の複数の計算リソースにアクセスする場合、OpenCVやNVIDIA CUDAなど、複数のAPIを利用する必要がありました。また、PVA (Programmable Vision Accelerator)やVIC (Video and Image Compositor)など、そもそも、オープンなAPIが存在しない計算リソースがありました。VPIはこれら複数の計算リソースにシームレスにアクセスし、かつ、それらの処理性能を犠牲にすることなく、コンピュータビジョンおよび画像処理のAPIを提供します。
VPIがアクセス可能な、計算リソースは、CPU、GPU、PVAそしてVICです。VPIの提供するAPIは、これら複数の計算リソースをバックエンドにした複数の実装を用意しています。パイプライン化された処理で、計算リソースをフル活用できます。たとえば、GPUで推論処理を行うのと同時に、次のフレームの前処理をPVAやVICで行い、かつ、CPUはその時、GUIを処理することが可能です。
また、VPIは、複数のバックエンドにまたがる処理の際に、無駄なメモリーコピーが発生しないように工夫されています。このゼロコピーメモリー割り当てによって、処理スループットを最大化します。
さらに、VPIはOpenCV、CUDAをベースに開発された既存プロジェクトとの相互運用を提供します。OpenCVで実現していた処理を、容易にVPIに置き換え、処理性能アップを可能にします。

Perspective Warp
VPIは多くのアルゴリズムを提供していますが、今回はその中で、Perspective Warpに注目します。
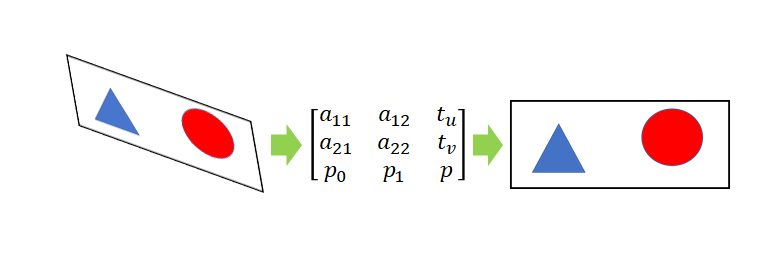
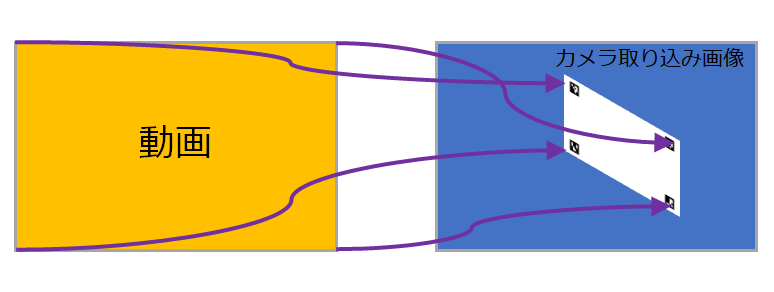
Perspective Warpは、画像の幾何学補正アルゴリズムで、カメラの位置決め不良などが原因で歪んだ画像を補正するためなどに利用されます。補正は3×3の変換行列により表現されます。
アルゴリズムの詳細は以下のページでご覧いただけます。
VPI Documentation -> Algorithms -> Perspective Warp -> Implementation
まずは弊社で作成した、VPI Perspective Warpサンプルアプリケーションを実行した様子をご覧ください。

ArUcoマーカー
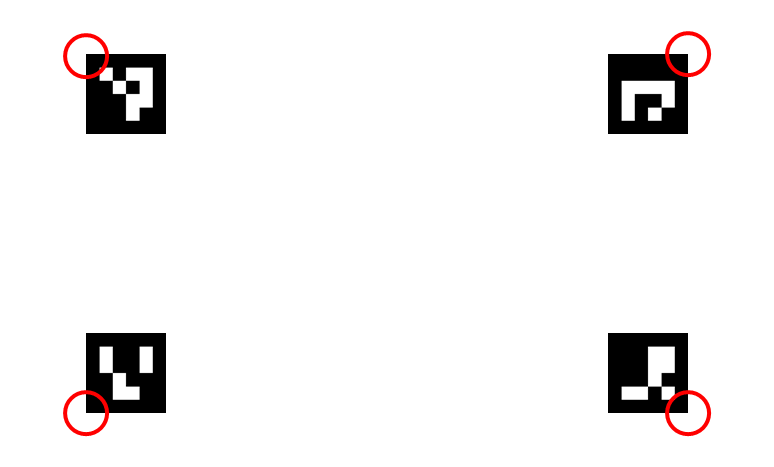
今回、作成したサンプルアプリケーションでは、OpenCV ArUcoマーカーを利用して、Perspective Warpの変換行列を生成しています。変換行列は、変換前の平面座標4点と、変換後の平面座標4点を指定すると求めることができます。サンプルアプリケーションでは、4個のArUcoマーカーから、変換後の平面座標4点を決定しています。変換行列の生成にはOpenCV getPerspectiveTransform()関数を利用しています。なお、変換前の平面座標4点は、動画の四隅の座標です。
サンプルアプリケーション
では、サンプルアプリケーションの構成について解説していきます。
本アプリケーションは、ArUcoマーカーを印刷したシートをカメラで連続キャプチャーして、そのシート上に動画を重ね合わせて表示します。
サンプルアプリケーションの処理フローは以下のとおりです。ステップ6から9はすべてVPIのAPIによる処理であるので、個々の処理完了を待つことなく、次の処理に進むことができます。これはStreamsという機能で実現しています。
- カメラから画像取り込み
- カメラ取り込み画像からArUcoマーカーの検出(cv::aruco::detectMarkers)
- 検出したArUcoマーカーから4点の座標を決める
- 変換行列を求める(cv::getPerspectiveTransform)
- 動画フレームのデコード
- 動画フレームの画像形式をNV12へ変換(vpiSubmitConvertImageFormat)
- 動画フレームをカメラ取り込み画像と同じサイズにリサイズ(vpiSubmitRescale)
- 動画フレームにPerspective Warp処理(vpiSubmitPerspectiveWarp)
- 動画フレームのPerspective Warp処理結果の画像形式をBGRへ変換(vpiSubmitConvertImageFormat)
- VPI処理の完了を待つ(vpiStreamSync)
- 動画フレームPerspective Warp処理結果データをMat形式へ変換(vpiImageDataExportOpenCVMat)
- カメラ取り込み画像に、動画フレームのPerspective Warp処理結果を重ね合わせる(cv::add)
- 重ね合わせ結果を表示(cv::imshow)
- 1に戻る
サンプルアプリケーションはGitHubで公開中
弊社で作成したVPI Perspective Warpサンプルアプリケーションを元にご紹介してきましたがいかがでしたでしょうか。今後VPIの活用についてさらにご紹介していく予定です。
サンプルアプリケーションはGitHubで公開しています。ぜひご覧ください。
![[AI画像解析アプリ開発に必要な知識] 第1話 NVIDIA DeepStream SDKとはのサムネイル画像](/business/semiconductor/articles/134117_thumb_r_4.png)