- Semiconductor BusinessHOME
- Products and Services of Macnica,Inc.
-
technical information

-
Events and Seminars
- Handling Manufacturer
- Support
- Inquiry
- Click here to purchase products
- Semiconductor business e-mail magazine registration
![]()
![]() Narrow down by specifying conditions
Narrow down by specifying conditions
現在2164件がヒットしています。check

Introduction
The latest Intel® CPUs are equipped with Intel® Software Guard Extensions (Intel® SGX) called Trusted Execution Environment (TEE), which has been further strengthened. TEE is a security technology implemented in each CPU, and it is a technology that enables program execution while protecting data by creating an encrypted area (enclave area) on the memory and arranging the program and data.
In recent years, the importance of data has increased due to efforts in AI and IoT, but there is a demand for speedy development and efficient operation using public clouds. System requirements are changing along with these innovations in IT infrastructure. Until now, it was sufficient to encrypt highly confidential data and store it in storage, but there is also an option to further increase the safety and robustness of the system by handling it in an encrypted state even when it is used by applications. I'm starting to get it.
Fortanix provides the Confidential Computing Manager (CCM), a tool that converts "anonymization", which operates with the memory used by web applications encrypted, without changing the code.
In this article, I'll walk through how to use Fortanix's CCM to make a simple container-based web application built using Flask ready for confidential computing.
Advance preparation
・Fortanix CCM account
If you are new to Fortanix CCM, before you begin sign up please.
・Docker Hub account
Used by Docker Hub accounts to store images converted by Fortanix CCM.
・An account with a Microsoft Azure pay-as-you-go subscription
Here, we use Microsoft Azure's Confidential Computing Virtual Machine, DCSv2 series, which supports Intel® SGX as a platform.
As of December 2021, use of the DCSv2 series requires a pay-as-you-go subscription (free accounts cannot select DCSv2 series).
*If you have any questions, please contact us using the inquiry form below.
procedure
From now on, I will explain how to make your application compatible with confidential computing.
1. Sign up and log in to Fortanix CCM
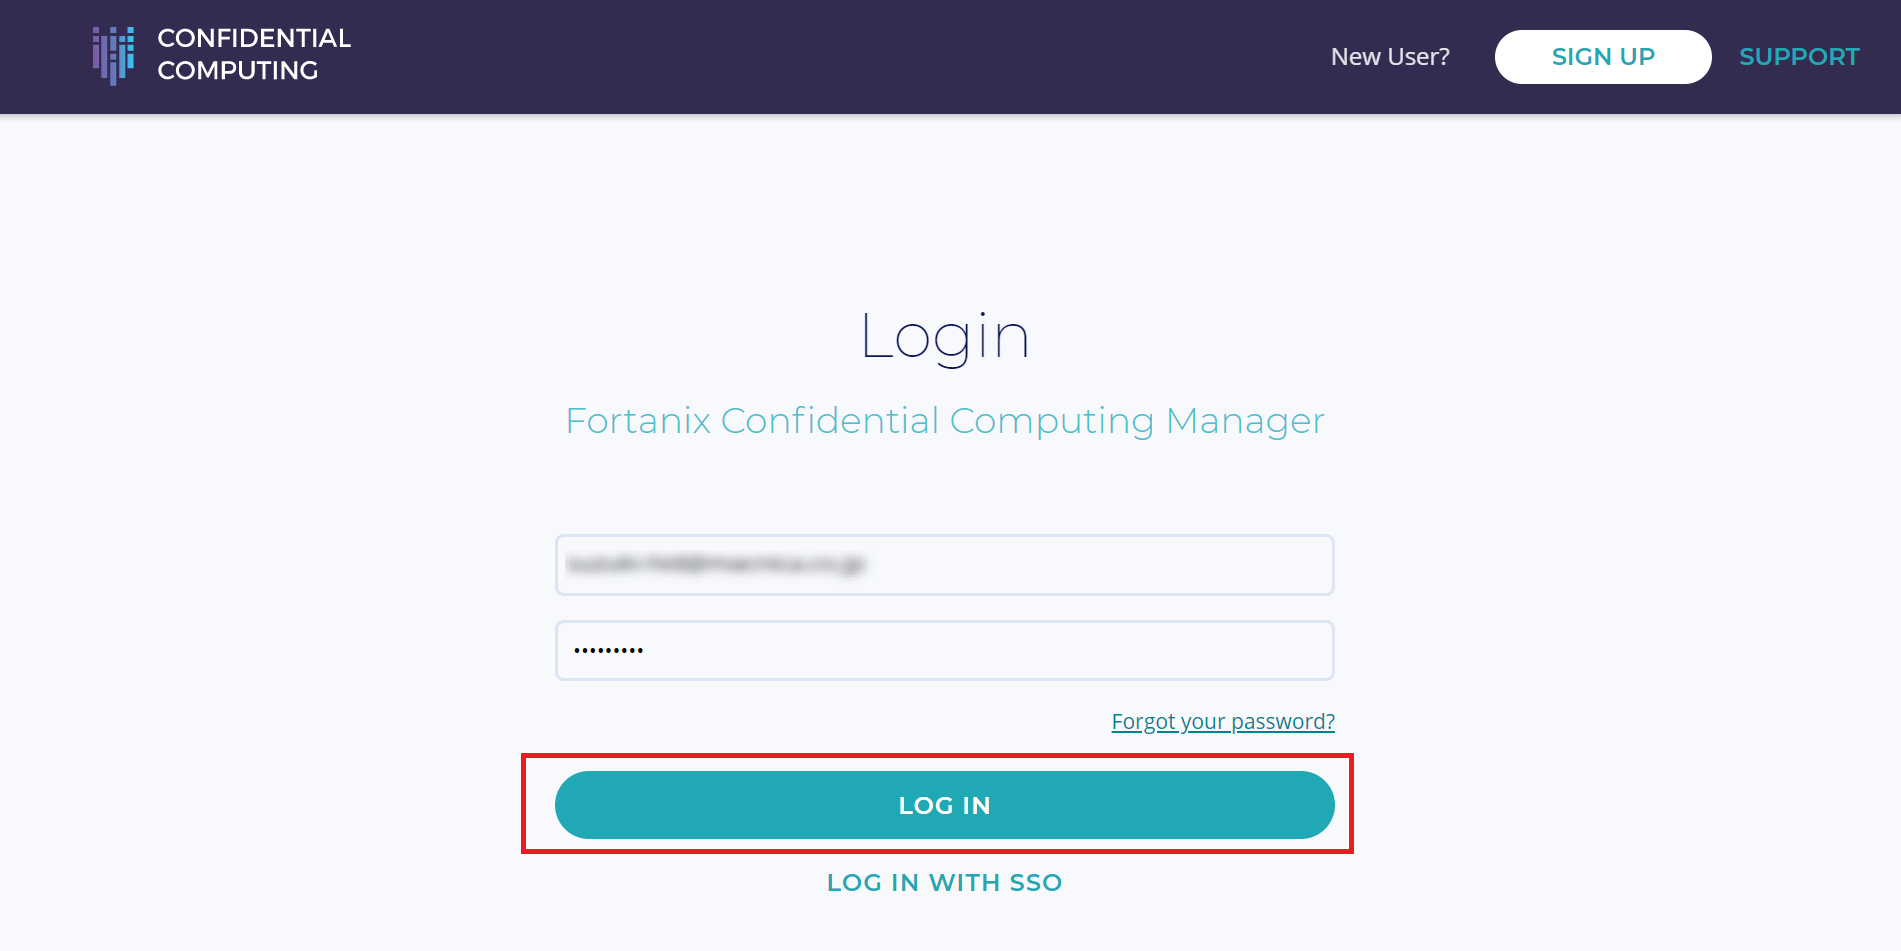
1. Go to https://ccm.fortanix.com/ and sign up.
2. Once your account has been approved by an administrator ( Fortanix in the demo version at the URL above), log in with your email address and password.
2. Create and select an account within Fortanix CCM
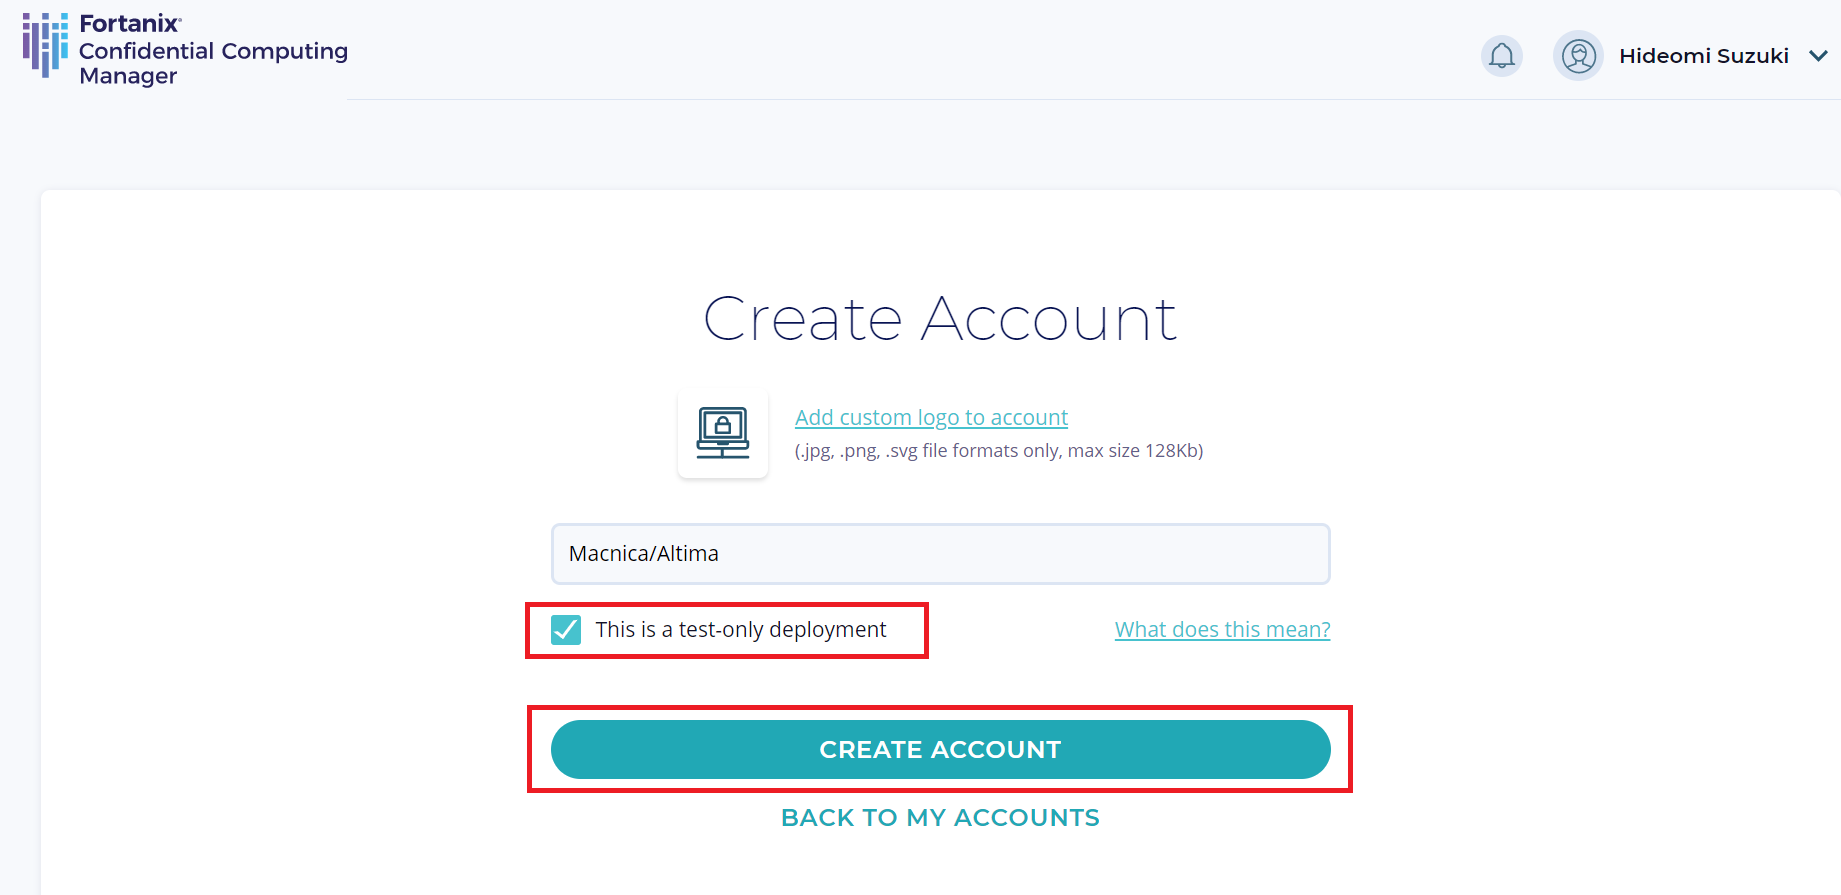
1. After logging in to Fortanix CCM, you will be redirected to the Accounts page. Click [+ ADD ACCOUNT] to create a new account. An account is the top layer of security objects in Fortanix DSM and CCM, and is usually associated with your company or one organization within your company, rather than an individual. All security objects, groups and applications belong to one account and are not shared between different accounts.
2. After entering a name for your new account, you can optionally add an account logo.
3. Check "This is a test-only deployment" to bypass the Attestation Service for Intel® SGX (IAS) and create accounts so that Compute nodes can register successfully regardless of attestation failures. See the User Guide [Disable Fortanix CCM Attestation] for details.
4. Select CREATE ACCOUNT to create an account.
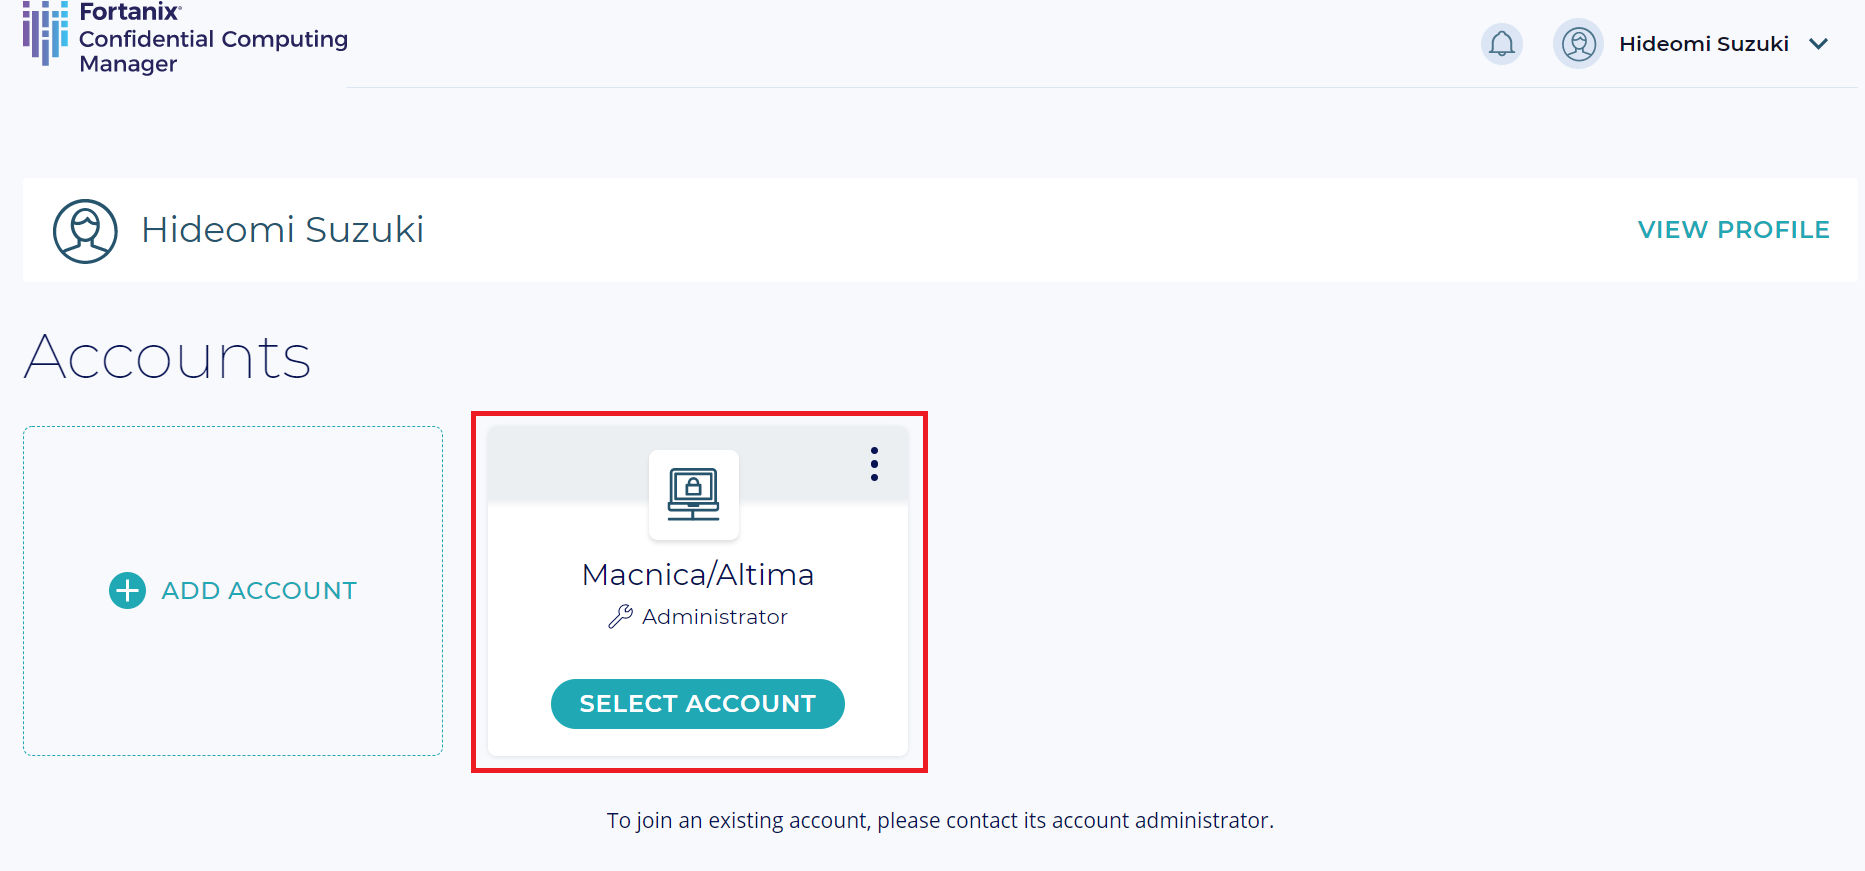
5. After the account is created, press [ SELECT ACCOUNT ] and select the newly created account to register the compute node and create the application.
3. Add application to convert (e.g. web server with Flask)
Register the information of the application that supports CC here.
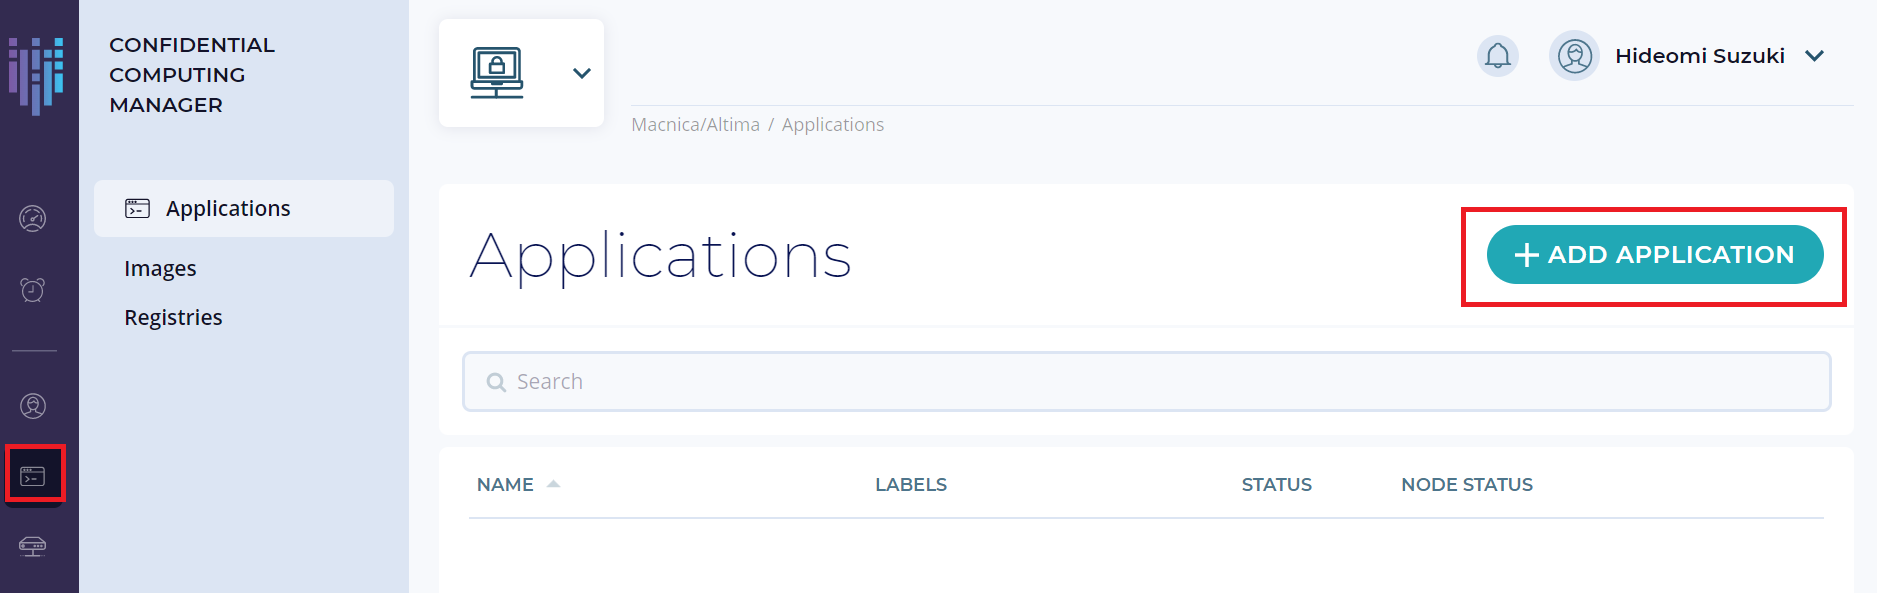
1. Select [Applications] from the left side menu to move to the Applications page and select [+ ADD APPLICATION]. In this article, we will run a simple web server using Flask, registered in Fortanix's Docker public registry, on the Enclave OS.
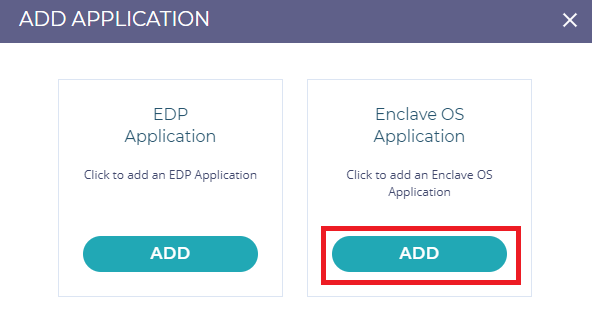
2. A pop-up window will appear asking you to choose between EDP Application and Enclave OS Application.
This time we will add an EnclaveOS application that runs a Python Flask server, so select the EnclaveOS application. Enter the settings as follows and click [Next]. For Output image name, enter your private registry information.
*This article describes Enclave OS applications, but for EDP applications, see EDP applications on CCM.
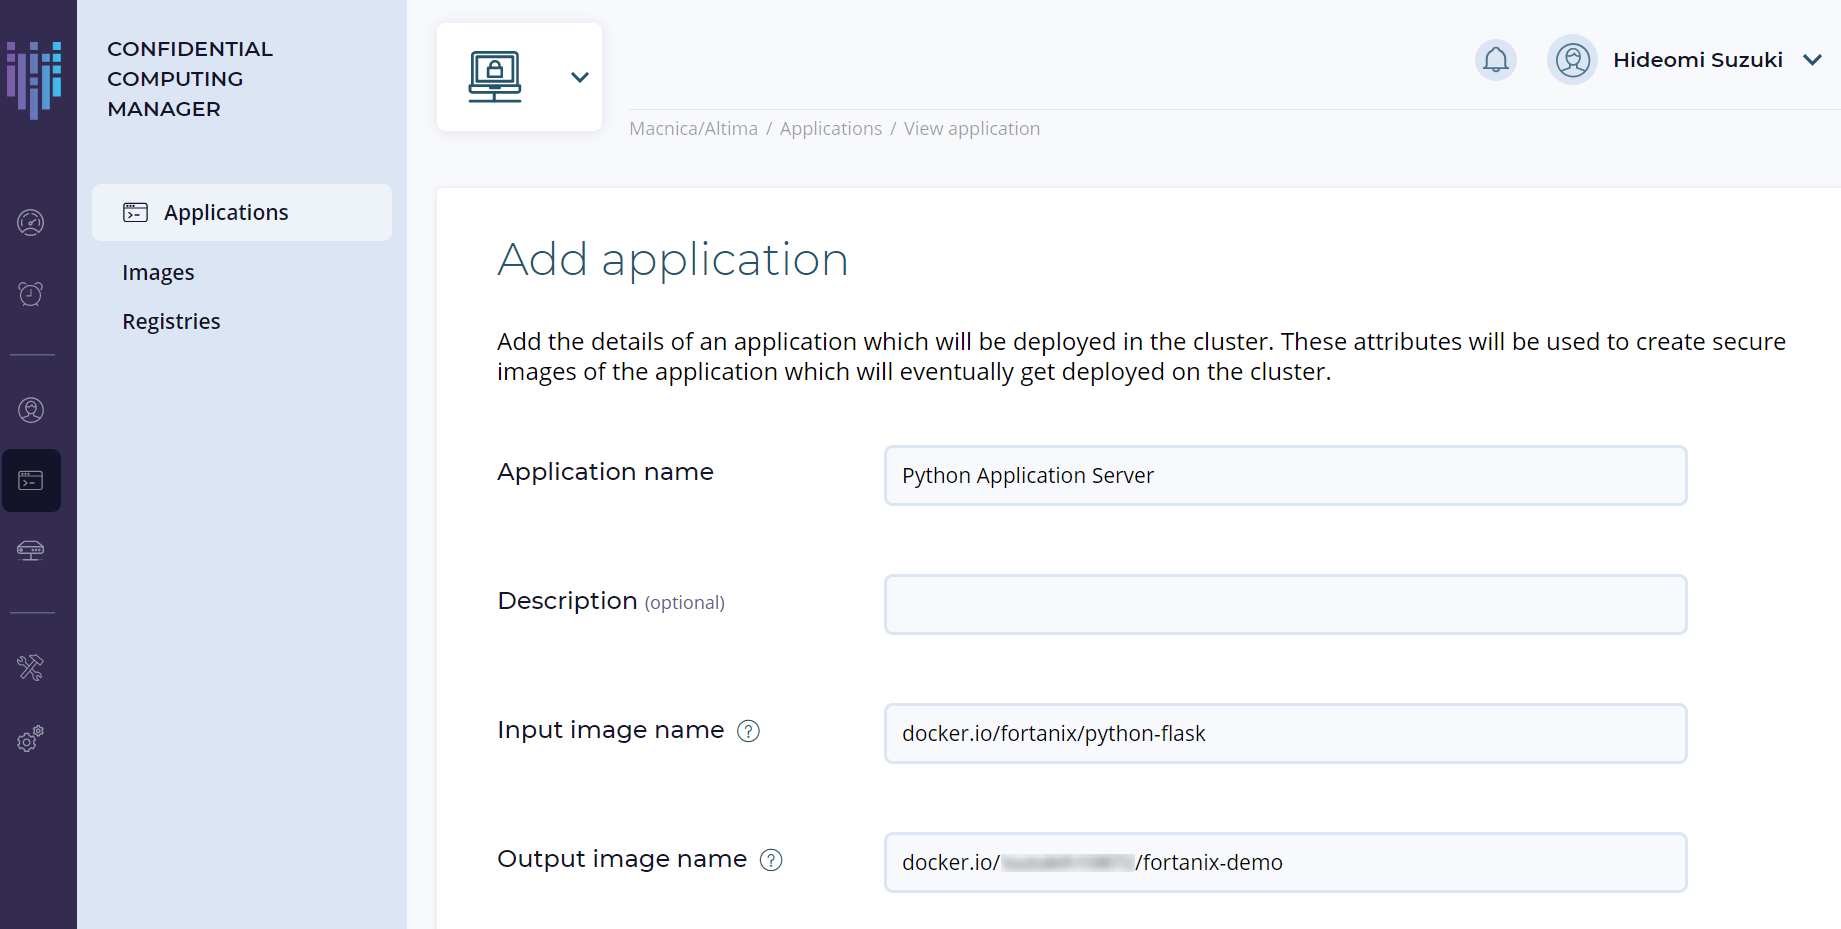
3. Enter the relevant items as shown below and click NEXT. The samples used in this article use Fortanix's Docker Hub public registry.
Docker Hub: https://hub.docker.com/u/fortanix
Optional: You can check by running the original application with the following command:
sudo docker run fortanix/python-flaskInput items are as follows.
Application name : Python Application Server
Input image name: docker.io/fortanix/python-flask
Output image name : docker.io/suzukih10872/fortanix-demo #Enter your private registry information
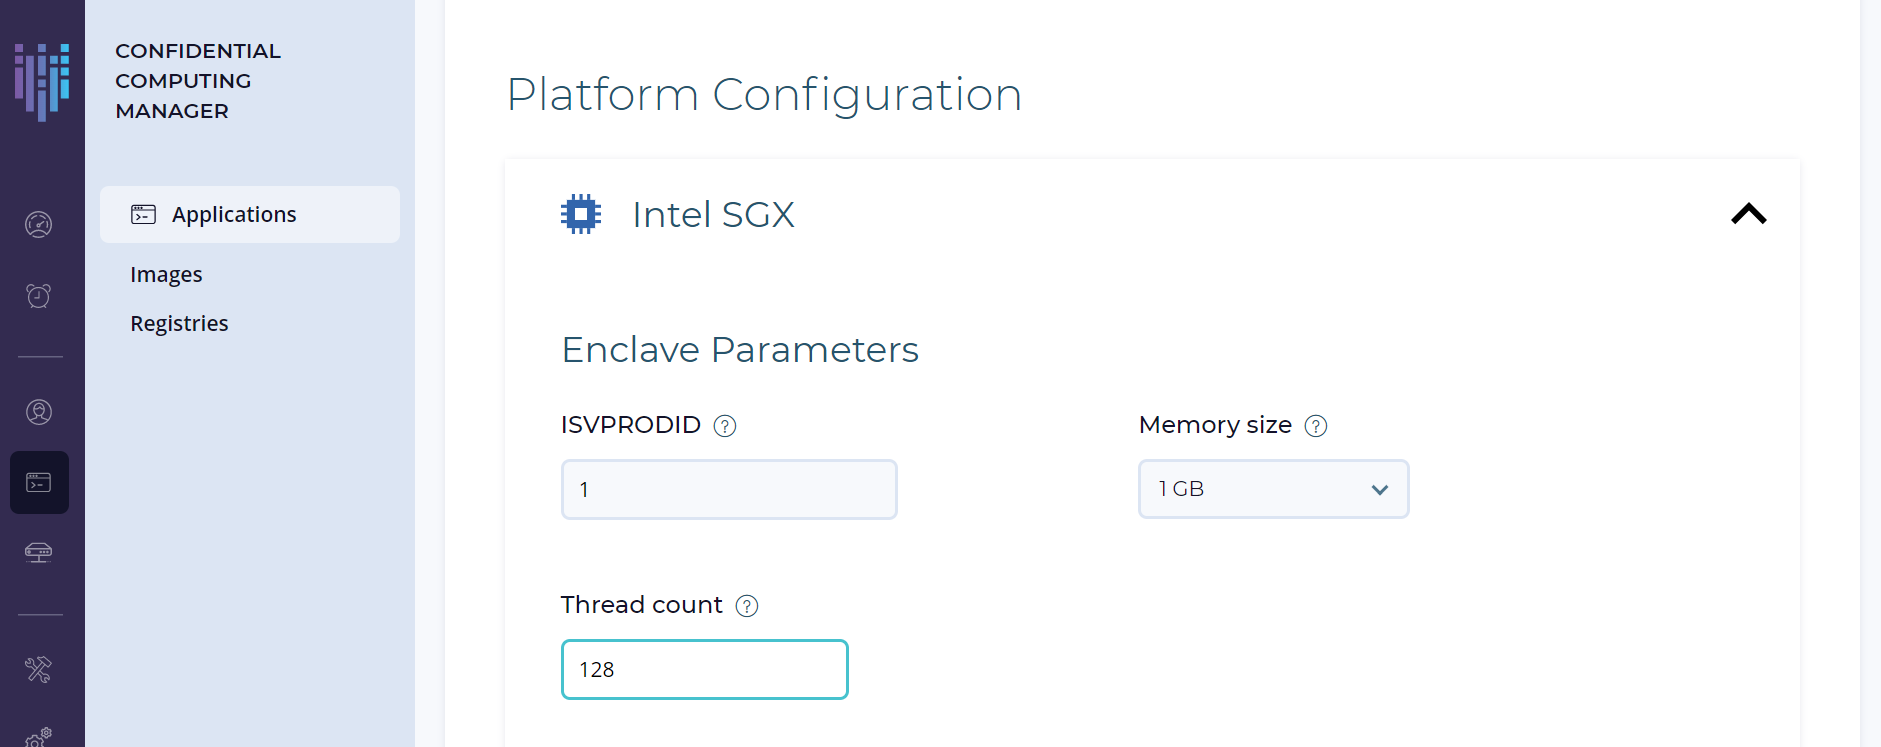
ISVPRODID : A numeric product ID. Assign a unique value between 0 and 65535 to your application.
ISVSVN : A numeric security version assigned to the enclave.
This number should be increased if security-related changes are made to the application.
Memory Size : Change the Enclave's memory size by selecting a memory size from the dropdown.
Thread count : Change the number of threads to support your application.
For Output image name, it is recommended to create and use your own private registry. See Adding an Enclave OS application for more information on setting up an Enclave OS application image.

4. Create a Fortanix CC compatible application image and store it in a private registry
Here, based on the information you entered, create an application image that supports CC.
1. Images created with Fortanix CCM are specific software releases or versions, with one enclave hash (MRENCLAVE) for each image.
2. On the Applications page, select the application you added in the previous step and click the [+ IMAGE] button.
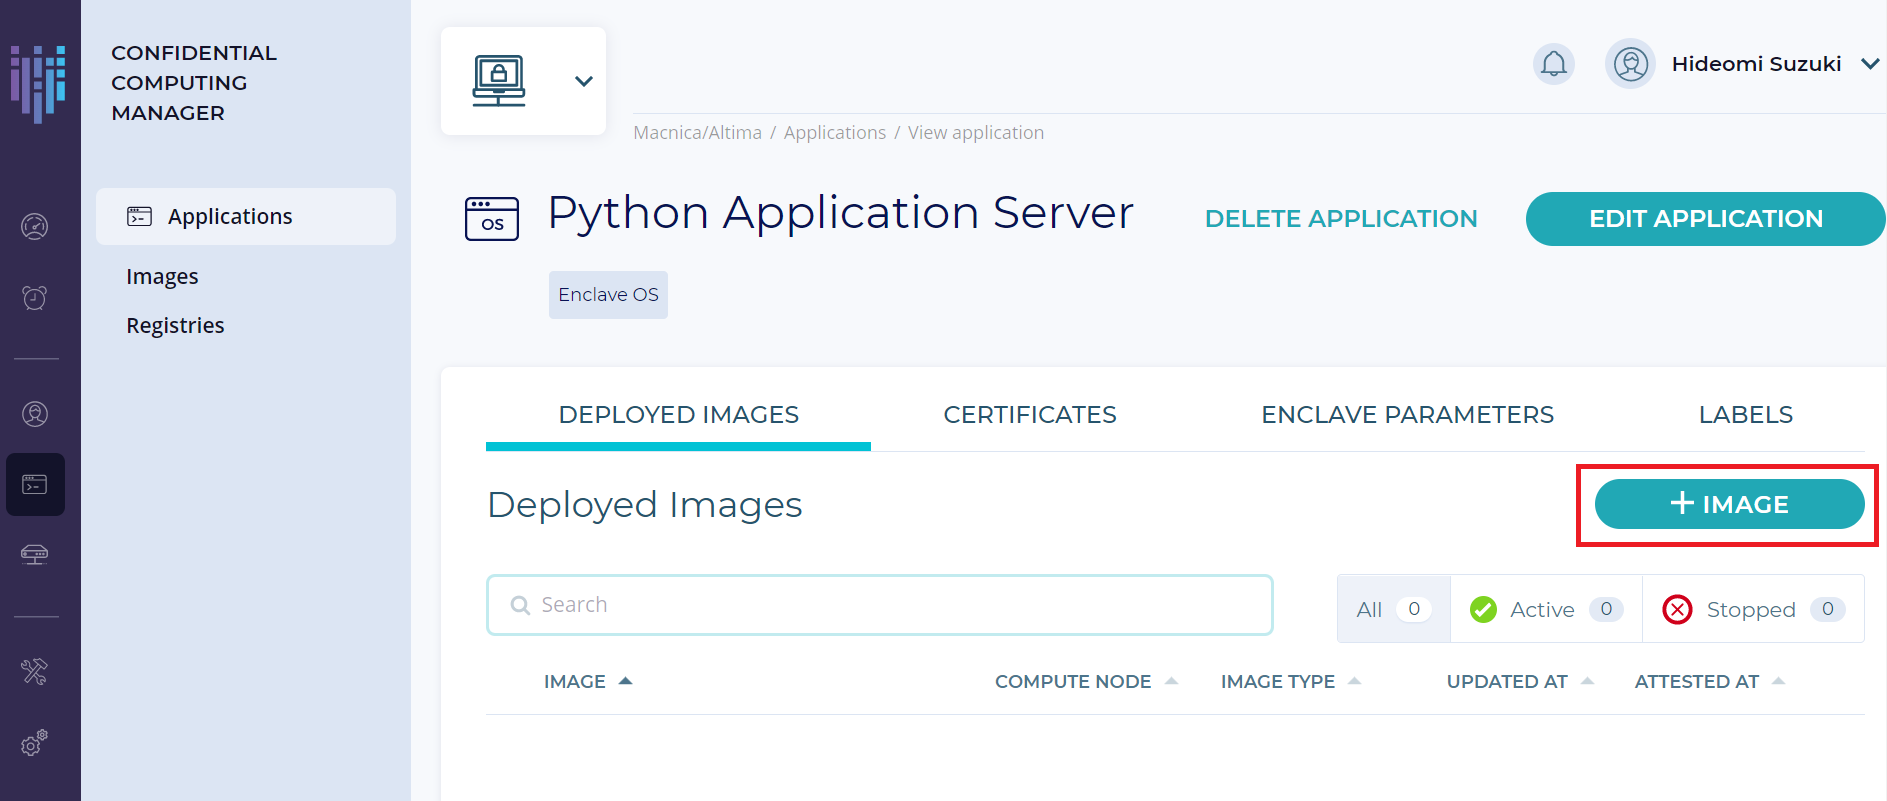
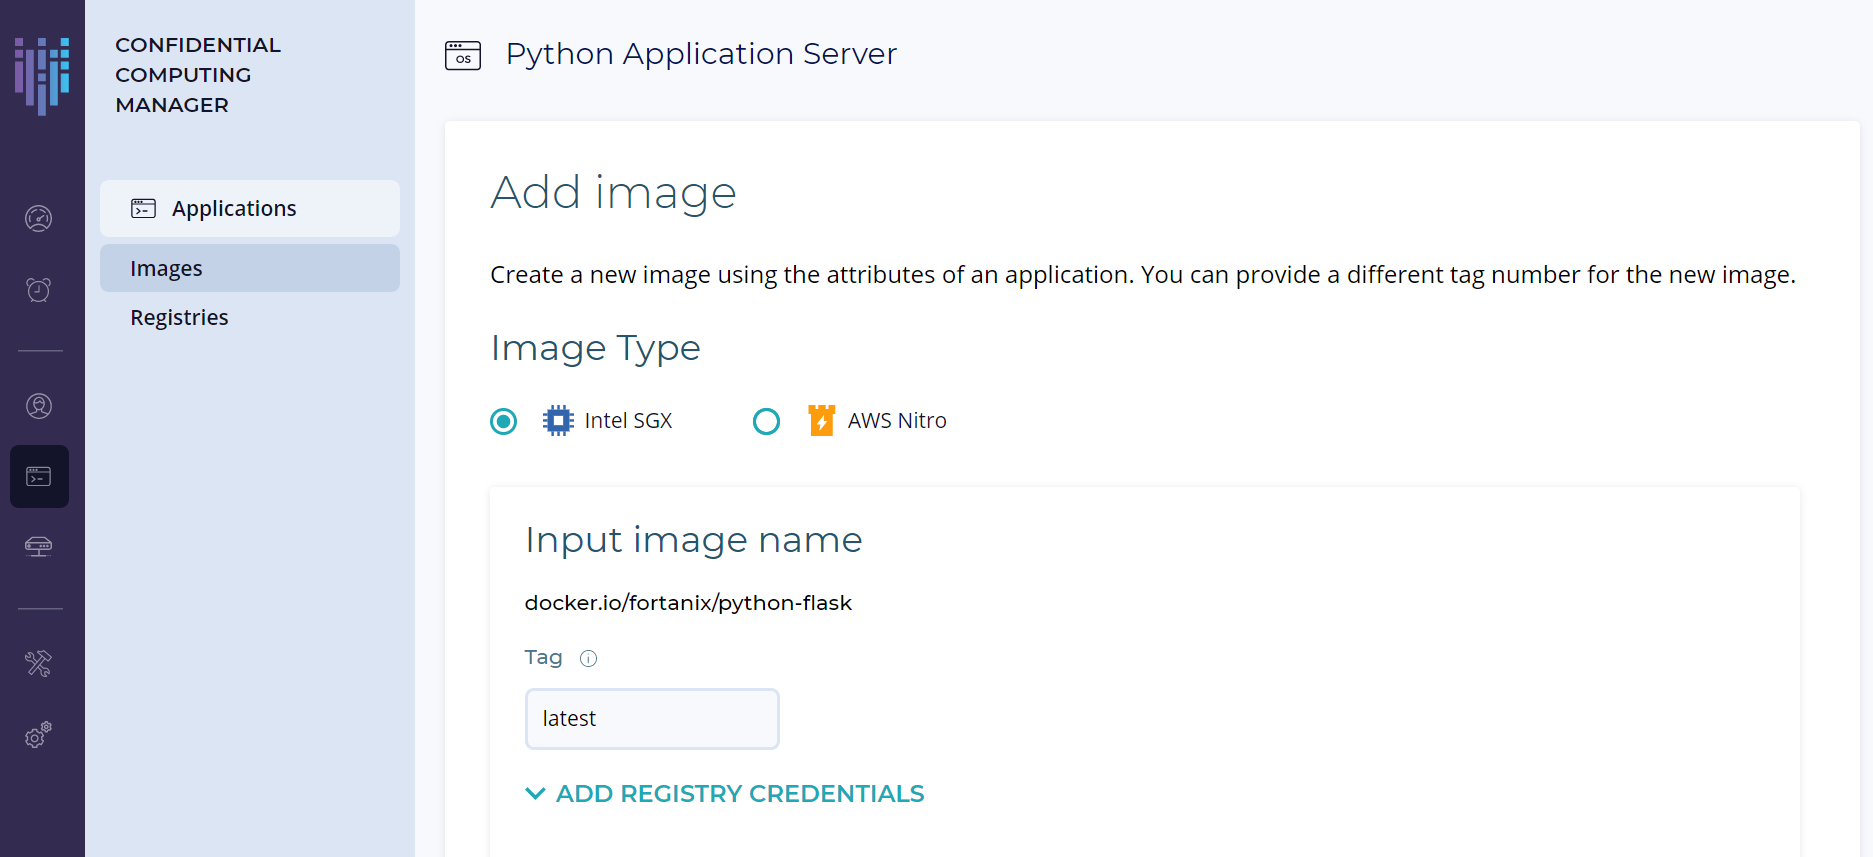
3. Select Intel® SGX as the image type.
4. In the [tag] field of Input image name, enter "latest" to specify the latest build.
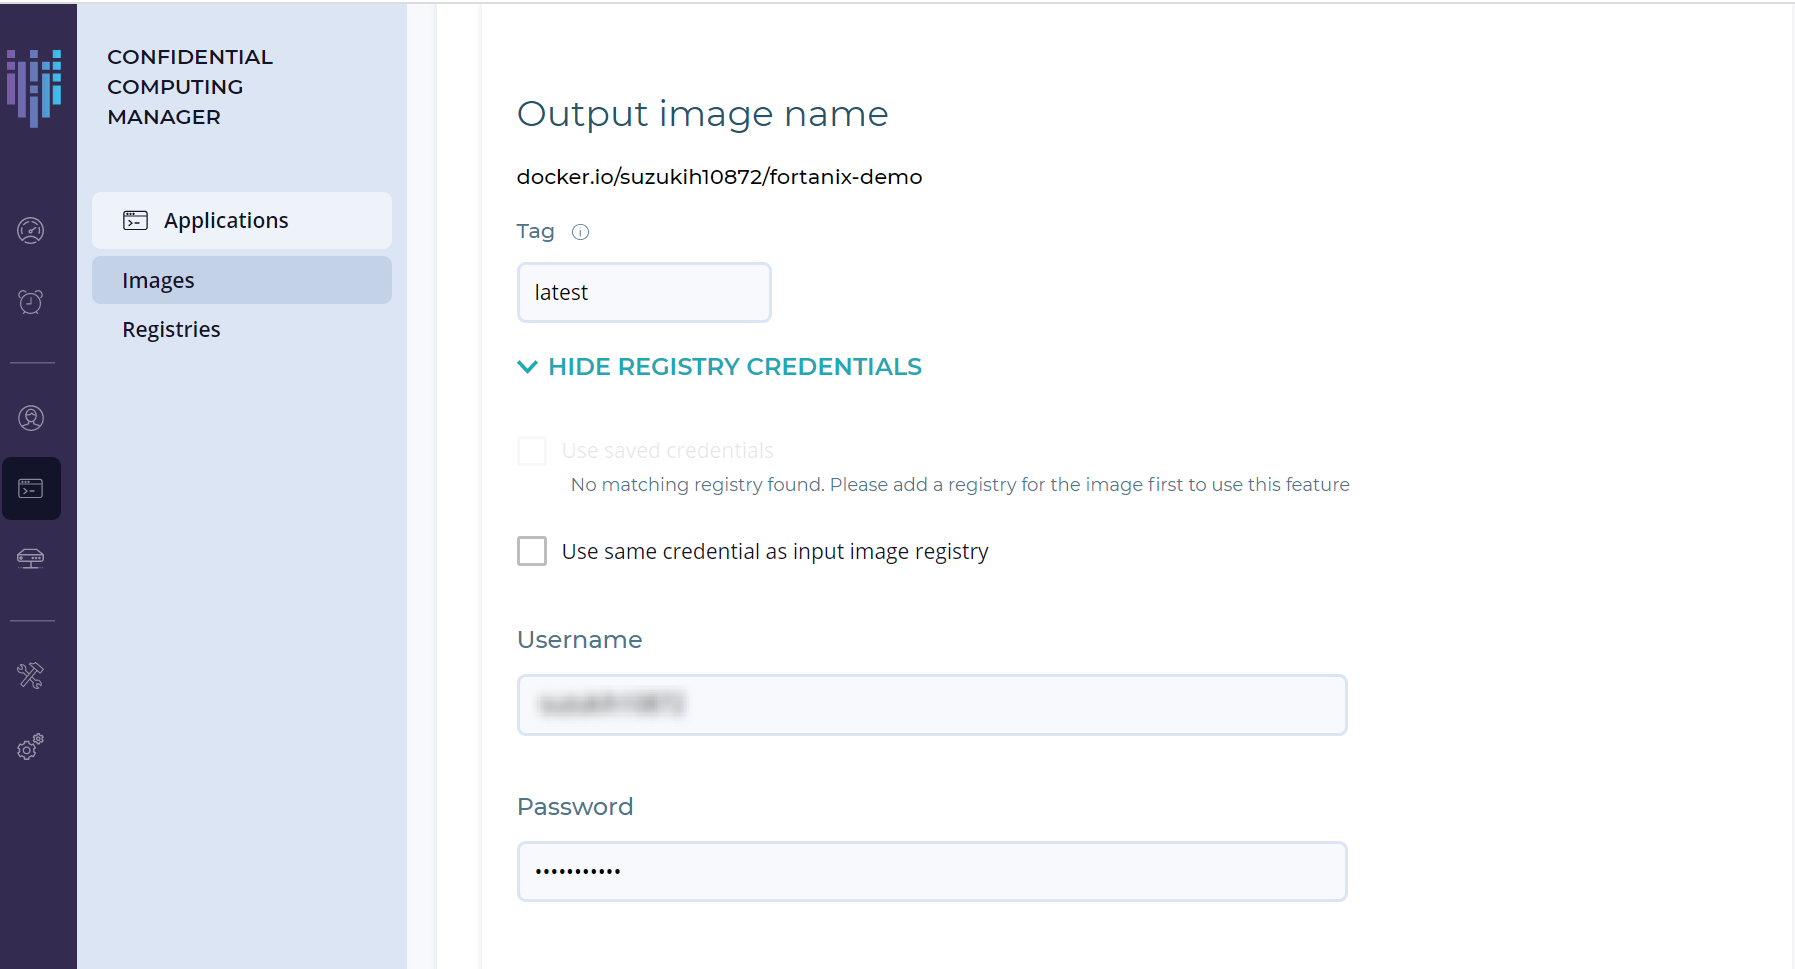
It uses images stored in the Fortanix public registry, so no credentials are required. Also enter "latest" in the tag field for the Output image name and enter your Docker Hub private registry credentials.
5. After entering, press [CREATE].
6. Once the image creation is complete, you will see a notification that the image was created successfully and your application will be listed under the Applications tab.
For more information on image creation, please refer to the URL below.
・Add multiple images: https://support.fortanix.com/hc/en-us/articles/360048967971-User-s-Guide-Image-Registry
・Create Enclave OS Application Image : https://support.fortanix.com/hc/en-us/articles/360043529411-User-s-Guide-Create-an-Image#CreateanImageforEnclaveOSApplications
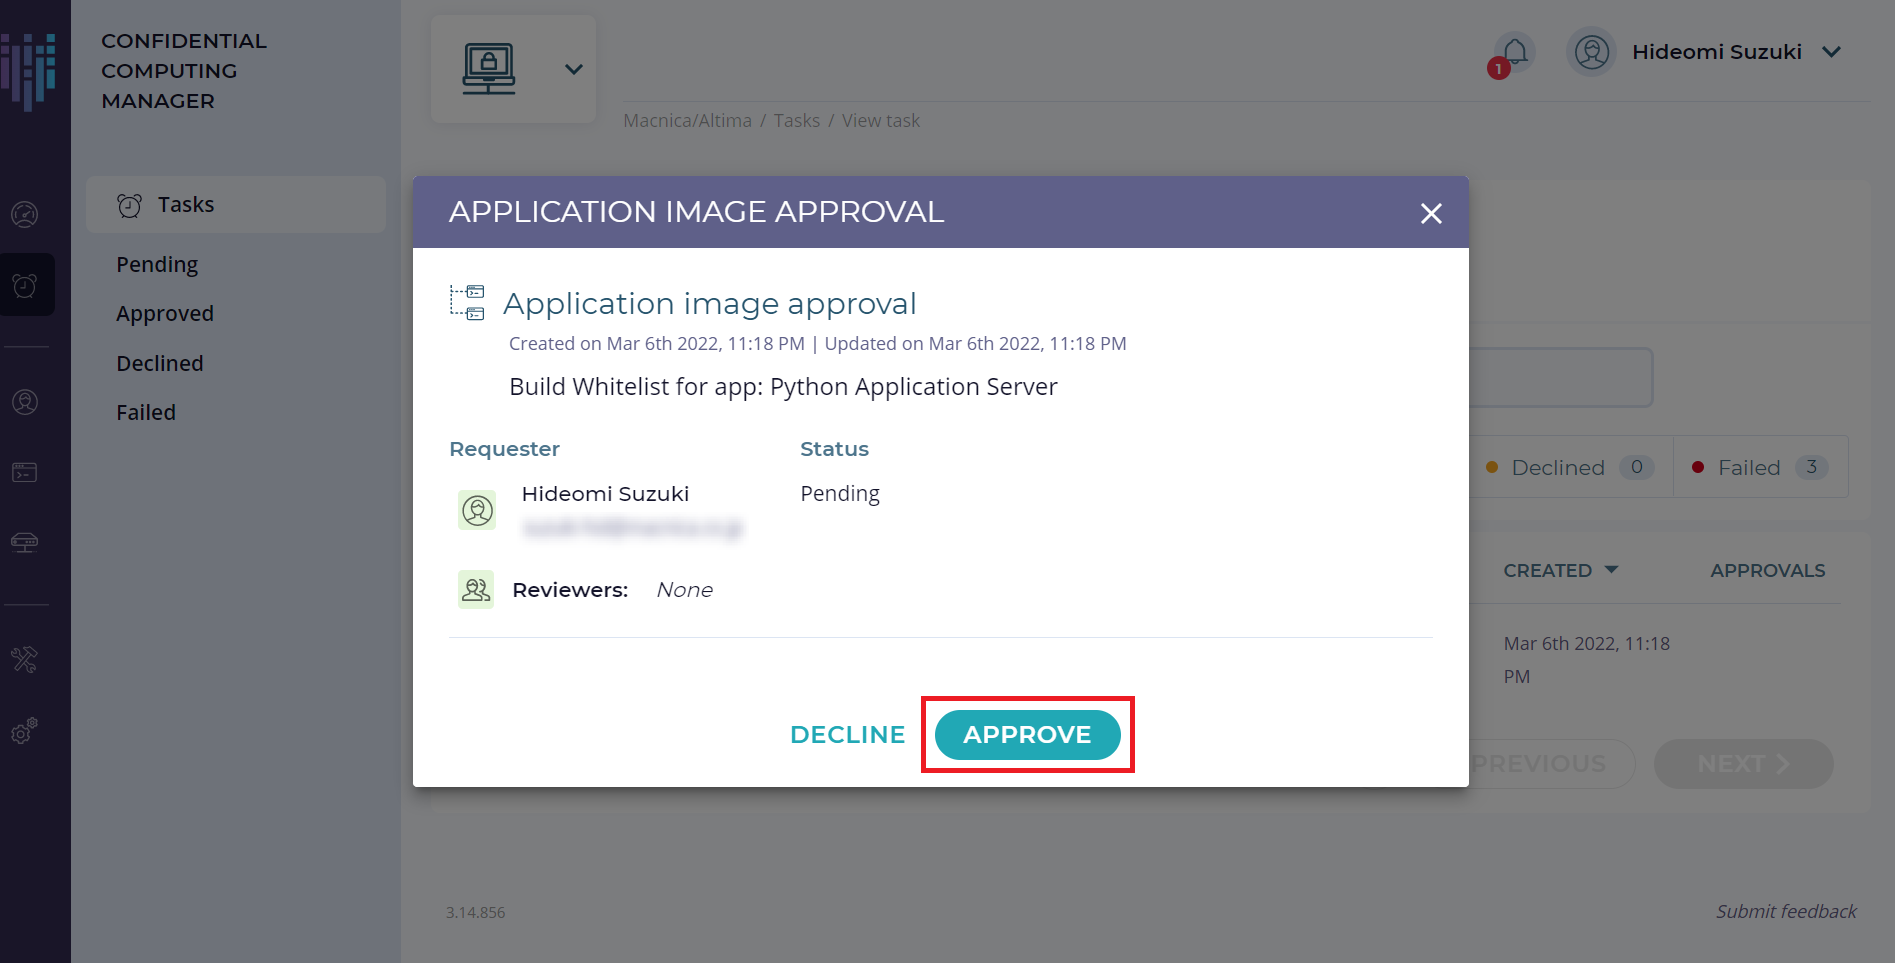
5. Application Image Approval
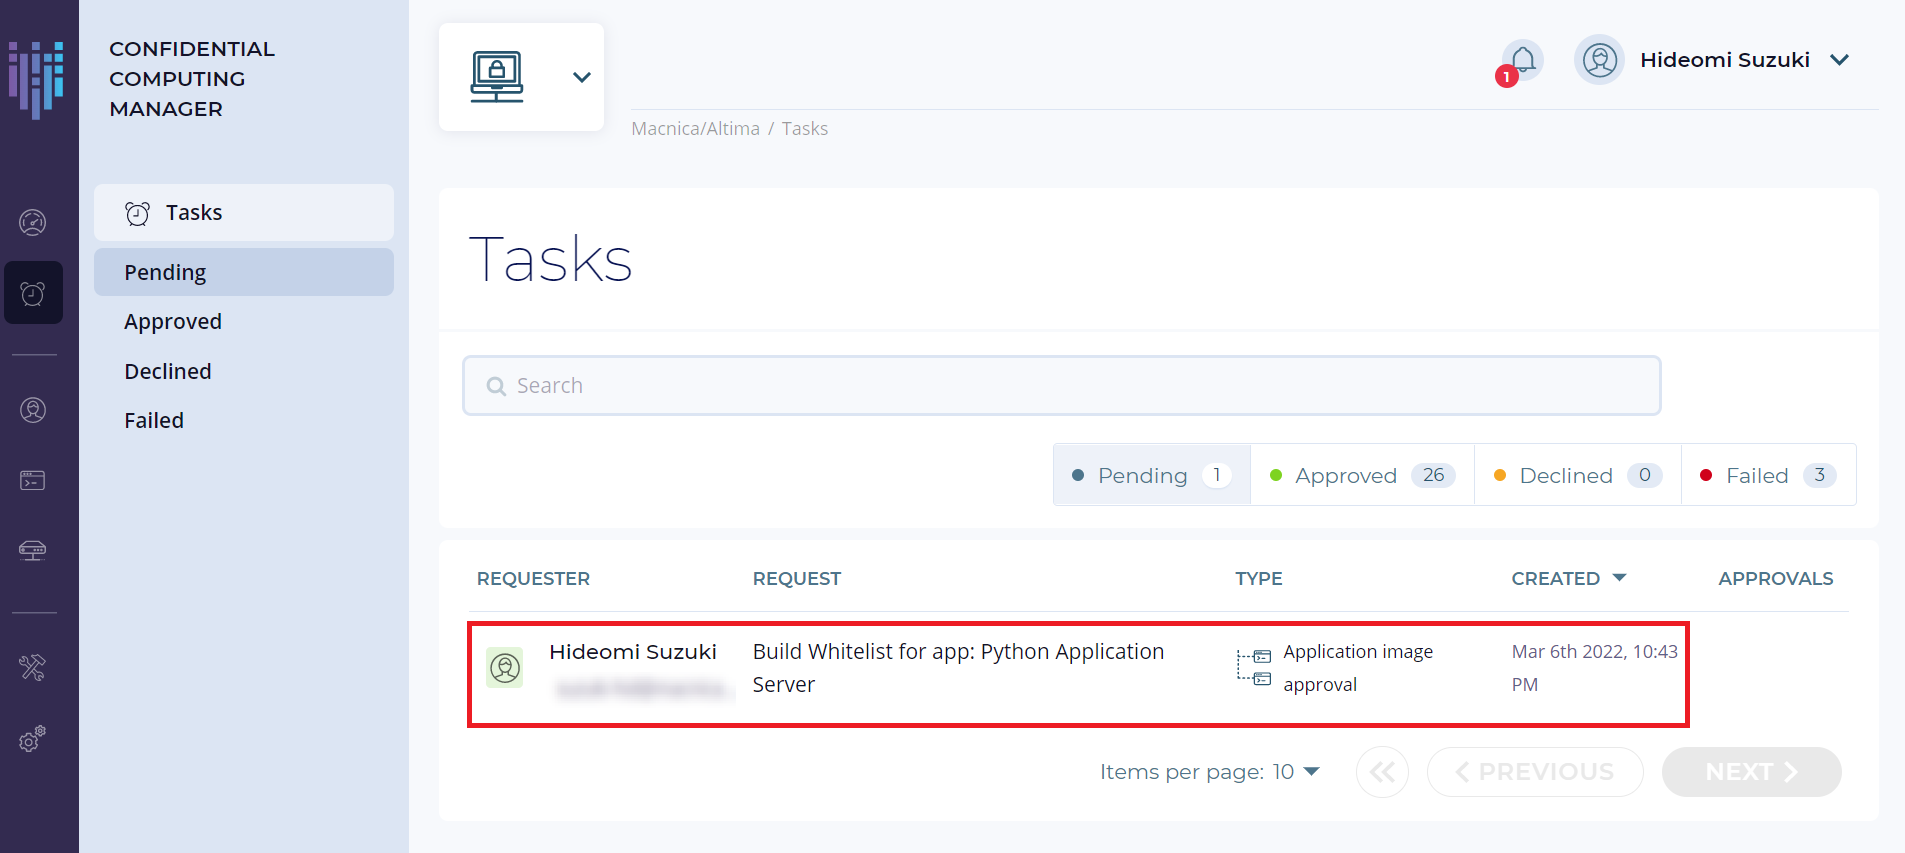
1. Select the Tasks tab on the left menu and click “Build Whitelist for app: Python Application Server” from the Pending Tasks.
2. Click APPROVE to whitelist the image. This will remove it from the Pending Task list and change APPROVAL to "Approved" in the Images list.
6. Compute node agent registration
Here, a token is issued to give execution authority for the created image, and it is registered with the compute node agent.
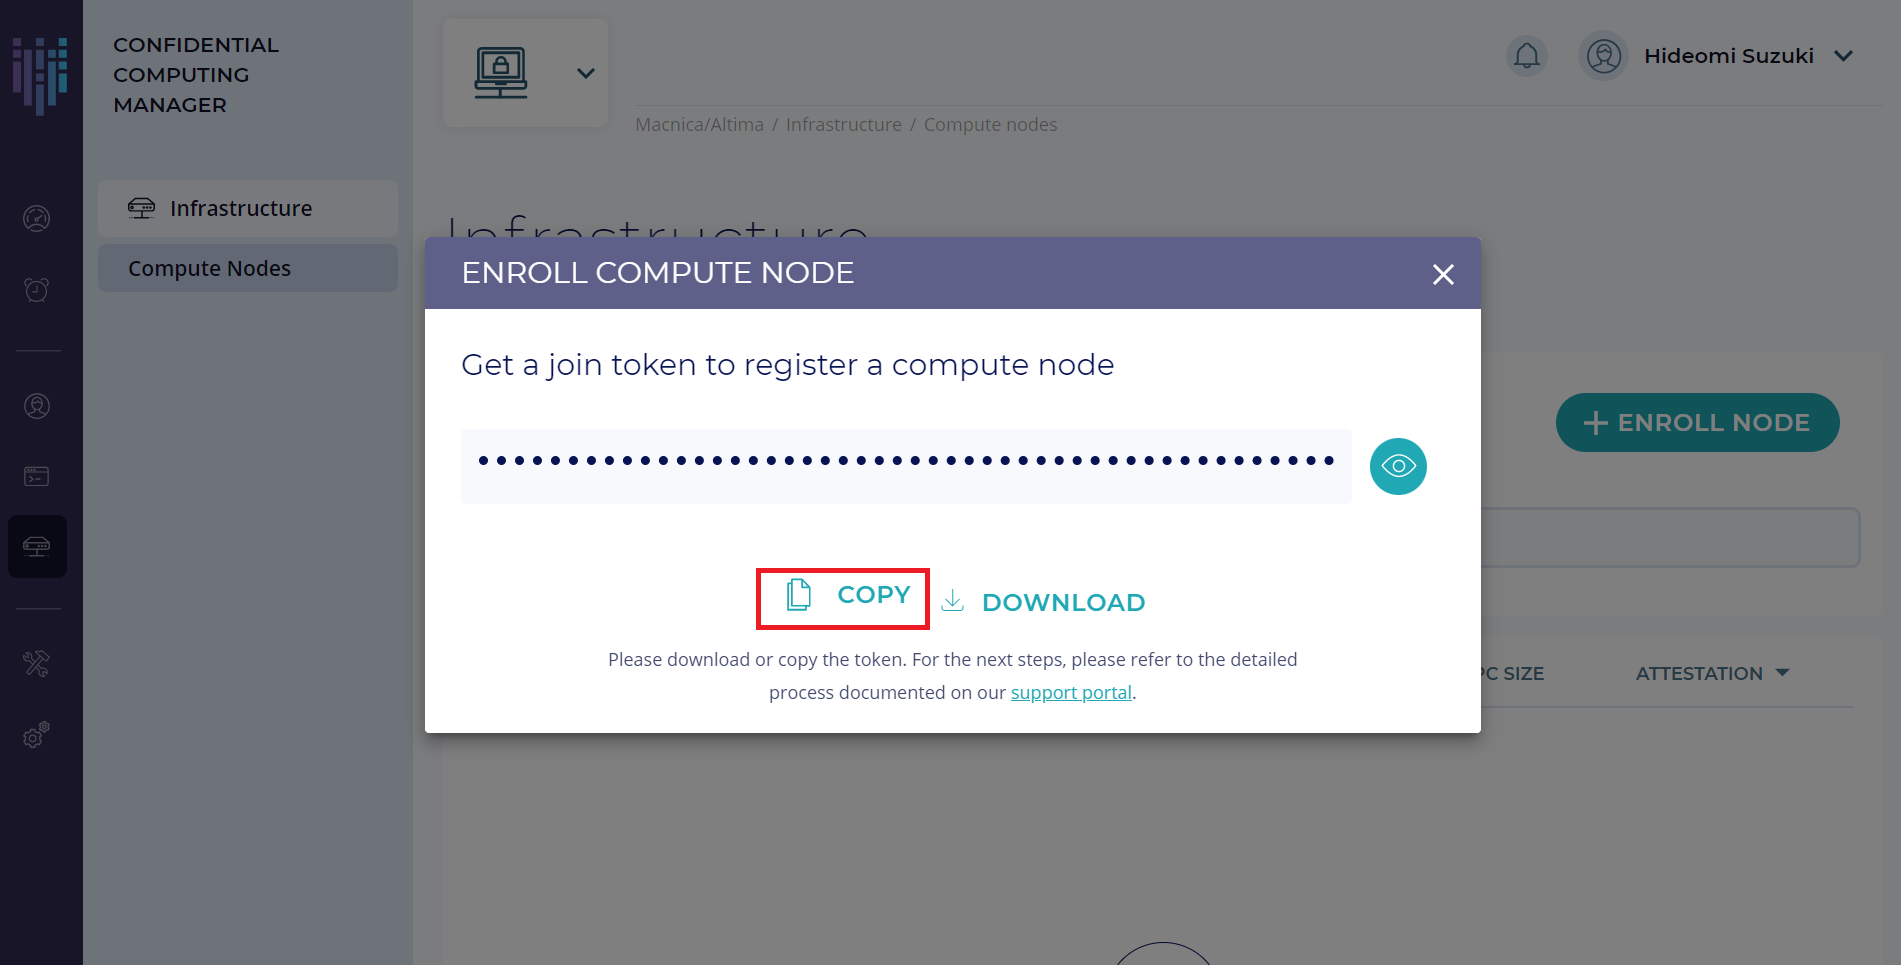
1. Select the Infrastructure tab on the left menu and click [+ ENROLL NODE] on the Compute Nodes page.
2. A pop-up will appear, click COPY to copy the token. This token is used by Compute nodes for authentication.
3. Go to the Microsoft Azure Portal and create a Compute node agent VM.
Type "Fortanix" in the search Box, select "Fortanix Confidential Computing Node Agent" listed and press the "Create" button. Alternatively, you can install the Fortanix Node Agent software provided on the Fortanix website and run it on your Intel SGX machine.
4. Enter the information as shown below and select Review & Create. Other than the following, the default values can be left as they are.
Resource Group: Select Create New and give it a name. Example) CCNAGRv1
Compute Node Name: Give it an appropriate name. Example) ccna1
Username : Give it a suitable name. Example) hoge
Password : Please set it appropriately.
Join Token : Copy and paste the token issued when you press "ENROLL NODE".
After verification, press the "Create" button to start the compute node agent on Azure.
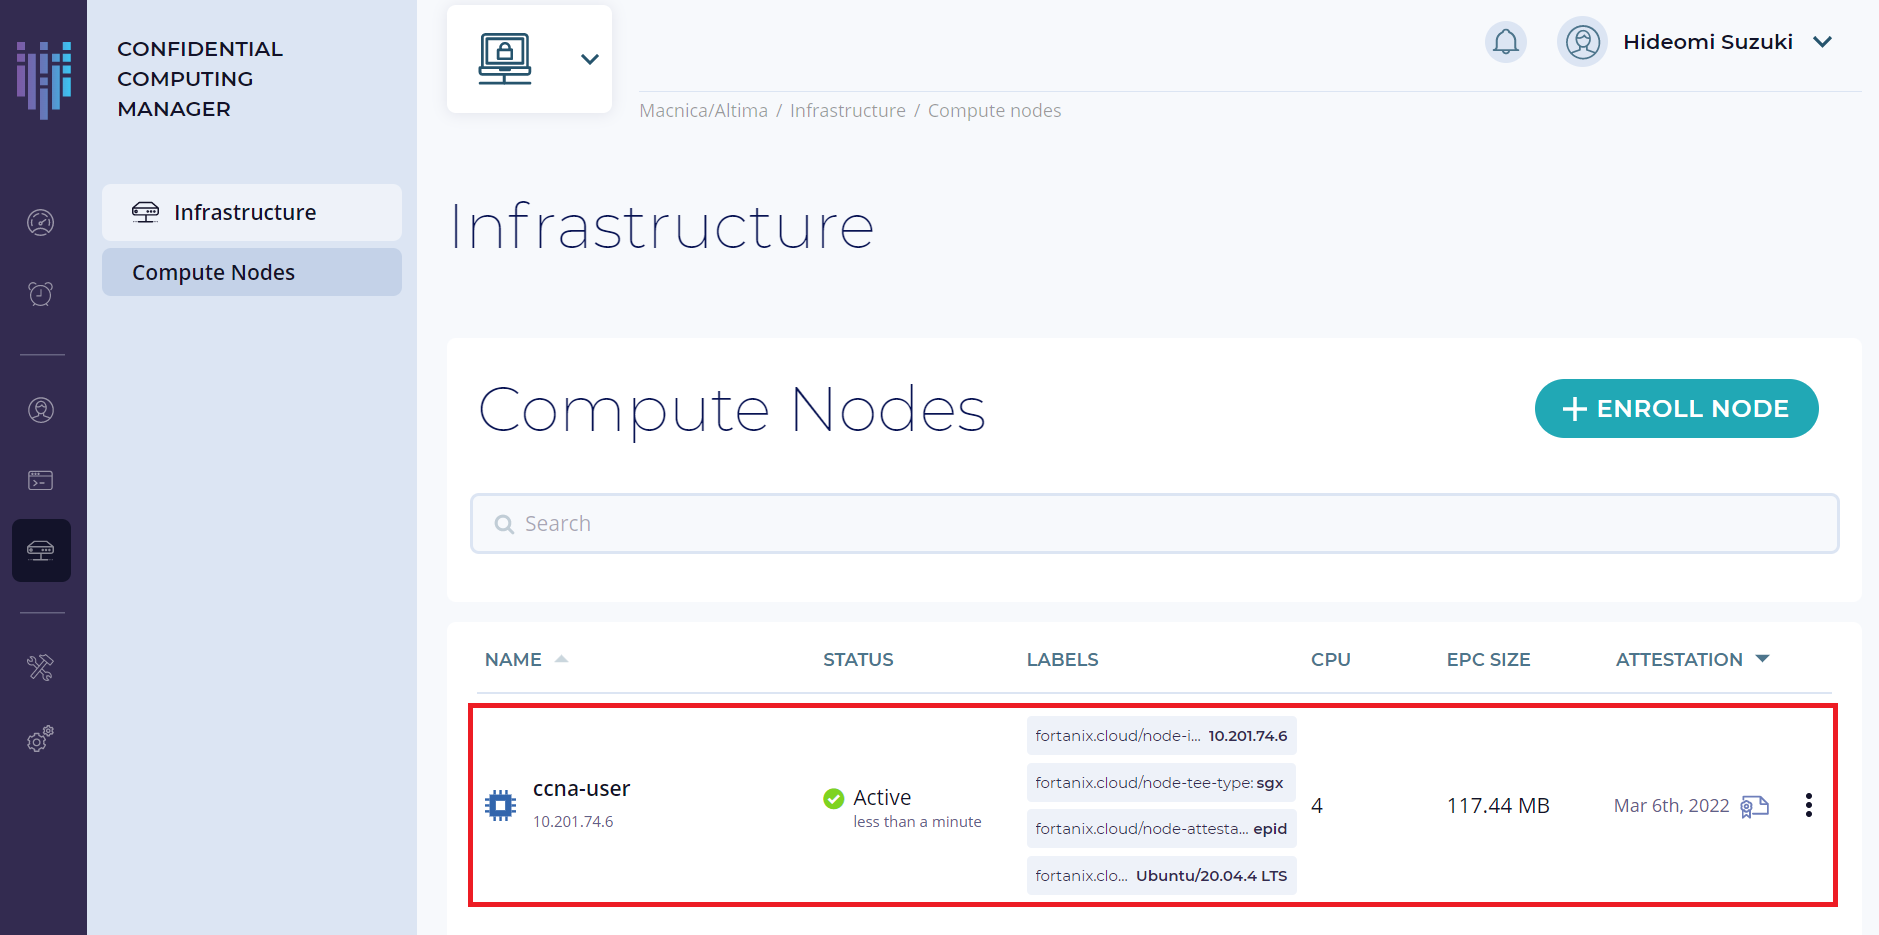
5. After the compute node agent deployment completes, the compute node is registered with Fortanix CCM and appears in the Compute Nodes list.
For more information on registering compute nodes, see CCM Compute Nodes.
7. Run CC applications on registered Compute nodes
1. Select the Compute node agent VM you created, find its public IP address, and ssh to it. After logging in, type the following command to install docker on the registered Compute node agent.
sudo apt install docker.io2. Log in to your Docker account by typing the following command to launch the CC enabled application image you created.
sudo docker login3. Type the following command to run the CC enabled application image on the Compute node you just created.
sudo docker run --device /dev/sgx --device /dev/gsgx -v /var/run/aesmd/aesm.socket:/var/run/aesmd/aesm.socket -e NODE_AGENT_BASE_URL=http://20.124.109.247:9092 suzukih10872/fortanix-demoChange the following parts according to your environment.
20.124.109.247: Compute node agent public IP address
9092 : the default port that the node agent listens on
suzukih10872/fortanix-demo: Your own Docker Hub private registry to store converted application images
Summary
This time, I explained how to use Fortanix's CCM to make a simple web application compatible with confidential computing.
For other features of Fortanix CCM, see the following guides.
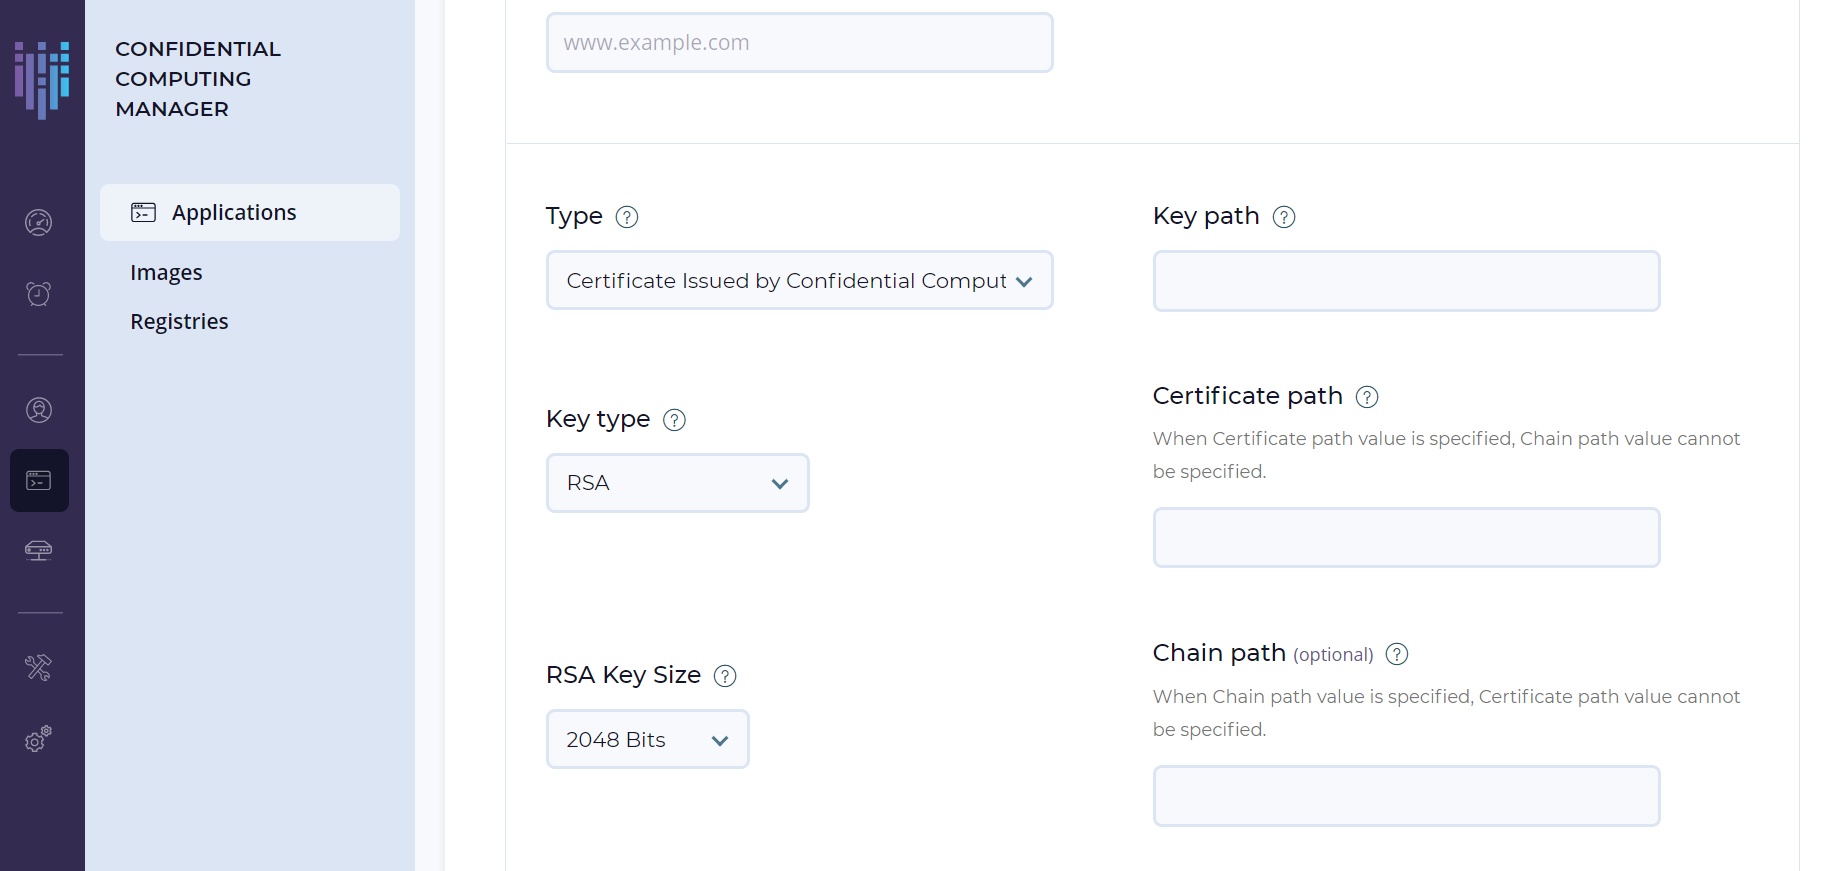
・Provision a TLS certificate using CCM: Certificate configuration
・Use identity and policy management on applications and compute nodes
-Application and compute node policy enforcement
-Compute node labels
・Build and deploy confidential computing applications in Rust using the Fortanix EDP platform: EDP applications on CCM.
Inquiry
If you have any other requests or questions, please contact us using the contact button below.
Fortanix Manufacturer Information Top
If you want to return to Fortanix Manufacturer Information Top, please click below.