Okta
Octa
Introduction
By using Auth0's Universal Login feature, you can redirect users to an authentication server managed by Auth0 and have them authenticate each time they log in to your application. Universal Login has the following advantages over embedded login:
・No need to implement a login screen on the application side
Social login and MFA It can be easily added by using Auth0's functions.
- Because it uses the screen functions provided by the managed authentication server, customization is possible without modifying the application.
On this page, we will introduce the contents and items that can be implemented with the universal login function of Auth0.
premise
The information regarding functions and settings described on this page is current as of November 2024.
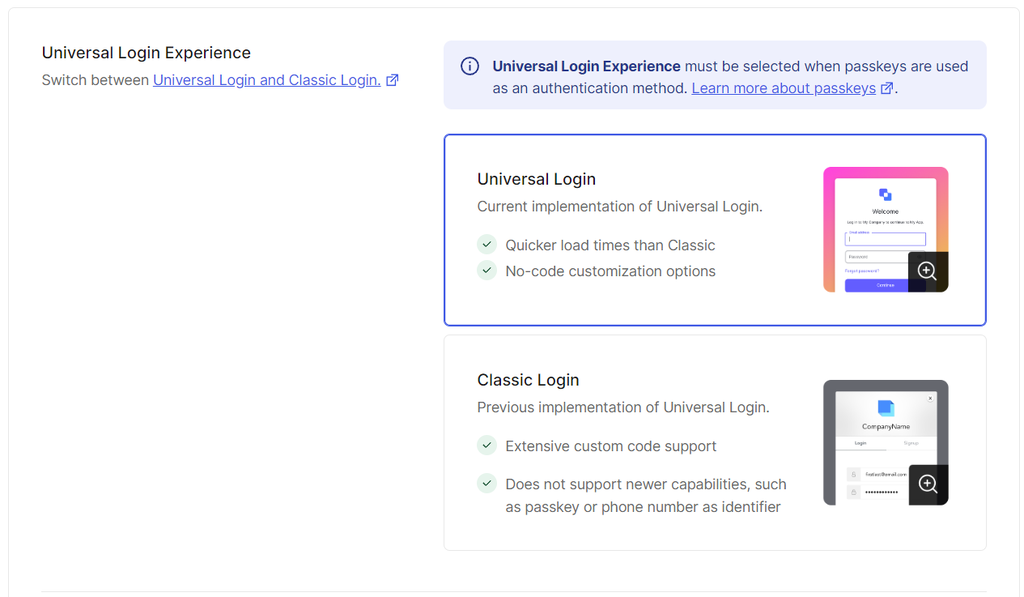
Differences between the Universal Login and Classic Login experiences
When authenticating users with Auth0's Universal Login, you can choose between two types: "Universal Login" and "Classic Login". You can choose which to use from Branding > Universal Login > Advanced Options in the Auth0 admin panel.
・Universal Login
New screen design and login flow 2019 It was released in .
JavaScript Since it does not require a , it is lightweight. WebAuthn or Enterprise Connection Improvements have also been made in terms of functionality, such as support for new languages and language localization.
However, some functions Classic Login Please note that it is only available
・ Classic Login
This is a login screen customization function that has been available since before the Universal Login function was provided.
*Passkey authentication is not supported with Classic Login.
We have listed the main differences between Universal Login and Classic Login in Universal Login. For details on the differences, please see below.
Universal Login vs. Classic Login – Auth0 docs
| function | Universal Login | Classic Login |
|
Apply new features without changing HTML |
○ |
× |
|
Continuous development and addition of new functions |
○ |
× |
|
Lightweight HTML |
○ |
× |
|
Use JavaScript |
× |
○ |
|
page customization |
○ (Edit using page templates or change colors, logos, etc.) |
○ (Editing login, MFA and password reset screens using HTML) |
|
Passwordless login |
○ (WebAuthn using device / biometric authentication) |
Yes (SMS or email authentication only) |
|
Use WebAuthn with device / biometric authentication |
○ |
× |
|
WCAG compliant |
○ |
× |
|
Support for Organizations feature |
○ |
× |
|
Acquisition of agreement to the terms of use at the time of sign-up |
〇 |
○ |
|
Custom fields on signup |
〇 |
○ |
|
Customize the language of the displayed text |
Yes (supports languages listed at https://auth0.com/docs/universal-login/text-customization) |
△ (Login screen only) |
|
Apply localization to all pages |
○ |
× |
|
Support for MFA using email |
○ |
× |
|
Support for MFA using voice calls |
○ |
× |
|
How Duo Supports MFA |
Yes (if Duo is the only MFA factor enabled) |
○ |
|
Button for Enterprise Connection |
○ |
× |
|
Disable password reset links |
○ |
○ |
|
Using custom URLs for password reset and sign-up |
〇(Use of page templates) |
○ |
|
Passkey Authentication |
〇 |
× |
Please note that current and future development work for Universal Login will be done for Universal Login, so from here on, we will mainly focus on Universal Login when introducing customizations for Universal Login.
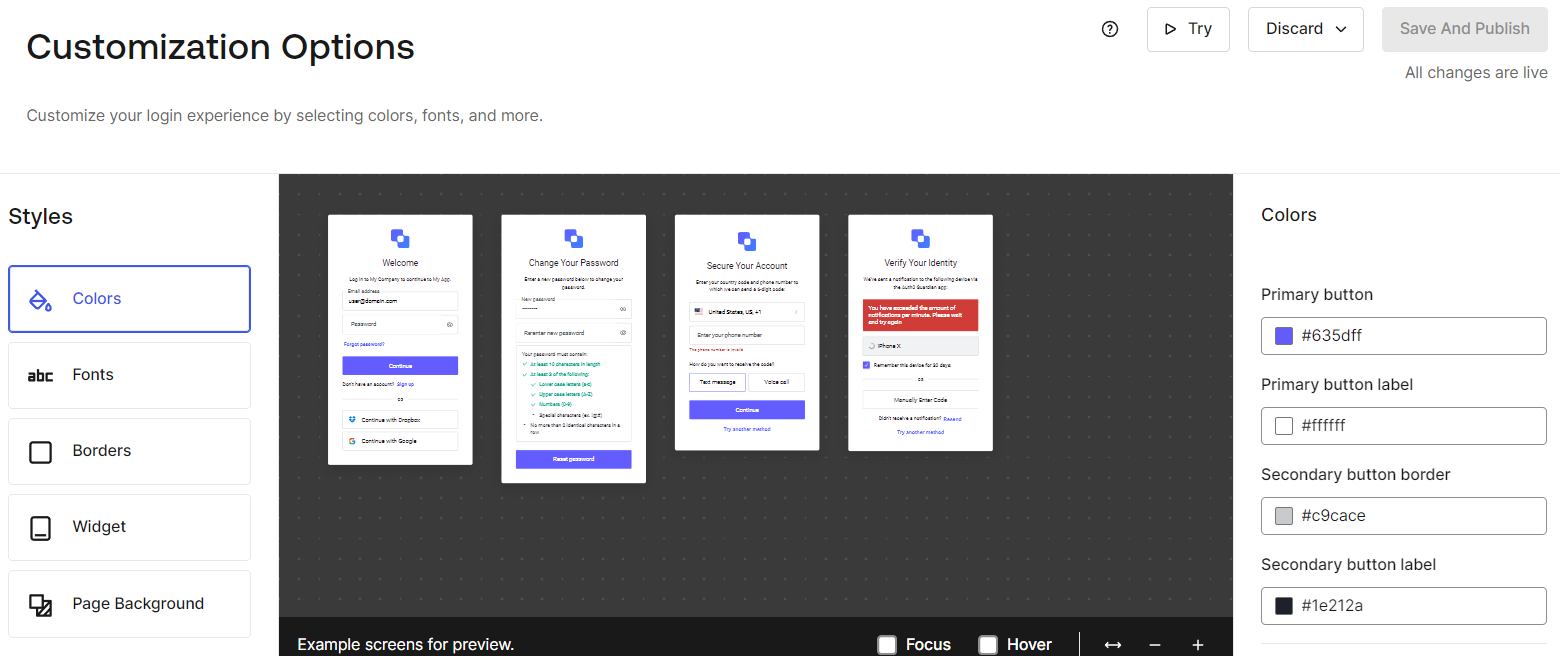
Customize login screen without coating
In Auth0, the following items can be set without coding. There are a lot of setting items, and it is characterized by being able to customize even the smallest details.
| Styles | Setting items | Default configuration |
|
Colors |
Primary button |
#635dff |
|
Primary button label |
#ffffff |
|
|
Secondary button border |
#c9cace |
|
|
Secondary button label |
#1e212a |
|
|
Base Focus Color |
#635dff |
|
|
Base Hover Color |
#000000 |
|
|
Links & focused components |
#635dff |
|
|
Header |
#1e212a |
|
|
Body text |
#1e212a |
|
|
Widget background |
#ffffff |
|
|
Widget border |
#c9cace |
|
|
Input labels & placeholders |
#65676e |
|
|
Input filled text |
#000000 |
|
|
Input border |
#c9cace |
|
|
Input background |
#ffffff |
|
|
Icons |
#65676e |
|
|
Error |
#d03c38 |
|
|
Success |
#13a688 |
|
|
Captcha Widget Theme (Widget Theme) |
Light |
|
|
Fonts |
Font URL |
No settings |
|
Reference text size |
16px |
|
|
Title |
150% |
|
|
Subtitle |
87.5% |
|
|
Body text |
87.5% |
|
|
Buttons text |
100% |
|
|
Input Labels |
100% |
|
|
Links |
87.5% (bold) |
|
|
Links style |
Normal |
|
|
Borders |
Button border weight |
1px |
|
Buttons style |
Rounded corners |
|
|
Button border radius |
3px |
|
|
Input border weight |
1px |
|
|
Inputs style |
Rounded corners |
|
|
Inputs border radius |
3px |
|
|
Widget corner radius |
5px |
|
|
Widget border weight |
0px |
|
|
Show widget shadow |
enable |
|
|
Widget |
Logo position |
Center |
|
Logo URL |
No settings |
|
|
Logo height |
52px |
|
|
Header text alignment |
Align center |
|
|
Social buttons layout |
On bottom |
|
|
Page background |
Page Layout |
Center |
|
Background color |
#000000 |
|
|
Background image url |
No settings |
The above settings can be configured in your Auth0 dashboard under Branding > Universal Login > Customization Options.
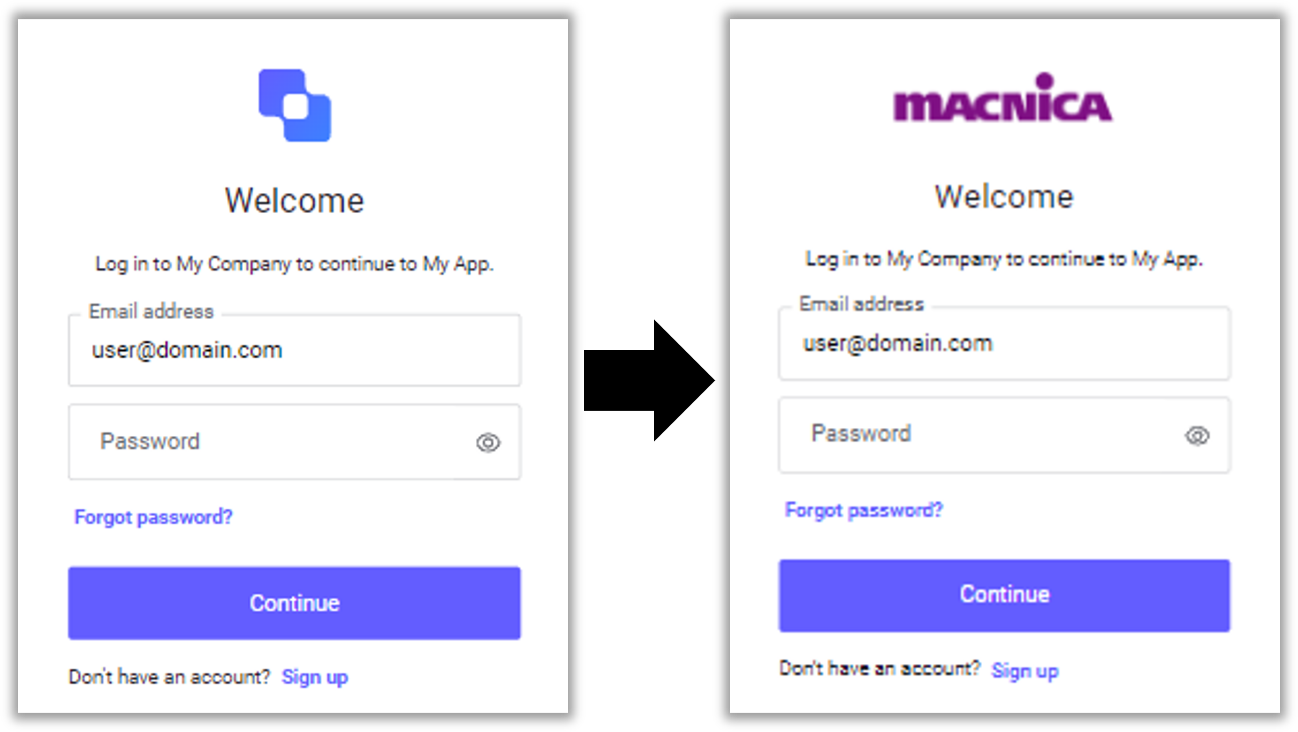
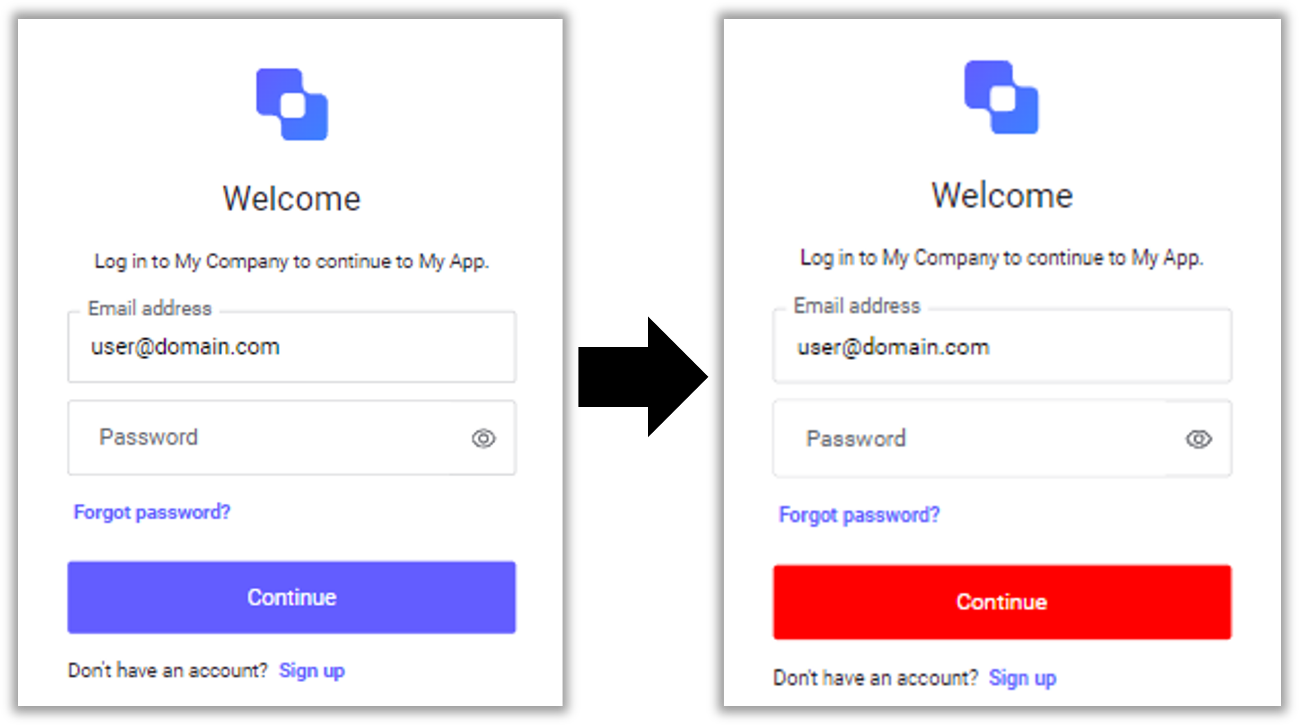
Below is an example of changing the "Logo" and "Primary bottom Color" settings.
<Change logo image>
< Change Primary bottom Color from #635dff to #ff0000>
For more information on customization, see below.
Customize Universal Login Page Themes – auth0 docs
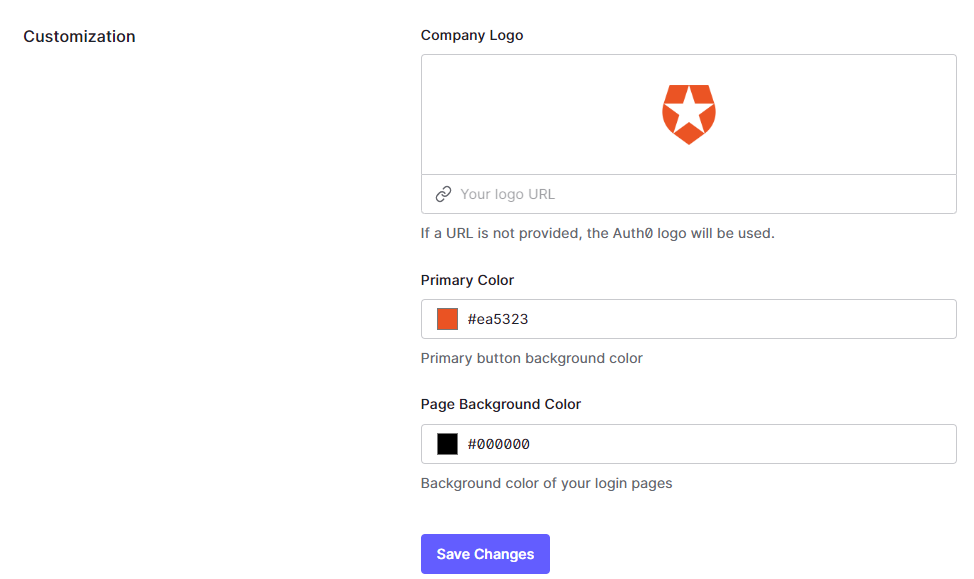
[supplement]
With Classic Login, only the following can be set:
・Company Logo
・Primary Color
・Page Background Color
Customization of screen text wording using API
Universal Login uses the Auth0 Management API to allow you to edit the text displayed on pages such as login, MFA registration, password change, etc.
The API endpoints and required parameters to be used are as follows:
Endpoint: /api/v2/prompts/{prompt}/custom-text/{language}
Method: PUT
Required parameters
-prompt (a specific step in the login flow)
-language (language used)
-body (describe the changes and text)
Format (JSON): { "SCREEN": { "TEXT_ID": "text message " } }
SCREEN: Screen of the prompt to be set
TEXT_ID: Text change part set for each SCREEN
text message: The text to be set in the location specified by TEXT_ID
For details on the above parameters required for API calls, please see below.
Customize Universal Login Text Elements – Auth0 docs
As an example, here are the steps to change the title of the login screen using the Auth0 Management API.
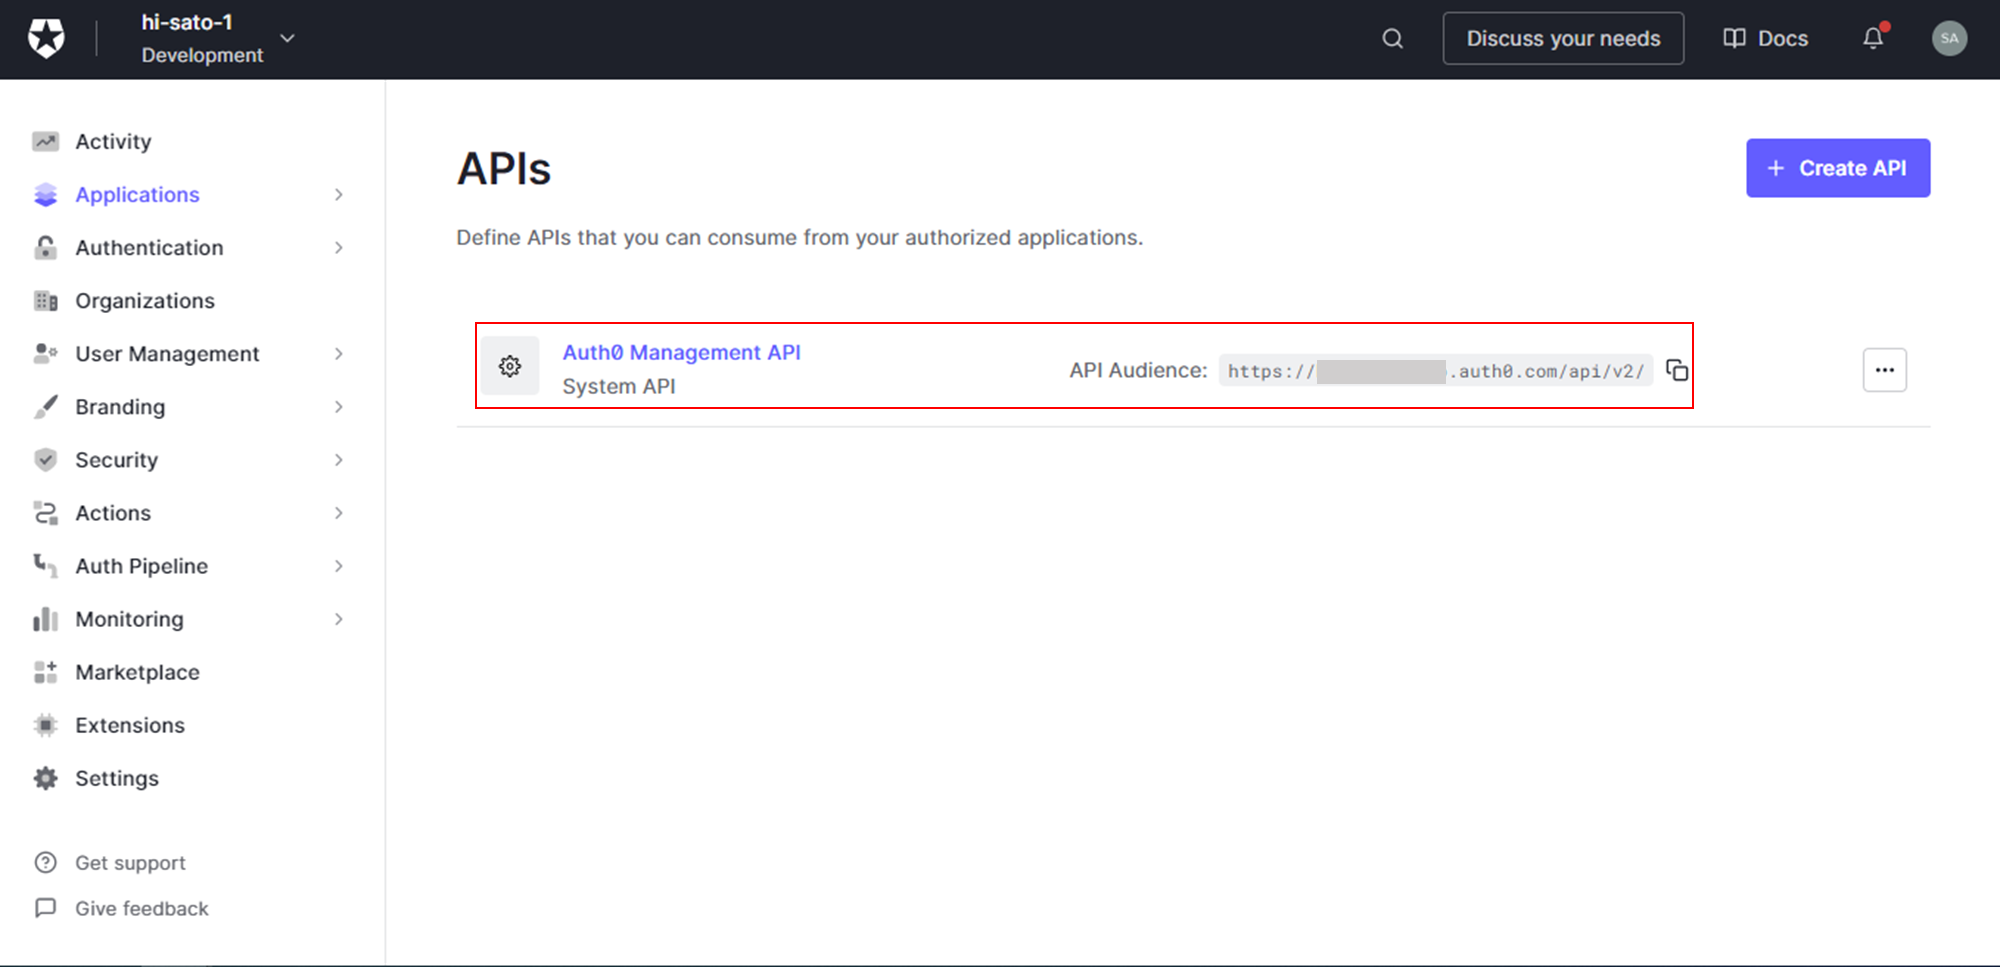
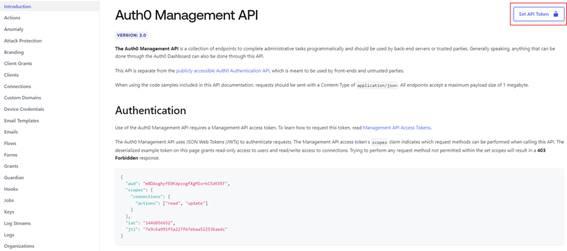
(1) To issue an access token for the Auth0 Management API, click Applications > APIs > Auth0 Management API in the Auth0 dashboard.
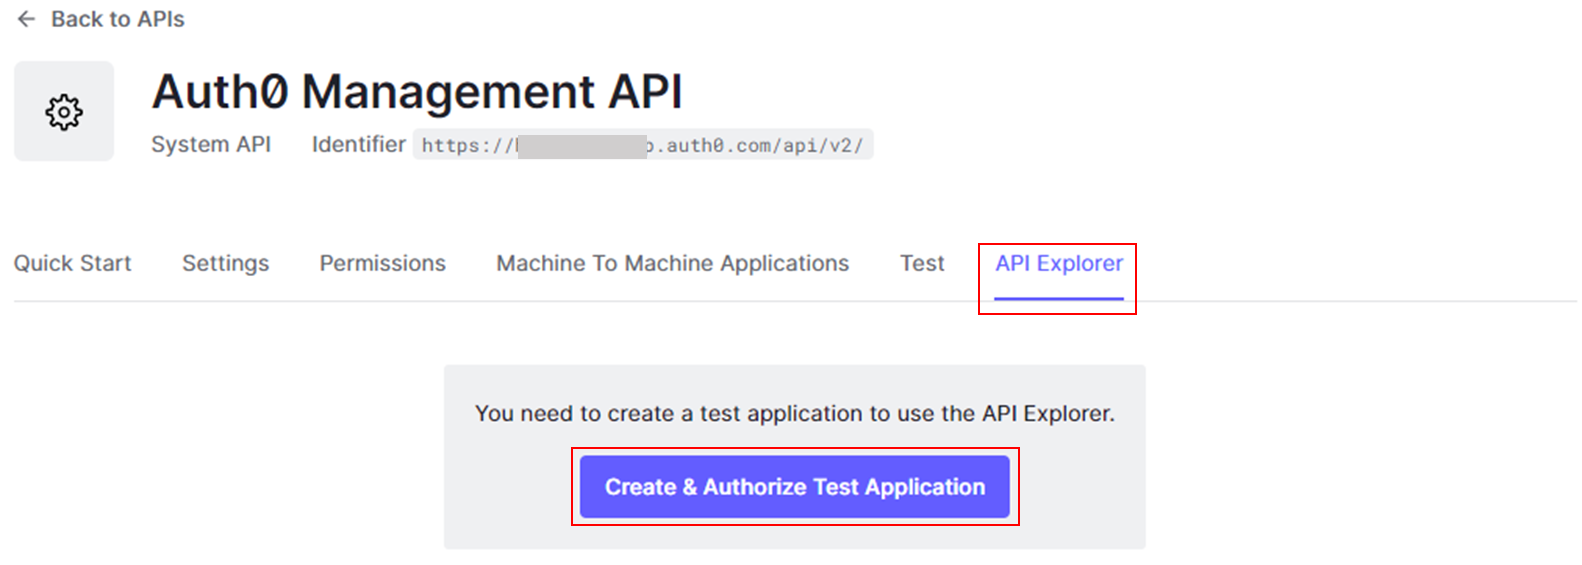
(2) Go to the API Explorer tab and click [Create & Authorize Test Application].
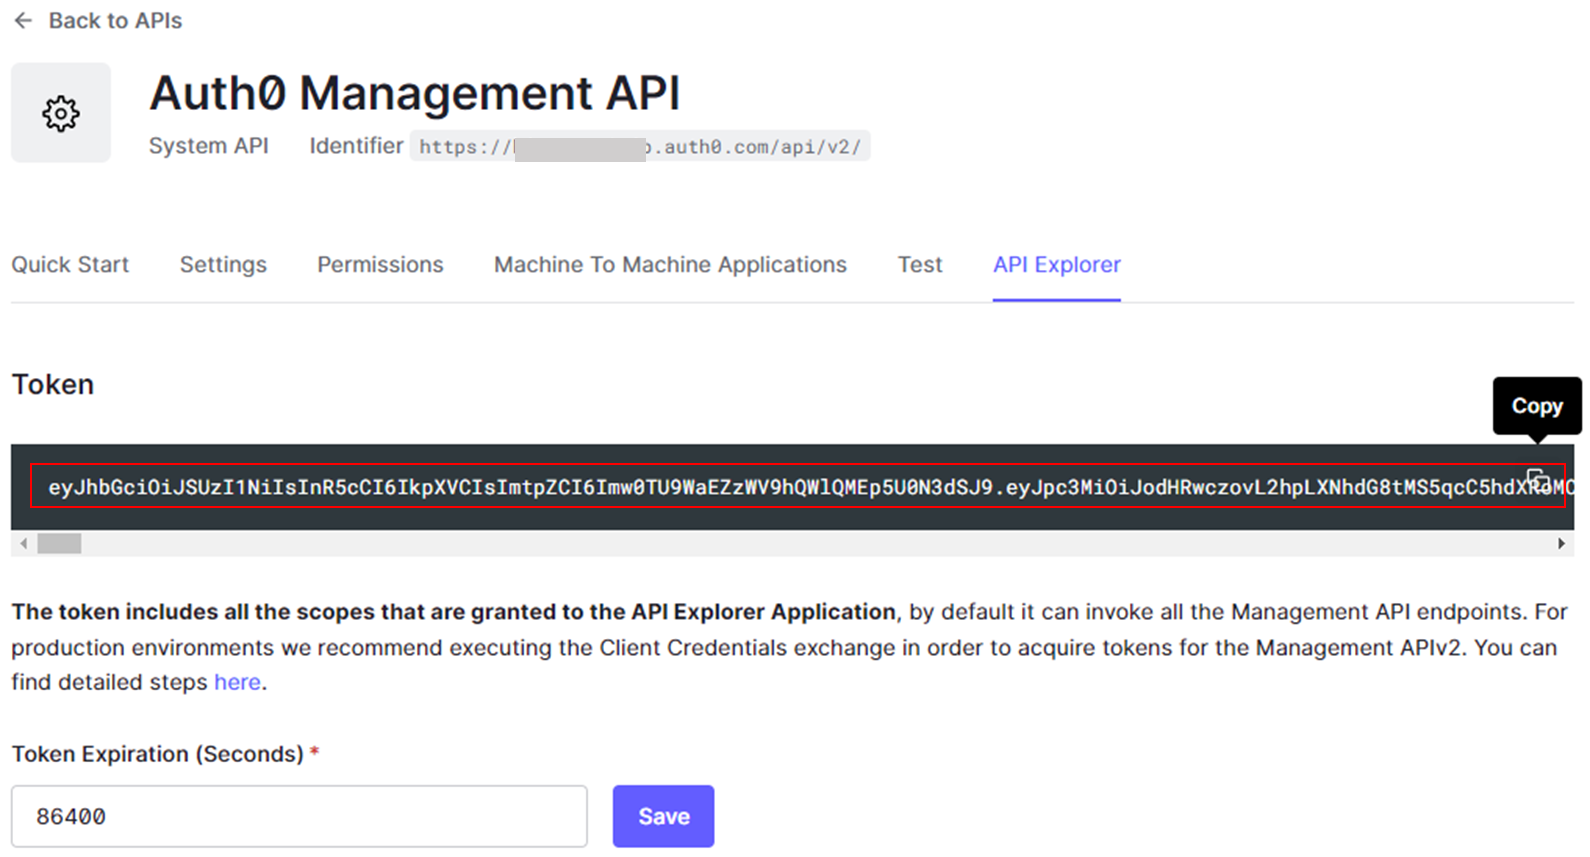
(3) Copy the Token portion of the issued access token.
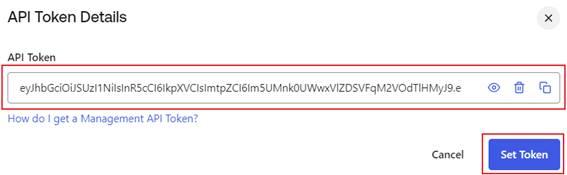
(4) Open Auth0 Management API Explorer and click [Set API Token] in the upper right corner of the screen.
(5) Paste the access token copied in (3) into the API Token field and click the [Set Token] button.
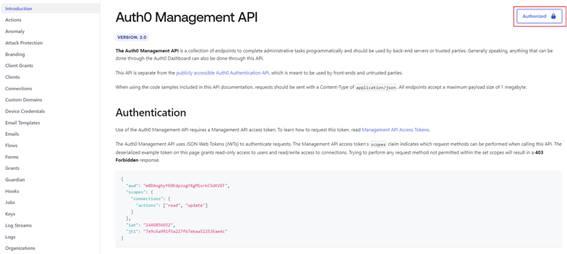
(6) Confirm that [Authorized] is displayed in the tab on the right side of the screen.
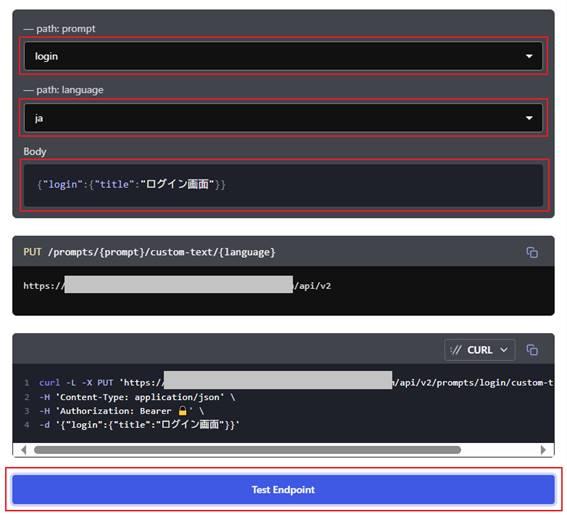
(7) On the left side of the screen, click Prompts > [Set custom text for a specific prompt].
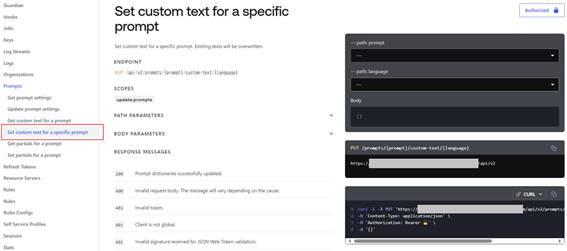
(8) Set the parameters required for the API call as follows and click [Test Endpoint].
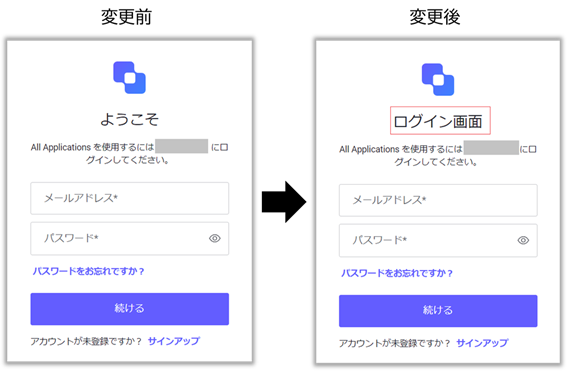
*By specifying the parameters below, the default title on the login screen will be changed from "Welcome" to "Login Screen".
・prompt:login
・language:ja
・body:{"login": {"title":" Login screen"}}
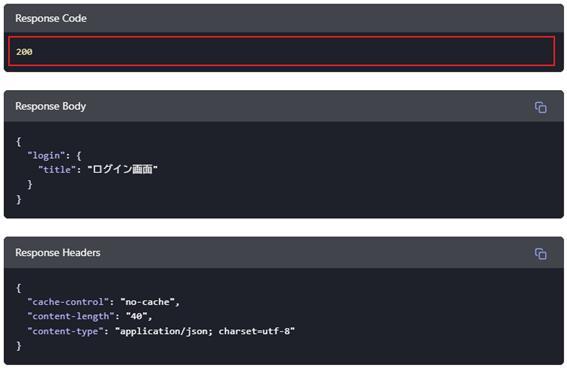
(9) The API call result will be displayed. Verify that the Response Code is "200".
*If any value other than 200 is displayed, the operation has failed. Please refer to the error message and take appropriate action.
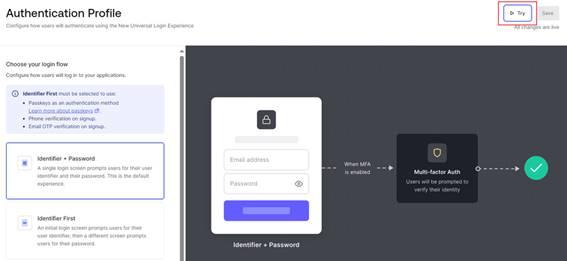
(10) To check the new login screen, go to Authentication > Authentication Profile in the Auth0 administration screen and click the [Try] button.
(11) Confirm that the title of the login screen has been changed to "Login Screen"
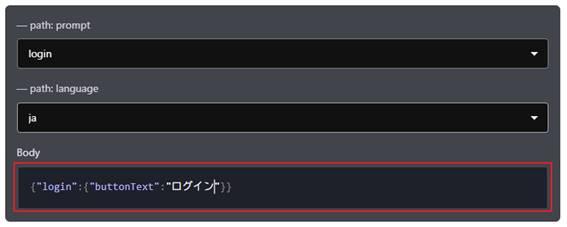
As another example, the settings for changing the login button label on the login screen from "Continue" to "Login" are shown below.
・ Body content
{"login": {"buttonText":" Login"}}
・Setting screen
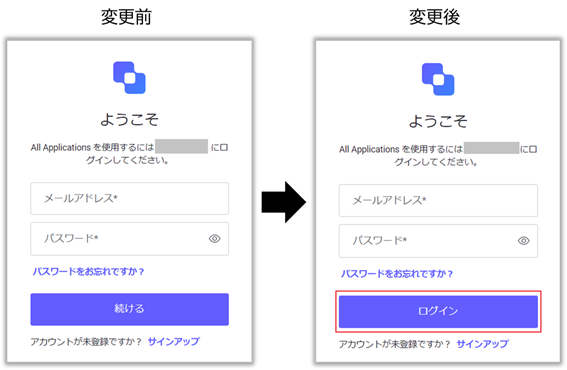
・Screens before and after the change
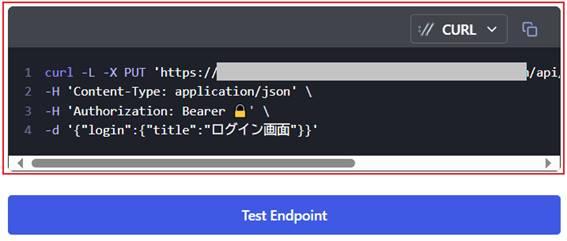
[Supplement ①]
When executing an API call with the curl command, do the following:
curl -L -X PUT '{YOUR_AUTH0_URL}/api/v2/prompts/login/custom-text/ja' \ -H 'Content-Type: application/json' \ -H 'Authorization: Bearer {YOUR_ACCESS_TOKEN}' \ -d '{"login":{"title":"ログイン画面"}}'The curl command to be executed can be obtained by copying the code at the top of [Test Endpoint] in the Auth0 Management API Explorer.
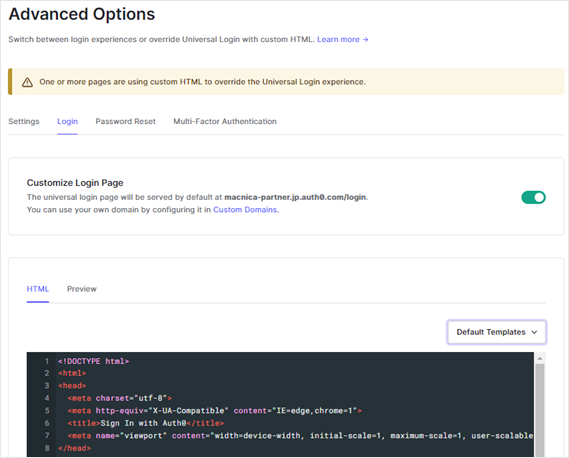
[Supplementary Note ②]
Classic Login can be set in the Auth0 admin screen under Branding > Universal Login > Advanced Options, select the flow-specific tab at the top of the screen, and enable it by turning on the "Customize *** Page" section. Even if you are using Universal Login, the contents of the "Customize *** Page" section will take priority, so be careful when setting it up.
The login screen for Classic Login is implemented using Auth0 Lock. For more information about Auth0 Lock, see [About Auth0 Lock].
in conclusion
By using Auth0's universal login function, you can intuitively customize the GUI without having to make any coding changes. You can also easily change the text on the screen using the API.
By all means, please try customizing the login screen with this universal login function.
Inquiry/Document request
In charge of Macnica Okta Co., Ltd.
- TEL:045-476-2010
- E-mail:okta@macnica.co.jp
Weekdays: 9:00-17:00