Okta
Octa
Introduction
With Auth0, you can log in to an Auth0-linked application using not only the user database of Auth0 itself, but also user accounts managed by an external IdP. You can continue to use the user account information registered with your existing IdP, and you can achieve authentication integration with Auth0 with minimal work.
External IdP integration in Auth0 uses the Enterprise Connection feature. On this page, Okta Workforce (Okta) is used as the external IdP and the protocol is SAML, and the necessary settings and actual login operations are introduced.
In addition, Okta is used as an example of external IdP integration using SAML this time, but please note that Okta, which is provided as an integration template in Auth0, is an OpenID Connect integration.
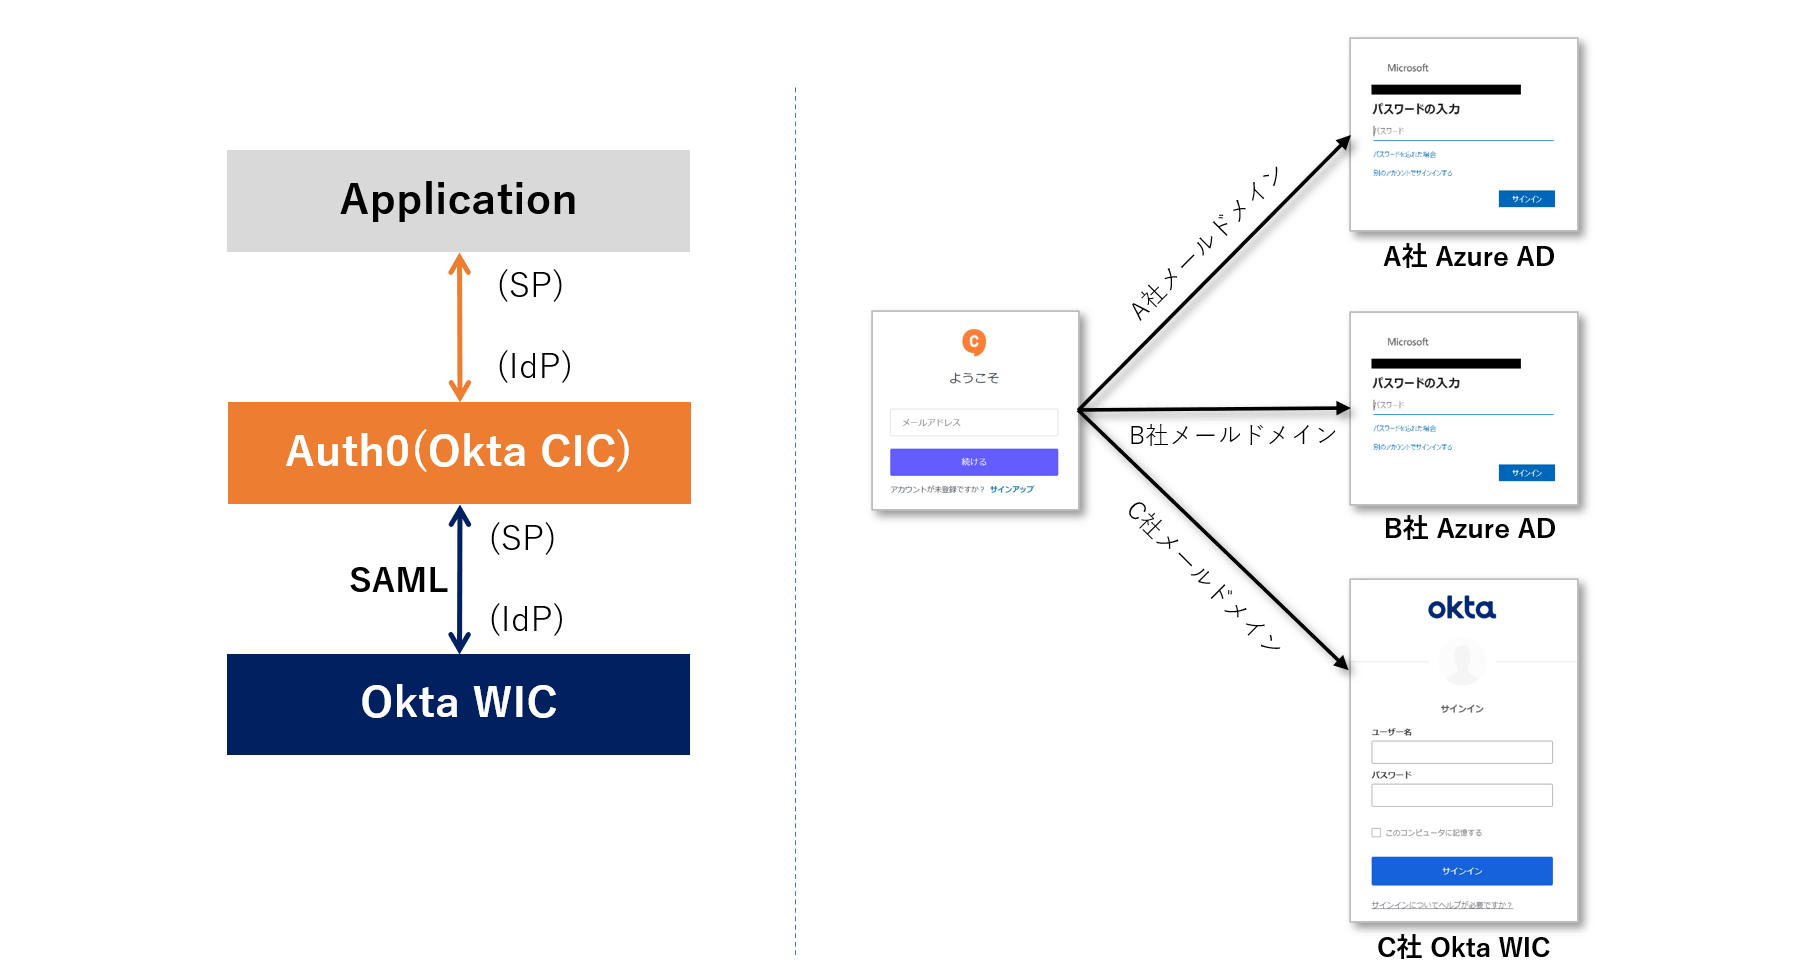
External IdPs supported by Auth0
You can check the external IdPs supported by Auth0 below. Supports major IdPs such as Okta Workforce Identity and Azure AD. Also, IdPs not listed can be linked if they support SAML or OpenID Connect protocol.
Enterprise Identity Providers - Auth0
premise
The settings and operation examples on this page assume that the following has been prepared.
- Auth0-integrated web application
- Create Okta Workforce Tenant
For the login screen function by Auth0, use New Universal Login.
*The Connection Button setting described later is not compatible with the Classic version.
In addition, the information on functions and settings described on this page is current as of January 2023.
Setting overview
In order to achieve authentication integration with Okta as an external IdP in an Auth0-linked web application, the settings required for each of Auth0 and Okta are as follows. *SAML is used for Auth0/Okta integration.
- Application registration
- Acquisition of information to be registered on the Auth0 side (Single Sign-On URL and X.509 Certificate)
- Enterprise Connection settings for Okta
- Enabling IdP-initiated SSO
- Enabling Enterprise Connection in Application
From here, we will introduce the specific setting method and an example of operation at login.
Setting Example
Check the following information required for Okta settings
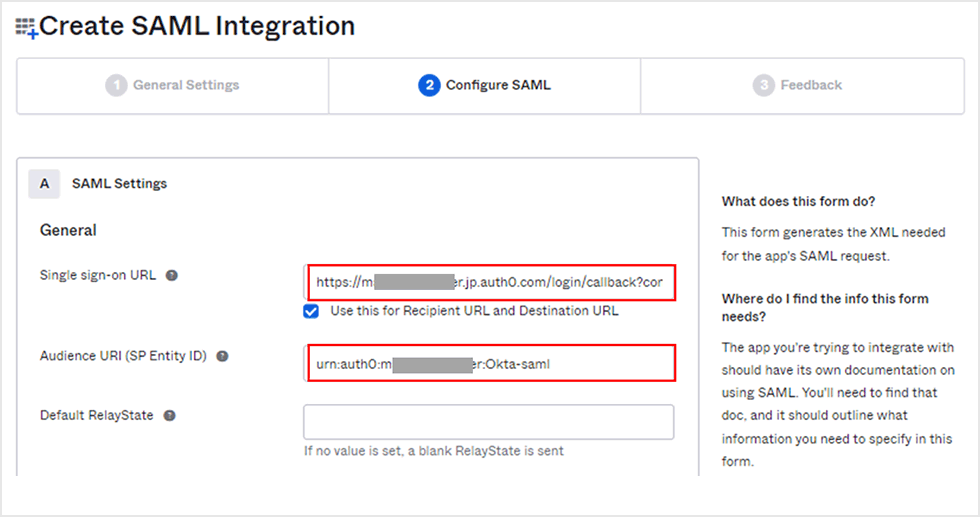
- Single sign-on URL:
https://<YOUR_DOMAIN>/login/callback?connection=<YOUR_AUTH0_CONNECTION_NAME> - Audience URI (SP Entity ID):
urn:auth0:<YOUR_AUTH0_TENANT_NAME>:<YOUR_AUTH0_CONNECTION_NAME>
[Supplement] About "YOUR_DOMAIN", "YOUR_AUTH0_TENANT_NAME", "YOUR_AUTH0_CONNECTION_NAME" values
- YOUR_DOMAIN: <YOUR_AUTH0_TENANT_NAME>.<REGION_DOMAIN>.auth0.com
* REGION_DOMAIN = jp when using the Japan region - YOUR_AUTH0_TENANT_NAME: Auth0 tenant name
*Check from Auth0 management screen [Settings] > [General] tab > [Tenant Name] - YOUR_AUTH0_CONNECTION_NAME: Connection name for SAML IdP linkage set on the Auth0 side
*"Okta-saml" in this setting example
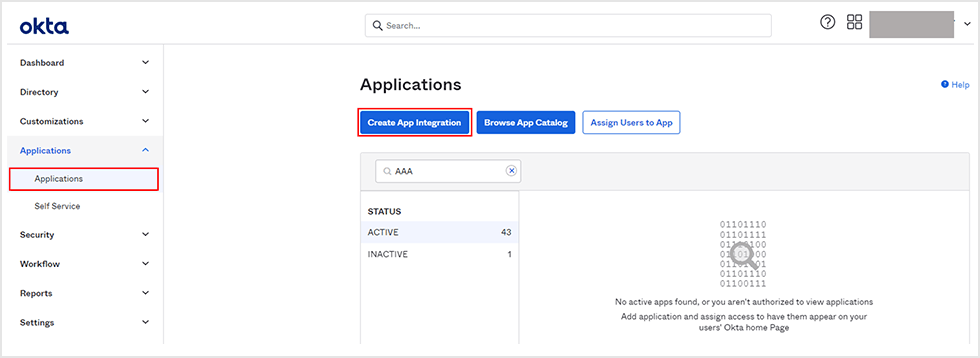
- After moving to [Applications] > [Applications] on the Okta management screen, click [Create App Integration]
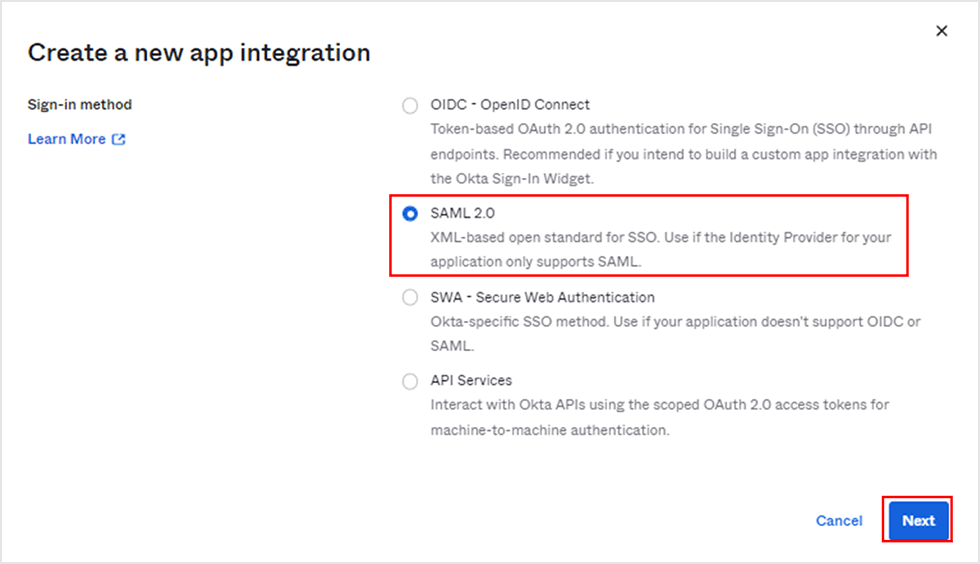
- Select [SAML 2.0] for Sign-in method and click [Next]
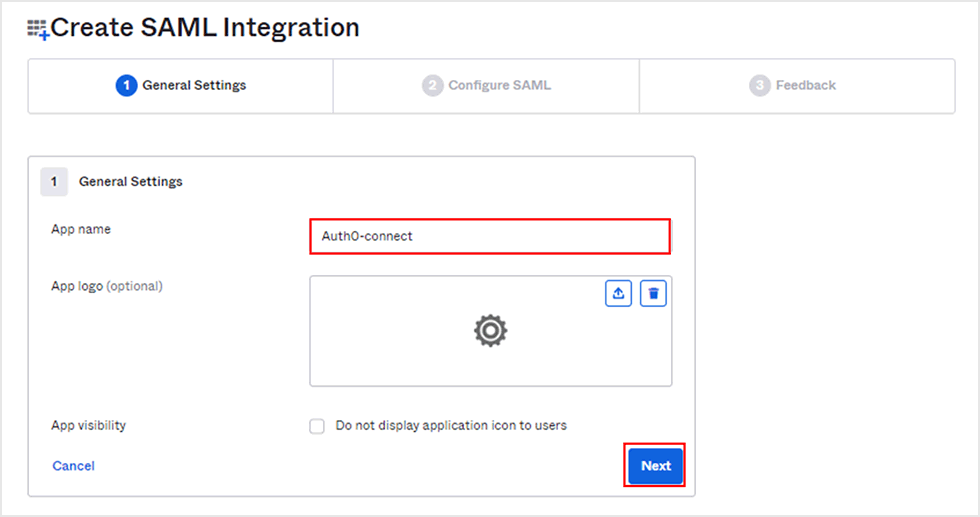
- Enter an arbitrary name in [App name] in the application registration and click [Next]
- Enter each value* in the SAML settings and move to the bottom of the screen
* Value confirmed in "1. Organizing Auth0 side information required for Okta settings"
Single sign-on URL:
https://<YOUR_DOMAIN>/login/callback?connection=<YOUR_AUTH0_CONNECTION_NAME>
Audience URI (SP Entity ID):
urn:auth0:<YOUR_AUTH0_TENANT_NAME>:<YOUR_AUTH0_CONNECTION_NAME>
- Enter each value in Attribute Statements and move to the bottom of the screen
* If you want to link other attribute values with Auth0, you can link by adding them in the same way.
Setting Example)
| Name | Name format | Value |
| Unspecified | user.email | |
| given_name | Unspecified | user. firstName |
| family_name | Unspecified | user. lastName |
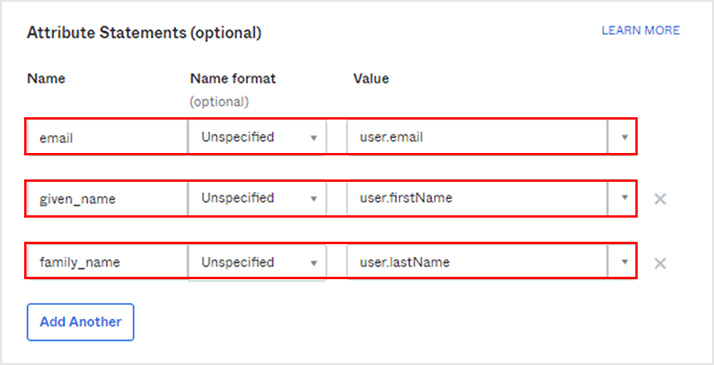
- Click Next
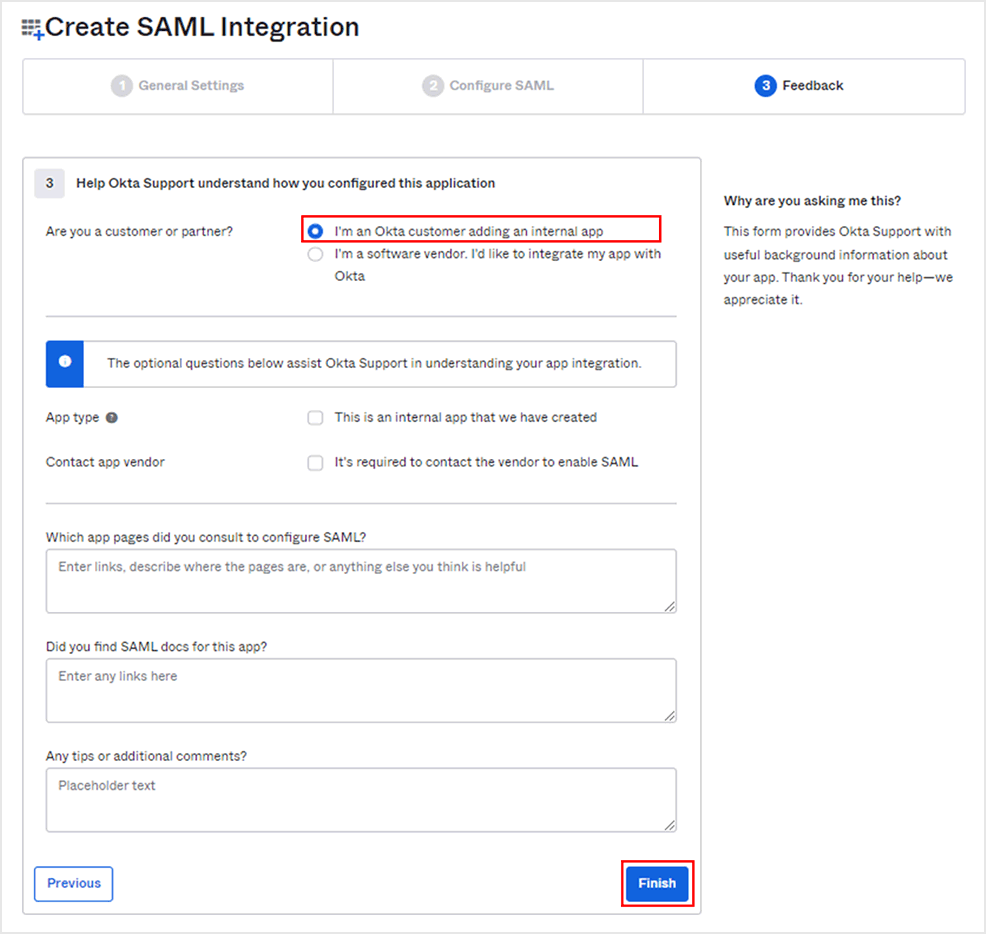
- Select [I'm an Okta customer adding an internal app] and click [Finish]
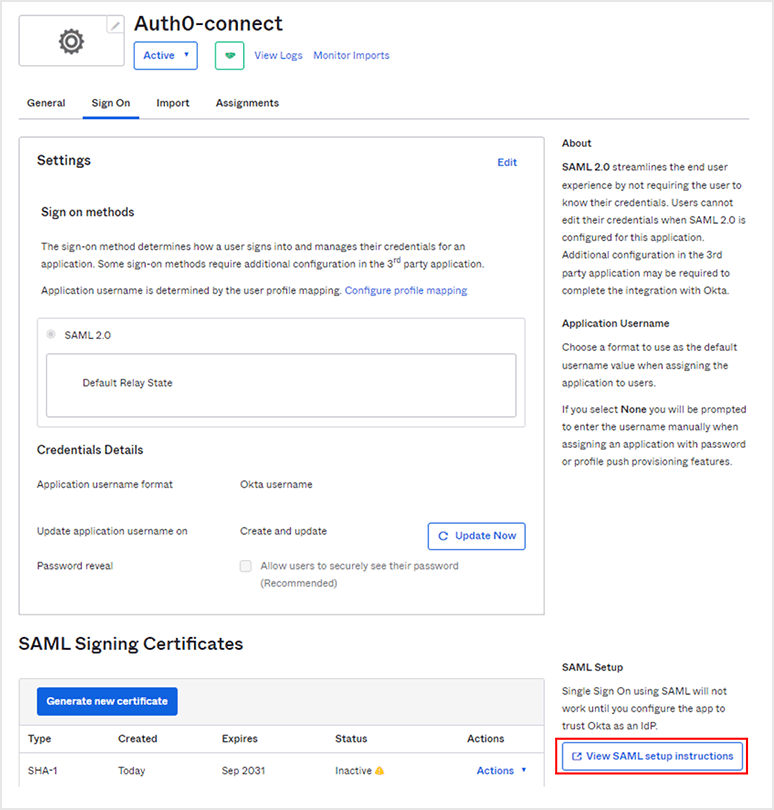
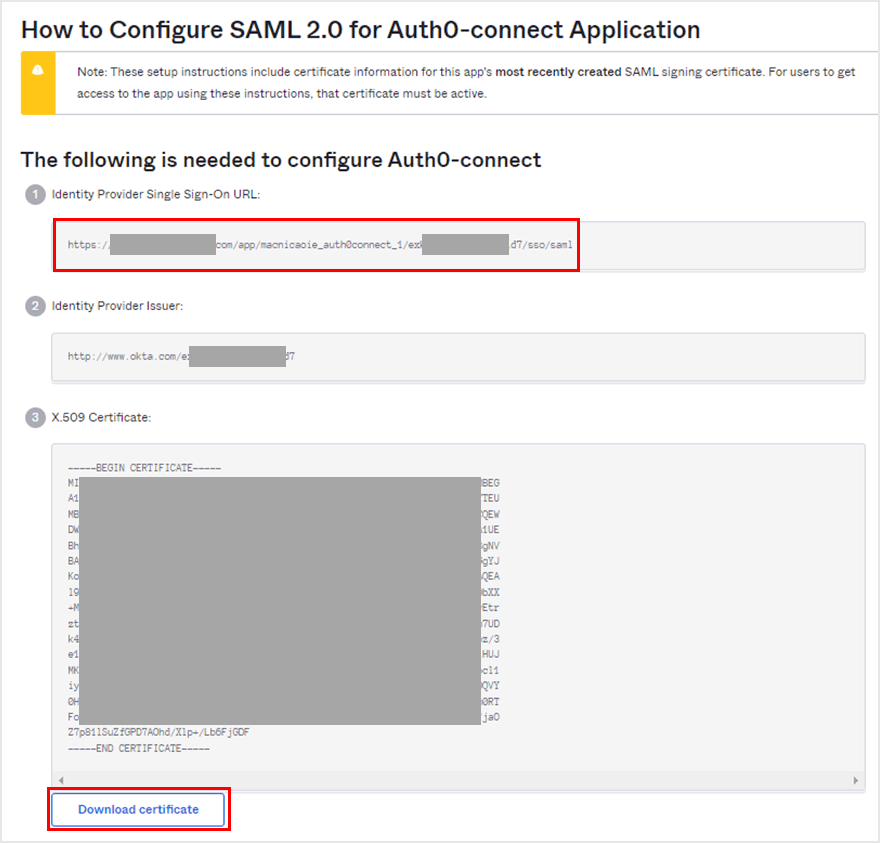
- Click [View SAML setup instructions] at the bottom of the screen to get the registration information for Auth0.
- Download a copy of the Identity Provider Single Sign-On URL value and the X.509 Certificate file
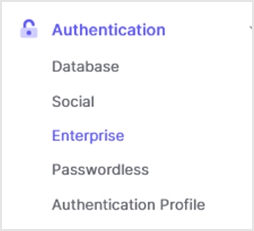
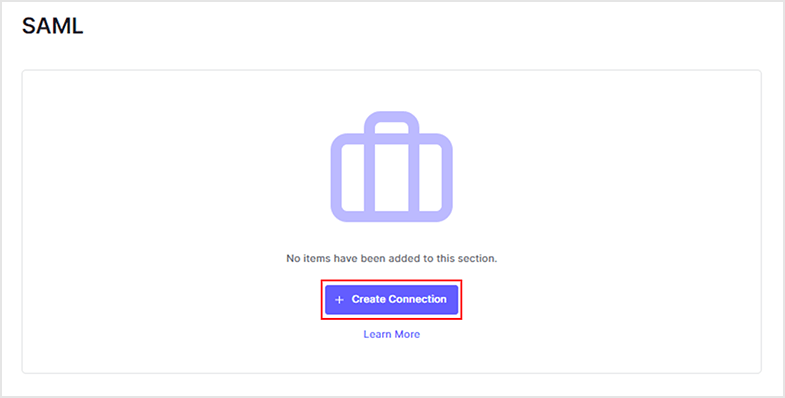
- On the Auth0 admin screen, click [Authentication] > [Enterprise]
- Click [SAML]
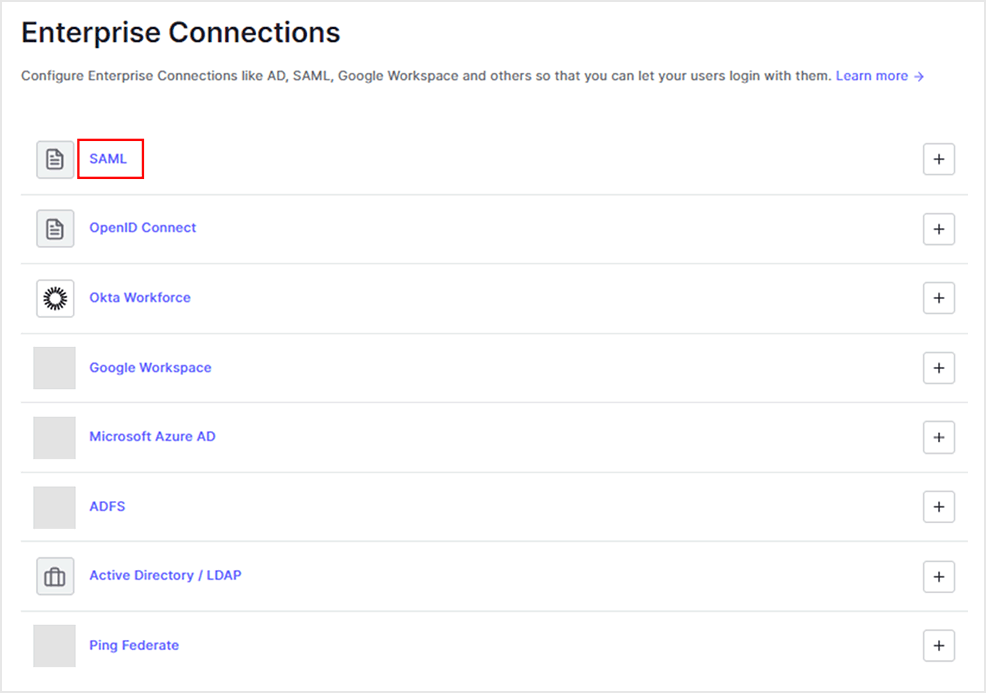
- Click [Create Connection]
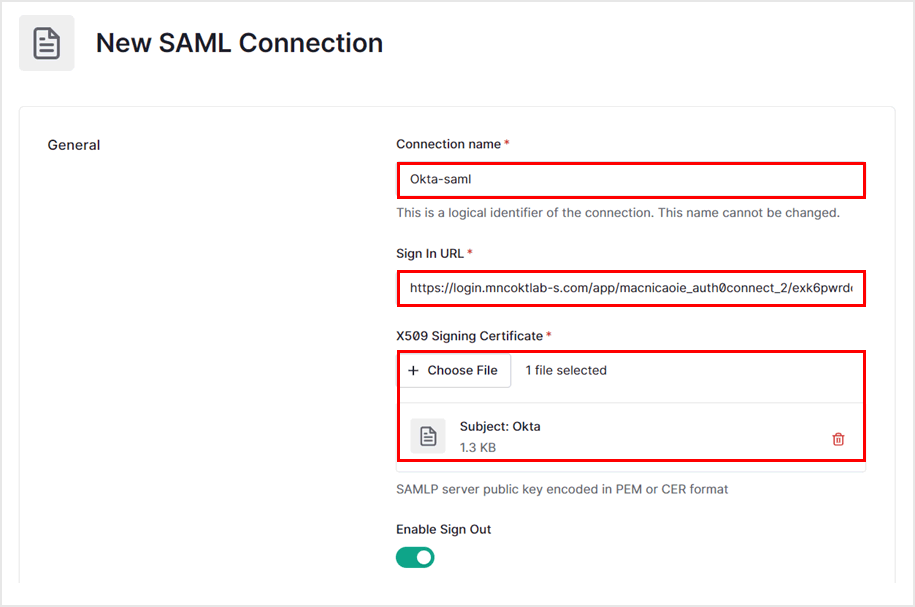
- Set each item and move to the bottom of the page
- Connection name: Arbitrary setting name (<YOUR_AUTH0_CONNECTION_NAME>)
- Sign In URL: The Identity Provider Single Sign-On URL value you copied in "2. Okta Settings"
- X.509 Signing Certificate: X.509 Certificate file downloaded in "2. Okta Configuration"
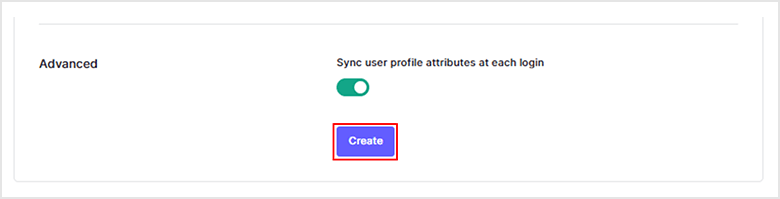
- Click Create
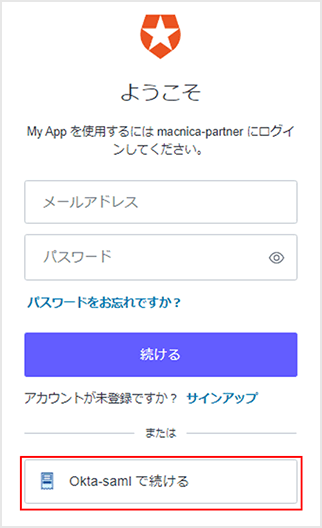
- Perform Connection Button settings on the [Login Experience] tab and click [Save] at the bottom of the page
- Display connection as a button: Check (Display the login button by Okta on the login screen)
- Button display name: Specify button display name

- On the [IdP-initiated SSO] tab, select [Accept Requests], configure each item, and click [Save Changes].
- Default Application: Select the target application
- Response Protocol: SAML

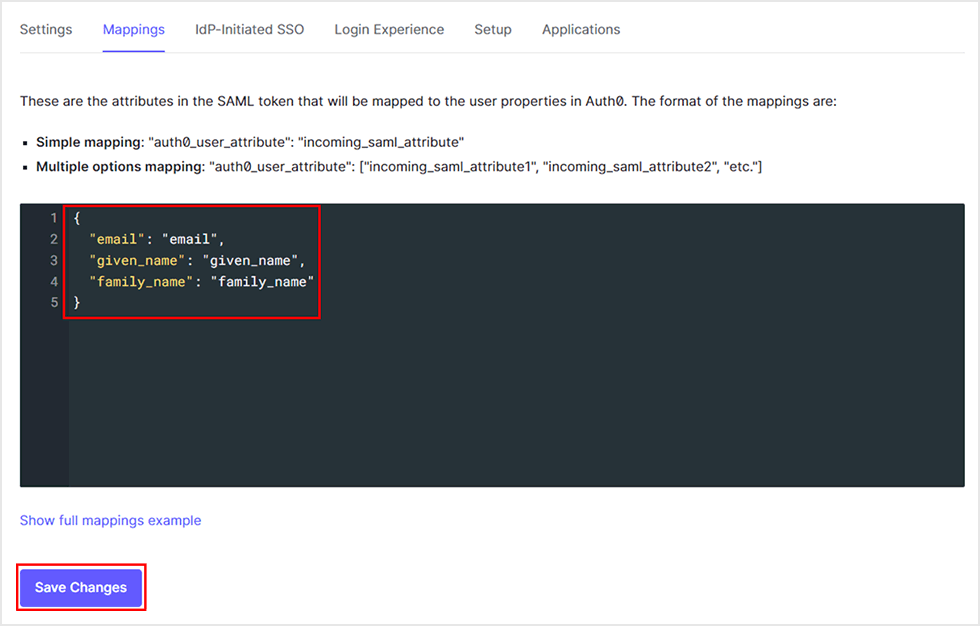
- Enter the following values in the [Mappings] tab and click [Save Changes].
*"auth0_user_attribute": "Okta_saml_attribute" can be used to add additional attributes
Setting Example)
{
  "email": "email",
  "given_name": "given_name",
  "family_name": "family_name"
}
- Enable the created Enterprise Connection in the linked Application settings
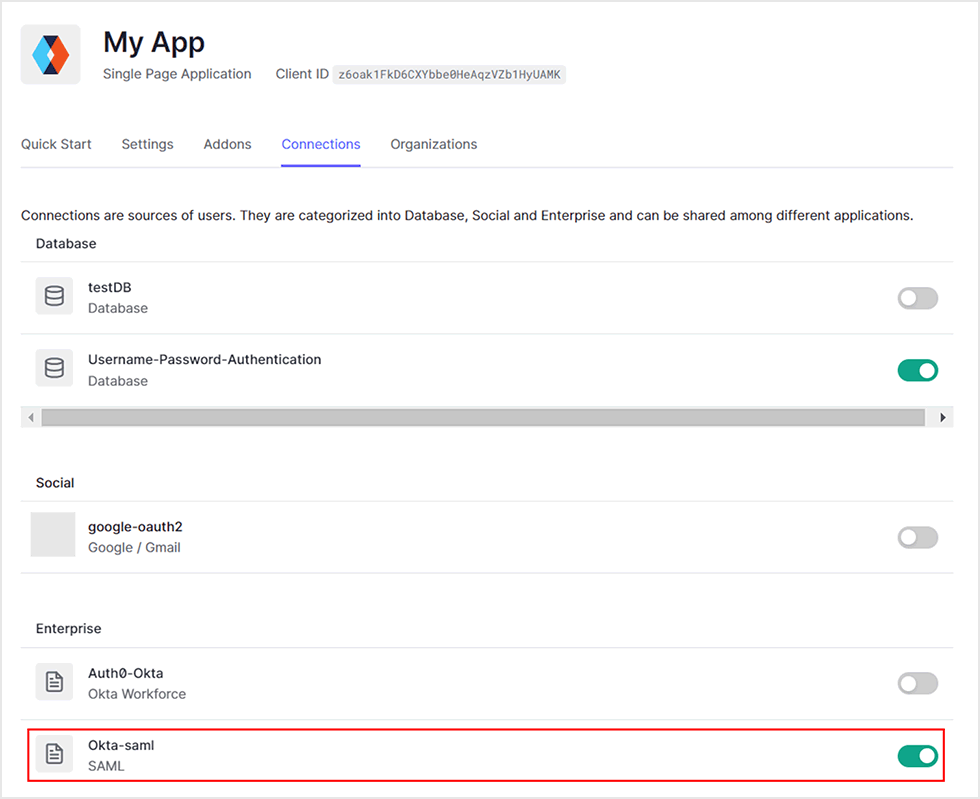
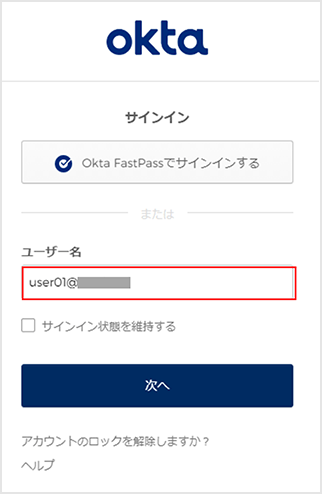
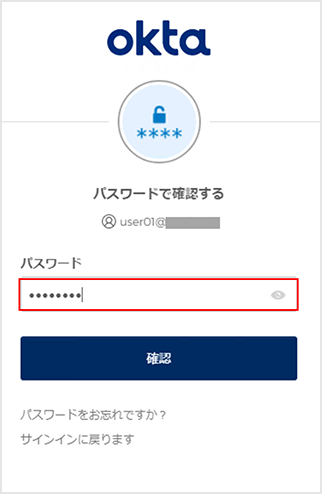
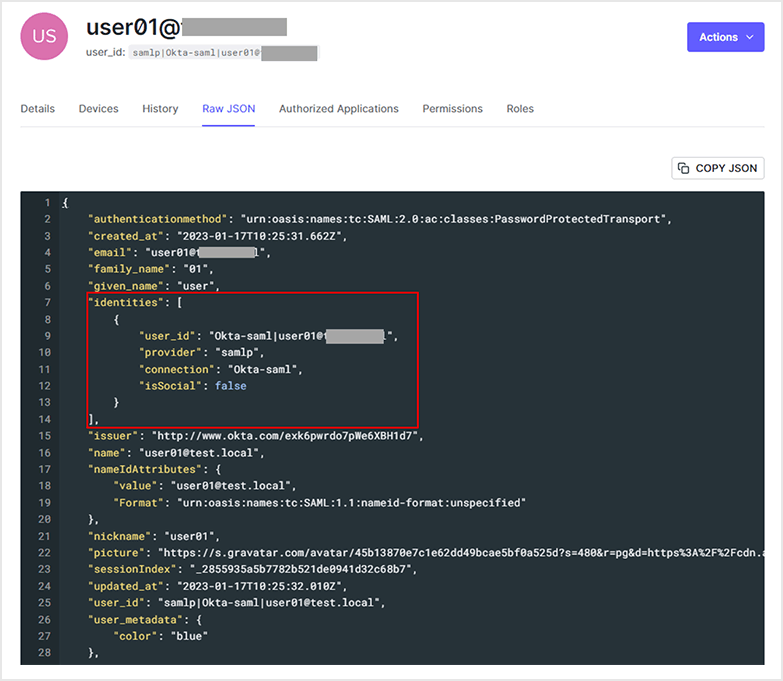
Login behavior example: Login by user registered in Okta
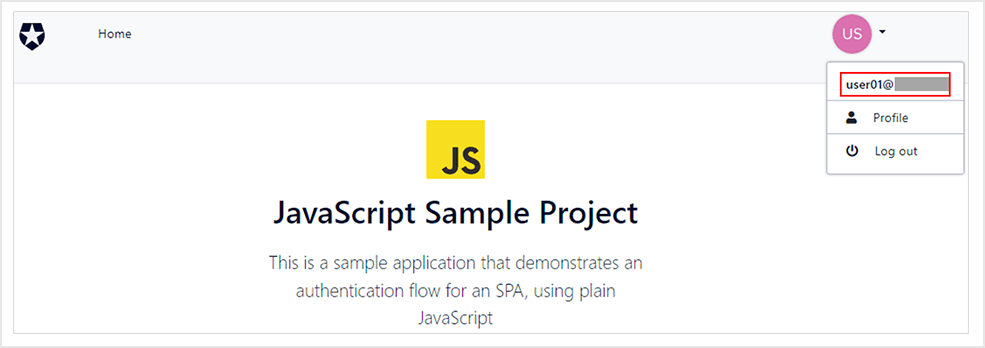
* Confirm that the values on the Okta side are also linked for "email", "given_name", and "family_name" that have been linked.
Summary
With Auth0, by using the Enterprise Connection function, you can easily implement authentication processing using an external IdP. You can also try the Enterprise Connection function in the free Auth0 trial environment, so please feel free to experience it.
If you are interested in integrating authentication with Auth0 using your existing IdP, please contact us.
reference
Inquiry/Document request
In charge of Macnica Okta Co., Ltd.
- TEL:045-476-2010
- E-mail:okta@macnica.co.jp
Weekdays: 9:00-17:00