I tried to create an application linked with Auth0 from scratch
Introduction
Auth0 publishes the tutorials you need for each type of application and platform when working with applications.
https://auth0.com/docs/quickstarts
This time, we will target "Single Page Application" as the application type and "JavaScript" as the programming language, and follow the tutorial provided by Auth0 to create an application linked with Auth0 from scratch.
The application and Auth0 linkage operation finally realized through the procedure described on this page are as follows.
- When [Log in] button is clicked (redirect to user authentication by Auth0)
- When [Log out] button is clicked (redirect to top page)
In addition, if you want to check the linkage operation with the sample application provided by Auth0, please refer to [How to set up linkage between Auth0 and sample application (link)].
premise
The information on functions and settings described on this page is current as of October 2022.
Advance preparation
Please prepare the following before performing the following settings.
- macOS or Windows PC
- Installing Node.js, Node Package Manager
- Issuing an Auth0 free trial account (Reference: [How to use Auth0 trial (link)])
Setting overview
The setting procedure introduced here is as follows.
- Auth0 settings
- Application creation and configuration in Auth0
- Application settings
- Application setup
- Web server construction
- Initializing the Auth0 SDK
- Authentication status evaluation settings introduced
- Introduce login behavior to the application
- Introduced login-out behavior from the application
- Display user information on the page after logging in to the application
From here, we will introduce specific settings and operation check procedures.
Creating and configuring an application in Auth0
In order to implement the application authentication function using Auth0, first configure the application linkage settings on the Auth0 side. This time, I will introduce the procedure for Single Page Applications using JavaScript.
(1) Log in to the Auth0 management screen and click [Create Application] in Activity
* It is also possible from [Create Applications] in Applications > Applications.
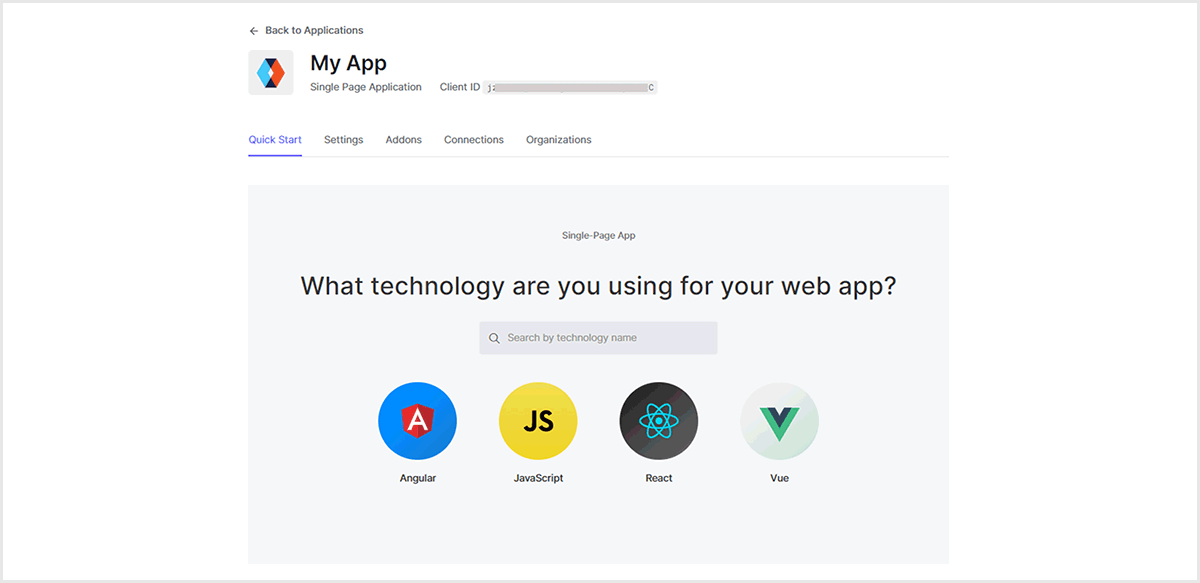
(2) Setting items for the application to be created are displayed. Set the following and click [Create].
- Name: Set any name (can be set in Japanese, can be changed later)
- Choose an application type: Select "Single Page Web Applications"
(3) Confirm that the application setting was created with the arbitrary name you specified
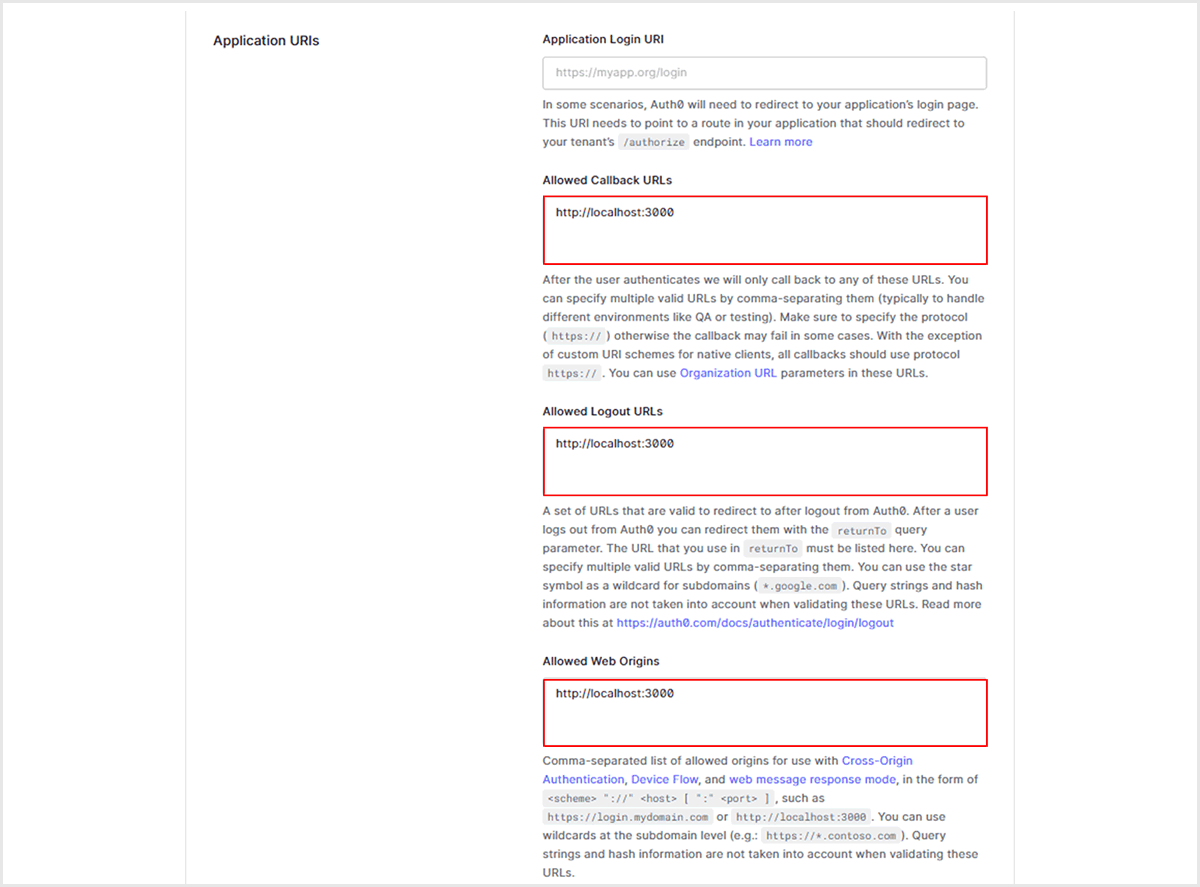
(4) Go to the Settings tab on the application settings screen and move to "Application URIs" at the bottom of the screen
(5) Set "http://localhost:3000" for all of the following setting items
- Allowed Callback URLs (whitelist of URLs that can be redirected after logging into Auth0)
- Allowed Logout URLs (whitelist of URLs that can be redirected after logging out of Auth0)
- Allowed Web Origins (whitelist of origin URLs to request to Auth0 API)
(6) Click [Save Changes] at the bottom of the screen to save the settings.
Application setup
First, create an HTML/CSS/JavaScript file and a storage folder for the application linked with Auth0, and then create an environment information file that describes the Auth0 tenant domain and Client ID. The setting procedure is as follows.
(1) Create a root folder for saving files (folder name is arbitrary)
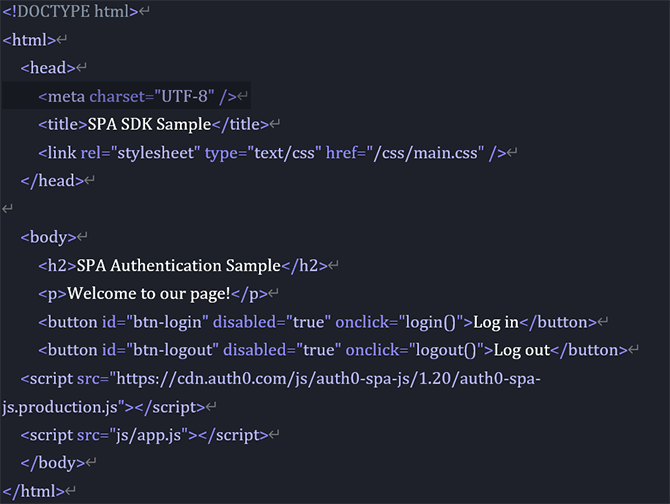
(2) Create an index.html file in the root folder and enter the following code
*By adding the <script src="https://cdn.auth0.com/js/auth0-spa-js/1.20/auth0-spa-js.production.js"></script> statement, index. Get Auth0's SPA SDK by referencing the package from the CDN in your html file.
(3) Create a folder named "public" in the root folder
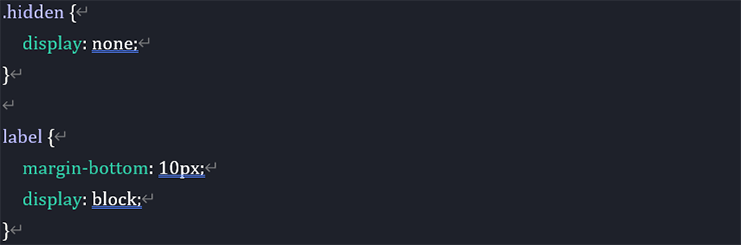
(4) Create a folder named "css" in the public folder, create a main.css file, and write the following code
(5) Create a folder named "js" in the public folder and create an app.js file
* At this stage, it is not necessary to write code in app.js.
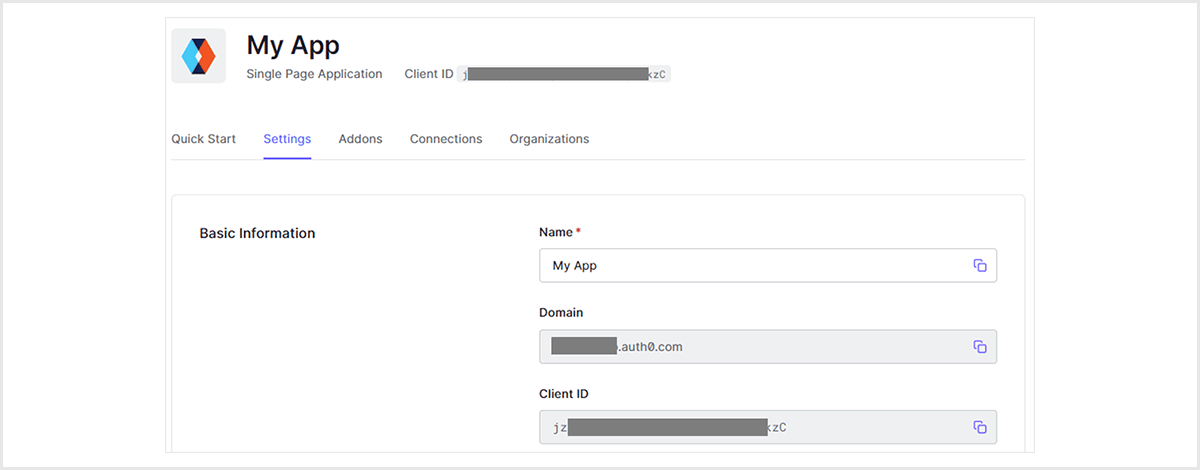
(6) Create an auth_config.json file in the root directory and include Auth0 tenant domain and Client ID information
*The Auth0 tenant domain and Client ID can be confirmed on the Settings tab of the linked application on the Auth0 management screen.
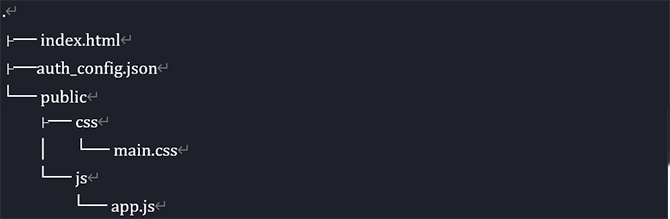
* The file structure of HTML/CSS/JavaScript is as follows.
Web server construction
Next, I will explain how to start a web server using Node.js. The setting procedure is as follows.
(1) Open a terminal and move to the folder where the index.html file was created
(2) Execute the following command to initialize the project to be managed
(3) Execute the following command and confirm that the package.json file has been created.
(4) Execute the following command to install Express and save it in the dependency list
(5) Execute the following command to install nodemon
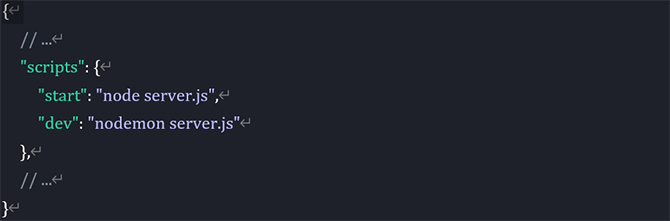
(6) package.json file: code edit the "scripts" part as follows
*With the above settings, the application will start normally when "npm start" is executed, the application will be started using nodemon when "npm run dev" is executed, and the process will be automatically restarted when the code is changed.
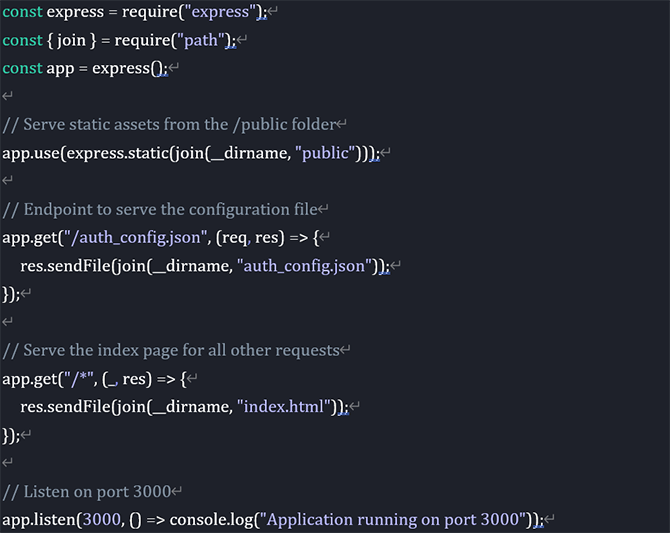
(7) Create a server.js file in the same folder as the index.html file and add the following code
*This is the backend server setting for providing the SPA page.
Initializing the Auth0 SDK
Next, we introduce the initialization settings for the Auth0 SDK. The setting and operation check procedures are as follows.
(1) app.js file: add a variable to store the Auth0 client object
(2) app.js file: set the fetchAuthConfig function to reflect the Auth0 configuration information described in the auth_config.json file
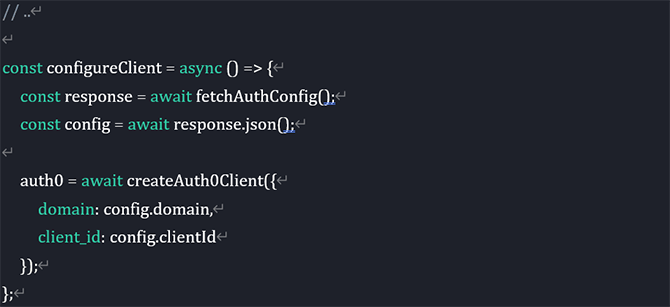
(3) app.js file: To initialize the Auth0 tenant domain and Client ID, create a configureClient function and set to call the setting value from the fetchAuthConfig function
*The Auth0 tenant domain and Client ID are set using the createAuth0Client method.
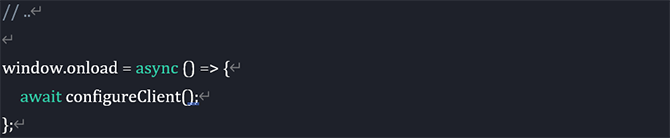
(4) app.js file: Set to call the configureClient function in the window.onload function of the event handler in order to initialize the application settings.
(5) Execute the following command to start the server
*Currently, the button is disabled, but there is no problem.
Authentication status evaluation settings introduced
Whether or not you are logged in to Auth0 can be checked from the auth0.isAuthenticated() method, which can be used to enable/disable the [Log in] and [Log out] buttons. The setting and operation check procedures are as follows.
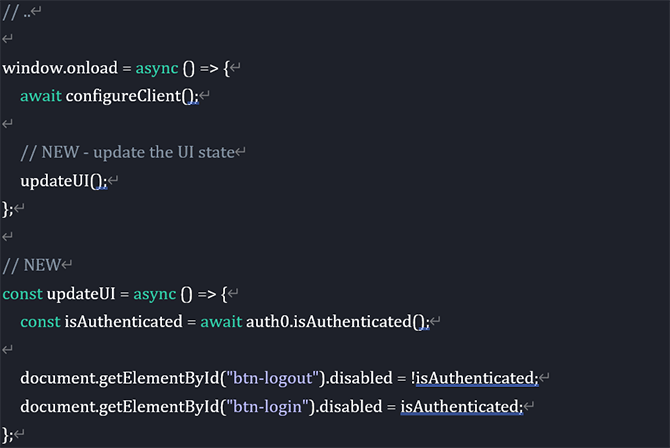
(1) app.js file: add updateUI function to call auth0.isAuthenticated() to display enabled/disabled buttons, add setting to call updateUI function after initializing application settings in window.onload
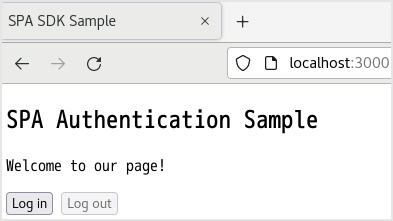
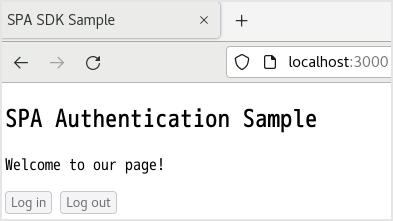
(2) After starting the server, open
http://localhost:3000 in a web browser and confirm that the welcome message is displayed and the [Log in] button is enabled and the [Log out] button is disabled.
* Since the operation after clicking the [Log in] button has not been set, nothing will happen even if the [Log in] button is clicked.
Introduce login behavior to the application
To redirect login authentication to Auth0, use the auth0.loginWithRedirect() method. The setting and operation check procedures are as follows.
(1) app.js file: Add a login function to redirect login authentication to Auth0 when clicking the [Log in] button
*Use the window.location.origin property to redirect to the original page after login.
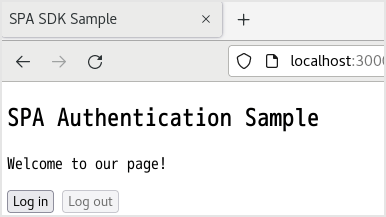
(2) After starting the server with the command below, open http://localhost:3000 in your web browser and click the [Log in] button.
(3) The Auth0 login screen will be displayed, so log in as a registered Auth0 user
(4) Confirm that login with Auth0 is successful and you are redirected to the top page of the application
*The [Log in] button is enabled because the authentication result is not reflected on the page after login.
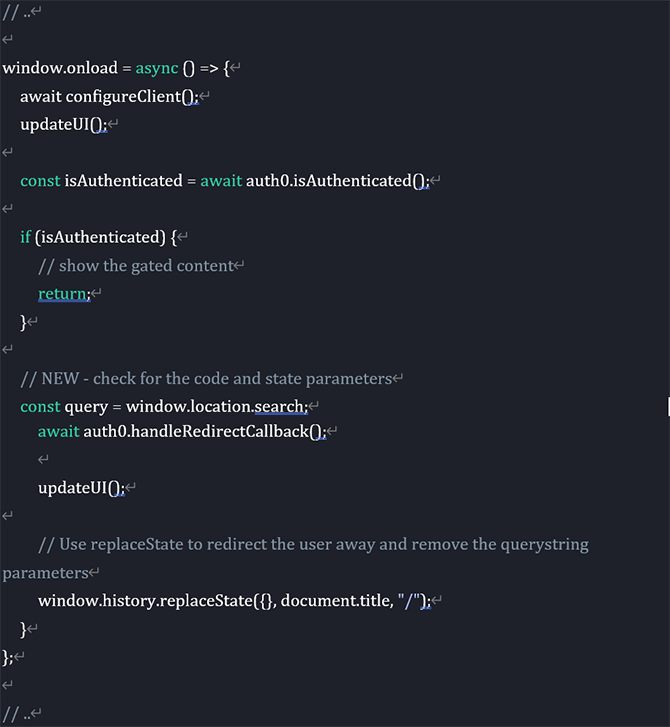
(5) app.js file: Change the contents of windows.onload to add settings for post-login page processing in Auth0
*When user authentication is completed, both code and state parameters are included in the URL query. Therefore, if these two parameters are included, the authentication result from Auth0 is called by the auth0.handleRedirectCallback() method and reflected on the page.
* The URL of the page is processed so that the state and code parameters are not displayed using the window.history.replaceState () method.
(6) Start the server again and confirm that the [Log out] button is enabled on the redirect page after user authentication in Auth0 and the URL is http://localhost:3000
* Since the operation after clicking the [Log out] button has not been set, nothing will happen even if the [Log out] button is clicked.
Introduced login-out behavior from the application
Add settings for logout processing. The setting and operation check procedures are as follows.
(1) app.js file: Add a logout function and use the auth0.logout () method to perform logout processing from Auth0 in order to add operation processing when the [Log out] button is clicked.
(2) Start the server and click the [Log out] button on the redirect page after user authentication in Auth0
(3) Confirm that the [Log in] button is enabled
Display user information on the page after logging in to the application
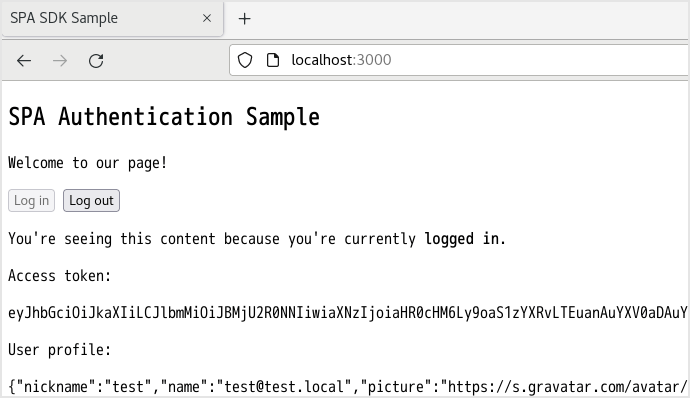
You can get an access token and an ID token each time a user logs in. Also, the logged-in user's profile information can be extracted from the ID token. Here, set to display the login user's access token and profile information on the page redirected after user authentication in Auth0. The setting procedure and operation check are as follows.
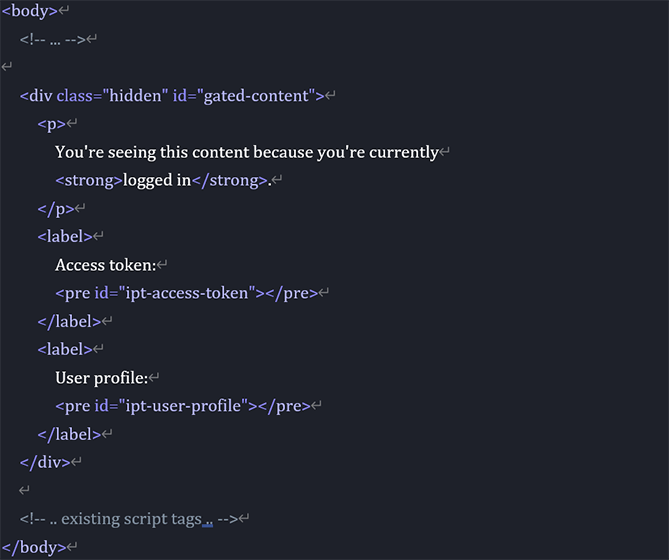
(1) index.html file: Add the following code to body
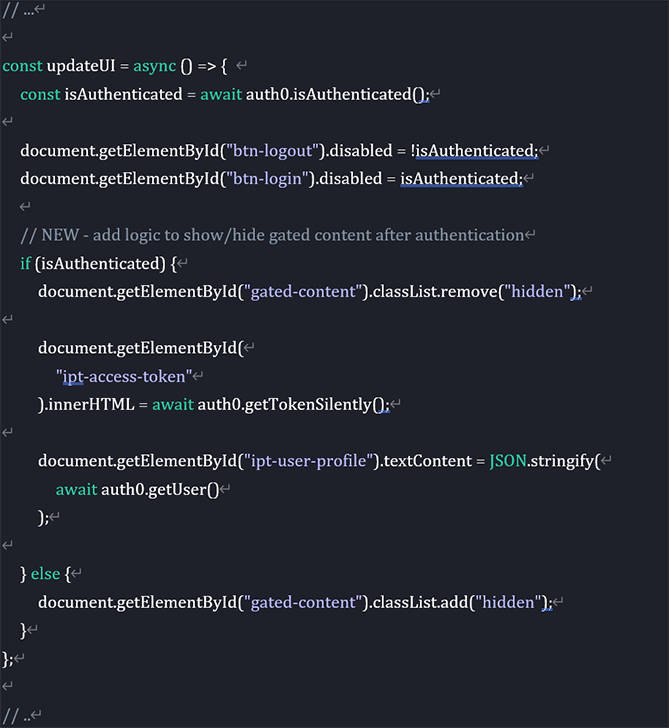
(2) app.js file: Add settings to updateUI() function to get and display access token and profile information
*By using the auth0.getTokenSilently() method, it is possible to obtain the access token of the user logged in to Auth0.
*By using the auth0.getUser() method, it is possible to obtain the profile information of the user logged into Auth0.
(3) Start the server and confirm that the login user's access token and profile information are displayed on the redirect page after user authentication in Auth0
(4) Confirm that the user's access token and profile information are hidden by clicking the [Log out] button
Summary
The Auth0 methods used in the setting procedure on this page are as follows.
We hope that the explanations on this page will help you understand the settings required for linking Auth0 with your application and how Auth0 works.
Inquiry/Document request
In charge of Macnica Okta Co., Ltd.
![When [Log in] button is clicked (redirect to user authentication by Auth0)](/business/security/okta/image/okta_auth0_application_dr02.png)
![When [Log out] button is clicked (redirect to top page)](/business/security/okta/image/okta_auth0_application_dr04.png)
![Auth0管理画面にログインし、Activityの[Create Application]をクリック](/business/security/okta/image/okta_auth0_application_dr05.png)
![作成するアプリケーションの設定項目が表示されるので、以下を設定し、[Create]をクリック](/business/security/okta/image/okta_auth0_application_dr06.png)

![画面下の[Save Changes]をクリックし、設定保存](/business/security/okta/image/okta_auth0_application_dr10.png)


![サーバ起動後、Webブラウザでhttp://localhost:3000を開き、ウェルカムメッセージが表示され、[Log in]ボタンが有効かつ[Log out]ボタンが無効であることを確認](/business/security/okta/image/okta_auth0_application_dr31.png)
![app.jsファイル:[Log in]ボタンをクリックした際にAuth0へログイン認証をリダイレクトするようにlogin関数を追加](/business/security/okta/image/okta_auth0_application_dr32.png)
![以下コマンドにてサーバ起動後、Webブラウザでhttp://localhost:3000を開き、[Log in]ボタンをクリック](/business/security/okta/image/okta_auth0_application_dr33.png)
![以下コマンドにてサーバ起動後、Webブラウザでhttp://localhost:3000を開き、[Log in]ボタンをクリック](/business/security/okta/image/okta_auth0_application_dr34.png)

![再度サーバを起動し、Auth0におけるユーザ認証後のリダイレクトページで[Log out]ボタンが有効化されていること、URLがhttp://localhost:3000になっていることを確認](/business/security/okta/image/okta_auth0_application_dr38.png)
![app.jsファイル:[Log out]ボタンクリック時の動作処理を追加するため、logout関数の追加、auth0.logout ()メソッドを用いてAuth0からのログアウト処理を実施](/business/security/okta/image/okta_auth0_application_dr39.png)
![サーバを起動し、Auth0におけるユーザ認証後のリダイレクトページで[Log out]ボタンをクリック](/business/security/okta/image/okta_auth0_application_dr40.png)
![[Log in]ボタンが有効化されることを確認](/business/security/okta/image/okta_auth0_application_dr41.png)

![[Log out]ボタンをクリックすることで、ユーザのアクセストークンとプロファイル情報が非表示となることを確認](/business/security/okta/image/okta_auth0_application_dr45.png)